Internet does not work.
The third case in a week - the Internet does not work. Gentlemen and ladies, friends, you can’t do that! You need to be very careful and careful about your computer, and even more so about the sites that you visit. Any movie, song, picture, by definition, cannot have the extension song-name.exe! EXE- this is an executable file, and since almost all users working on their computer have the rights and powers of the System Administrator, the file you run starts with these rights. And the virus installs itself, with your "blessing". Another issue is that you do not see the extension of the file you downloaded, and indeed all the files in the system, but all because the owners of Windows - Microsoft, for some "good" reasons, took and hid them from you by default. Everything - the Internet does not work, or you have a banner, full screen, with an offer to send money to some uncle so that the computer is unlocked. How to find a virus, I will return to this issue later, as well as hidden file extensions.
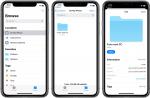
File extensions - three letters at the end of the name, after a dot. For example, windows notepad is notepad.exe built into Windows graphics editor- mspaint.exe, or the cartoon “Masha and the Bear.avi”, song by A.B. Pugacheva - Iceberg.mp3. I suggest making it all visible. To do this, in the control panel, access to the panel can be obtained through the Button - Start (Start) -\u003e Control Panel.
 Control Panel, Folder Options
  Folder properties
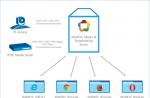
 Now back to the question - about the not working Internet. All three cases are like a blueprint. A cable from the provider comes to the apartment, inserted into wifi router. The router distributes the Internet via DHCP (DHCP is a program in the router that assigns numbers to your pieces of iron in order to remember how to access them), Wi-Fi and a cable (patchcord) around the apartment.
On one of the laptops, the Internet does not work, although in the PDA and in desktop computer the Internet is. On that laptop where the sites do not open, the icon in the lower right corner says that everything is fine - the Internet is connected. But like I said, it doesn't really exist.
I will write a troubleshooting algorithm:
1. Run the console (Start button -> Run -> cmd.exe). In the console we write ping ya.ru. If we see something like this.
 ping ya.ru
 It means that something is wrong with your Browser (Explorer, Opera, Mozilla, Google Chrome). We are looking for a new distribution and install it again.
If we see such a picture.
 Ping doesn't work
 This really means that pings do not go through - yes, there is clearly no Internet. (You can use the Windows command "tracert" to understand where something is lost)
2. Turn off Windows Firewall, try the Internet.
3. Disable the Anti-Virus, or rather delete it. try the internet. We put another one, we try.
4. We try to connect the laptop to the router via a cable (patchcord).
patch cordIf the Internet ping passes, then there is a problem with WiFi. We are trying to restart the router. If, after restarting, the Internet via Wi-Fi does not work again, we are trying to deal with the Wi-Fi module in the laptop. To do this, enable, disable Wi-Fi, erase all existing connections in the Network Adapter Properties -> Wireless networks.
Reinstall drivers
(Delete the old ones after downloading the new ones from the module manufacturer).
 wifi driver module
 If after the done manipulations the Internet works for everyone except you.
5. Start fighting viruses:
6. First, see what is loaded with the system, i.e. Autoload.
 autoload
 Run through the book. Start -> Run -> enter the command - msconfig -> Startup tab.
 msconfig - autoload
 We turn off everything unnecessary, if you don’t know what, for what, we check with Internet Google search.
If there is no Internet after disconnecting and rebooting, do the following.
7. We add a new user to the system, and give Administrator rights, reboot the system, and try to log in as a new user, if the Internet is working, then your old user's profile is corrupted or infected with a virus. (Next, we are struggling with the found problem)
8. Further, harder - Use the services of a pro.
Go to folder properties, through the control panel, and uncheck - Hide system files and folders, Hide extensions for system files, select - Show hidden folders and files.
 folder properties
 Let's go clean user profiles. - Default User, All Users, and user folders. Looking for extra. Clear Temp folders, Check startup folders. (I know what should not be there), the Internet will help you.
9. Further, more difficult - Use the services of a pro.
Checking System registry- Run through the book. Start -> Run -> enter the command - regedit. The Registry Editor will launch.
 Windows registry editor - regedit
 Be sure to check out two branches:
HKEY_CURRENT_USER\Software\Microsoft\Windows\CurrentVersion\Run
HKEY_LOCAL_MACHINE\SOFTWARE\Microsoft\Windows\CurrentVersion\Run
They should not have anything extra. To help Google-Serach
10. Clear "Temp" folders in C:\Documents and Settings\All Users\Application Data\TEMP\, C:\Documents and Settings\Default User\Local Settings\Temp\, C:\Windows\Temp, etc. P. - from there you can delete everything. What the system needs is not removed.
11. Through Total Commander check folders C:\RECYCLER\
 virus in recycler folder
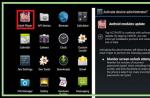
 12. We check for viruses. How to find a virus - first we look in the manual C:\WINDOWS\SYSTEM32 for understandable files- csrcs.exe, aadrive32.exe or 22CC6C32.exe, etc. Run Anti-Virus for a full system scan. (files in the settings say not to delete, but move to quarantine).
At this stage, in two cases, the Internet through Wi-Fi earned. In the third case, I booted the system from a flash drive with WinPE_uVS _recSys, and found the missing ones.
 WinPE_uVS _recSys - how to find a virus
 You did everything as expected, removed the virus, but now, you realize that you cannot connect to the Internet. The following article will help you get your internet settings back after a virus has removed them.
1. Check Your Web Browser Settings
The virus may redirect your browser to another host, i.e. it is worth checking the proxy server settings. You must make sure that your web browser is configured properly. Otherwise, you will receive an error message: “ Internet Explorer cannot display this web page." Take the following steps to fix the proxy server error:
Open IE
. Open Internet Options
. Then select the Connections tab.
. Select Network Setup.
. Check Automatic detection of parameters, uncheck the rest of the checkboxes.
If your proxy server was configured differently, then after the changes described above and pressing the Apply button, the Internet connection should be restored. Just refresh the page by pressing F5.
If it doesn't help, read on.
2. Restoring WinSock
Usually, WinSock corruption appears due to the removal of some viruses that change the system settings related to the Internet connection. You will need to take several steps to restore WinSock. (In WIndows 7, you can click "diagnostics")

In Control Panel > Network and Sharing Center and public access> Change adapter settings. Right-click on the connection, and select "Diagnose". This will help fix the corrupted WinSock.
If this fails to restore WinSock or you have a different Windows version You will need to manually restore the network settings in order to resolve the issue. You need to remove the Winsock entries and then reinstall the TCP/IP protocol.
Reinstall WinSock by editing the registry
First you need to make a copy of the registry by creating a system restore point. Go to Start > Programs > Accessories > System Tools > System Restore, System Restore and create a restore point.
Then, open the registry editor, press WIN+R and type regedit in the dialog box. You should now be in the Registry Editor.
Attention: executing commands in the registry can damage your computer. Be careful.
In the Registry Editor, locate the following keys and right-click on the desired key, select delete:
1. HKEY_LOCAL_MACHINE\System\CurrentControlSet\Services\Winsock
2. HKEY_LOCAL_MACHINE\System\CurrentControlSet\Services\Winsock2

Restart your computer after you remove the WinSock keys.
If you do not restart the computer after you have removed the WinSock keys, the next step will not work properly.
Step 2: Install TCP/IP
1. Right click on properties network adapter, and then click Properties.
2. Click Install.
3. Select Protocol, and then click Add.
4. Select Install from disk.
5. Specify the path: C:\Windows\inf, and then click OK.
6. Select Internet Protocol (TCP/IP) from the list of available protocols, and then click OK.
7. Restart your computer.
The above steps should help you repair your browser and/or your damaged WinSock if you are unable to connect to the Internet after removing the virus. And you need further assistance, please contact our specialists.
If you are faced with a lack of access to the Internet or some sites have stopped opening, then two options are possible: a virus blocks access to some sites or your antivirus removed a malicious program that changed the settings operating system determining the connection to the Internet. These can be browser proxy settings, network card settings (Internet Protocol version 4), LSP stack configuration, etc.
As a result, you are faced with a situation where websites stop opening. Messages appear that "The web page is not available", "You are not connected to the network", "The proxy server is not responding" and other similar ones.
Ways to solve the problem "No access to the Internet"
The instructions below will help you solve Internet access problems. Moreover, a variety of methods are used, from the simplest to those requiring application. special programs. Do them one by one. If Internet access is restored at any of the stages, then you can stop and not perform the following. If you have any questions, leave a comment below, ask a question in the section on our website or contact us for help.
1. Restore your browser's proxy server settings.
Internet Explorer, Microsoft Edge and Google Chrome
All three of these Internet browser explorer, Microsoft Edge And Google Chrome use the same proxy server settings. In order to return them to the original, do the following.
Launch Internet Explorer. Click on the button in the form of a gear, which is located in the upper right corner of the browser (). A menu will open as shown in the following picture.

Click on an item Browser Properties. You will be shown a window with several tabs. Select tab Connections.

Click the button Network configuration as shown below.

In section Proxy server uncheck the box next to Use a proxy server for local connections . Click OK once again OK.
Mozilla Firefox
Launch Firefox. Open the browser menu by clicking on the button in the form of three horizontal stripes (), which is located in the upper right part of the window. You will see the main Firefox menu like the picture below.

Click here on the gear icon Settings. A window will open in front of you Firefox settings. Click on the caption Additional.

In the window that opens, in the section Compound, click on the button Tune. This action will open the settings that determine which proxy server the browser should use.

Select an item No proxy and click on the button OK. Restart your browser.
2. Restore Internet Protocol version 4 settings.
Windows XP, Vista, 7
Click the button Start, in the menu that opens, select the item Network connections .
Windows 8, 8.1, 10
Press on the keyboard at the same time windows keys and the X key. A menu will open as shown in the following figure.

Select an item Network connections.
You will see a window with a list of all network connections.

Click on the name of your adapter (network card) and select Properties.

A window will open with the properties of the selected network adapter. In the list of components, find the item Internet Protocol Version 4(TCP/IPv4).

Double click on the selected item. In the window that opens, check the box Obtain an IP address automatically And Get DNS server address automatically.

Click OK once again OK.
By setting these settings in this way, you will enable Windows to obtain an IP address and DNS server address from a router, modem, or router. If your computer uses a static network address, then enter it in the previous step.
3. Clear DNS cache.
The DNS cache stores a table of correspondence between the site name and its IP address. Some viruses can replace this match and thus block the opening of certain sites, as well as redirect users to various misleading web pages.
Like the following picture.

Enter in the field Open command cmd and press Enter. Will open command line. Enter ipconfig /flushdns in it and press Enter.

4. Restore the LSP stack configuration.
LSP is a software service in the operating room Windows system consisting of several layers. Each layer defines one program. All information requested from the Internet passes through this group of layers. Thus, at incorrect deletion one of them, or a program that is tied to one of the layers, the entire LSP service crashes, causing Internet connectivity to become unavailable.
Windows XP, Vista, 7
Press the Windows key and the R (K) key on your keyboard at the same time. A window will open as shown in the following figure.
Enter in the field Open command cmd and press Enter.
Windows 8, 8.1, 10
Press the Windows key and the X key on your keyboard at the same time. A menu will open as shown in the following figure.
Select an item Command Prompt (Admin).
A command prompt will open. Type netsh winsock reset in it and press Enter.

Restart your computer.
5. Use AdwCleaner to remove malware components that block Internet access.
AdwCleaner is a small free utility created by programmer Xplode. It will quickly scan your computer and remove components malware, which can block access to the Internet or certain sites.
Download if the file download does not start automatically. After the program has finished downloading, launch it. The main AdwCleaner window will open.

Click the button Scan. This process can take up to several tens of minutes. When the scan is completed, you will see a list of found malware components.

Click the button cleaning. AdwCleaner will start cleaning your computer. You will need to restart your computer to complete the process.
6. Use TDSSKiller to remove hidden Trojans and rootkits that block Internet access.
TDSSKiller is a free utility created in the Kaspersky Lab. It can find and remove a wide variety of rootkits such as TDSS, Cidox, RLoader, Phanta, ZeroAccess, SST, Pihar, Sinowal, Cmoser and the like.
On the page that opens, click on the green button Download

Click the button Start verification. The program will start scanning your computer.

Wait for the scan to finish and remove the found rootkits. At the end of the program, you need to restart your computer.
7. Use Malwarebytes Anti-malware for additional checks.
Malwarebytes Anti-malware is an excellent program created by Malwarebytes. It easily removes a wide variety of trojans, rootkits, malware and potentially unnecessary programs. The program is absolutely free for home use.
On the page that opens, click on the green button Download if the file download does not start automatically. Run the downloaded file.

After the installation is completed, you will see the main screen of the program.

The program update procedure will start automatically. When it's over press the button Run check. Malwarebytes Anti-malware will start scanning your computer.

When the computer scan is complete, Malwarebytes Anti-malware will open a list of malware components found.
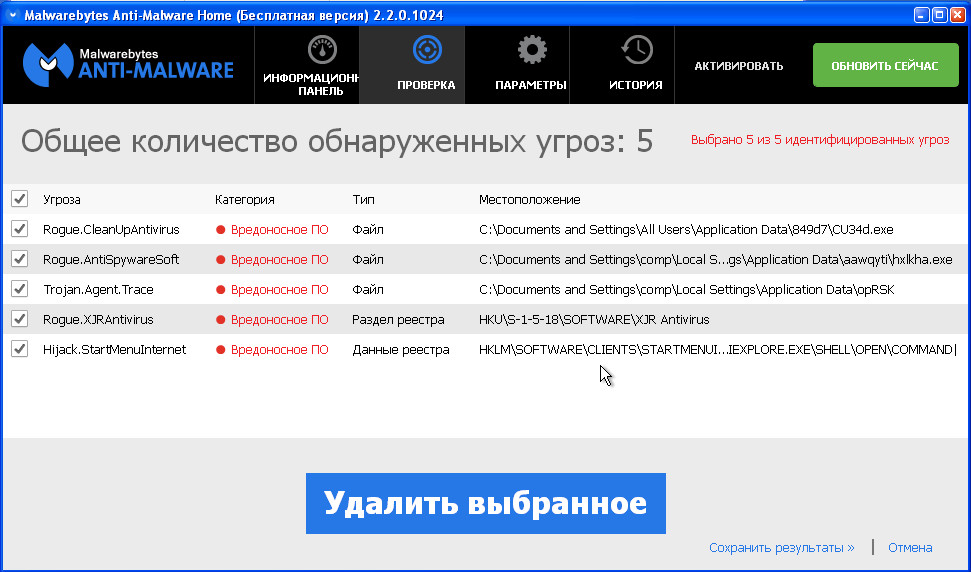
Click the button Delete selected to clean your computer of malware that can block Internet access.
Conclusion
After following this instruction, you should solve the problem with the lack of access to the Internet. Unfortunately, there are infection options when this instruction may not help you, in this case, contact our.
In order not to infect your computer in the future, please follow three small tips.
1. Always try to download programs only from official or trustworthy sites.
2. Keep your anti-virus and anti-spyware programs updated to the latest versions. Also pay attention to what you have included automatic update Windows and all available updates are already installed. If you are not sure, then you need to visit the site windows update, where you will be prompted how and what you need to update in Windows.
3. If you are using Java, Adobe Acrobat Reader, Adobe Flash Player, then be sure to update them on time.
Already 4 computers in a week had to be treated for the following misfortune: a machine with installed Windows XP and the free version of Avast Free antivirus stops seeing the local network. You open the connection status - it's empty there: no IP address, nothing. Network services such as DNS and DHCP also stop working. If you look in the logs, then the following messages are present: the DNS service cannot start due to a missing driver, etc. etc.
The following happened:
From 5 to 6 December 2012 Avast! Free antivirus received an update in which, due to a developer error, the tcpip.sys file ( system file responsible for the local network and TCP / IP protocol) was considered malicious and, accordingly, removed. At the same time, the local network completely stops working on this PC.
How to restore the local network after Avast
I did the following: already tested on 4 machines, the method works 100%.
I myself have not used Avast for a long time, because it's enough. Passes everything, including lockers, banners, worms. It's better to pay for Kaspersky and be calm than to use for free, but IMAGINARY protection.
Note: This problem only occurred on the Russian version of Windows XP
From December 5, 2012, there was a blocking of the Internet among users of Russian operating Microsoft systems Windows XP. The problem arose due to an error by the employees of the anti-virus company, a signature was released that damaged the TCP / IP protocol driver. On the 5th and 6th of December, all providers and services were "on their ears" - the Internet was lost for users of Avast antivirus. The solution was found quickly, but the sediment from such work of the most popular antivirus remained.
« Avast blocked internet"- this problem is solved in several ways:
Solution #1 in 99% it helps users to restore the Internet (even if you have already uninstalled the antivirus itself - you can use Solution #1, just ignore the instructions on enabling / disabling Avast).
Download the file from the link: here (mirror): http://depositfiles.com/files/jx9xqxtes
Instruction:
Download the avastfix.zip file from a friend/comrade/relative/neighbor who has Internet access (see the link above for XP SP3) to your flash drive/CD-R;
Unpack the avastfix.zip archive on a faulty computer / laptop (right-click on the file - “extract all”);
Disable Avast: right-click on the Avast icon near the clock, select "manage avast screens", then select "disable permanently";
Run the fixtcpip.bat file, which is located inside the folder you unpacked, after that the computer will reboot;
Update Avast databases to latest version(double-click on the Avast icon near the clock, select "maintenance" - "update" - "update the scan engine and virus definitions"), enable avast: right-click on the Avast icon near the clock, select "manage avast screens", then select "turn on all screens".
ATTENTION! In very rare cases, you may have an "old" operating Windows XP with the second service pack (Windows XP SP2). If you do not know what version of the XP SP2 or XP SP3 operating system you have, then you can find out about it from the properties of the computer: click Start - right-click on "My Computer" - select "properties" and it will say which one you have Service Pack - 2 or 3.
Or download from here (mirror): http://depositfiles.com/files/a69gvaj6w
Solution #2
It is advised to first restore to the last working restore point, install Avast again and select "Ignore" when a message about this detection appears.
System Restore:
Pull out the cable with the Internet / USB-modem before restoring the system. Start button - Accessories - System Tools - System Restore - select a restore point earlier than December 5 and perform a restore. After restoring the system, uninstall avast through the "Add or Remove Programs" in the control panel, insert the cable / modem.
Reinstall Avast:
How to produce complete reinstallation avast! Free/Pro/IS
1. Download and save the full installer of avast! Free/Pro/IS.
2. Download and save the utility on the desktop avast uninstaller!
3. Remove the installed copy of avast! Free/Pro/IS
4. Restart your computer in safe mode.
5. Launch the avast! Free/Pro/IS (file aswclear.exe).
6. Specify the version of the program and its folder (if the program was not installed in the default folder).
7. Click the Uninstall button and wait for the uninstall test to complete.
8. Close the uninstall utility window and agree to restart the computer in normal (normal) mode.
9. Install avast! Free/Pro/IS from the downloaded installer.
10. Restart your computer to complete the installation.
Note: The avast! Free/Pro/IS can be used without first uninstalling the program through the Panel Windows controls. In this case, you must first disable the self-protection module: open the main program window => Settings => Troubleshooting => uncheck Enable self-defense module avast!
If, after installation, the program did not request permission for boot scanning, it is recommended to assign it manually.
Don't forget to re-register free version or enter license information in paid.
Solution #3
Go to the folder C: / Windows / system32 / dllcache, where it is located backup copy tcpip.sys and copy (but not move) it to C:/Windows/System32/drivers, then restart your computer. Or Replace the tcpip.sys file with a file with installation disk(here it is in zip archive).
Important: The tcpip.sys file must be added not to the %windows%/system32 folder, but to WINDOWS\system32\drivers
Solution #4
1. Boot into Safe mode.
2. Start-Run-regedit and delete 2 keys in the registry.
HKEY_LOCAL_MACHINE/System/CurrentControlSet/Services/Winsock
HKEY_LOCAL_MACHINE/System/CurrentControlSet/Services/WinSock2
3. Go to the %windows%/inf folder, find the Nettcpip.inf file, open it, find the section and in the Characteristics = 0xa0 entry, replace 0xa0 with 0x80
4. Go to Network Connections, right-click on your network connection - Properties.
Open the General tab - click Install, Protocol and Add in sequence.
In the Select Network Protocols window, click Install from Disk.
In the Copy files from disk: type C:/windows/inf and click OK.
Highlight the Internet Protocol (TCP/IP) item and press the OK button.
We return to the connection properties screen by local network, the Delete button is now enabled.
Now remove the Internet Protocol (TCP/IP).
It is advisable to replace the tcpip.sys file with the file from the installation disk (here it is, in the zip archive), before installing the protocol. You need to copy it to the folders %windows%/system32/dllcache and %windows%/system32, then install the protocol.
To restart a computer
Go back to Network Connections and install the Internet Protocol (TCP / IP) again using the Install from disk button and the path c: / windows / inf
And restart your computer again.
Solution 5
In some cases, if the three solutions to the problem did not help, it is also necessary, in addition to tcpip.sys, to copy the nettcpip.inf file from a working PC running XP to the windows / inf folder and repeat the steps from "Solution 4".
Solution 6
Copy the "working" (see Solution 1.3) tcpip.sys file to c: / windows / system32 / drivers
Then go to the device manager - "view" - "show hidden devices". select "Non-Plug and Play Device Drivers" - "Tcp / IP Protocol Driver" with the right button "properties". driver tab - autoload, type set to "system". restart the computer.
Solution 7
Use the TCPIP.Sys RestoreTool utility from UnHackMe. Link: http://www.greatis.net/tcpip_sys_restore.zip
Solution 8
Link to the description of the process: http://itfound.ru/85-net-seti-avast-tcpip.html
Solution 9
Duplicates the solutions described here, but contains the tcpip.sys file for Windows 7. The problem mostly affected Windows XP, but according to several users of the avast forum, there were cases of false positives on Windows 7 as well. Link to the file tcpip.sys if you can't find it on another computer or as written in solution #3: http://avast-russia.com/files/tcpiprestore/tcpipWIN7.zip
After following the steps described in the solutions to the problem, if avast again wants to delete this file, be sure to put this file in the exceptions until you update your anti-virus databases to the latest version, which no longer contain the erroneous definition of the file as malicious.