After buying acoustics with support for 5.1-channel sound, I ran into a number of problems. Simply put, 5.1 mode did not work in Windows 10, only 2 out of five columns worked, and even then in compatibility mode. At first I thought that this was all Google Chrome (which controls the sound itself), but no, you had to know one feature when setting it up. In the continuation of detailed instructions for setting up 5.1 sound on Windows 10.
First you need to check which sound card is installed on the PC. To do this, go to the "Device Manager" and find the item "Sound, game and video devices" (this can be done by right-clicking on the "Start" button, "manager" will be the fifth from the top). If the sound card is from any manufacturer other than VIA Audio, skip the next step.

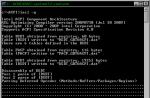
If the sound card is manufactured by VIA Audio, then before setting up it is necessary to install the drivers of the version: "VIA HD Audio v 11.11.00" (you can download it from the link). However, the VIA programmers messed up something and prescribed the wrong one to the built-in mixer, so after downloading the archive with the drivers, we simply unpack it into any folder. After you need to go to the "Device Manager", then in the "Properties" of the built-in sound card, find the "Driver" tab and click on the "update driver" button. Then "Search for drivers on this computer". Then select the folder with the unpacked drivers from VIA. After successful installation, restart your PC.

To set up 5.1 sound on Windows, you need to go to the "Playback Devices" tab (right-click on the volume icon in the Windows tray). Next, select the speakers we need and click on the "Settings" button in the lower left corner. Next, and this is very important, you need to select the 7.1 sound mode !, then click "next" and uncheck the "side pair" of speakers. Then just click "next-next" and exit the settings window. 5.1 sound activated, congratulations.


It is also necessary to configure the virtual surround sound mode so that when playing files with stereo sound, not 2 speakers work, but all 5. To do this, go to the "Properties" section (button in the lower right corner). There is a tab "Enhancements", where there is a list of different modes, we are interested in the "Enable Speaker Fill" mode - check the box opposite. This completes the sound setup.
Whether you're setting up your 2.1, 2.0 computer speakers, or a complex 5.1 home theater system, setting up channels, acoustics, and placement is the most important step in enjoying your new sound system. Read on as we give you a crash course in surround sound setup.
Why should this bother me? Why do I need to set up 5.1 acoustics?
A long time ago a friend of mine made a big purchase and bought a new led panel, as well as a smart, powerful receiver and new acoustics. At the time, he researched relentlessly, surfed the forums, and made his purchase anyway, spending most of the money on a fancy, powerful receiver and a small amount on 5.1 (pretty) speakers.
When it came time to connect the acoustics in the prescribed manner, my friend simply placed all the 5.1 acoustics right on the shelf under his new TV.

Then he called me and said that the acoustics in cinema 5.1 are “complete rubbish, hammering as it should, but there are no effects at all.” When I came to his house, I laughed for a long time when I saw such a picture, but then I arranged his 5.1 acoustics in the proper order and set everything up.
After this setup, I invited my friend and showed on some test movies how the 5.1 system sounds, my friend's face became joyful, by the way, a little later my friend bought all the same a normal 5.1 system and replaced the poor one with a good cinema projector. 
There are a huge number of acoustics for home theater. All of them add sound effects to films - all of which contribute to recreating realistically pleasing sound in your .
In order to take advantage of all that energy put into producing amazing soundtracks and movie ratings, you have to do your own tuning. Don't worry, we've already done the research for you. Just follow along with us as we explain what each speaker does and where to best place it.
To begin our speaker placement, let's first start with the most well-known audio setup, a simple stereo sound. When you listen to your player or smartphone with a pair of headphones, or listen to the radio, you hear sound in .
Stereo audio is simply two channels of audio, one for the left speaker and one for the right speaker. This is the smallest setting you will need to give the listener the illusion of sound directionality and perspective.
In surround sound terms, this is a simple setup—two channels are called a 2.0 system (or, 2 channels without a subwoofer). The addition of a subwoofer changes the notation 2.1-. Where the number 1 represents the subwoofer and the attached low-frequency effects channel that it is.
More sophisticated audio systems are the 2.1 system and extra channels added to create sound around the listener. Unlike simple 2-channel systems that are usually found in hardware on the main device (such as a portable music player or TV), multi-channel surround systems typically require a separate component known as a receiver to distribute audio signals from the source. (Blu-ray player or cable TV) to acoustics. However, there are kits not only standard 5.1 but also 7.1, as well as 9.2 and 11.2 audio channels (five speakers with one subwoofer and eleven speakers with two subwoofers,).
The vast majority of receivers now support 5.1 and 7.1 surround sound, of which Blu-Ray is plentiful, with movies now shipping with even more than 5.1 audio support.
Let's start with the acoustic setup. We'll start with a simple 2.1 setup and move on to a 7.1 setup.
How to set the sound to stereo (2.1)?
Now that we've got some terminology out of the way, let's take a look at how we can best set up the most common speaker systems, starting with a 2.1 system.
2 channel placement: With a stereo channel setting of 2.1, all movie sounds (with the exception of the low-frequency effects generated by the subwoofer) will be played on the left and right channels. All sound effects, music and dialogue from the speakers will be broadcast to you from the front speakers.
In addition to the placement of 2.1 and 2.0 speakers, which should be located on the sides of the screen and when listening to the viewer, the speakers must be turned inward towards the listener (known as convergence, as opposed to those standing in front of it), the ideal acoustic placement angle is 22-30 degrees. Position your speakers accordingly to create this cone of sound that points towards the center of your listening area (for example, the middle spot on yours).
A Note on Accuracy: It's important to note that we strive for optimal home theater sound (within reason), of course you won't get an IMAX sound system. Simply moving the speakers to the appropriate position for the viewer will drastically improve the quality of your soundstage.
How do I set up 5.1 channel audio (surround)?
5.1 channel audio is widely regarded as the absolute minimum speaker setup required to create incredible surround sound. The 5.1 speaker setup builds on the 2.1 setup layout, but adds a center channel and left and right speakers for surround.
In order to set up 5.1, the first thing to set up is the subwoofer and the left and right front channels (2 channels from the 2.1 setup above). After you have angled the left and right front channels, you need to add the center channel and rear channels.

Center channel placement: In a 2.1 setup, the left and right front speakers are responsible for delivering all music, communication, and sound effects. In the sound settings of the 5.1 receiver, you must enable - the function of additional speakers (rear).
The most important role of the central channel is dialogue. This is how actors' dialogue is usually centered on the screen, but sometimes in special effects the dialogue is mixed and goes to the left or right channel.
The center channel must be placed exactly in the center. The center channel should be as close to ear height as your setup allows and can be placed either above or below the screen. If you can't place the center channel as close to the bottom or top of the screen as you'd like, you can turn the speaker up or down a bit to direct the sound more towards your head.
Placement of Surround Left and Right, Surround Channels: Just like adding a center channel, part of the 5.1 surround back operation offloads from the original left and right channels by adding left and right surround sound channels. If you are watching a recording of a concert, for example, applause and whistling from the audience, then these rear channels create the auditory illusion that you are sitting in the front row at the concert.
In order to position the left and right surround channels for maximum impact, you need to position them approximately 90-110 degrees from your listening position, in other words, the rear speakers are positioned behind the viewer. Also, you should place them just above the viewer's head.
If you have a compromise in speaker placement due to the shape of the room and the placement of the furniture in it, it is better to place your surround speakers farther and higher than lower (this will disorientate background noise).
How do I set up 7.1 channel surround sound?
If a 5.1 channel system is the absolute minimum for surround sound, then 7.1. surround sound is by far the best for consumer home theater. While there are now more and more Blu-ray discs released for 7.1, more and more releases are coming out with 7.1. sound and most receivers are fine with surround sound channels from a 5.1 source - yet 7.1 has a more immersive sound than 5.1.

To set up a 7.1 system, place the subwoofer first, then the front left, right, and center channels, and the surround sound channels. In addition to these five channels and the subwoofer, you now have two more channels: left and right - this is the rear speakers.
Left and right rear speaker placement: The 7.1 setting adds even more realism to your home theater sound by adding two more surround sound channels. These channels should be placed 135-150 degrees behind the viewer and just above their head level.
Again, if you have a compromise with rear speaker placement, then we recommend that you move them further, closer together, and/or higher. This will affect the sound quality and sound quality.
Automatic calibration: Most of us who have modern receivers have this feature. You can sit and tune each individual channel, but you can use a well-trained microphone.
Check the documentation that came with the receiver to see if the microphone supports enhanced optimization. Nowadays every company calls it differently, Yamaha calls their system YPAO or Yamaha Parametric Room Acoustic Optimizer, a small microphone is connected to the receiver, placed where the listener's head would be during normal listening, and then a series of tones and signals are sent through the speakers to check sound, echo and others. The receiver then dynamically adjusts the acoustics for these problems to produce a more balanced sound.
Although many automatic calibration systems allow you to save from 2-10 additional measurements from additional places located in the listening area, we recommend that you measure not far from the center of the listening area of the measurement area - this can lead to distorted results.

Adjust the center channel A: While many of you are big fans of using the manufacturer's automatic calibration, if you turn the volume up to "very loud" during a movie you may not hear any dialogue, it's best to adjust your center channel.
In the receiver, it's best to boost the volume to the center channel until the dialogue becomes clear, this is best done with test sound effects.
Don't use a super-cheap cable like the thin wire noodles that usually come with the equipment, it's better to connect the speakers to a good branded one.
+ BONUS Music in high quality flac, ape, wav
Onuka-2014 Onuka Can be downloaded below
Charlie Haden - The Art of the Song (1999) Download below
Bill Evans Trio_Waltz For Debby Can be downloaded below
Kazumi Watanabe - ONE for ALL (1999) 111 MB, Can be downloaded below
Lars Danielsson & Leszek Mozdzer - Pasodoble, Size: 206.54 MB, Can be downloaded below
Open a Word document, point to any link and press CTRL + left mouse button - the link will open in the browser, go and download, all files are checked - there are no viruses!
I hope the article helped someone
For any questions please email me. mail: [email protected] or VK
Today I will teach you how to connect 5.1 audio systems to devices without multi-channel audio support. Anyone.
So, imagine the situation: you already have a good multi-channel audio system. We emphasize - analog, classic connectors are used as inputs RCA (tulip). At the same time, as a result of upgrading device gadgets with suitable interfaces, the system cannot be used.
How to connect such 5.1-channel speakers to devices with HDMI/Toslink digital outputs, popular USB or use a stereo output? Or how to convert multi-channel digital audio signal to multi-channel analog?
Real and "virtual" multi-channel audio

A true multi-channel audio outputs the voice to the center channel, effects and music to the rear and front speakers. Or - in accordance with the distribution during recording (in some standards of multi-channel sound).
"Virtual" multi-channel audio is distributed according to the spectral response of the reproduced sound. Software and hardware decompose the signal into components according to predetermined algorithms, and distribute sounds around the listening point, creating surround sound.
Method 1. We spare no expense for high-quality sound

The easiest way is to buy a multi-channel receiver according to your preferences and needs. The simplest, most effective. And the most omnivorous.
The purchase will give you a variety of input / output interfaces for video and audio signals, be able to decode files on your own and become the center of your home entertainment system. You can always choose a model with the required number of suitable inputs - and RCA in receivers is the liveliest of all. 
Modern receivers support improved sound distribution algorithms, including Dolby Atmos, which can distribute any number of tracks to any number of speakers, taking into account the acoustic properties of the room.
The disadvantage of the solution is the cost. It starts from 10 thousand rubles for a used one and from 30 thousand for a receiver with Dolby Atmos support.
In addition, the receivers have impressive dimensions. Well, if the place and the interior allow. And if not?
Method 2. (Digital) Optical -> Multichannel Analog

For the sake of this, the article was started. I often get asked questions like: “How do I connect my home theater to a new TV? It has no analog audio outputs!”.
Mine only has a two-channel mini-jack and an optical Toslink. For a while before buying new acoustics, I connected the old 5.1 kit using such a Chinese converter. 
A rather primitive digital-to-analog converter is hidden inside the device and DSP processor- a microcircuit responsible for mixing, equalizing and effects.
The application is very simple - we connect an acoustic system to the analog RCA outputs, on the other hand we supply an audio signal through a coaxial or optical connector and external power from the supplied power supply. 
If the signal corresponds to the number of connected acoustic channels, it passes without mixing and processing. As it is.
That is, if the film 5.1 channel audio track, and we use the appropriate audio system - the sound quality will be the same as the original.
If a two-channel track is fed to it, then the signal is converted using a "virtual" mixing in the processor, and is distributed to all speakers.
Of course, this is very different from real 5.1-channel sound, but it still sounds nicer than regular stereo. Unless, of course, we are talking about films.
So you can connect acoustics and to other devices- for example, through the usual headphone output of a laptop, tablet or player. 
But the output will only be virtual 5.1-channel sound, even if the original track is multi-channel. Nothing else can be obtained from the stereo connector.
If necessary, the converter allows you to play any incoming audio signal in two-channel. Suitable for standard music systems systems 2.1, as well as in cases where the DSP converter does not play the track correctly.
Method 3. HDMI -> Multichannel Analog

The option using HDMI is more promising, since this interface is used much more often in modern gadgets.
To transmit a multi-channel audio track, the jack on the audio source must support the HDMI Arc protocol. Otherwise, a regular stereo signal will be broadcast, which will be converted to "virtual" 5.1 by software.
If HDMI supports this function, you can purchase such a converter. This box also supports end-to-end transmission of a composite signal: by connecting a source via HDMI, you can separately output sound to an audio system via coaxial, optical or analog connectors, while running the video sequence on a projector or TV.
Method 4. USB -> Multichannel Analog

Most of the Chinese “multi-channel USB audio cards” offered on the Internet are rather primitive tricks that produce processed stereo. Save will not work.
Another thing is external audio cards. Some of them are capable of producing multi-channel sound, and are suitable for connecting to tablets, laptops, desktop computers. 
Unfortunately, even Smart TV, not to mention most devices with proprietary firmware (receivers, media players) will not be able to recognize it as an audio device. Therefore, Creative Sound Blaster Omni Surround 5.1 , Creative X-Fi Surround 5.1 Pro or ST Lab M-330 USB is suitable only as computer accessories, or in the case of separate audio and video streaming from a computer. And this is a completely different story.
"Chinese box" or a full-fledged receiver?

In fact, the choice is ambiguous. If you need to link several devices into a single system, the choice is obvious.
So, you have become a happy owner of 5.1-channel computer speakers (AC / acoustic system / acoustics) and correctly connected them to the sound card. What's next? In this note, I will tell you in detail and "pictures" point by point how to correctly and quickly configure sound in windows 7 using the Control Panel and the Realtek HD audio manager. In the last paragraph, I will also mention the rating South Korean media player PotPlayer. Who is interested - read further after the button of the same name.
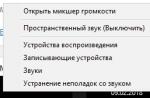
1. Let's start our brief digging into the settings by calling the "window" control panel ("Start" → "Control Panel"). Find and open the parameter (applet) "Sound" → then, on the main tab "Playback" we designate the playback device as "Speakers" ("Speakers") → at the bottom left click on the button "Configure" (see first screenshot). In the window that opens, in the "Sound Channels" list, select "5.1 Surround Sound", after which we will not forget to click on the "Check" button (of course, all speakers should produce sound). After passing the test, let's move on to the next settings, where you need to specify which speakers will be full-range, rear, etc.

2. Having properly configured the speakers and clicking on "Finish", we will return to our multi-tab "Sound" window → selecting "Speakers" again, look at "Properties" → in the "Properties: Speakers" window on the "Improvements" tab, check the box next to " Environment", confirming the change with the "OK" button (screenshot). This completes our manipulations with the "Sound" applet.

3. Now let's open the Realtek audio manager (see the "Realtek HD" option in the windows control panel). On the "Speakers" tab, select the "5.1 speaker" configuration → check in the same place that the "Virtual Surround" and "Bass Control Connection" items are activated. Close the dispatcher with the "OK" button (screenshot), and the control panel - of course, with a "cross".
Note: You can download the manager with the Realtek sound card driver package from the official website here (see "High Definition Audio Codecs (Software)").

4. If media files in your system are opened not by the built-in (windows Media Player), but by a third-party player, then the final "digging" will be changing the channel settings from stereo to "5 + 1". For example, for the test winner "Choosing the best media player for windows OS: a comparative review of programs for playing audio and video files" Daum PotPlayer "digging" is as follows: when the program is running, press F5 ("Settings") → on the "Audio" tab in the "Speakers" setting " change "2.0 stereo" to "3/0/2 + LFE - 5.1 channels" → "OK" (screenshot).
Actually, this is all - not too difficult and long. All that's left is to experience surround sound by playing your favorite Dolby Digital (DTS) movie.
Dmitry dmitry_spb Evdokimov
TestSoft.su
Setting sound 5.1 in windows 7

Surround sound lovers - hello! The setting can be done using the control panel as well as the Realtek Sound Manager. Open Start > Control Panel > Sound. Find a tab called "Playback" there, then highlight the "Speakers" icon and go to "Customize". If you see a green arrow there, it indicates that this device is currently in use.
Initially, you should check if you have a codec for playing and sound settings at all. If not, you can download realtek for windows 7 at any time. Those who have already downloaded realtek hd for windows 7 and 8 will not have to spend a lot of time setting it up, the sound will now be excellent.
In the window that you have opened in the list, you should find "Surround Sound 5.1" and there click on "Check". After that, you should hear sound from all speakers. It is also important to note that if you do not hear sound from all the speakers, then you can try choosing "7.1 Surround Sound" instead of 5.1.
After you pass the test, then click on "Next". Next, you will need to select in the settings which speakers should be rear, full-range, side, etc. When you finish working with the wizard, you will again need to select the "Speakers" icon and go to "Properties". Once you find the "Properties: Speakers" window, go to the tab called "Advanced Features" and there check the "Virtual Surround Sound" box, and then click the "OK" button. After that, you can check the parameters of the installed sound effects again.
coolinfoo.ru
Setting up surround sound in windows 7 and windows 8
Hello dear readers. Today's article will be especially useful for music lovers, as I will tell you how to set up surround sound in windows 7 or 8 operating system.The first thing you will need is to purchase speakers and a good sound card. Let's assume that you already have these two components. Then, be sure to install the drivers for the sound card. You can find out the name of your “zvukovuha” using the “Everest” program or any other similar program.
Next, we connect the previously purchased stereo system to the computer. To achieve better sound quality, I would recommend using a 7.1 system, but 5.1 is fine too. Connection of a 5.1 stereo system to the system unit is carried out in the following outputs:
- Orange - subwoofer and center speaker;
- Green - front speakers;
- Black - rear speakers.


The Sound dialog box will open, showing you the devices connected to your computer to output sound. Make sure the audio device you want to configure is set to "default".
 Now a new "Setup Speaker" dialog box will open. In my case, two channels appeared in the list of audio channels: Stereo and 5.1 Surround. In your case, it may be 7.1 Surround or some other name. It only depends on the equipment you have connected.
 Selects the 5.1 Surround channel. If you just set the Stereo value, then only two columns will “light up” on the image in the window, if 5.1 - four additional columns will be added and 7.1 - five additional columns will be added
speakers.  Then I recommend testing by clicking on the "Test" button. At the end of testing, click "Next" and go to the advanced surround sound settings in windows 7 or 8. I advise you not to change anything here, as the operating system automatically adjusts to optimal performance.
At the very end, you will receive a message that the setup was successfully completed. Click the "Finish" button and you will finish setting up surround sound in windows 7 or 8.
Using this short instruction, you will be able to do everything yourself, without resorting to calling wizards or special services. In the end, I would also like to recommend you to read the article that was previously published on our website, about one very useful program with which you can convert the sound in your favorite mp3 compositions from mono to stereo and vice versa from stereo in a matter of minutes in mono.
vgtk.ru
Setting up 5.1 sound via S / PDIF in windows 7
There is a computer with Win 7 on board There is a 5.1 receiver with support for DTS and DolbyDigital When connected via a digital output, the sound comes only in stereo mode At the same time, for movies with DTS or DD tracks, 5.1 works only in windows Media Player Movies with regular 5.1 tracks are played back as stereo. When connected via analog, everything is ok. How to enable 5.1 by default system wide? - Sound card - built-in Realtek ALC888/1200 Receiver Kenwood KRF V4070
latest version of Klite and AC3Filter
- Question asked over 3 years ago
- 31880 views
- I solved the problem by purchasing a sound card with DOLBY DIGITAL LIVE support! (Creative audigy 4) and the actual library of the same name on off. manufacturer's website. Satisfied, I advise.
Thanks for answers.
Like Comment
- 5.1 worked great for me for movies in VLC (in the settings, select "All Options", the Sound section, the "Use S / PDIF if available" checkbox). For the entire system is unlikely to succeed. Like Comment
- "Movies with regular 5.1 tracks" - what are these ordinary ones? Multi-channel movie tracks can be encoded in different formats (DTS, DolbyDigital, etc.). If the track standard matches the capabilities of your receiver (a bunch of all sorts of icons on the front panel), then it will play multi-channel sound. If it's a game or something other than what it can decode, then you won't hear anything. The sound card in this case can reproduce the whole thing, because its capabilities are not limited to DTS or DolbyDigital. - Similarity of the solution: The receivers have modes of virtual decomposition of stereo signals into all 5.1 channels. Usually this is Dolby ProLogic or similar. Check the instructions for your receiver. Then you will have all 5 speakers playing, although the input signal will be stereo.
And yet, by default, AC3Filter does not seem to have an option for signal output to SPDIF.
Like Comment
- Good day! I decided not to create a new topic, the question is almost the same. there is an LG TV 42" with S/PDIF output on board, a PC with a Sound Blaster X-Fi Xtreme Audio PCI Express sound card on board S/PDIF in, analog 5.1 speakers. We want to watch DTS movies with 5.1 sound. everything is OK with TV, the output from the computer is also OK, but the input is only stereo firewood, everything is there.
set up (3-4 years ago) everything worked but the other day I reinstalled Windows and sailed, I remember I also suffered for a long time, help with advice where to dig
Like 1 comment
So, you have become a happy owner of 5.1-channel computer speakers (AC / acoustic system / acoustics) and correctly connected them to the sound card. What's next? In this note, I will tell you in detail and "pictures" point by point how to correctly and quickly configure sound in Windows 7 using the control panel (eng. control panel) and audio manager Realtek HD. In the last paragraph, I will also mention the rating South Korean media player. Who is interested - read further after the button of the same name.
![]()
1. Our brief digging into the settings will start by calling the "window" control panel (" Start" → "Control Panel ").Find and open the parameter (applet)" Sound" → then, on the title tab " Playback" denote the playback device " Speakers" ("Speakers") → at the bottom left click on the button " Tune" (screenshot).

In the window that opens, in the "Audio channels" list, select " 5.1 surround sound ", after which do not forget to click on the button" Examination" (Of course, all speakers should make sound). After passing the test, let's move on to the next settings, where you need to specify which speakers will be full-range, rear, etc.

2. By setting the speakers appropriately and clicking on " Ready", back to our multi-tab "Sound" window → highlighting " again Speakers", let's look at " Properties" → in the window "Properties: Speakers" on the tab " Improvements"check the box next to the item" Environment", confirming the change with the button " OK". This completes our manipulations with the "Sound" applet.

3. Now open the audio manager Realtek(See the Windows Control Panel option " Realtek HD").On the tab" Speakers"select configuration" 5.1 dynamics "→ in the same place we will check that the items are activated" Virtual environment" And " Bass control connection". Close the dispatcher with the button " OK", and the control panel - understandable, "cross".

4. If media files on your system are opened not by the built-in (Windows Media Player), but by a third-party player, then the final "digging" will be changing the channel settings from stereo to "5 + 1".
For example, for the winner " Choosing the Best Media Player for Windows..." Daum PotPlayer"digging" is as follows: when the program is running, press " F5" ("Settings") → on the tab " Audio"in the "Speakers" setting, change "2.0 stereo" to " 3/0/2 + LFE– 5.1 channels " → "OK".
Actually, this is all - not too difficult and long. All that's left is to experience surround sound by playing your favorite Dolby Digital (DTS) movie!
Dmitry dmitry_spb Evdokimov