How to connect a projector?


Nowadays, the projector is an integral part of showing a business or educational presentation, as well as photo and video materials. Thanks to the device, you can demonstrate information to a large number of people at the same time. Today we will talk about how to connect a projector to a computer and laptop.
Independent connection of the projector
- Disconnect the power cables from the computer and the projector (unplug devices from power outlets).
- Depending on the connector type, the computer and the projector are connected with a VGA or HDMI cable. If the devices have different types of input, then a special adapter is used.
- Next, you need to turn on the projector and computer.
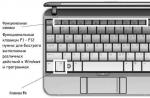
- The next step is to set up the image. In most cases, it happens automatically. However, it happens that you have to connect the image yourself. To do this, you need to wait until the OS is fully loaded. Next, simultaneously press the "Fn" key and the key for switching between screens (depending on the computer model, this can be one of the F1-F12 keys, sometimes two screens are drawn on the button). Using these keys, you can connect the image in three modes - the image only on the monitor, the image only on the projector and the image that will be simultaneously on two devices.
- The second way to connect devices is through the Connect to Projector program (included with some operating systems). With this connection method, you must activate the program and click on the required tab ("Turn on / off the projector", "Screen mirroring"). The "Expand" tab allows you to split the image into two parts (when clicked, the left side of the screen will be on the computer, and the right side on the projector).
- The third method involves connecting through the computer settings. To do this, click the "Start" button, go to "Control Panel", then select the "Display" section and the "Screen extension" tab. Select the image connection type - computer or external screen (projector).
- For the fourth method of connecting devices, you need to right-click on the computer desktop, select "Properties", then "Screen" and go to the "Settings" tab, where you need to select the type of image connection - computer or external screen (projector).
- And finally, the fifth way is the keyboard shortcut "Windows" + P. In the window that appears, you will need to select the type of screen connection (that is, select a computer monitor, projector, image sharing or screen sharing).
Connection methods will depend on the version of the operating system that is installed on your computer or laptop. The ability to connect two monitors (computer and projector) will depend on the presence of a second video output in the video card.
Differences in connecting the projector to a PC or laptop
The principle of connecting devices is carried out in a similar way. The only difference is that the laptop does not require a monitor to be connected.
Speaking of the monitor, it is very important to choose a screen with a high resolution. In this case, in the monitor settings, you need to select a resolution that is closest to that reproduced by the projector.
How to connect a wireless projector
- First you need to install the necessary drivers and the program, which are recorded on the installation disk and come with the device. If you do not have a disk, then drive the model of the projector into the search engine and download the free program to your computer.
- Next, you need to connect the antennas to the computer and the projector. To do this, a small antenna in the form of a flash card is placed in the corresponding slot of the projector. And a second antenna is connected to the USB connector of the computer, which looks like a flash drive.
- As soon as the indicator turns green, the device is ready for use.
- Use the instructions above to switch between screens.
In our section you will find many articles that talk about self-configuring and connecting various devices.
A projector is such a device, the main task of which is to project an image from a laptop or PC onto special screens, plasma or interactive whiteboards. This technique is most often used during lectures, conferences, presentations to demonstrate multimedia content. Connecting the projector to a laptop takes a minimum of time and is not difficult. To make the process go as quickly as possible, you need to read the step-by-step instructions for connecting.
The connection itself is a fairly simple task, but if a person has not done this at all, some of the settings and parameters may cause him difficulties. That is why it is important to study the relevant instructions in detail.
Wired connection
- First, you should carefully examine the case of the projector and laptop to find a VGA, HDMI or DVI connector. It will be ideal if these two devices are equipped with an identical connector.

Note! As practice shows, HDMI is the most optimal, since it is able to provide a high-quality picture.
- In a specialized store, it is recommended to purchase a cable, the two sides of which differ in identical connectors.

- If the projector and laptop are equipped with only one type of connector, you will have to additionally purchase the optimal adapter.

- One end of the connector of the new cable should be connected on the back of the projector to the "Computer IN" jack.

- The same must be done in a laptop or computer and check that the wires do not hang out and are connected securely. If a VGA cable is used, it is mandatory to secure the connector with conventional clamps.

- Upon completion of the wired connection, it is recommended to turn on the power on all the equipment used, and then proceed to its configuration.
Hardware setup
It was already mentioned earlier that the projector adjustment often takes place on a video signal transmission. How can I check if the connection was successful? It's simple: after starting work, the projector will start displaying the picture from the laptop.

Changing the screen resolution
It is necessary to see with what resolution the projector is able to function normally. Budget options support 800x600 or 1024x768, but more expensive ones can handle 1920x1080

Users of the latest version of Windows will not be able to find the above section in the context menu, so they need to adjust the resolution in the display settings.
You need to open "Start" and visit the "Settings" section. Go to the "System" tab, after which the "Screen" section will appear. Next, go to advanced options.

Once the optimal settings are set, the configurations are saved.
After performing all these manipulations, a normal and clear image will appear on the wall. The next connection step is to select the demonstration mode display.
Display mode changes
To change the principles of functioning of technology, you need to press two keys on the keyboard at once - Win + P.
Then several items will appear:
- a computer. The technique itself will turn off, the picture will remain exclusively on the main monitor;
- duplicate. The projector is copying the picture from the main monitor;
- expand. The image becomes identical for laptop and hardware. In this case, the main screen will be located on the left;
- only the second screen. The picture remains only on the wall of the projector.

When using a laptop, there is an Fn button on the keyboard. With its help, it turns out to instantly switch the display option.
If these steps are followed correctly, it will not be difficult to achieve a positive result by successfully connecting and setting up the projector.

How to work with Power Point?
Typically, the projector is used to show slides through the program. In this case, to properly configure the display, you will need to perform a few more steps, namely, determine the display to display. So far, only slides on the projector are visible to the public, and other information is available on the monitor screen, for example, the text of the abstract.
- Before selecting a screen, you need to make a connection and change the projector settings.
- When the equipment is ready for work, you need to find the "Slide Show" section in the program itself and select your multimedia projector in the "Show presentation on" menu.

How to fix the problem of connecting equipment to a computer
If a recently purchased projector was connected to the device, but the signal does not want to appear, this indicates that the user has configured the equipment incorrectly. In this case, it is necessary to double-check whether everything was connected in the correct order.
First, the device is connected, and only then the laptop is turned on. The connection process itself is performed via a VGA or HDMI cable connector, which gives the most detailed picture. There are models that operate via WI-FI. In each individual case, you must carefully re-read the instructions and understand that everything was done correctly.

Note! If there is no signal from the equipment and the laptop does not display new devices, it is better to reboot the system. Most likely, there were problems with recognizing a new device.
Sometimes it happens that the laptop suddenly stops communicating with the projector, although until recently there were no such problems. If this happened when the OS was reinstalled, it's most likely a driver problem.

As practice shows, usually problems of lack of connection occur due to inattention during connection. Modern projectors are distinguished by the simplest control, so it will be enough to familiarize yourself with the above instructions and everything will work out. At the same time, even after successful connection and configuration of programs, work with the equipment does not end. It is important to reliably and correctly place the equipment, correctly calculate the distance so that the image is detailed and clear.
Video - How to connect a projector to a laptop
Projectors today have become quite common and are used quite widely. Yes, now there are quite a few people who use them at home to watch movies, but in a school or office, this equipment is often used to demonstrate presentations and other materials. Connecting the projector to a computer or laptop is a fairly simple operation, which for some reason causes a variety of difficulties for many. Let's try together to figure out how it's done.
Are there any differences in connecting the projector to a computer and a laptop?
The method of connecting to a laptop and a computer is almost identical, except that you do not need to connect a monitor to a laptop and deal with its settings, as is the case with a PC. Note that before connecting the projector, it is highly desirable to select a monitor with the highest possible resolution. Next, in the monitor settings, select the resolution that is closest to that reproduced by the projector.
This small detail is very important, because the projector may not perceive the high resolution, issuing the phrase “No signal”. In the same case, when the resolution of the monitor and the projector are significantly different, the image quality leaves much to be desired. The reason is simple - the projector has to recalculate the image, crop and stretch it, thereby adjusting it to its resolution. In this regard, there may be problems with displaying the details of objects or text messages (they will simply be impossible to read).
Cable connection
You will need a cable to connect the projector to your computer. HDMI or VGA , depending on which outputs you have on your PC and projector. Preferably, of course, HDMI , since the signal is much faster and better (without unnecessary noise). If the input types are different on the projector and the PC video card (this happens when the computer has only DVI , and on the projector HDMI or VGA ), then you can use a special adapter.
As a rule, the connection cable comes with the projector, but if this is not the case, then you can buy it at any electronics store, you can also buy an adapter there. The main thing is to determine exactly which connector you have on your PC and projector.

Software setup
After you have solved all the problems with connecting devices to each other physically, you can proceed to the software settings. If the computer was working before, you need to reboot after connecting the projector to it. Next, right-click on the desktop and select " Properties ». In the window that appears, we need a tab "Parameters ».
We click on the image of the second monitor, and a little lower under the picture we select our projector as the second display. Now you need to set the optimal resolution. In order to find out what resolution is optimal for your projector, you can use the documentation for it. Next, check the box next to the option "Extend the desktop to this monitor" and click "Apply".
Completion of works
At the final stage, it remains only to restart the computer without turning off the projector, and everything should work, after which you can set up the display clarity, color gamut, and other parameters. We looked at the simplest way to connect a projector to a computer for the Windows XP operating system, but in Windows 7 and 8 the settings are made exactly the same (just the names of individual tabs may differ).
There are also other ways to connect the projector to a computer (such as duplicating or using it as a main screen). The setting there is done in a similar way and differs only at the final stage (instead of "Extend the desktop to this monitor", select duplication, etc.).
With a second screen, you can easily view multiple open apps at the same time. You can also connect a projector so that the screen can be seen by everyone in the room.
Most monitors and projectors can be connected using a DVI, VGA, or HDMI cable. (Some devices can even connect wirelessly.) Your computer may contain one or more of these ports.

Connecting a second monitor or projector to your computer allows you to:
- interacting with the four corners of any of the screens using the mouse or the edges of the touch screen to open the launch screen, function bar, or recently used apps;
- view multiple open windows on each screen with the ability to launch applications in each window;
- customization of screens, placing the taskbar on one or all displays to transfer applications between screens.
Connecting a second monitor to a computer
Most monitors and projectors for connecting a device with a cable have an appropriate port (DVI, VGA or HDMI). If your computer only has one DVI port that is already busy, you can use a non-standard monitor cable provided by some OEMs to split the signal from one DVI port to two monitors.
Notes:
- For a desktop computer, a graphics card with two DVI, VGA, or HDMI ports is required.
- If your monitor or projector comes with a cable that is not suitable for the ports on your computer, you can use an adapter to convert one type of port to another type.
To connect an additional monitor to your computer
- Find a free video port on your computer.
- Connect the appropriate cable from the second monitor to this port.
The Windows operating system must automatically locate and install the monitor.
Connecting the projector to a computer
For wired connections, connect the projector's cable to the VGA, DVI, or HDMI port. In most cases, Windows will automatically detect and install the projector.
If Windows detects the Wi-Fi projector, you can connect to it.
To establish a Wi-Fi connection with the projector
- Move your finger quickly from the right edge to the center of the screen, and then press the pad Devices. (If you are using a mouse, select the lower right corner of the screen, move the mouse pointer up, and then select the Devices panel).
- Click Other Screen and then press the key Add WiFi Screen.
- Select the projector from the list of found devices and follow the instructions on the screen.
Customize monitor content
After connecting a second monitor or connecting a projector, you can select the appropriate screen options.
- Move your finger quickly from the right edge to the center of the screen, and then tap the Devices panel. (If you are using a mouse, select the lower right corner of the screen, move the mouse pointer up, and then select the Devices panel).
- Click the Other Screen button and select one of the following options:
- Only computer screen. The entire contents of the computer screen will appear.
- Duplicate. Both screens will display the same content.
- Expand. The entire image will be expanded across two screens and you can drag and drop items between them.
- Second screen only. All images will be displayed on the connected secondary screen. The first screen will be blank.
Using the taskbar on all screens
With the right setup for a second monitor or projector, it might be nice to have multiple taskbars to make it easier to switch between apps and files on your desktop.
The following describes how to display taskbars on all screens and change how buttons are displayed on them.
- Swipe inward quickly from the right edge of the screen, click the Search button (if you're using a mouse, select the top right corner of the screen and then click the Search button), and then in the search box type Taskbar and Navigation.
- Click the button Taskbar and Navigation.
- In section Multiple screens check the box Show taskbar on all screens and select the appropriate options to customize Show taskbar buttons And Buttons on other taskbars.
- Press the OK button.
Transfer applications on screens
Applications can be moved between screens and within the same screen.
To move an app from the Windows Web Store within the screen, press the Win key + ← or the Win key + → .
To move an app from the Windows Web Store to another monitor, press the Win key + Shift + ← or the Win key + Shift + → .
To move the desktop application on the left side of the screen to the center and right of the screen and then to the second monitor, double-click the Win + → key and the Win + Shift + ← key.
Cursor behavior control when one monitor is touch
If you are connected to a computer with or without a touch screen, you may need to change the cursor settings.
- Swipe inward quickly from the right edge of the screen, press the Search button (or if you're using a mouse, select the top right corner of the screen and then press the Search button), type , and then press the key or select an item Tablet PC settings.
- Click the Settings button.
- If you are prompted with a choice, press the Touch Input button and follow the instructions on the screen.
You can connect a wide variety of devices to your computer. All PC users should be aware of the features of each process. Today we have to understand how to connect the projector to the computer. In fact, to bring the idea to life is not as difficult as it seems. The main thing is to know about some of the nuances of the connection. What should users pay attention to? What will help bring the idea to life?
Connection methods
First of all, it is important to understand that there are several options for the development of events. How to connect a projector to a computer? The user can use the following connection methods:
- wired via VGA;
- wireless method;
- using HDMI.
Accordingly, the first option is used on and the second - on laptops. There is nothing special about the process. The main thing is to act correctly. How exactly?
Preparing for the process
For example, to prepare everything necessary for the implementation of the process. It is possible to bring an idea to life only if there are certain things. As a rule, all users have them. In any case, after purchasing the projector for sure. Therefore, there are often no problems with preparation.
How to connect a projector to a computer? This will require:
- projector;
- a computer;
- monitor;
- vga wire,
- power connection cable;
- driver disk.
This is the most common inventory that is used to complete the task. Additionally, you need to have a separate outlet to which the projector is connected.

Instructions for working with VGA
The easiest connection is considered to work with a VGA cable. How to act in this situation? When the user has all of the listed components, it will be necessary to follow a certain algorithm of actions. And regardless of what operating system is installed on the computer.
- Put the projector in the right place.
- Plug it in and plug it into an outlet.
- Take 2 VGA wires. Connect them to the projector.
- Insert one of the cables into the monitor, the other into the system unit, instead of the monitor.
- Turn on the projector, then the computer.
- Install drivers for the connected device.
- Set the projector as a monitor in the operating system settings.
- Save changes.
This is all. No further special action needs to be taken. Sometimes questions arise regarding how to set the projector instead of the monitor in the operating system. But this will be discussed later. First you need to understand all the nuances of connecting the device.

Via HDMI
You can also use an HDMI cable to operate the projector. This is a better way to transmit an image. But how to connect the projector to the computer?
To do this, you will have to use the previously proposed algorithm of actions. The only difference that is recommended to pay attention to is that the VGA cable will be replaced with HDMI. The rest of the instructions remain the same.
An important point is that you will have to work initially with the equipment turned off. Otherwise, there is a risk of failure and malfunction of the projector.
Without wires
However, these methods are relevant only for desktop computers. Work with a laptop in this way will not work. How to connect to a computer?

It has already been said that you can use a wireless connection. In fact, there is nothing special or incomprehensible in the process. The main thing, again, is to follow a certain sequence of actions. Only in this way will it be possible to fully realize the task in hand.
To connect a projector (monitor) to a computer, you need to do the following:
- With the technology turned off, insert special USB signal receivers into the laptop, as well as into the projector.
- Turn on equipment. As soon as the green light on the projector lights up, it will synchronize with the computer.
- Install drivers to work with equipment. In Windows 7, they can be detected automatically.
- Put a program called "Connect to the projector." It is usually found on the device driver disc.
- Run the installed software.
- Accept the existing hardware settings.
Everything is easy and simple. Now it’s clear what you need to connect the projector. The computer (Windows 7 or any other operating system - this is not so important) must have a set of new drivers for it. Otherwise, it will not work properly.

Settings in the system
Now a little about how to properly display data from a computer on a projector. It is important to know about this feature. Otherwise, the projector will be connected but will not work.
As a general rule, the user should adhere to the following steps:
- Start operating system.
- On the desktop, right-click on any free area.
- Select "Screen Resolution" from the list that appears.
- In the "Screen" section, check "Screen 2, projector". The inscription may be different, but the meaning does not change.
- Save changes.
After that, the image should be transferred from the computer to the connected equipment. It doesn't matter if the user has Windows 7 or Windows 10 installed. How do I connect the projector to a computer? From now on, the answer to this question is clear. In fact, everything is not so difficult. The main problems can arise precisely with the output of an image from a computer to a projector. But fixing the situation is not difficult.