K-Lite Codec Pack is a set of tools that allows you to play videos in the best quality. The official website presents several assemblies that differ in composition.
After downloading K-Lite Codec Pack, many users don't know how to work with these tools properly. The interface is quite complicated, besides, the Russian language is completely absent. Therefore, in this article we will consider the configuration of this software. For example, I previously downloaded the assembly from the manufacturer's website "Mega".
All codec settings are done when you install this software. The selected parameters can be changed later, using special tools from this package. So let's get started.
We launch the installation file. If the program finds already installed components of the K-Lite Codec Pack setup, it will prompt you to remove them and continue the installation. If it fails, the process will be aborted.
In the first window that appears, select the operating mode. To configure all components, select "Advanced". Then Next.


Profile selection
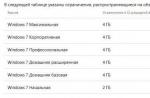
The next window will be one of the most important in setting up this package. The default is Profile 1. The principle can be left as it is, these settings are perfectly optimized. If you want to carry out full customization, select Profile 7.

Some profiles may not have the player installed. In this case, in brackets you will see the inscription "Without player".
Filter settings
In the same window, we will select a filter for decoding "DirectShow video decoding filters". You can choose either ffdshow or LAV. There is no fundamental difference between them. I will choose the first option.

Splitter selection
In the same window, go down below and find the section "DirectShow source filters". This is a pretty important point. The splitter is needed to select the audio track and subtitles. However, not all of them work correctly. The best choice would be LAV Splitter or haali splitter.

In this window, we have marked the most significant items, the rest is left by default. Click Next.
Additional tasks
If you want to install additional program shortcuts, then check the boxes in the section "Additional shortcuts" next to the desired options.
To play videos only from the white list, check "Restrict usage to whitelisted applications".

To display video in RGB32 color mode, check "Force RGB32 output". The color will be more saturated, but the load on the processor will increase.

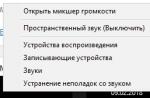
You can switch between audio streams without the player menu by highlighting the option "Hide systray icon". In this case, the transition can be carried out from the tray.
In field "Tweaks" subtitles can be set.

The number of settings in this window can vary significantly. I show how mine is, but it could be more or less.
Leave the rest unchanged and click Next.
Configuring Hardware Acceleration
In this window, you can leave everything unchanged. These settings are great for the job in most cases.

Renderer selection
Here we will set the renderer parameters. Let me remind you that this is a special program that allows you to get an image.
If the decoder Mpeg-2, built into the player suits you, then mark "Enable internal MPEG-2 decoder". If you have such a field.
In order to optimize the sound, select the option "Volume normalization".

Choice of languages
To install language files and the ability to switch between them, select "Install language files". Click Next.

We get into the language settings window. Choose a primary and secondary language that suits your requirements. You can choose another one if needed. Click Next.

Now let's select the player to play by default. I will choose "Media Player Classic"
In the next window, mark the files that the selected player will play. I usually select all videos and all audio. You can select everything using special buttons, as in the screenshot. Let's continue.

The audio configuration can be left unchanged.
This completes the K-Lite Codec Pack setup. It remains only to press Install and test the product.
Codec is a program for to and dec coding (packing and unpacking) video and audio streams. The average user needs codecs to play compressed video or audio formats on a computer. The fact is that in most modern formats, such as mp3, mp4, compression is used. And when installing a clean operating system, most of the compressed formats are not supported. Therefore, in order for playback to become possible, you need to install a codec. Most codecs slightly degrade the quality in order to significantly reduce the file size. But there are also lossless codecs - those that compress a file without quality loss.
K-Lite Codec Pack - what is it?
K-Lite Codec Pack is a set of the most popular and in-demand codecs in one package. By installing this package you will be able to watch almost any video and play any audio format.
Benefits of K-Lite Codec Pack
- The maximum set of codecs in one installer.
- Regular updates.
- The package includes one of the best players Media Player Classic - convenient, lightweight and fast.
- It comes in different configurations - Basic, Standart, Full and Mega (from the minimum set of codecs to the maximum).
Disadvantages of K-Lite Codec Pack
Sponsored software may be included in the installation package. If you install a codec pack without looking, you can install something you don't need. Read below for how to avoid this.
How to download K-Lite Codec Pack
Now about how to download the K-Lite Codec Pack correctly in order to download exactly it, and not something else by mistake.
1. Go to the official website:
http://www.codecguide.com/download_kl.htm
2. Click Download Mega :


How to install K-Lite Codec Pack without extra programs
1. Run the downloaded file:

Click Yes in the User Account Control window:

2. Slowly, click Next. If you see a window with a Decline button, click Decline!
So like here:
 And here:

If you have any problems with playing movies and video clips on your computer, then you can solve them using the K-Lite Codec Pack, which is distributed in several versions: Basic, Standard, Full and Mega. In this guide, we will walk through the installation process of K-Lite Codec Pack Mega, which includes components from all other packages.
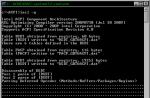
Step 1 Installer
We launch the browser and go to the K-Lite Codec Pack Mega page. Click on the link to download the distribution:
Download and run the distribution.
Step 2. Preparation
At the very beginning, you will be asked to specify the installation type. Choose Advanced and press the button Next:


Step 3 Path and Components

Select all components in the option Player, if they are suddenly not affixed in advance. If you have a 64-bit OS installed, then you can leave the checkbox x64, and if 32-bit - x86. Click on Next:

You will then be prompted to create a K-Lite Codec Pack folder in the start menu for quick access. To cancel an action, check the checkbox Don't create a Start Menu folder. Click Next:

On the next screen, leave all the default settings:

Optionally, you can add player shortcuts Media Player Classic and K-Lite settings on desktop and taskbar:

Scroll down, disable options Show configuration tips And Show optional offer. Click Next:

Step 4Language Pack
In the window that appears, enable the option of language packs Install language files, if it is suddenly not active, and click on Next:

Step 5Hardware Acceleration
We leave the default settings for the H.264 codec and click Next:

The developers recommend changing these settings only if you are an advanced user and understand what these options are responsible for, which you can read about in more detail in the help (Help button in the lower left corner).
Step 6Language Settings
Further as the main language ( Primary language) leave the Russian ( Russian) or change at will, but as a secondary language ( secondary language) we are offered English ( English). It can also be changed at will:

The bottom options allow you to customize the output of subtitles. For example, if we select the 2nd checkbox, then subtitles will be displayed by default if the language of the audio track does not match the main one ( Primary language). Leave this option and click Next:

Step 7. Finishing
Here we can select those players for which the K-Lite Codec Pack settings will be active. We select our favorite video players, focusing on the bit depth of your OS (x86 is 32-bit, and x64 is 64-bit), and click Next:

In a new window, click on the button All video and click on Next:

If your settings for video file extensions are reset, and all audio formats are selected instead, then click on the button None and choose again All video.

You will then be asked to specify the types of video preview extensions that will be displayed in the standard explorer. Leave everything as default and click Next:

Click Install and wait until the installation of all components is completed:


Upon completion of the installation, click on the button Finish:

If your audio or video file does not play, most likely the problem is the lack of suitable codecs. You can learn more about codecs and how to choose them correctly from our article. Let's move from theory to practice and tell you how to install codecs, update or remove them.
You can install codecs for playing sound and video either separately for each format or in a package, which is most convenient.
One of the most popular and complete packages of audio and video codecs - K-Lite Codec Pack - is suitable for Windows XP, 7, 8 and 10 operating systems. It can be downloaded for free from almost any soft portal - a site for downloading programs. To download the latest version of the package with all the updates, it is better to go to the official website of the manufacturer. In addition, you will protect yourself from possible viruses.
Consider step by step how to install codecs
How to update, reinstall or remove codecs

You have installed codecs and now you can play files in any media format on your computer. But what about watching videos on mobile devices? You can find a player that supports the required codecs, but there is an easier way - to convert the file using
Codecs- these are the files needed to run the audio and video files in avi, wav, mpeg formats, etc. If you suddenly do not play any audio orvideo file, then most likely you do not have the necessary codecs. The K-Lite Codec Pack, which contains a complete set of codecs for playing and encoding videos of even the rarest formats, will help you fix this problem.
To install the K-Lite Codec Pack codecs, follow the steps below in order.
Step 1 . Run the K-Lite Codec Pack installation file by double-clicking on it with the left mouse button.
Step 2 . The K-Lite Codec Pack Installation Wizard window will open. Click to continue Next.

Step 2 . Choose an installation option:
Simple.
- Normal.
- Extended.
Select advanced ( Advanced mode) and click the button Next.

Step 3 . In the next window, you need to specify the codec installation pathK-Lite Codec Pack. Leave the default path and click Next.

Step 4 . In the new window, you need to selectinstalledComponents. Click on the dropdown menu and select a set Lots of stuff. To continue installing codecs, click Next.

Step 5 . In this window, you will be prompted to create a folder in Start. If you want to create it, then in the fieldDon't create a Start Menu folderuncheck. If you do not want to create, then check the box. Click Next.

Step 6 . In a new window, you will be asked to make a few more settings to the components that you selected in step 4. Perhaps here you can uncheck the box Reset all settings to their dafaults. Click to continue Next.

Step 7 . Hardware acceleration is configured in the Hardware Acceleration window. Leave everything as default and click on the button Next.

Step 8 In the File associations window (file association) tick all players installed on the computer to be able to associate different files with these players and click Next.

Step 9 . Selecting files associated with the player Media Player Classic . Click on the button Sellect all video and Select all audio . Click Next.

Step 10 . Now we select the associated files for another player, which is called Windows Media Player . Similarly to the previous step, select all video and audio files and click Next . If you have another player installed, then set up an association for it.

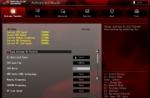
Step 11 . Next, select the number of speakers connected to your computer and click Next.

Step 12 . The next window will display all the information aboutestablishedcomponents. To install codecsK-Lite Codec Pack click Install.

Step 13 Will begin codec installation processto your computer, which will last approximately 10-15 seconds.