Whenever something goes wrong with your computer or laptop, there are a number of troubleshooting tools you can follow to try and fix the problem. Windows 10/8/7 has several built-in commands that can be used to check and repair corrupted system files that cause problems over time when changed. One of the ways to troubleshoot Windows-related problems is System Check and System File Restore. It can help with all types of problems like slow system, blue screen of death, sudden power outages and system crashes.
Let's take a look at how to run the System File Checker tool on Windows using command line CMD and PowerShellcommands such as sfc / scannow and tool DISM. I want to note that for the Anniversary update Update Windows 10, it will be better to use methods with PowerShell.
Checking and restoring system files via CMD
System File Checker scans your computer for any damage or changes to system files that might otherwise prevent your PC from working properly. From there, it replaces the file with the correct version to keep it running smoothly. Using the command line, you can try to scan and repair system files of late operating systems like Windows 10/8/7 / Vista. Let's analyze two commands sfc / scannow and DISM using CMD.
1.
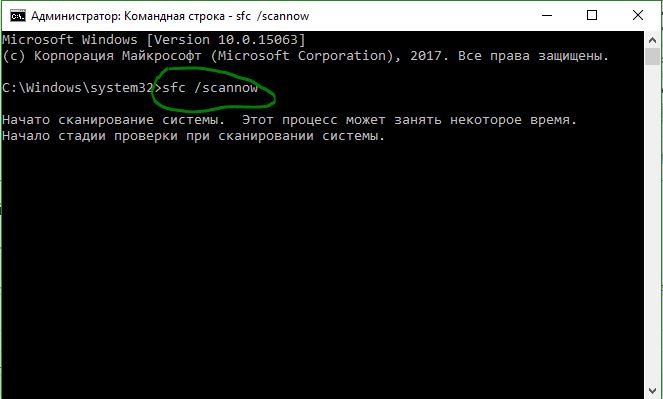
- Run Command Prompt (CMD) as administrator. Click "search" and write simply "cmd" or "command line", then right-click on it and run as an administrator.
- Set command sfc / scannowand wait for the process to finish.
Note:After scanning your system, you will get one of three results:
- There will be no system file errors.
- There will be system file errors and Windows will repair them automatically.
- Windows has encountered errors but is unable to repair some of them.
If you show option 3 that an error was found and the system cannot recover, then repeat the procedure. I advise you to turn off encryption and, if they are available at the time of verification. Nothing succeeded? Moving on below.

2. (DISM)
If the above doesn't work in safe modeThere is one final way to check for corruption in system files and fix them. We use the Deployment Image and Service Management (DISM) tool. The team works with Windows 8 / 8.1 / 10 systems. Open back and use the following command:
The process can take a long time with the percentage scale freezing. When finished, restart your computer and start back sfc / scannow, to make sure there are no errors or the error is gone.

Checking and restoring system files viaPowerShell
We'll be using Windows PowerShell to show you how to use the Servicing and Management Service DISM to scan and fix damaged system files in Windows 10. This method will be more effective for updating Anniversary windows 10 than the command line.
1. Using the System File Checker (SFC) Tool
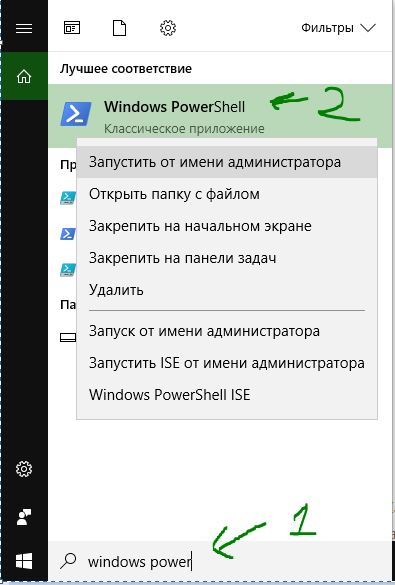
- Run PowerShell as administrator. Click "search" and type windows powershell, then right-click and select as admin.
- Ask in the window PowerShell command sfc / scannow.If the scan finds any problems, Windows will try to fix them. If Windows cannot fix them, it will warn you that further research and action is needed. Move down if errors are found.

2. Using the Deployment Image and Service Management Tool (DISM)
DISM scan detects corrupted system files and Windows will try to fix them and give you a progress report at the end. If Windows cannot find the files it needs to repair corrupted system files, you will also be provided with information on what to do next, with a link to the Microsoft website and troubleshooting options. Run below command in PowerShell window.
DISM / ONLINE / CLEANUP-IMAGE / RESTOREHEALTH
If DISM fixed everything or did not reveal errors, then restart the laptop, computer and run it back to check sfc / scannow.

One of the undoubtedly indispensable tools of the Windows 10 system is diagnosing and troubleshooting your computer. Consisting of several child tools, this application makes it easier to solve problems that arise in the system - from a sound failure to fixing errors in the operation of a network adapter. But how do you use this useful utility to its fullest?
Windows 10 Diagnostic Tools
The Windows 10 Computer Diagnostic Tool consists of 20 tools that identify and fix system problems.
Run Computer Troubleshooter
In the Search line, enter "Troubleshooting" and open the found item.
We need a highlighted item in the results
How errors are corrected
Diagnostics occurs as follows: the launched component checks the state of the system at the moment and compares it to the initial default state. If differences are found, the tool informs the user about it and offers to "roll back" the system to the original settings.
How to work with diagnostic tools in Windows 10
After going to the "Troubleshoot" tool, we see a window in which 4 sections are available to us.
Sections and settings available to the user

Now more about how to work with tools. Let's look at an example of fixing problems with sound.
- We select the item "Play sound" in the troubleshooting window.
Diagnosing Sound Problems
- Be sure to check the box next to "Apply fixes automatically". Click "Next".
- After the system detects problems, you need to apply the proposed settings, if, of course, you want to solve the problem.
All that is required of us is to apply the fix
Sometimes, to apply the settings, administrator rights are required (select the "Run as administrator" item).
Setting up administrator rights
How to remove the memory diagnostic icon from the notification area
Some users don't like the fact that the notification area (the area with small icons in the right corner) is often crowded. Among others, this zone may be occupied by a diagnostic program. How to remove the annoying icon?

Computer diagnostics at startup
Most of you are probably familiar with the blue screen at startup. The text on it begins with the words "There was a problem on your PC ...".
Picture familiar to most
Why does it start
One of the most common reasons for such a failure is incorrect installation of system updates. You may have run out of patience and shut down your computer when it says “Do not turn off. Updates are being installed ”or it was due to a voltage drop. In any case, this inscription is not accidental, and at the moment the system requires updating the update. For those users who are afraid to get into the system on their own - we recommend taking the computer to a service center. But if you want to try to do it with improvised means, we work according to the following instructions.
How to disable
For the next steps, we need to boot through Safe Mode.
- Click on the notification area (lower right corner) and select the "All parameters" tile.
We need a tile "All parameters"
In the window that opens, we need the item "Updates and Security".
Item "Updates and security"
Now select the item "Recovery" and in the "Special boot options" click on "Restart now". We wait.
Select "Special boot options" and reboot
When the computer boots, we get into safe mode. Select "Advanced Options" and here is the "Download Options" tile. As is clear from what is written on the screen, we need to press F4 to boot in safe mode. Click.
Everything is described in sufficient detail on the screen
Now is the moment of truth. If the download went well, then the problem causing the blue screen is in the software. Then here, in safe mode, check the computer device drivers (are there outdated ones) and look at the list of programs - we are interested in suspicious programs, the installation date of which coincides with the date of the appearance of problems in the system.
If the blue screen prevented the boot in safe mode, the system warns us of a serious hardware problem, which must be solved in a service center or by rearranging Windows.
How to run a random access memory (RAM) check
There are several ways to do this:

In both cases, we get to the Windows Memory Checker window. Here we choose the option we need.
Before us are two options for starting diagnostics
RAM check will start after system reboot. You will need to wait for a while, during which the current verification statuses will be displayed on the screen. At the end of the check, the system will be restarted again. The diagnostic result can be viewed by clicking on the "Memory Tester" icon in the notification area in the lower right corner of the screen.
Identifying network and internet problems
Before starting to troubleshoot network problems through system tools, make sure there is no network disruption from your ISP. Try restarting your modem and / or router. If the problem persists, then you should turn to the simplest way to solve network problems.
In the lower right corner, we are looking for the icon of your connection, right-click on it and select "Troubleshooting" from the context menu.
Choose your type of problem
After choosing your type of problem, simply follow the instructions on the screen.
One of the most common causes of network problems is an outdated network device driver. In this case, you need to update it.
- Right click on the Start icon. Choose "Device Manager".
Selecting "Device Manager"
- In this window, open the "Network adapters" item.
You must select the network adapter we are interested in
In the list of available adapters, we are looking for the one that responds to the Internet connection (in the picture this is the second Realtek).
- Sometimes after installing a driver update, the system may ask for a restart. Reboot either immediately or at your convenience.
In the context menu, select "Update driver", and in the window that opens, we agree to automatically search for updated drivers.
Selecting the first menu item
Now follow the instructions on the screen and close the setup wizard when finished.
The problem has been resolved.
Diagnostic wizard problems - won't start or hang
What if you have problems with the Problem Solver? It sounds strange, but it happens more often than you think.
We need to restart one of the system components. Before proceeding with the next steps, make sure that you are running as the system administrator.
- Right button on the Start menu, turn on the Control Panel.

We are looking in the list of .NET Framework 3 versions
- After booting the system, we follow the same path, but now we set the checkbox to the active state. Click OK, reboot again.
Done. You can run the troubleshooter again.
For common situations and system problems, the troubleshooter is the best option. There are many third-party programs and utilities available, but Windows 10 generally handles crashes on its own. Anything that you cannot fix at home becomes a concern. service center... We remind you: if you are not sure that you will master the work with system files and settings, it is better to immediately take the computer to the master. Stable work for you!
If you encounter errors in applications or work operating system (especially in tasks related to writing or reading information on the disk), then there is a high probability that there are various annoying errors on the disk. They can occur due to improper shutdown (system failure or sudden power outage), physical damage to the drive (shock, dropping, vibration, etc.), improper operation, or too long a period of use. In this case, it is recommended to check the disk for errors. Perhaps the check will not fix the problem itself, but it will help you navigate the diagnosis of a malfunction and move in the right direction in attempts to get your computer back into working order
Note: all actions in this manual are performed on behalf of the Administrator. If your account does not have the appropriate rights, you will need a password from the Administrator profile.
How to check disk for errors in Windows 10 via Command Prompt
You need to run the utility chkdsk... She can check the disk for errors and fix them if necessary. The same procedure starts automatically with Windows if the system detects partition problems on its own. You can manually initiate a check if needed.
note: command chkdsk only supports NTFS or FAT32 formatted drives. ReFS does not need to be verified at all, as this file system has its own integrity checking mechanisms.
Pay attention again: If the system is currently using a disk that is being verified, errors cannot be corrected. If so, Windows will prompt you to schedule an automatic fix after the next reboot.
If Windows has encountered errors but cannot fix them in any way, try using the check disk offline command. In this case, the system disables other programs from accessing the disk and tries to fix it. After completing the procedure, the disk will be activated again and applications will be able to read and write information to it. For offline check on the command line, you need to use the command chkdsk X: / f / OfflineScanAndFix... In this case X: is the drive to be checked.
To display additional arguments for chkdsk (additional actions), enter chkdsk /? ... Command Prompt will display a list of available commands.
How to diagnose a disk in Windows 10
Another option is to use the storage diagnostic utility. In the command line launched as Administrator, enter the following command:
stordiag.exe -collectEtw -checkfsconsistency -out X: \\ XXXX.
Instead X: \\ XXXX enter the location where the system will save the scan results. Please note that after this command, Windows will check all connected drives, so the process may take a little longer. Just be patient and wait for the message about successful completion diagnostics of drives.
It must be said that this method only collects information about the state and is unlikely to help the average user fix disk problems. However, for a specialist, the information collected can provide a lot of useful information. Diagnostic utility collects information about the results of the check chkdsk and any errors encountered, registry files associated with drives, and the Windows Event Viewer log.
How to check hard drive errors via PowerShell
The more modern PowerShell utility uses a separate command to run a disk error check.

When checking the disk for errors, you may find it useful to use a command that will disable communication between the drive and applications ("offline" mode), which will prevent programs from writing information to it. The team is responsible for this procedure. Repair-Volume -DriveLetter C -OfflineScanAndFix... Again, instead of FROM you must supply the letter of the drive you need.
Checking disk for errors in Windows 10 through Explorer
If Command Prompt and PowerShell are not for you, you can use more in a simple way check the disk for errors. IN windows explorer all the necessary mechanisms are already built in with a friendly user interface.

How to check a disk for errors through the Control Panel
For a long time, the classic Windows Control Panel will contain options and tools that are not available in the more modern Settings application. Checking the status of the disk is one of those.

If, after checking and correcting errors, you further observe malfunctions in the operation of your computer, then it makes sense to think about troubleshooting in another place, or try to replace the media with another.
Often, a computer user is faced with the fact that his PC starts to work slowly. It starts to "slow down" the launch and operation of some programs, although the window with the message and error code on the monitor did not pop up. It requires checking Windows 10 for errors. Do not immediately "demolish" and reinstall the operating system. After all, the reason may lie in the change or damage to system files.
This can often be due to the influence of viruses and other malware, improper shutdown of the computer after work, and other problems. It should be borne in mind that not all errors can be displayed on the screen, they accumulate imperceptibly, interfering with the work of the PC. In order to identify and eliminate them, it is required to periodically carry out a full-fledged check of Windows 10 for errors. You also need to analyze the integrity of the system, registry, video card, hard disk and other vital elements of the computer.
Checking your hard drive for Windows 10 errors
The hard drive and its bad sectors in Windows 10 can mainly be checked in the explorer interface and through the command line. Moreover, the installation of any programs during this process is not required.
- Through "Conductor"... This check is basic and is performed by Windows 10 in automatic mode. Since it takes about 60 minutes, it is better to run disk defragmentation at night, as it checks all disks. IN "Explorer" (right mouse button) open it on one of the disks "Properties", then - transition to "Service" with pushing "Optimize".
- Using the command line. Using this method, you cannot restore the order on the hard disk, as with defragmentation, but you can quickly recover data from bad sectors. To do this, the Command Prompt (Administrator) opens and the chkdsk C: / F / R command is entered into it (F - automatic fixing of found problems, R - data recovery attempt).

After checking the C drive, you need to check all other drives for errors, replacing only the designation letter.
Checking RAM for Windows 10 errors
You can diagnose memory errors using the built-in Windows utility. To launch it, you need to take the following steps:

After the end of the check, the PC will restart and the monitor after logging in will display information on checking the memory on windows errors 10. To see the results (MemoryDiagnostics-Results) need to enter « Windows logs"-" System ".
Check Windows 10 registry for errors
If the error in the registry is not eliminated in time, the consequences of its "life" in it may turn into a blue screen of death for the computer, or even start the system completely. Verify windows registry 10 for errors can be done through:
- Through the built-in utility in Windows 10, but it is more suitable for detecting critical errors in the registry. Launch Command Line (Admin) - entering the scanreg / fix command - Enter.
- Through the CCleaner computer cleaning program. After starting the utility, you need to make a transition in it to the "Registry" section, then - "Search for problems" and after checking, click on "Fix the selected ...". To troubleshoot problems with the registry, use the "Fix Marked".

Checking ssd drive for Windows 10 errors
An SSD disk can be checked for errors using the functionality of some appropriate programs that will conduct a full test. Among them it is worth paying attention to:
- You need to download, install and run it. It will scan the hard drive and give you the test result. In the main menu, you need to use the tab "Service".
- This free utility will identify all problems, because it is specially designed to analyze the health of an SSD drive.

In addition to these programs, you can also use SSD Life, DiskCheckup and HDDScan.
Check Windows 10 system and system files for errors
Windows 10 system files are checked for errors using SFC.exe and DISM.exe. Let's consider both options.
- SFC.exe. To run the command, you need to enter Command line on behalf of Administrator and enter sfc / scannow - Enter. Next, an appropriate check will occur, during which errors in system files will be automatically corrected. If you want to analyze a specific system file, use the sfc / scanfile \u003d ”file_path command.
- DISM.exe. Through Command Line (Admin) you need to run in turn the following commands dism / Online / Cleanup-Image / CheckHealth, dism / Online / Cleanup-Image / ScanHealth, dism / Online / Cleanup-Image / RestoreHealth, each of which takes a certain period of time when checking and troubleshooting system files.

Checking the video card for Windows 10 errors
To check the video card for Windows 10 errors, it is recommended to take these steps.
- Press Win + R - enter command dxdiag - Enter.
- The monitor will pop up "DirectX Diagnostic Tool" (there will be an offer to check the drivers), click on "Yes" and then click on "Screen".
- If you see in the window "Note" the list of identified errors, then they need to be eliminated and then the video card will have high performance. It should be borne in mind that this field should not contain a list of errors, because otherwise these problems "slow down" the functionality of the video card.
You also need to know that this video card test was performed without load. Therefore, you need to do an additional check of the computer element, but with a load.
To do this, you can use the benchmark for the graphics card FurMark... It is completely free and very easy to download from the developer's official website. All procedures for checking the video card are carried out after visual inspection for external damage.
The performance of the Windows 10 operating system depends on many factors and reasons. To avoid many problems in it, which lead to disastrous results, you always need to carry out a full diagnosis on time.
With the help of many both built-in and downloaded utilities (besides, they are completely free), it is possible to identify and also eliminate serious errors in systems at an early stage. This can be done completely independently, without resorting to the services of an expensive specialist from a computer service.
If you are tired of constant crashes from the system, errors and other "troubles" with the computer in the process of work, then it is necessary to diagnose its elements more often to identify very serious problems.
After all, some of them in work may be completely invisible, but layering one on top of the other, these errors can cause great harm to your computer or laptop.
Just like hardware, software also falls into disrepair, since it is exposed to significant loads from the user. Therefore, the integrity check of system files in Windows 10 should be performed periodically, and, if necessary, damaged areas are restored.
Check
The OS has a built-in utility that detects damaged files and replaces them with workable versions.
Good to know! The original OS files are stored on the system drive in the folder Windows \\ WinSxS.
Possible problems
OS recovery using sfc / scannow will fail if the source repository itself has been damaged. In this case, you must first restore the original image using the utility Deployment Image & Servicing Management (DSIM)... It is designed to work with Windows images.

Good to know! DISM uses Update Center when restoring the repository.
Recovery
After running the utility DISM and restore the sources, run the command again in the command line sfc / scannow... This will completely restore the integrity of the system. Restart your computer for further work. If for some reason the fix failed and you are using a radical method of reinstalling the OS, read how to create a bootable USB flash drive in the article "".
Conclusion
The integrity of Windows 10 files is compromised after improper work with them, frequent reinstallation of programs, or overwriting of information. Use the built-in utility to restore sfc / scannowwhich will do everything automatically using the original file storage. If the original image is damaged, restore it using Deployment Image & Servicing Management.