The son asks the programmer father:
- Dad, why does the sun rise in the east?
- Have you checked it?
- Yes.
- Works?
- Yes.
- Does it work every day?
- Yes.
- Then sonny, for God's sake, don't touch anything, don't change anything!
Of course, it was thought that the problem was in the River. Errors like "WARNING: Failed to associate with" endlessly appeared in it, even without Pixiewps, he stopped picking up anything for me. But if you look closely at the work of other programs, for example, Wifite, then there is the same problem - the attack on WPS does not work. Penetrator-WPS doesn't work either.
The answer was suggested by one of the site visitors with the name Vladimir... Here is his message:
“I noticed a problem that airmon does not always switch the card to monitor mode (the name of the card changed to wlan0mon, but the mode remained managed), this time the penetrator was also unable to switch the card to monitor. As a result, the card was manually switched to monitor mode via iwconfig wlan0 mode monitor. After that, penetrator -i wlan0 -A started working "
Vladimir, thank you so much for guiding you to the right decision!
Error for wireless request "Set Mode" (8B06): SET failed on device wlan0; Device or resource busy.
In my case (I think for others who have a similar situation with River), it turned out that the card simply did not switch to monitor mode.
This can be done, as Vladimir pointed out, with the following command:
Iwconfig wlan0 mode monitor
True, the command gave me the following error:
Error for wireless request "Set Mode" (8B06): SET failed on device wlan0; Device or resource busy.
The following sequence of commands allowed me to overcome this error and switch the card to monitor mode:
Ifconfig wlan0 down iwconfig wlan0 mode monitor ifconfig wlan0 up
As a result, the card was switched to monitor mode and programs using this mode started working properly.
Today's article is a great example of how our own knowledge grows when we share it with others.
See the updated instruction "" which has been prepared to replace this instruction.
Putting a wireless card into monitor (control) mode is the very first thing to do before starting wireless penetration testing. If this is not done, then no program will work correctly! Therefore, if something was done wrong, or something went wrong at this stage, then all other actions described in the instructions are meaningless.
This is such a basic and necessary operation that some instructions simply skip this step. And some people mention it very briefly, so if you have some kind of mistake when putting the wireless card into control mode, then it is quite difficult for beginners to figure out why nothing works for them.
How to determine which mode a wireless card is in
To control the process, let's first learn how to determine which mode the wireless card is in. This can be done with the command:
Iwconfig
[email protected]: ~ # iwconfig eth0 no wireless extensions. wlan0 IEEE 802.11abgn ESSID: off / any Mode: Managed Access Point: Not-Associated Tx-Power \u003d 15 dBm Retry short limit: 7 RTS thr: off Fragment thr: off Encryption key: off Power Management: off lo no wireless extensions.
In my case, two interfaces (eth0 and lo) do not have wireless extensions (no wireless extensions.), They are not of interest to us and we will not return to them. We are interested in wlan0... Of all the information given, at present, the important line for us is Mode: Managed... This means that the wireless card is in a managed mode.
What are the modes of wireless cards
Before moving on to changing the mode of the wireless card, let's figure out what they are and what, in fact, we are not satisfied with the controlled mode.
The device operating mode setting depends on the network topology and the purpose of use. The mode can be:
- Ad-hoc (the network consists of only one cell without an Access Point),
- Managed - Managed (the node connects to a network consisting of many Access Points, there is roaming)
- Master - Master (the node is the master of synchronization or works as an Access Point),
- Repeater - Repeater (a node forwards packets between other wireless nodes)
- Secondary - Secondary (the node acts as a backup master / repeater),
- Monitor - Monitoring (the node is connected to all cells and passively monitors all packets on the frequency)
- Auto - Automatic.
Already from this brief description it becomes clear that the mode of interest to us is the monitor (control) mode.
Switching the wireless card to monitor mode with the iwconfig command
The most popular translation method is using the airmon-ng program. But lately there have been reports of related errors. The airmon-ng command not only puts it in control mode, but also changes the interface name. So, often airmon-ng changes the name and does NOT switch to monitor mode. The unfamiliarity of the situation can confuse even the seasoned.
Therefore, I will start with an alternative method of transferring to control mode, since there is no difficulty in this. You need to type the following sequence of commands:
Ifconfig wlan0 down iwconfig wlan0 mode monitor ifconfig wlan0 up
Or in one line
Ifconfig wlan0 down && iwconfig wlan0 mode monitor && ifconfig wlan0 up
Note that in each of these commands you may need to replace wlan0 with the name of your wireless interface. This name can be found with the same command iwconfigdialed without options. This also applies to subsequent commands - replace the interface name with your own if you have a different name.
We check:

Line Mode: Monitor tells us that everything worked out.
The channel can be set as follows:
Iwconfig wlan0 channel 3
But, firstly, some modes ignore this setting, and secondly, it is not often needed.
It is easier to set the channel directly in the used program:
Airodump-ng wlan0 --channel 3
How to return a wireless card to Managed mode
Returning to controlled mode is done like this:
Ifconfig wlan0 down iwconfig wlan0 mode managed ifconfig wlan0 up
If you used a method to switch to control mode that changed the interface name (for example, to wlan0mon), then in all commands you need to replace wlan0 to the new interface name.
How to put the wireless card into monitor mode with the airmon-ng command
By the way, you can read about the airmon-ng command in the Kali Linux Encyclopedia at this link (in Russian): http://kali.tools/?p\u003d406
We look at the available network interfaces:
[email protected]: ~ # airmon-ng PHY Interface Driver Chipset phy0 wlan0 iwlwifi Intel Corporation Centrino Advanced-N 6235 (rev 24)
To switch to observation mode, use the command:
Airmon-ng start wlan0
Again, if you have a different interface name (and not wlan0), then change the name in the above command to it.
The help tells us two commands (you can see the details at the above link to the Encyclopedia):
Airmon-ng check airmon-ng check kill
But personally, these commands do not help me.
Canceling monitor mode is done like this:
Airmon-ng stop wlan0mon
If your card does not support switching to monitor (surveillance) mode, this means that you need a new Wi-Fi card. For help in choosing, refer to the article "".
Updated on 02.19.2016 By
There is already an instruction "". It hasn't stopped working, but the programs ifconfig and iwconfig used in it are marked as obsolete. For this reason, they are not installed by default and you need to be prepared for them to disappear from the repositories.
Therefore, this updated instruction is offered to your attention. In it, we will not use outdated commands, but will use the new ones that have replaced them.
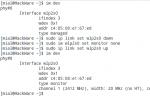
So, you need to start by finding out the name of the interface. Previously, we used the iwconfig command without options for this, now we need to do this:
$ iw dev phy # 0 Interface wlp2s0 ifindex 3 wdev 0x1 addr c4: 85: 08: e1: 67: ed type managed $
We are interested in the string Interface wlp2s0 (i.e. interface name wlp2s0). In order not to get up twice, let's also look at the line type managed... Those. the interface is in managed mode.
We need to put it into monitor mode. You can do it like this (of course, replace wlp2s0 with the name of your wireless interface - it's not for nothing that we recognized it). Refer to the article on to find analogues of the ifconfig command. find an alternative for iwconfig.
In total, we get this:
Sudo ip link set wlp2s0 down sudo iw wlp2s0 set monitor control sudo ip link set wlp2s0 up
Delakam check:
$ iw dev phy # 0 Interface wlp2s0 ifindex 3 wdev 0x1 addr c4: 85: 08: e1: 67: ed type monitor channel 1 (2412 MHz), width: 20 MHz (no HT), center1: 2412 MHz $
Fine! Line type monitor tells us that everything worked out.

Change channels like this:
Sudo iw wlp2s0 set channel<номер желаемого канала>
For example, go to the sixth channel:
Sudo iw wlp2s0 set channel 6
As you can see, everything worked again:

Let's write the received commands in one line:
Sudo ip link set wlp2s0 down && sudo iw wlp2s0 set monitor control && sudo ip link set wlp2s0 up
The next big command has to figure out the name of the wireless interface and put it into monitor mode:
T \u003d `iw dev | grep "Interface" | sed "s / Interface //" `; sudo ip link set $ t down && sudo iw $ t set monitor control && sudo ip link set $ t up
By the way, let's get back to the command:
Sudo iw wlp2s0 set monitor control
The very last word - noneIs a flag, there are the following flags:
A set of monitor flags. Valid flags: none: no special flag fcsfail: show frames with FCS errors control: show control frames otherbss: show frames from other BSS cook: use cooked mode active: use active mode (incoming unicast ACK packets)
As you have already noticed, we need a flag flag control.
Under certain conditions, NetworkManager may prevent the Wi-Fi adapter from switching to monitor mode. Moreover, it can return a wireless card already switched to monitor mode to a controlled mode. Therefore, it is recommended to disable NetworkManager when testing for wireless penetration.
BlackArch and Kali Linux do it like this.
To hack a Wi-Fi network, you need a wireless adapter that supports monitoring mode and packet injection. Not all wireless adapters are able to do this. You can quickly test the capabilities of the one you already own, or make sure the adapter you are about to purchase uses a chipset suitable for Wi-Fi hacking.
Wireless adapters that support monitor mode and packet injection allow a white hat hacker to eavesdrop on Wi-Fi connections and even inject malicious packets into the network. The wireless cards that are used in most laptops are not very good at doing anything other than the standard task of establishing a basic Wi-Fi connection.
While some built-in Wi-Fi cards offer some support for monitoring mode, most often such cards are not supported by the tools included in the Kali Linux distribution. We found that the card in a Lenovo laptop supports both modes, so sometimes you can save money by using the laptop's internal card when the situation allows. If the internal card does not support these modes, then an external one is required.
External network adapters average between $ 15 and $ 40 per card. It may not seem like a lot, but making a mistake when buying a network adapter increases your costs, which is very discouraging and demoralizing, especially if this is your first time dealing with Wi-Fi security issues.
These devices seem complicated at first glance, but in reality they are quite simple. Each wireless adapter has a chip inside, with its own central processing unit. This chip, along with other circuitry in the adapter, converts signals from your computer into radio pulses, so-called "packets," that transmit information between devices. In order to choose the right Wi-Fi adapter, you need to know a few things, in particular - which chipset is inside, which antenna is used and the types of Wi-Fi supported by the card.
Option 1: Check the adapter chipset before purchasing
If you haven't bought the adapter you were planning yet, there are several ways you can check if it supports monitoring and batch injection mode. However, before we dive into this, you need to know the difference between manufacturers so you don't get confused.
Card Merchant Identification
The seller, you guessed it, is the manufacturer that sells the network adapters. For example, TP-link, Panda Wireless or Alfa. These manufacturers are responsible for the chip topology and adapter design, but they do not manufacture the processor that these adapters use.
Chip manufacturer identification
The second manufacturer is the one who produces the chip on which the adapter operates. The chip controls the behavior of the card, so it is much more important to determine the chipset manufacturer than the adapter manufacturer. For example, Panda Wireless cards often use Ralink chipsets, and this is, in our opinion, the most important information.
Chipset definition
Some chipsets are known to work out of the box without any prior configuration required to get started, which means that an adapter that uses an OS supported chipset is a very good choice.
When you start looking for information on which adapters use certain chipsets before purchasing, the best place to start is by looking at the Aircrack-ng compatibility pages. The old version still contains a lot of useful information about the chipsets that will work with Aircrack-ng and other Wi-Fi hacking tools.
The newer version of the Aircrack-ng manual also contains many helpful explanations on how to check the compatibility of new maps, although it does not have the visual compatibility table that is on the legacy page.
In addition to the Aircrack-ng website, you can view information about the adapters you are interested in on resources like WikiDevi, which will give you the information you need about most wireless network adapters. Another good source of information is the list of officially supported Linux drivers, which has a handy table showing which adapter models support monitor mode.
Atheros chipsets are particularly popular, so if you suspect your device is powered by an Atheros chipset, it makes sense to check out the Atheros chipset manual.
If you don't know which chipset your card uses, you can find the FCC ID number on the sticker on your adapter. This number can then be entered on websites like FCCID.io that contain pictures of the chipsets in use.
Once you have identified the chipset of the device you want to buy, you can predict its behavior. If the chipset of the W-Fi adapter supports monitoring mode, then everything is fine.
What you should pay attention to
To make things easier for you, we offer a selection of chipsets that, according to our tests, support monitoring and batch injection modes:
- Atheros AR9271... The Alfa AWUS036NHA is our favorite long-range AC adapter and the standard by which we rate other adapters of this type. It is a stable, fast and well supported b / g / n wireless adapter. There's also the TP-Link TL-WN722N, a favorite of both novice and experienced hackers. It is one of the cheapest and smallest b / g / n adapters and offers impressive performance. However, only version 1 (v1) will work with Kali Linux as v2 uses a different chipset.
- Ralink RT3070... This chipset is used in a number of popular Wi-Fi adapters. In particular, Alfa AWUS036NH is an adapter for b / g / n networks with some ridiculous range of coverage. However, it can be amplified by an omnidirectional antenna, and can also be connected to a Yagi or Paddle antenna to create a directional array. If you are looking for a more compact wireless adapter that can be plugged in via USB, the Alfa AWUS036NEH is a powerful b / g / n adapter that is slim and does not require a USB cable. It has the added benefit of being able to replace antennas. If you need an inconspicuous option that will not arouse suspicion, then you can look towards the g / n adapter Panda PAU05. Despite its small size, this low profile adapter offers high performance at close to medium range and a reduced range for those tasks where you need to collect network data without connecting many different devices.
- Ralink RT3572... While the previous adapters were only 2.4 GHz, the AWUS051NH is a dual channel adapter that is also compatible with 5 GHz networks. Its low cost, dual-band capability and compatibility with 802.11n version 3.0 and 802.11 a / b / g wireless standards make it one of the best options for advanced use.
- Realtek 8187L (Wireless G adapters). The Alfa AWUS036H USB 2.4GHz adapters use this old chipset, which is not as useful as the previous ones as it doesn't handle enough networks. These adapters still work, but only for some networks. They are great for beginners because there are a lot of them and they are quite cheap.
- Realtek RTL8812AU... Alfa AWUS036ACH, first supported by Kali in 2017. It is a monster with two 802.11ac antennas, compatible with a / b / g / n networks and 300 Mbps at 2.4 GHz and 867 Mbps at 5 GHz. This is the newest Kali compatible offering, so if you are looking for the longest and fastest adapter this is the first choice. To use it, you may need to run "apt update" first and then "apt install realtek-rtl88xxau-dkms", which will install the necessary drivers to enable batch injection.
Aircrack-ng also lists several best-in-class cards on their website, so if you're interested in additional suggestions, check them out (some of the above are also on this list). Also check out the results of our Kali Linux compatible wireless network adapter test.
What else to look for when choosing an adapter
Besides the chipset, another important selection criterion is the frequency at which the adapter operates. Although most Wi-Fi devices, including IoT ("Internet of Things") devices, operate in the old 2.4 GHz band, many newer devices offer 5 GHz networks. These networks are generally faster and can transfer more data, but they are usually associated with 2.4GHz networks. The question arises: is it worth investing extra money in a 2.4 / 5 GHz antenna that can work (and attack) on both networks?
In most cases, a 2.4 GHz adapter will suffice, unless the purpose of the attack is to explore all available networks in the area. If 5GHz support is important to you, there are many 5GHz Wi-Fi cards that support monitoring and batch injection mode, such as the Panda Wireless Pau09.
Another important factor is determining whether to install a dedicated antenna. Generally, most omnidirectional antennas will work very well for a beginner, but you can put up a directional antenna to focus on a specific network or area rather than scanning around. If so, look for antenna adapters that can replace other antenna types.
Option 2. Test your existing Wi-Fi adapter
If you already have a wireless network adapter, then you can easily check if its chipset supports monitoring and packet injection mode. First, plug in your network adapter and open a terminal. You can determine the chipset of your network adapter by simply typing the lsusb -vv command in the terminal and looking at what it has output, for example, as in the screenshot below.
Lsusb -vv Bus 001 Device 002: ID 148f: 5372 Ralink Technology, Corp. RT5372 Wireless Adapter Device Descriptor: bLength 18 bDescriptorType 1 bcdUSB 2.00 bDeviceClass 0 (Defined at Interface level) bDeviceSubClass 0 bDeviceProtocol 0 bMaxPacketSize0 64 idVendor 0x148f Ralink Technology, Corp. idProduct 0x5372 RT5372 Wireless Adapter bcdDevice 1.01 iManufacturer 1 Ralink iProduct 2 802.11 n WLAN iSerial 3 (error) bNumConfigurations 1
In our example, we are looking at the Panda Wireless PAU06 network adapter, which reports the presence of the Ralink RT5372 chipset. In the lists above, it is listed as supporting these modes! Once you determine your card's chipset, you have a rough idea of \u200b\u200bwhat it can do.
Testing the capabilities of your adapter
Now let's move on to more active testing of the adapter's capabilities.
Step 1. Put the card into monitoring mode
In this step we will use Airmon-ng, but before that we need to find the interface name. Run the command ifconfig (or ip a) on your system to see a list of all connected devices. On Kali Linux, your card should be listed as something like wlan0 or wlan1.
Ifconfig eth0: flags \u003d 4163
Once you know the name of the network interface, you can try to put it into monitor mode by typing airmon-ng start wlan0 (assuming your interface name is wlan0). If you see the same picture as in the screenshot below, it means that your card supports wireless monitoring mode.
Airmon-ng start wlan0 Found 3 processes that could cause trouble. If airodump-ng, aireplay-ng or airtun-ng stops working after a short period of time, you may want to run "airmon-ng check kill" PID Name 428 NetworkManager 522 dhclient 718 wpa_supplicant PHY Interface Driver Chipset phy1 wlan0 rt2800usb Ralink Technology , Corp. RT5372 (mac80211 monitor mode vif enabled for wlan0 on wlan0mon) (mac80211 station mode vif disabled for wlan0)
You can confirm the results of changing the adapter operating mode by typing iwconfig at the console. And you will see that the name of the map has changed - the suffix "mon" has been added at the end of the name. The output of this command should also inform you about this in the "Mode: Monitor" field, provided that the card has been successfully switched to monitor mode.
Iwconfig wlan0mon IEEE 802.11 Mode: Monitor Frequency: 2.457 GHz Tx-Power \u003d 20 dBm Retry short long limit: 2 RTS thr: off Fragment thr: off Power Management: off
Step 2. Test the Batch Injection Card
Testing the ability to use batch injections is fairly straightforward thanks to the tools included with Airplay-ng. After putting your card into monitor mode, as indicated in the previous step, you can run a test and see if your Wi-Fi adapter is capable of injecting packets into nearby wireless networks.
Make sure you are in close proximity to multiple Wi-Fi networks for the adapter to have a chance of success. Then, to run the batch injection test, in a terminal, enter the command aireplay-ng —test wlan0mon.
Aireplay-ng --test wlan0mon 12:47:05 Waiting for beacon frame (BSSID: AA: BB: CC: DD: EE) on channel 7 12:47:05 Trying broadcast probe requests ... 12:47:06 Injection is working! 12:47:07 Found 1 AP 12:47:07 Trying directed probe requests ... 12:47:07 AA: BB: CC: DD: EE - channel: 7 - "Dobis" 12:47:08 Ping (min / avg / max): 0.891ms / 15.899ms / 32.832ms Power: -21.72 12:47:08 29/30: 96%
If you get the same result as in the screenshot above, then congratulations, your network card is successfully injecting packets into nearby networks. If you get a result similar to the one in the screenshot below, then, alas, your card does not support batch injection.
Aireplay-ng --test wlan0mon 21:47:18 Waiting for beacon frame (BSSID: AA: BB: CC: DD: EE) on channel 6 21:47:18 Trying broadcast probe requests ... 21:47:20 No Answer ... 21:47:20 Found 1 AP 21:47:20 Trying directed probe requests ... 21:47:20 74: 85: 2A: 97: 5B: 08 - channel: 6 - "Dobis" 21: 47:26 0/30: 0%
Attack test to make sure everything works
Finally, we can put the above two steps into practice and try to get a WPA handshake with Besside-ng, a versatile and extremely useful WPA cracking tool, which is also a great way to test, assuming your card is capable of attacking WPA networks.
First, make sure you have a nearby network and permission to launch attacks. By default, Besside-ng will attack everything within the range of the Wi-Fi adapter, and its attacks are very noisy. Besside-ng is designed to scan networks for connected devices. It then attacks the detected connection by injecting deauthentication packets, which causes the device to be instantly disconnected from the network. When the owner of his device reconnects, the hacker can use the information exchanged between the devices to brute force the user's password.
Enter the command besside-ng -R ‘Target Network’ wlan0mon, after replacing the information in the -R field with the name of your test network. He will start trying to get a handshake from the victim's network. For this attack to work, a device must be connected to this network (which you are attacking). If there is no device on the network, then this means that there is no one who could be disconnected from this network, so you will not be able to intercept the handshake.
Besside-ng -R "Target Network" wlan0mon Let "s ride Resuming from besside.log Appending to wpa.cap Appending to wep.cap Logging to besside.log
If you get an output like the screenshot below, then congratulations! Your card is capable of capturing handshakes from WPA / WPA2 networks. You can also check out our tutorial on Besside-ng to learn more about what its attacks are capable of.
Besside-ng wlan0mon Let "s ride Resuming from besside.log Appending to wpa.cap Appending to wep.cap Logging to besside.log TO-OWN OWNED Crappy connection - Sonos unreachable got 0/10 (100% loss) [-74 dbm ] Got necessary WPA handshake info for DirtyLittleBirdyFeet Run aircrack on wpa.cap for WPA key Pwned network DirtyLittleBirdyFeet in 0:04 mins: sec TO-OWN OWNED
Flexible network adapter - key to Wi-Fi hacking
A powerful Wi-Fi adapter with the ability to use packet injection and listen to conversations around it on Wi-Fi gives any hacker control over radio waves. Choosing the right adapter is a painstaking task, but if you carefully check the chipset on which it works, then you will make the right purchase. If you already have an adapter, then before using it in the field for something important, we recommend testing it according to the methods described above.
We hope you enjoyed this guide to testing wireless network adapters for packet injection and wireless monitoring modes. If you have any questions about adapter compatibility with Kali Linux or comments, do not hesitate - write.
Denial of responsibility: This article is written for educational purposes only. The author or publisher did not publish this article for malicious purposes. If readers would like to use the information for personal gain, then the author and the publisher are not responsible for any harm or damage caused.