There are now over a billion computers in the world. Each computer runs on a specific OS, be it a system Linux or system Windows... Many system administrators and advanced users are faced with replacing the OS with a large number of computers... Therefore, each sysadmin has at hand several disks and bootable flash drives with different operating systems.
In this article, we will try to make life easier for a sysadmin or an experienced user. We will describe the installation process multiple OS images on one bootable USB flash drive... That is, after reading the article, you will be able to do bootable USB drive with various operating systems.
The first way to create a multiboot drive
For the first method, we need two utilities RMPrepUSB and Easy2Boot... You can find them on their official websites www.rmprepusb.com and www.easy2boot.com. Install the utility immediately after downloading RMPrepUSB... To do this, run the installer.

Now click the main Install button, after which the program will be installed and immediately notify about it in the final installation window.
Close the installer window and paste USB stick... Then run the utility from the shortcut on your Desktop.
Before creating a bootable USB flash drive, we need system images for example iso Window 7, Windows 10 and Windows XP... You can make them from licensed disks using utilities Alcohol 120% or CloneCD... If the iso images are ready, you can immediately proceed with the direct preparation of the multiboot drive. To do this, mark all the radio buttons as shown in the figure and specify the path to the archive with Easy2Boot.

Having put all the switches correctly, feel free to press the button Prepare disk... The process of writing the required data to the drive should begin.

Now let's go to the USB drive in the "_ISO \ WINDOWS" folder and write the iso images of our systems to the appropriate folders:
- Windows XP in "_ISO \ WINDOWS \ XP";
- Window 10 in "_ISO \ WINDOWS \ WIN10";
- Window 7 in "_ISO \ WINDOWS \ WIN7".
After the images are written to USB stick, you need to do the last operation by pressing the key combination Ctrl + F2. In a couple of minutes, your multiboot drive will be ready. You can check its performance in the built-in emulator RMPrepUSB... Press F11 to run it. After pressing the button, the emulator will start loading with your drive and after a few minutes you will see the bootloader menu.

As you can see from the example, this method of creating a multiboot USB drive can seem a little tricky. But if you follow the instructions, then after a few tests of this method it will be very simple for you, like any other. In addition, with its help you can make a boot menu with different pictures. For example, as in the picture below.

You can also find ready-made pictures on the website www.rmprepusb.com.
The second way to create a multiboot drive
For this method, we need a utility WinSetupFromUSB... You can download it from the official website www.winsetupfromusb.com. The utility is distributed as a self-extracting archive. Therefore, it is enough to download and unpack it to a place convenient for you. If you compare this method with the previous example, then this one will turn out to be much easier and especially suitable for beginners... Before creating, also prepare two images of Window 7 and Ubuntu 14. Install a formatted USB flash drive into your computer and run the utility.
Now select the iso images of the OS as shown in the image below.

At this point, all the settings for creating a bootable drive are ready and you can press the GO button, after which the multiboot USB drive will start recording.
If you want the created multiboot USB flash drive to boot into the virtual machine, then before pressing the GO button, check the “ Test in QEMU».
The example shows that any user can handle this application. But in WinSetupFromUSB there are also options for advanced users. To use them, check the box “ Advanced options».
If you want to write another similar operating system to the medium, for example, Windows 7, then do the same with the image Windows 7 in the considered example on the same flash drive. By following these steps when booting from a drive, you will receive two versions of the system Windows 7.
An example of starting a multiboot flash drive in a laptop
For example, we will use the newly created disk using the utility WinSetupFromUSB and laptop Lenovo IdeaPad Z570... In order for our laptop to see the bootable USB flash drive, we need to boot from it. To do this, before booting the laptop, press the F11 key, which will launch the bootable media selection utility.

Select our media and press Enter. This will launch our drive's menu.

For example, let's choose for installation Ubuntu 14 and press Enter. The installation process will begin Ubuntu 14.

The installation process of the seven is similar Ubuntu 14.
As you can see, launching the media on a laptop is quite simple and even a novice user can handle it. The drive startup process may differ slightly on other laptops and desktops. You can find out how to load the bootable media selection menu in the manual that came with your laptop or motherboard.
Summarize
In our material, we examined the most popular utilities for creating multiboot drives. In addition to the two programs RMPrepUSB and WinSetupFromUSB, there are other utilities such as:
- SARDU;
- YUMI;
- XBoot.
Each of these utilities has both pros and cons. These utilities are not as popular as RMPrepUSB and WinSetupFromUSB, so we did not include them in the review. If you have a desire, then you can always familiarize yourself with them on your own, since there are a lot of materials on the network with reviews of these programs. Another advantage of these utilities is the ability to install images bootable antivirus or program images backup... Therefore, using a multiboot flash drive, you can always scan your hard disk for viruses and make backups before installing the OS.
I would also like to note that we have described only part of the functionality. RMPrepUSB and WinSetupFromUSB... Therefore, if you have a desire to join the advanced skills in the functionality of these utilities, we recommend that you visit their official sites. Here you will find all the necessary manual that will help you create a multiboot flash drive that meets your requirements.
We hope this article helped resolve the issues that have arisen.
Related Videos
Hello everyone!
Reinstalling Windows is one of the most pressing problems for many PC users today.
The reason for the reinstallation may be an action, an accidentally deleted system partition, etc.
In the absence of a floppy drive to install Windows, you will need a bootable USB flash drive.
Let's talk about this. Today I will tell you how to create a bootable USB flash drive using two programs that, in my opinion, are the most convenient.
But, perhaps, you will also be interested in these articles:
In order to create a bootable flash drive, you need to take a drive of at least 4 Gigabytes for Windows and at least 1 Gigabyte for Windows XP. If you want to save an OS image containing a set of certain programs, then it is better to take a USB flash drive with 8 GB or more.
You will also need an ISO image of the operating system, which you can download on the web, and a specialized program for creating bootable media.
WinSetupFromUSB 1.4.
First thing you need to do is download this application. To do this, go to the official Internet resource of the developers http://www.winsetupfromusb.com/downloads/.
It will be saved on your computer as an archive,. If you plan to create 32-bit Windows, then select WinSetupFromUSB_1-4.exe, and if 64-bit - WinSetupFromUSB_1-4_x64.exe.
Launch the application, choose your flash drive. Then check the box next to "Auto format it with FBinst" and note that you need a file system called "NTFS".
Remember! The described method consists of such steps - formatting, selecting and burning an ISO image. You can also just put the birds in all the right places, select the image at once and click on "Go".

After you click on "Go", a dialog box will appear in front of you, in which you need to select "Yes". A message will appear on the screen that you need to format the flash drive and all data will be lost. Don't worry, you took a USB flash drive without information?
The formatting process takes a few seconds. After that, the program will inform you that the work is completed. Click on "Ok" and go to the next step.
After formatting the flash drive, the application will immediately start recording Windows. Since we are going to install the seventh version of Windows, you should select the appropriate field. The same is true when working with Windows XP. Place the bird, click on the button with the ellipsis to.

After the name of the image appears in the field, select "Go". The program will begin the process of creating a bootable flash.
Creating a USB flash drive for installing Windows takes 3-5 minutes. When everything is ready, at the bottom of the window you will see a message, click "Done" and you will see a window with the same confirmation. Click "Ok".
All is ready! If this method does not suit you for something, then let's consider the next one.
Create bootable flash drive using CMD command line
I like this method first of all because there is no need to search and download all kinds of programs, everything is done using standard Windows tools. In the seventh version there is a special utility called DISKPART. It is with the help of it that you and I will create our USB flash drive. Let's get started.

Now let's move on to the last step - unpacking the ISO image and copying the files to a USB flash drive. To do this, right-click on the image and select "Extract to ..." (select any folder on your PC), after unzipping, select everything and copy it to the drive. That's it, the bootable USB drive is ready!
I hope the information you received today was helpful. Share the link to the material you read on social networks, subscribe to the blog news and see you soon!
Best regards! Abdullin Ruslan
To create a bootable USB flash drive, we will use programs from both a third-party manufacturer and the built-in Windows command interpreter. Each method is different and has its own specifics, but I think that a simple end user will be able to cope with creating a bootable USB flash drive using any of the proposed methods:
- how to make a bootable USB flash drive using the command line
- how to make a bootable USB flash drive using the UltraISO program
- how to make a bootable USB flash drive using Windows7 USB / DVD Download Tool
If you are interested in information on creating a bootable USB flash drive for a family of Linux operating systems, then you can familiarize yourself with the information on this link "bootable USB flash drive for Linux".
So, I propose to start creating a bootable USB flash drive in order, as defined in the above list, respectively, go to the first method.
BOOTING USB stick using the command line (I method)
Next, we will use only those commands that we need to create a bootable USB flash drive. Therefore, the following figure shows the sequential input of commands to create a bootable USB flash drive. And please pay attention to the fact that the commands entered are indicated by a red underline!
Graphical representation of command input at the command line
Now let's describe the previously entered commands:
DISKPART- run the program, a text-mode command interpreter, which allows you to manage objects (disks, partitions or volumes) using scripts or direct command input from the command line.
list disk- we display a list of disk drives connected to the personal computer.
select disk 1- select the disk with the number "1", since in our case it is a removable flash drive.
clean- clears all data from removable media - flash drive.
create partition primary- we create a primary section.
select partition 1- select the created section.
active- make the section active.
format fs = NTFS- we format the flash drive in the NTFS file system.
assign letter = T- if necessary, in this way you can assign a letter to the flash drive.
Exit- exit from the DISKPART program.
LOADING FLASH CREATED!
NOTE: After you have created a bootable USB stick, you need to transfer the operating system files to this removable media. The files must be transferred in an unpacked form, in no case do not just add an image of the operating system, for example, one * .ISO file, so it WILL NOT WORK !!!
You can see the complete list of Diskpart commands in the following table:
Table of commands of the program "DISKPART"
| COMMAND | EXPLANATION |
| ACTIVE | - Mark the selected section as active. |
| ADD | - Adding a mirror to a simple volume. |
| ASSIGN | - Assign a name or mount point to the selected volume. |
| ATTRIBUTES | - Working with the attributes of a volume or disk. |
| ATTACH | - Attaches a virtual disk file. |
| AUTOMOUNT | - Enable or disable automatic mounting of basic volumes. |
| BREAK | - Splitting the mirror set. |
| CLEAN | - Clears configuration information or all data on disk. |
| COMPACT | - Attempts to reduce the physical size of the file. |
| CONVERT | - Convert disk formats. |
| CREATE | - Create a volume, partition or virtual disk. |
| DELETE | - Delete object. |
| DETAIL | - Viewing object parameters. |
| DETACH | - Detaches the virtual disk file. |
| EXIT | - Shutdown DiskPart. |
| EXTEND | - Expand the volume. |
| EXPAND | - Increase the maximum available virtual disk space. |
| FILESYSTEMS | - Displays the current and supported file systems for the volume. |
| FORMAT | - Format this volume or partition. |
| GPT | - Assigning attributes to the selected GPT partition. |
| HELP | - Displays a list of commands. |
| IMPORT | - Import of a group of disks. |
| INACTIVE | - Mark the selected section as inactive. |
| LIST | - Displaying a list of objects. |
| MERGE | - Merging the child disk with the parent. |
| ONLINE | - Transfer of an object marked as "offline" to the state "online". |
| OFFLINE | - Transfer to the "offline" state of the object marked as "online". |
| RECOVER | - Updating the status of all disks of the selected package. Attempting to repair disks of the wrong packet and resynchronizing mirrored and RAID5 volumes with outdated plex or parity data. |
| REM | - Doesn't take any action. Used to comment out scripts. |
| REMOVE | - Deleting a drive name or mount point. |
| REPAIR | - Recovering a RAID-5 volume with a failed member. |
| RESCAN | - Search for disks and volumes on the computer. |
| RETAIN | - Placing a service partition on a simple volume. |
| SAN | - Display or set the SAN policy for the currently loaded OS. |
| SELECT | - Setting focus on the subject. |
| SETID | - Changing the type of section. |
| SHRINK | - Decrease the size of the selected volume. |
| UNIQUEID | - Display or set the GUID Partition Table (GPT) code or Master Boot Record (MBR) signature of the disk. |
LOADING USB stick using UltraISO program (II method)
UltraISO is designed to create and edit disk images. When creating a bootable USB drive, we will use the built-in functions of this program.
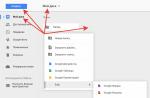
Open the program with administrator rights, as shown in the figure:


We select the necessary operating system image to create a bootable USB flash drive, for example, the Windows Vista disk image is selected here:


A pop-up window appears where you need to make sure that the removable media, the file of the recorded image and the recording method are correctly specified (it must be installed in the USB-HDD + mode) and click the "burn" button

After clicking the "Write" button, the "Hint" window will appear, which will offer you to erase all information on the USB flash drive. Agree!

Then the data will be written to the USB flash drive ...

And finally, after a certain time, the operating system image will be written to the newly created bootable USB flash drive for future installation.

LOADING FLASH DRIVE IS DONE!
NOTE: Do not forget to set the primary device boot in the BIOS I / O system, that is, make sure that the computer boots from removable media - the bootable USB flash drive you created.
DOWNLOAD DRIVE using Windows7 USB / DVD Download Tool (Method III)
Windows7 USB / DVD Download Tool created by Microsoft for writing operating system disk images to optical and removable media. When creating a bootable USB drive, we will consistently follow all the instructions of the program.
First, you need to download this program from the official Microsoft website. Then you need to install the program following the instructions of the installer. After installing the program, a shortcut will appear on the desktop, as shown in the figure:
Run it with "Administrator rights", right-click on the shortcut and click on the line "Run as administrator". The program will start, click the "Browse" button and select the operating system image * .ISO

After you have selected the image of the recorded system, click "Next", another window will appear where you will be offered to select the type of media - optical or removable. Since we have a removable media - a flash drive, select "USB device"

We select our removable media from the proposed list, i.e. USB flash drive and press the "Begin copying" button

After pressing the above button, the process of formatting the flash drive will begin ...

After a while, the process of writing the disk image data to the USB flash drive will continue.

We wait for some time until the image is recorded, and in the end we will get 100%, and now the bootable USB drive has been generated!
NOTE: Do not forget to set the primary device boot in the BIOS I / O system, that is, make sure that the computer boots from removable media - the bootable USB flash drive you created.
This article addresses the questions asked by users of our site in the article: Creating a bootable USB drive using WinSetupFromUSB. For example, there was a question about how can you write two axes of Windows 7 on one USB stick or "what if you want to install two axes on a flash drive at once: for example, Windows XP Home and Windows XP Prof, then how to do this so that this choice of operating systems is also displayed on the netbook when booting?" ... We did not answer the questions raised as quickly as some of our visitors would like, but in this article we will offer solutions to the questions raised.
The question is also relevant because the memory capacity of our flash drives is constantly increasing. It makes no sense to create a bootable USB flash drive with one image recorded on it, given that there is still a lot of free space left. (The creation of "regular" bootable USB drives was discussed in the following articles: How to make a bootable USB flash drive using Novicorp WinToFlash? and How to make a bootable USB flash drive with Windows 8 ). Therefore, it would be logical to make such an option: write several versions of Windows to one USB flash drive and, if necessary, choose what to install.
Let's get down to implementing the issues raised. Our task will be to write two operating systems to one flash drive at once - Windows XP and Windows 8 in such a way that after booting from the flash drive, we could choose which one to install. And for this we need a small portable program YUMI... You can download it from these links (YUMI version 2.0.1.5):
After downloading the archive with the program, unpack it and run the file. A window will appear:


Creating a bootable USB stick is broken down into a few simple steps. The first step is to specify the USB stick. Of course, the flash drive must be connected to USB. It needs to be formatted, preferably with the NTFS file system.
The program allows you to format in FAT32, but since this file system does not work with files larger than 4GB, it is better to manually format it to NTFS. If, nevertheless, you will not record images larger than 4GB, then you can try FAT32 as well.
How to format a USB flash drive to NTFS was discussed in the articles: Writes that there is not enough space on a USB flash drive, although there is space and How to format a USB flash drive.

So, we have completed the first step, indicated the USB flash drive, proceed to the second step - we need to choose what we will write to the USB flash drive. We recommend choosing the penultimate option .

We have come to the third step - select the ISO image for writing to the USB flash drive. To do this, press Browse.

Specified the ISO image, now click , that is, Create.

Click Yes

We see that files are being copied from the image to the USB flash drive.

All files from the image have been successfully copied to the USB flash drive, click Next.

There is a very important point here. The program asks if you want to add another ISO image. If we want to write only one image to a USB flash drive, then press No... But our task is to write another image to a USB flash drive, so we press Yes.

Here we go over the previous three steps again. Here's what you should get as a result:

We recorded two images on a USB flash drive and this is enough for an example. Since we do not copy any more disk images to a USB flash drive, then click No... You can write as many iso images to a USB flash drive as the size of your USB flash drive allows.

The program reports that everything has been recorded perfectly. To complete the work, click .
Everything is now ready. To start working with our flash drive, configure the BIOS to boot from the USB port. Having booted from a USB flash drive, you will see a menu where its items will be the names of the images that you recorded on the media.
In this way, a multiboot flash drive is created or, in other words, in this way you can write several operating systems to a USB flash drive at once.
About how successfully you work with the proposed program or your own methods of creating multiboot flash drives, write in the comments to the article.
1. What is UEFI?
UEFI (Unified Extensible Firmware Interface) is a BIOS replacement that better meets the requirements of today's diverse hardware. At its core, UEFI is the interface that is responsible for the pre-boot environment of the operating system.

2. What are the advantages of UEFI over BIOS?
- Media support> 2TB
- Easier preparation of bootable media, no need to write different boot sectors
- Own download manager. Now it is not necessary to start a multi-level leapfrog of bootloaders in order to organize a multiboot environment, all records about available bootloaders are stored in the EFI NVRAM, and switching between bootable operating systems is carried out in the same way as between bootable media.
- More secure boot environment
- Graphical UEFI configuration mode, with graphics and mouse support
3. Can I update my BIOS to UEFI?
Not really. UEFI cannot be flashed instead of BIOS as it takes up much more memory. But there is such a thing as DUET. This is a BIOS-loaded UEFI environment through a separate boot partition, which can be useful if you are going to use> 2TB drives on your old BIOS hardware.
4. Is it possible to boot from UEFI, as before, via boot sectors and MBR disks?
Yes, if Legacy Boot support is enabled in UEFI configuration
5. What is GPT?
GUID Partition Table, GPT is a standard format for placing partition tables on a hard disk. It is part of the EFI interface. EFI uses GPT wherever BIOS uses MBR.
6. What are the advantages of GPT over MBR?
- Media support> 2.2TB
- No limitation on 4 main partitions, and as a result, no need for logical partitions
- Enhanced Security - GPT stores a backup of the partition table at the end of the disk, so in the event of a problem, it is possible to restore the partition using a spare table.
- Protection against corruption by outdated programs with Protective MBR
- It is possible to use old boot sectors.
7. Where are boot sectors analogs stored in GPT?
EFI uses the EFI / boot folder at the root of the FAT32 partition to store boot loaders. By default, the file /EFI/boot/bootx64.efi should be loaded
If the bootable disk is partitioned in MBR style, then the presence of the FAT32 file system on the first partition (if there are several of them) and the file with the bootloader located in the default path are the only conditions for booting from this media (CD / DVD are also supported). If the disk is partitioned in the GPT style, the partition does not have to be the first, but it must have the boot flag (you can check and set it through gparted)
8. Is it possible to convert a disk from MBR to GPT and vice versa without data loss?
Yes. This will require a bootable disk / stick with Gparted. After booting from the bootable media, a gparted window will open with the scratch disk displayed in the upper right corner (usually / dev / sda). You need to remember the name of the disk that you want to convert, open a terminal, and type sudo gdisk / dev / sda there where instead of sda, if necessary, you need to substitute the name of your disk. Then you need to enter the w command and confirm writing the GPT table to disk. That's it, the disk is converted to a GPT table. To convert back to MBR, you need to open gdisk for your disk in the same way, and sequentially type the command r, then g, and then confirm the entry of the new table using the w command.
9. What is UEFI Shell?
This is an environment for working with the EFI environment (terminal-like), which allows you to run efi-compatible boot loaders on the fly, perform simple file operations, and also operate the built-in boot manager.
10. How do I edit / delete / add boot items to the UEFI boot menu?
Download the UEFI Shell, copy it to the file /EFI/boot/bootx64.efi on a FAT32 flash drive, and boot from it. After successfully loading the shell, a command line prompt should appear
Shell>
Above the prompt, you should see a list of available mapped drives (fs0 :, fs1 :, BLK0, and the like). To call this list again, if necessary, use the command
map fs *
Some information about the drive can be gleaned from the full drive name. For example:
PciRoot (0x0) / Pci (0x1,0x1) / Ata (0x0) / HD (1, MBR, 0x27212721,0x3F, 0x13FA6D9)
from here
Ata (0x0) -disk connection interface as well as controller port
HD is hard drive
1-number of partitions on the disk
MBR markup scheme
Having found the necessary disk in this way, you need to go to it
fs0:
then using the good old dos dir and cd commands, you need to grope and go to the directory with the boot efi files. This is usually / EFI / boot /. Then, while in this directory, you can immediately load into it by entering the name of the loader file. To add the required file to the list of boot records, it is advisable to first read the existing records using the command
bcfg boot dump
Then, to add the boot file to this list, you need to enter
bcfg boot add N filename.efi "label"
Where N is the ordinal number of the record (if there was something in its place, this item will be overwritten)
filename.efi-filename with bootloader
label-name under which this entry will be displayed in the list
You can view the list of boot records again via
bcfg boot dump
and make sure everything is in place. You can reboot and check.
To remove an entry from the list, use the command
bcfg boot rm N
where N is the record number
11. What is Secure Boot?
The Secure Boot specification was developed by Microsoft as part of the UEFI project and allows you to protect the boot environment from tampering with boot files by checking the signatures of the downloaded files for their compliance with the whitelist of keys hardwired into uefi as trusted. A "side effect" of such protection against rootkits is the impossibility of installing an OS other than Windows 8 (at the moment only it supports Secure Boot), and also excludes the possibility of starting from old mbr disks and bootable CDs / flash drives.
12. How do I disable Secure Boot?


13. How to make a UEFI-compatible USB flash drive with the OS distribution?
In most cases, everything is very simple:
- Format the USB flash drive to the FAT32 file system
- Copy the entire contents of the iso-image of the distribution to it
But in the case of Windows Vista / 7 OS, you will need to prepare the distribution kit in advance, because they initially do not contain the EFI files in the correct locations. Just a small disclaimer - windows supports working with uefi only in 64-bit editions.
14. How do you know that the bootable USB flash drive is made correctly and will boot in UEFI mode?
If everything is done correctly, then two devices with the same name, but different prefixes should appear in the list of bootable media, UEFI: and USB:... The first one is booted in UEFI mode, the second is Legacy boot from the boot sector. 
15. What is Fast Boot Mode?
Fast boot mode, in which control is almost immediately transferred to the operating system, even before the equipment is ready for operation, the initialization of which is carried out by the OS itself. Fast Boot eliminates delays caused by double initialization of devices. In the "classic" mode, after gaining control, the operating system reinitializes the previously initialized BIOS devices. Considering that the initialization of some types of devices is a rather lengthy process, the gain in speed is obvious. When Fast Boot is turned on, control is transferred to the system before USB initialization is performed, which leads to inaccessibility of USB drives and keyboard before the start the system installed on the disk. Since Microsoft makes rather strict requirements for the time in which the firmware must meet when the Fast Boot mode is enabled, and the initialization of USB devices can take seconds, by the time the system starts, USB devices remain uninitialized. In this case, the reverse side of the coin appears - a computer user with a USB keyboard cannot interrupt the boot process and initiate the installation of another system, since the keyboard remains inoperative until the OS starts. Moreover, the i8042 chip initialization also takes time and on some laptops the firmware manufacturers leave the built-in PS / 2 keyboard uninitialized.