For some reason, devices like the Time Capsule generate much less public interest than Apple's new smartphones, tablets and computers. However, the American company also updates them quite regularly, keeping the technology used in them up to date. This has been the case for the past few years, while the AirPort Extreme and Time Capsule have received only on-the-fly visceral updates without affecting their appearance. That all changed this summer when Apple undertook a massive redesign of its routers, along with slightly changing their names. Now the company's assortment includes three AirPort devices with a new and absolutely identical design. it AirPort Extreme and two models AirPort Time Capsule, differing in the volume of the built-in hard disk. In this review, we'll take a look at the younger 2TB AirPort Time Capsule.
Appearance
The packaging of the new AirPort Time Capsule is immediately noticeable for its size. Especially if you remember the low flat "capsules" of previous years. The height of the box is nearly 25 centimeters, and it weighs more than one and a half kilograms. After removing the cover, which is the main part of the packaging, you can see the AirPort Time Capsule itself. It turns out that the device in the box is raised by a good third of the internal space with the help of an improvised stand that hides the power cable and traditional information brochures underneath. Here, in fact, is the whole package.

The 2013 AirPort Time Capsule takes up a much smaller footprint, but it has grown seriously. The height of the "capsule" is 168 millimeters, the length and width are equal and are 98 millimeters. The router weighs a lot - 1.48 kg. The hard drive plays an important role in this. As you have already noticed and understood from the dimensions, the device now has the shape of a tower. This solution has both pros and cons. If earlier the Time Capsule was almost as tall as ordinary routers and was calmly placed in any narrow place - just out of sight, now such a trick will not work. The new AirPort Time Capsule asks for an open space and does not have any fixtures for, say, a wall.

All side edges of the device are made of glossy milky white plastic, which perfectly retains fingerprints and is difficult to clean. I would even say that this is exactly the same plastic that is used in all Apple chargers. And it also scratches easily from the slightest contacts with another flat surface. Most of the time, however, your Time Capsule will probably be in its normal position while standing on the rubberized base. There is also the Apple logo, and the "capsule" itself is slightly raised, exposing the ventilation holes to remove heat from the hard drive. The top of the device is made of white matte plastic with a black Apple logo in the middle.

Overall, like all Apple devices, the AirPort Time Capsule looks awesome. An uninformed person may not even guess that he has a powerful and high-tech router in front of him. Unless, of course, he looks behind the back of our tower. It houses 3 gigabit LAN ports, USB 2.0, a WAN port and a power cable connector. To the right of the network cable socket is a hole for resetting the device if problems arise with it. On the back side of the front panel there is one single indicator light that glows orange or green depending on the current state of the device.

Customization and characteristics
It's time to plug the power cord and bring your AirPort Time Capsule to life. An orange indicator on the front of the device blinks, indicating the need for user intervention. If you are a happy owner of a Mac, then your computer already has AirPort Utility... For iOS devices, there is a similar application in the App Store, but owners of Windows computers will need to download AirPort Utility from Apple's website. Through this program, the initial and all further configuration of the AirPort Time Capsule is performed. There are no dull web interfaces here.

Although Time Capsule supports all current types of Internet connections, it contains an exhaustive number of settings for ordinary and wireless networks, but all this is at the level of ordinary users. You won't get any specialized functions from Apple routers. This device is for the home and the widest audience. Of the interesting features, we can note the creation of a guest network so that other people's devices can use the Internet access, but do not have access to the device's hard drive. You can use your Apple ID to access the contents of the capsule over the Internet, but this requires a static IP address.

Setting up your AirPort Time Capsule for the first time is obscenely simple and should be the goal of all manufacturers of such devices. In my case, I only needed to tell the provider the Mac-address of the new router and Internet access appeared. If you want or don't have any special knowledge, you don't even have to look into the jungle of the "capsule" settings - everything usually starts working after the first wizard for setting up the device is completed.
AirPort Time Capsule supports the all-new 802.11 ac Wi-Fi standard. It is also supported by the updated MacBook Air and will certainly be supported by all future Apple devices. In theory, the new standard allows speeds of 1.3 Gb / s. In fact, the results were somewhat different, but more on that later. Like the previous "capsules", the new one supports the simultaneous operation of Wi-Fi at 2.4 GHz and 5 GHz. If desired, the last frequency can be allocated to a separate wireless network. Do not forget that several antennas are hidden in the router case.

Time Capsule differs from AirPort Extreme in that it has a hard drive. In this model, its volume is 2 TB. It is not very noisy and attracts attention only in complete silence. However, you have to pay for it with its low performance, but as a file storage, its capabilities are not satisfactory. There are no problems with accessing it from Windows, but other home devices will most likely remain out of work, since Time Capsule works over the SMB protocol.
Performance testing

The new AirPort Time Capsule, as noted above, boasts a powerful Wi-Fi receiver with multiple antennas and simultaneous dual frequency bands. However, as a performance test, I would like to suggest not just another "synthetics" reflecting the ideal state of affairs, but a test that is close to real conditions.
As part of the test, an archive of exactly 2 GB was transferred from the computer to the capsule and vice versa. In each case, the test was performed three times and then the average was calculated. In some cases, there were unexplained failures in device performance during single attempts. In this case, the test started over.
In the first two tests, a file was transferred from a Windows 8 computer to the AirPort Time Capsule over a cable. As a result, the speed indicators "rested" on the capabilities of the hard disk built into the device. Both tests took a little over a minute on average, and the speed ranged from 27.7 to 28.8 MB / s.
Then came the 2013 MacBook Air, which supports Wi-Fi 802.11ac. For him, three groups of tests were carried out, differing in distance: 1 m, 7 m and 15 m + a wall with a thickness of 0.4 m. In each group, 4 tests were carried out: 2 in 5 GHz mode and 2 in 2.4 GHz mode. Thus, the test file was sent both from the "capsule" to the poppy, and in the opposite direction.
The results were quite expected. The 5 GHz mode demonstrated a high speed, in some places superior to Ethernet at a distance of up to 7 meters, inclusive. When an obstacle appeared in the signal path and the distance doubled, the data transfer rate dropped on average by half.
As for the 2.4 GHz mode, it also showed approximately the same performance at a distance of up to 7 meters. Then there was a drop in speed indicators, but not as significant as in the first case. At the same time, the 5 GHz mode was still faster. But there is one important point to pay attention to. The operation of the two devices at a distance of 15 meters in 5 GHz mode was not the most stable. A couple of times the signal was interrupted and the data transfer had to be started over again, the Internet fell off.
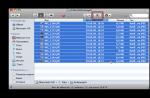
For clarity, the test results are summarized in the following table:

As a small conclusion to this subsection, I would like to note that the 5 GHz mode shows itself most effectively at short and medium distances within the apartment. Therefore, using this mode of operation as a separate wireless network does not seem appropriate. The MacBook Air itself often switched to a faster mode of operation, if the signal quality allowed it. Overall, the AirPort Time Capsule is capable of providing more than acceptable wireless access within an apartment or small home. Do not expect miracles and incredible signal strength from the device.
conclusions
Apple sells the AirPort Time Capsule for $ 299 and $ 399 for the 2TB and 3TB models, respectively. In terms of the device's capabilities, this price is still a bit overpriced. However, if you pay attention to the design, then in this regard, the "capsule" has not many competitors, if any. At the same time, the plastic from which the device is made is scratched too easily for a device in this price category. Perhaps this fact upset me the most while studying Time Capsule. Although, on the other hand, it is unlikely that someone will constantly drag the router from place to place.

This device is a mini-station and can help you with the following tasks:
- when setting up a new Internet connection prepared for devices and their connection to each other;
- increase your Internet network: you can add any gadgets while browsing the Internet;
- using gadgets connected to this unit, exchange any files.
In this article we will talk about apple airport time capsule 2tb and configure it.
Step 1 We take out the broadband wire with which you can access the Internet from your previous router and insert it into the WAN port of our unit. The device itself is included in the power supply. In "Programs" on your computer, look for "Utilities" and click on the branded utility Airport.
Step 2 In the window in the upper left corner of the screen, select the name of your device, then click the "Continue" button, then select the "Create a new wireless network" section and click "Continue" again. After that, your unit must reboot for all the manipulations you have selected to take effect.

Step 3 Now, you need to restart Airport in the window (upper left corner of the screen) select the name of your unit, click on it and select the "Configure manually" tab. Depending on what type of connection you have (PPPoE or VNP - these data are presented in the service agreement with your Internet provider), choose:
- if you have a PPPoE connection: "Connect via PPPoE" and enter the login and password from the contract with the provider;
- if you have a VNP connection: open the "wireless network" - there you assign a name and password to the network and click "Update".
Step 4 Now you are setting up access to your wireless station. In the same utility, select the Time capsule tab and enter the station name and password. Press the "Update" button and all the settings will take effect. 
Step 5 Through the Time mashine program, which is provided on all devices with the Mac operating system, our installed device is automatically detected when it starts. Through this program, you can work with the unit in solving any problems.

Airport time capsule 3 TB and its setup is no different from the steps described above. Any model of these devices can be attributed to this rule.
As you can see, creating the next connection on the apple airport time capsule 3tb and setting it up takes very little time, but the possibilities that will be available after completing all the steps described above will definitely delight any user.
In the life of every Apple lover, there comes a time when he "grows" into the ecosystem and the home fleet of devices expands so much that the question arises of buying the "right" router to deploy the "right" home network. The choice of Apple network equipment is incomparably simpler than that of other manufacturers, but there are also some nuances here, since Cupertinos produce three similar devices, each of which satisfies the needs of different categories of users. In this article, I want to tell you about the advantages of Apple routers, their differences from each other, as well as how to choose the right router based on your needs.
AirPort Express
The youngest model of the family of routers with a rather democratic price tag (3990 rubles). The diminutive AirPort Express is almost the same size as the Apple TV, but encased in milky white plastic instead of black. The dimensions of the device are less than 10 cm wide and just over 2 cm high. However, this little one has high productivity.
With AirPort Express, you can deploy an 802.11n home network that also supports a, b, and g devices. Thanks to the ability to simultaneously operate in two bands (2.4 GHz and 5 GHz), both old and new devices will operate at the maximum supported speed.

On the back of the little AirPort Express, there are two 100-megabit Ethernet ports, one of which is used for an incoming connection (WAN) from a cable or ADSL modem, and the other can be used to connect a desktop computer or any other device without Wi-Fi. Also here we have one USB port for connecting a printer, which will be available for all devices on your network, and a combined 3.5 mm audio jack for connecting to the receiver via an analog or optical cable (yes, AirPort Express can be used as an AirPlay receiver ).
In addition, AirPort Express can expand your wireless network by increasing signal strength in poor reception areas, such as individual rooms or even an entire floor. For these purposes, it is very easy to set up your AirPort Express in bridge or repeater mode using the built-in AirPort utility.
AirPort Extreme

A router one notch higher than AirPort Express. Its cost is twice as high as the junior model (8,290 rubles), but for this money you get a lot more options.
The AirPort Extreme is significantly taller than the AirPort Express (almost 17 cm), but the base size is the same for both models. Compared to previous generations of AirPort Extreme, the current model is much smaller and sleeker due to its height.
By the way, the case is made so tall not only for aesthetics, but also in order to house a powerful six-element antenna, which provides reliable coverage corresponding to the transmission speeds of the 802.11ac standard. Its transmission speed is three times faster than in the previous 802.11n revision, but it is fully compatible with all earlier revisions.
Keep in mind that this does not mean a threefold increase in Internet speed (your cable or ADSL modem will most likely be the bottleneck) - the speed gain will be noticeable only within your local network, when transferring from device to device and provided that they have 802.11ac support.
What devices are we talking about? Apple has begun rolling out 802.11ac support to all Macs since the MacBook Air introduced in June 2013. If your Mac has a Haswell processor, it supports 802.11ac as well. This also includes the Mac Pro, introduced last December, and all the new Macs coming and coming this year. iOS devices, unfortunately, still run the legacy 802.11n, but it's a matter of time;)
The differences between AirPort Extreme and the younger model are not limited only by speed. With its special antenna design, it can shape a directional beam to provide a more reliable connection with 802.11ac devices. The router detects which of them are using the latest standard and routes the signal in their direction, as a result of which, with devices supporting the 802.11ac standard, a more reliable and clear connection is established at high speeds.
AirPort Extreme connects not only to a printer via USB, but also to a hard drive that will be available to all devices on your home network. It certainly won't replace a file server or NAS, but the AirPort Extreme's functionality is more than enough for file sharing.

On the back, the AirPort Extreme has four Ethernet ports instead of two. One of them is used for WAN connection, to the other three you can connect any devices without Wi-Fi or a wired router. In addition, unlike the younger model, all Ethernet ports in AirPort Extreme are gigabit, that is, they support speeds 10 times faster than in AirPort Express.
Time capsule
Time Capsule is absolutely identical to AirPort Extreme: from appearance and size, to iron filling and functionality. You get an 802.11ac router with a six-element antenna, Gigabit Ethernet ports and USB for printer or hard drive connections.
However, Time Capsule is different in that it has a built-in hard drive. The device is available in two configurations: with a 2 terabyte hard drive (RUB 12,290) or 3 terabytes (RUB 16,290). Both versions are available to any Mac on your network for Time Machine backups.
As you probably know, Time Machine is a convenient backup utility that Apple has included with OS X since version 10.5 of Leopard. It allows you to automatically create backups of your disk, which record the current state of the system, including all your content, over a long period of time (depending on the amount of available disk space). Thus, if you need to recover any file that was deleted, say on May 1st, just open Time Machine and "rewind" to that date.
Who is AirPort Express for?
AirPort Express meets your needs when:
- you have a small house or apartment;
- you are using poppies from 2012 and older;
- your ecosystem is made up of only iOS devices;
- you want to use your receiver with AirPlay;
- you need to increase the signal strength of your existing home network in areas with poor reception;
The power and functionality of AirPort Express is more than enough for all of the above cases. The lack of support for 802.11ac and Gigabit Ethernet ports can be critical for people looking for maximum performance and speed, but there is AirPort Extreme for them.
Who is AirPort Extreme for?
The more powerful AirPort Extreme is a great choice for you if:
- you are building your network from scratch and want to foresee a certain "reserve for the future";
- you have a separate country house and several Apple devices for each family member;
- you own modern devices with support for wireless 802.11ac (it doesn't matter Mac or PC);
Who is the Time Capsule for?
The only, but very compelling advantage of Time Capsule over other Apple routers is the ability to use it as a network drive to create backups.
If you're still not backing up your Mac, I urge you to start doing it, especially since buying a Time Capsule would be a great excuse. This is an incredibly handy feature that you just need to configure once and just forget about it. Believe me, when something happens, she will help you out a lot.
Conclusion
The lineup of Apple network devices is wide and diverse enough to fully meet the needs of various categories of users. AirPort Express - For modest networking needs, expanding an existing network, or listening to music via AirPlay. AirPort Extreme - For uncompromising power and performance. Time Capsule - For hassle-free automatic backups. Whichever you choose, any of them will be the glue for your entire ecosystem and keep your network running reliably.
AppleTimeCapsule or another router model, you can always contact Cyberkiper for help. We are setting up WI- FI routers, as well as installing and configuring other network equipment. Our tel. 8 (499) 755-50-21. .jpg)
Setting up a routerAppleTimeCapsule differs from the configuration of many other routers, like many Apple products. When we give a guide to setting up an Apple router and try to tell you about the features of its setup.
Before starting work, here is a diagram showing the connectors on the Apple Time Capsule router:

After unpacking the device, you need to connect your ISP's cable to the WAN port located at the bottom of the router. Above are three Ethernet LAN ports that you can use to connect your computer with a cable. If the router is located near computers, we recommend a cable connection. It is faster and more stable than the wireless signal anyway. However, WiFi has also noticeably improved its technical performance recently, so all clients will receive Internet via a wi-fi signal without any problems. At the very bottom, you need to connect a 220V cable, and a USB connector is provided for connecting a printer or MFP to the Apple Time Capsule.

After connecting all the necessary wires, you can turn on the device.
What the bulbs say on Apple TimeCapsule is the following table:

The scheme of the Apple router:

The Apple router is configured through the AirPort utility. To do this, you need a Mac with OS X version 10.7.5 or higher. AirPort Utility on your computer. Connection via a network cable or wi-fi with a router. To configure you need:
- Open AirPort
- Select your AirPort Time Capsule from the list of networks.
- Configure the parameters of your provider, follow the instructions on the screen.
In addition to sharing the Internet, AirPort Time Capsule helps you keep all of your data in one place. The Mac is set up to back up and all your data will be backed up to the Time Capsule. If your mac fails, you don't need to data recovery, since all information will be located on an external device, from which everything can be easily restored.
AirPort Time Capsule Router Problems and Troubleshooting
Tips for locating your Apple Time Capsule router:
- Install the router on an open surface, there should be no large objects nearby.
- Do not install the Apple Time Capsule in a confined space such as a drawer cabinet, etc. Also, do not put it on the carpet, this will lead to heating of the device.
- Do not place large metal objects around the router as this will degrade the WiFi signal.
- Do not place objects on your AirPort Time Capsule.
- Keep your AirPort Time Capsule away from microwave ovens, radio equipment, or mobile phones.
You can always invoke the wizard to set up your Apple AirPort Time Capsule router. We will install and configure the Apple router.
I must say right away that Planet, in my opinion, is the easiest provider to set up, but it has 1 pitfall, which can unbalance a little if you don't know about it (details below)! I did the setup with a friend, where I was able to take a bunch of screenshots, and get a great photo from! So let's get started (there are a lot of pictures under the cut)!
AirPort Time Capsule
The first thing to do is turn on the access point, connect the cable from your ISP to the WAN connector, and launch AirPort Utility (Programs / Utilities). If the access point has already been configured for the previous provider, then it is better to reset by pressing and holding for 10 seconds the special button on the back of the AirPort, and configure it from scratch. Please note that the data on the disk (in the case of Time Capsule) is not deleted, only the network and WiFi settings are reset!
After all the conditions from the previous paragraph have been met, proceed to the setup. First, we have to select our access point from the list of available networks.
 Selecting a new access point
 AirPort Utility may open immediately afterward, with the Capsule pre-configured. If this does not happen, feel free to launch it!
 Turning on AirPort for the first time
  AirPort Auto Config
 The access point will prepare for configuration, and if you have previously configured other AirPorts from your computer, the system will automatically cycle through them to check the settings.
After going through all the previous options, the Utility will give you the fields for entering basic settings.
 Entering the network name and password
 I'll make a reservation right away that I chose the Other parameters item, as this will give a little more customization options. As a result, we see such a window:
 Creating a new network
 In this case, it was necessary to configure the Time Capsule as new, and I selected the first item. I think you will need the same one. Feel free to click Next!
 Entering the network name and password
 Here we write the main parameters of the future network. The network name is how the network will be seen by your devices, the base station name is the identifier of the access point itself (it will later be displayed in the Finder sidebar when accessing the drive), the password is the password by which you will connect to AirPort. The first and second names can be made the same. By the way, you can make different passwords to access the network and its settings. This is necessary if you want to protect your network from unauthorized reconfiguration, for example, in an office or a public place (cafe). After filling in all the fields, we boldly move forward.
 Creating a guest network
 In a new window, you can activate the guest network. You need it, for example, if you want to distribute the Internet and be on the same network with someone, but do not want someone to have access to the built-in disk (or to the USB connected in the case of Airport Time Capsule and Extreme ). If you skip this step and do not set up the guest network, you can activate it later from the advanced settings of AirPort Utility. Go ahead.
 Pre-saving parameters
 At this stage, the settings are applied and the access point is rebooted. After everything that we have done with the access point, it must take it all into itself.
After rebooting, we see the globe icon representing the Internet and our AirPort Time Capsule. If you click on it, then we will see a small menu where you can enter the fine-tuning of the access point. To do this, click on Change.
 Time Capsule Fine Tuning
 The first tab allows you to configure the Base Station.
 Base station tab
 Here we see the fields already familiar to us, in which we will not change anything if there is no urgent need. You can also set up using Apple ID, if you click on the plus and enter your ID and password. Let's go to the Internet tab.
 Entering details
 In this window, you will need to enter your Internet details provided by your provider. I remembered several providers that AirPort works with - Planet, ... Maybe there are others, but I won't say so straight away. Why these providers? Yes, simply because they do not use tunneling (VPN), which Apple APs do not support. Cabinet, Dom.ru, MTS, Beeline, Akado use VPN, and to configure AirPort Express / Extreme, you first need a VPN router that will connect to the provider, and only then distribute "clean" (via DHCP or static) Internet to Apple access point.
As for the pitfall of the Planet (Konvex and Ruskoma) - they have a MAC-address binding, and if you change the router, you will need to call the technical support service and ask to re-bind the point (you may need passport data). After a successful conversation with the TP, you will be able to access the Internet.
By the way, if the provider automatically issues the details, then leave Connect via in the DHCP state. If you use any other parameters (static IP or PPPoE), then select it:
 Choosing a connection type
 After choosing the type of connection and entering the details, you can go to the next tab.
 Setting up a wireless network
 At this stage, you can slightly change the operation of the access point itself, if it is a continuation of an already existing wireless network. In this case, select Advanced in the Network Mode menu. wireless network. A similar case may occur in a large house or office, where the range of one point may not be enough.
 Selecting the type of wireless network operation
 Also here you can change the encryption method for WPA, WPA 2 and others. By the way, if during the initial setup of AirPort you did not create a guest network, then this can be done right here.
If you click on the Options ... button, then another interesting field will open before us:
 5 GHz network activation
 In this window, you can activate a 5GHz network, as well as select a channel for a wireless network. Now we will not dwell on this in detail, you can try to experiment on your own and decide which operating mode suits you best. If there are no questions here, click Save and go to the next tab - Network:
 Fine-tuning network parameters
 I would be glad to tell you in detail about all the points, only here you will not need them in most cases. And if you need it, you can always 🙂
Let's go to the last tab - Disk.
 Setting up the built-in disk
 In case of setting up Tima Capsule, you will see the built-in disk, its volume and free space on it. Here you can clear the disk, or transfer all data to an external disk by clicking on the Back up disk button. We will not touch the other settings - everything works as it should!
If you went through all the points and chose the settings that suit you, then feel free to click on Update, and agree with the update. After restarting AirPort, you can reconnect to it and enjoy the Internet!
Let me remind you again that AirPort Express, Extreme and Time Capsule do not support VPN! I strongly recommend that you take this fact into account when choosing an access point to your home, or when choosing a provider! If you do find yourself in a VPN situation, do not despair - a simple "gasket" between the provider and your AirPort can serve as a TP-Link TL-WR841, for example. Personally, with me, a similar router takes out all communication in the apartment 🙂
Remote access to Time Capsule and backing up iPhone to Time Capsule
Dear readers, as an afterword, I would like to clarify something else. I very often receive messages by mail of the following nature:
- the ability to remotely access Time Capsule from the Internet (without using a permanent ip-address);
- interaction with Time Capsule disc and iPhone / iPad. How to back up your phone to a capsule.
AirPort Express / Extreme / Time Capsule - Home, Amateur Devices! They are very easy to configure, as you saw above, but their functionality is very poor! They cannot be loaded with Padavan firmware, dd-wrt or something similar, thereby expanding the potential of AirPort ... These access points are more suitable for the home or small office, but not for geeks who want to squeeze the most out of the device ...
Time Capsule can only be accessed remotely with your Apple ID... In the first tab "Base Station" you can enter your Apple ID at the bottom and then your capsule will be seen on your Mac from anywhere in the world, as long as there is Internet. No, it won't work with Windows. And it doesn't matter what kind of network connection you have: DHCP, static or PPPoE.
How to Watch Time Capsule Movies from iPhone / iPad? No way, without crutches ... This access point only works well with computers. Yes, on iPhone / iPad you can install a program like or and connect a drive from Capsule in it. To be honest: I tried these solutions and everything works extremely poorly user-friendly... In short, through one place ...
How to back up iPhone / iPad to Time Capsule? Almost nothing. That is, directly, so that by pressing one button a copy is created, or even automatically - no way! There is a workaround, but without a computer in any way: the most ordinary backup is created in iTunes, and then either the ~ / Library / Application Support / Mobile sync / Backups folder is thrown onto the capsule by hand, or we are waiting for the next update of the copy through Time Machine, so that a local copy from iTunes hit the capsule. And then we go to the iTunes settings and delete the backup so that it does not take up space on the built-in disk ... I say that it was done through one place ...
By the way, about the photo that I wrote about at the very beginning, here it is:
 AppleProfi
 Many thanks to Nikita Polosov for such a cool shot and for providing access to your AirPort Time Capsule!