In this article I want to consider in detail the features of the section - Installing and removing programs in Windows 10.
The new, tenth edition of Windows, in addition to the standard program installer, has several additional services. Store now available Microsoft applications, where you can find a huge number of interesting utilities that every person needs.
For more experienced users, a feature has been added to download software via the command line. More details about this later in this article.
First of all, I want to tell you how to open a section- Installation and removal of programms.
You can open the required menu in several ways:
Installing programs on Windows 10.
- Regular installation of any programs.
The installation wizard built into the system is also present in Windows 10. The only thing you need is to open the installation file (installation file) or run the disk, then follow simple instructions. Installation proceeds like in any other Windows.
- Microsoft Store.
Before you start, you must log in using your account. Microsoft entry. If you do not have an account, you need to create one; registration is intuitive and takes no more than 7 minutes. Then we go to the taskbar, where we select the “Store” icon. Use of the service is only available with an active Internet connection.
This specialized service contains a large amount of software stored on a remote server. Many useful utilities are free.

There is a built-in search. Finding what you need doesn’t take much time, it’s simple enter keyword in the store search box (top right). New and popular utilities are included in a separate TOP chart. The list can be found at home page store
The developers have introduced the ability to install utilities directly from “repositories” (storages) using the command line. Many are put off by the fact that this method does not imply the presence of any graphic design.
But the fact remains that installing content directly from storage is the fastest, most reliable way.
The OneGet service allows you to install software using just one command – “Install-Package”. This requires:

For example, if you need the Opera browser, then enter the name of this browser instead of *application_name*. After completing all the manipulations, the required software will be downloaded and then installed on Personal Computer, it looks like this:

- Normal removal.
Uninstallation is standard. To do this, right-click on the “Start” icon. In the list that opens, select Settings, then in the upper right corner, in the search bar, type “Programs and Features.”


Windows 10 has a tablet mode, the uninstallation algorithm in which is as follows:
- We go to “Start”.
- Find the “Settings” icon.
- Next we move on to the “System” section.
- A menu will open where we find the line “Applications and features”.
- We select the required software, after which the “Delete” button appears.

Installing and removing programs in Windows 10 includes both old proven methods and innovations that will appeal to only beginners and experienced users. Microsoft continues to take care of its customers by providing excellent quality software.
If you have questions about this topic, feel free to write in the comments, I will try to answer as quickly as possible. Sincerely, .
Among the latter, a new “glitch” stood out - sometimes the system blocks the installation of new programs. That is, it simply does not allow you to install the desired application. Why does this even happen and how to deal with it? Let's figure it out.
Causes
This can happen both with a really suspicious application, and with a completely familiar, familiar one. For example, the screenshot shows how Windows 10 does not allow you to install the popular torrent downloader:
It is with this red message that the system says that it “does not trust” this application. Agree, it's a shame. Moreover, the whole country uses the program from the example. You may also encounter another message, for example that .
The reason for this behavior in Windows 10 is as follows. Programs have a so-called digital signature, and operating system UAC, which controls accounts. It is this control that blocks the installation or launch of programs that have something wrong with the digital signature.
Actually, it may be expired or revoked, and sometimes even absent altogether. The last case should be alarming. To check this fact, follow these simple steps:
- Right-click on the program's executable file (usually with the extension .exe).
- Select “Properties”.
- Go to the “Digital Signatures” tab (or Digital Signatures in English version).
But if you are 100% confident in your installer, and Windows 10 does not want to “skip” it, you can bypass the protection.
By the way, there is a wonderful program HashTab, which adds a tab to the properties of all files checksums. Using them in an Internet search engine you can track whether the installer is original.
Workarounds
Firstly, digital signatures can be removed from programs. This method may help. But for this you need a third-party utility, for example FileUnsigner.
Secondly, you can disable UAC (without administrator rights it will not work), but this creates some security gap in the operating system. Therefore, you should do this only while installing the necessary programs. For this:
- open the classic control panel (in Windows 10 - Start - All applications - System);
- in the upper right corner, set “View” to “Icons”;

- open “User Accounts”;
- select the bottom item;

- move the slider to the very bottom;

- UAC will be disabled until you enable it back to its default state (“Notify only when attempts are made to make changes to the computer”).
If the system blocks the installation of programs that it does not like for some reason, you can do it even simpler: run the installer from the command line. This is done like this:
- Open Command Prompt as Administrator (this is important).
- Go to the folder where your installer is located. To do this, use the command CD space full path To folder . Example:
cd C:\Users\home-user\Downloads
And press Enter. You are now in the right folder. In this example, the user home-user has a certain exe file in the \Downloads directory. Let's say Firefox.exe.
- Be sure to enter the full name of the program along with the extension (Firefox.exe) and press Enter.
The installation will start, bypassing the annoying Windows protection 10.
Conclusion
As you can see, bypassing program blocking on Windows 10 is very easy. It is important that you only run applications that you trust. If your installation file is blocked, you should check its authenticity and make sure that it was downloaded from the program’s official website. Otherwise, you install the application at your own risk and you should prepare for the possible scanning of all files by an antivirus.
(Visited 37,193 times, 5 visits today)
In addition to standard for previous versions Windows methods installation of programs, version 10 has acquired several interesting services. The official Microsoft store has become available to users, from which they can conveniently install many useful applications. In addition, for command line lovers, the developers have created the ability to download software using text console commands directly from repositories.
Normal installation of programs
The Install Wizard, which is familiar to users, is also available in Windows 10. The process has not changed at all compared to previous versions - just run the installation file (or insert a disk) and follow the instructions provided.
Installing applications through the store
For those users who use a Microsoft account, the developers have created a special service - Shop. This is a huge software database stored on Microsoft servers. Many of the video games and programs presented are completely free.
All applications are convenient sorted by category, in addition, users can create their own categories with selections of programs that they think are useful. In addition, you can easily find any utility using the built-in search. The most interesting or new software is displayed in the TOP charts on home page store

To start using the store, you must be signed in to Windows 10 with your Microsoft account. After that, open the menu " Start" and select the item called " Shop" It is also worth remembering that to work with this tool, your computer must be connected to the Internet.
Installing software via OneGet
The developers have made it possible in Windows 10 to install programs directly from repositories using console commands. A similar function has been present in the Linux operating system for quite some time. Many users are put off by the lack of a graphical interface in the console, however, this is one of the the most convenient and fastest ways to download and install programs.
For example, if in previous versions Windows you needed to download Chrome, you did the following:
- Opened a standard Internet browser Explorer.
- Through the website, the search engine found the official page of the web browser from Google.
- Downloaded the installation file.
- We launched it and waited for the rest of the program to load.
- In the case of many utilities, you also had to agree to the license, click Next many times, and so on.
Using the service OneGet you can perform a complete installation of the application with just one command - “ Install-Package».
To do this, do the following:


For example, if you want to install the Opera Internet browser, use the “Install-Package Opera” command. After pressing Enter, all the necessary files will be automatically downloaded from the Microsoft repository and installed on your personal computer.
Regular program removal
Removing software in Windows 10, as before, is carried out through the utility built into the system. To call it, right-click on the menu " Start" and select the option " Programs and components" Next you need to select the right application and click on the Delete button, which will be displayed above the list.

Likewise, you can get to this menu in three more ways:
- Call up the dialog box “ Execute» using a combination Win keys+ R, enter the line “appwiz.cpl” and press Enter.
- Being in Windows Explorer 10 (icon " This computer"), click on the button " Computer" in the top menu and select " Remove or change a program».
- In the Start menu, right-click on the application icon and select the option “ Delete».
Delete in tablet mode
If you use Windows 10 in tablet mode, you will most likely find it convenient to uninstall through the " Options»:

Video on the topic
Windows 10 went on sale in 2015, but many users already want to install and configure the applications they need to work, despite the fact that some of them have not yet been updated to work flawlessly in this version of the operating system.
How to find out what programs are installed on Windows 10
In addition to the traditional list of programs, which can be viewed by opening the “Programs and Features” item in the “Control Panel,” in Windows 10 you can find out what applications are installed on your computer through a new system interface that was not present in Windows 7.
Opening a list of programs from the main Windows settings
Unlike previous versions of Windows, you can get to the list of available applications by following the path: “Start” - “Settings” - “System” - “Applications and Features”.
To find out Additional information about the program, click on its name
Calling a list of programs from the search bar
Open the Start menu and start typing “programs,” “uninstall,” or “uninstall programs.” Search bar will return two search results.
In recent Windows versions you can find a program or component by name
“Add or Remove Programs” is the name of this component in Windows XP. Starting with Vista, it changed to Programs and Features. In later versions Windows Microsoft The program manager was returned to its previous name, as was the “Start” button, which was removed in some builds of Windows 8.
Launch Programs and Features to get directly to the Windows Application Manager.
How to run an incompatible program on Windows 10
Applications for Windows XP/Vista/7 and even 8, which previously worked without problems, in the vast majority of cases do not work in Windows 10. Do the following:
- Select the “problematic” application with the right mouse button, click “Advanced”, and then “Run as administrator”. There is also a simpler launch - through the context menu of the application launch file icon, and not just from the program shortcut menu in the Windows main menu.
Administrator rights will allow you to apply all application settings
- If the method helps, make sure that the application always runs with administrator rights. To do this, in the properties, in the “Compatibility” tab, check the box next to “Run this program as an administrator.”
Check the box next to “Run this program as an administrator”
- Also, in the “Compatibility” tab, click on “Run the compatibility troubleshooter.” The Windows Program Compatibility Troubleshooter opens. If you know which version of Windows the program was launched in, then in the “Run the program in compatibility mode for” sub-item, select the desired one from the list of OSes.
Windows 10 Startup Problems with Old Programs Wizard offers additional compatibility settings
- If your program is not in the list, select "Not in the list". This is done when launching portable versions of programs that are transferred to Windows by simply copying them to the Program Files folder and work directly without a standard installation.
Select your application from the list or leave the option “Not in the list”
- Choose how to diagnose an application that stubbornly refuses to run despite your previous attempts to start it.
For manual indication Compatibility mode select "Program diagnostics"
- If you chose the standard test method, Windows will ask you which versions of the program worked well with.
Information about the version of Windows in which the desired program was launched will be transferred to Microsoft to solve the problem associated with the inability to open it in Windows 10
- Even if you chose a non-affirmative answer, Windows 10 will check information about working with this application on the Internet and try to launch it again. You can then close the Program Compatibility Assistant.
If all attempts to launch the application completely fail, it makes sense to update it or change it to an analogue one - rarely, but it happens that during the development of the program, comprehensive support for all future versions of Windows was not implemented at one time. Thus, a positive example is the Beeline GPRS Explorer application, released in 2006. It works with both Windows 2000 and Windows 8. And the negative is the drivers for the HP LaserJet 1010 printer and HP ScanJet scanner: these devices were sold in 2005, when nothing was known about Windows Vista Microsoft company didn't even mention it.
The following can also help with compatibility issues:
- decompiling or parsing the installation source into components using special programs(which may not always be legal) and installing/running them separately;
- installing additional DLLs or system libraries INI files and SYS, the lack of which the system can report;
- reworking parts of the source code or working version (the program is installed, but does not work) so that the stubborn application still runs on Windows 10. But this is a task for developers or hackers, and not for the average user.
Video: Working with the Program Compatibility Wizard in Windows 10
How to assign priority to an application in Windows 10
Any program corresponds to a specific process (several processes or copies of one process, launched with different parameters). Each process in Windows is divided into threads, and those, in turn, are further “layered” into descriptors. Without processes, neither the operating system itself nor the third-party programs that you are used to using would work. Prioritizing certain processes will speed up programs on old hardware, without which fast and efficient work is impossible.
You can assign priority to an application in the Task Manager:

Do not experiment with low priority for vital processes of Windows itself (for example, Superfetch service processes). The Windows system may begin to malfunction.
You can also set the priority using third-party applications, for example, using CacheMan, Process Explorer and many other similar manager applications.
To quickly manage the performance of programs, you need to figure out which process is responsible for what. Thanks to this, in less than a minute, you will sort the most important processes by their priority and assign them the maximum value.
Video: How to give an application the highest priority in Windows 10
How to install a program into startup on Windows 10
Most quick way enable program autostart when Windows startup 10 - through the already familiar “Task Manager”. In previous versions of Windows this feature was not available.

Autostart of a large number of applications after starting a new session with Windows is a waste of PC system resources, which should be sharply limited. The remaining methods - editing the system “Startup” folder, setting the autorun function in each application (if such a setting exists) are classic, “migrated” to Windows 10 from Windows 9x/2000.
Video: enabling application autostart through the registry and Task Scheduler
How to prevent installation of programs in Windows 10
In previous versions of Windows, for example, Vista, it was enough to prohibit the launch of any new applications, including installation sources such as setup.exe. Parental controls also remained, which did not allow running programs and games from disks (or other media) or downloading them from the Internet.
The installation source is installation batch files.msi packaged into a single .exe file. Even though the installation files are uninstalled programs, they are still executable files.
Prohibiting the launch of third-party programs
In this case, the launch of any third-party .exe files, including installation files, except those obtained from the Microsoft application store, is ignored.

Now the launch of .exe files downloaded from any other sites and received through any drives and over the local network will be rejected, regardless of whether they are ready-made programs or installation sources.
Video: How to allow apps from the Windows Store only
Block all programs by setting Windows Security Policy
To prohibit downloading programs through the “ Local policy Security", an administrator account is required, which can be enabled by entering the command "net user Administrator /active:yes" into the Command Prompt.
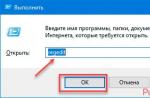
- Open the Run window by pressing Win + R and enter the command “secpol.msc”.
Click "OK" to confirm your entry
- Right-click on "Software Restriction Policies" and select context menu“Create a software restriction policy.”
Select Create Software Restriction Policy to create a new setting
- Go to the created entry, right-click on “Application” and select “Properties”.
To configure rights, you need to go to the properties of the “Application” item
- Set restrictions for regular users. The administrator should not restrict these rights, as he may need to change settings - otherwise he will not be able to run third-party programs.
There is no need to restrict administrator rights
- Right-click on “Assigned File Types” and select “Properties”.
In the “Assigned file types” item, you can check whether there is a ban on running installation files
- Make sure that the extension .exe is in the list of prohibited items. If not, add it.
Save by clicking "OK"
- Go to the "Security Levels" section and enable the ban by setting the level to "Prohibited".
Confirm the request to change the setting
- Close all unclosed ones dialog boxes by clicking “OK” and restart Windows.
If everything is done correctly, the first launch of any .exe file will be rejected.
Execution of the installer file was rejected by the security policy you changed
Changing the location where downloaded applications are automatically saved in Windows 10
When drive C is full, there is little space on it due to the abundance of third-party applications and personal documents that you have not yet transferred to other media, it is worth changing the location where applications are automatically saved.
- Open the Start menu and select Settings.
- Select the System component.
Select "System"
- Go to the "Storage".
Select the “Storage” subsection
- Follow the steps below for information about saving locations.
Browse the entire list for the drive label for applications
- Find the new application installation control and change the C drive to something else.
- Close all windows and restart Windows 10.
Now all new applications will create folders not on the C drive. If necessary, you can transfer old ones without reinstalling Windows 10.
Video: How to change where downloaded applications are saved in Windows 10
How to remove already installed programs in Windows 10
In previous versions of Windows, you could remove programs by going to Start - Control Panel - Add or Remove Programs or Programs and Features. This method is still correct to this day, but along with it there is another one - through new interface Windows 10
Classic Windows application removal scheme
Take advantage in the most popular way- via the Windows 10 Control Panel:

Windows Installer often asks for confirmation to remove the selected program. In other cases - it depends on the developer of the third-party application - the request message may be in English, despite the Russian-language interface of the Windows version (or in another language, for example, Chinese, if the application did not have at least an English interface, for example, the original iTools program) , or not appear at all. In the latter case, the application will be deleted immediately.
To uninstall a program through the new Windows 10 interface, open Start, select Settings, double-click System and click Apps and Features. Right-click on the unwanted program and remove it.
Select the application, right-click on it and select “Delete” from the context menu
Removal usually occurs safely and completely, excluding changes to system libraries or drivers in the Windows folder, common files in the Program Files or Program Data folder. In case of fatal problems, use the Windows 10 installation media or the built-in Windows wizard"System Restore".
Video: Uninstalling programs in Windows 10 using standard and third-party utilities
Why Windows 10 blocks installation of programs
Microsoft's software installation block was created in response to numerous complaints related to previous versions of Windows. Millions of users remember SMS ransomware in Windows XP, masqueraders as the explorer.exe system process in Windows Vista and Windows 7, keyloggers and other nasty things that lead to freezing or blocking of the Control Panel and Task Manager.
Windows 10 refuses to install uTorrent because the author or developer could not be verified
Ways to disable protection against unverified programs
This protection can and should be disabled when you are confident in the security of the program.
It is based on a UAC component that monitors accounts And digital signatures installed programs. Anonymization (removing signatures, certificates and licenses from a program) is often a criminal offense. Fortunately, protection can be temporarily disabled from Windows settings itself without resorting to dangerous actions.
Changing the Account Control level
Do the following:

Launching application installation from the Command Line
If you still cannot start the installation of the program you like, use the “Command Line”:

Most likely, your problem will be solved.
Why do programs take so long to install on Windows 10?
There are many reasons, as well as ways to solve problems:
- Problems with compatibility of older applications with the OS. The Windows 10 system appeared only a couple of years ago - not all well-known publishers and “small” authors have released versions for it. You may need to specify earlier versions of Windows in the properties of the program launch file (.exe), regardless of whether it is the installation source or an already installed application.
- The program is an installer-downloader that downloads batch files from the developers' website, and is not a fully ready-to-use offline installer. These are, for example, the Microsoft.Net Framework engine, Skype, Adobe Reader latest versions, updates and Windows fixes. If high-speed traffic is exhausted or the network is overloaded during rush hour with a low-speed provider tariff chosen for the sake of economy, downloading the installation package may take hours.
- Unreliable LAN connection when installing one application on several similar computers on the local network with the same build of Windows 10.
- The media (disk, flash drive, external drive) is worn out or damaged. Files take too long to read. The biggest problem is the incomplete installation. An under-installed program may not work and may not be removed after a stuck installation - it is possible to rollback/reinstall Windows 10 from an installation flash drive or DVD.
One of the reasons for a long program installation may be damaged media.
- The installer file (archive.rar or.zip) is incomplete ("Unexpected end of archive" message when unpacking the installer.exe before running it) or damaged. Download a newer version from another site that you find.
If the archive with the installer is damaged, you will not be able to install the application.
- Errors and shortcomings of the developer in the process of “coding”, debugging the program before publishing it. The installation starts, but freezes or moves forward very slowly, consumes a lot of hardware resources, and uses unnecessary Windows processes.
- Drivers or updates from the center Microsoft updates required for the program to work. Windows Installer automatically launches a wizard or console to download missing updates in the background. It is recommended to disable services and components that search for and download updates from Microsoft servers.
- Virus activity in the Windows system (any Trojans). An “infected” program installer that caused chaos in the process Windows Installer(clones of the process in the “Task Manager”, overloading the processor and RAM PC) and its service of the same name. Not
download programs from unverified sources.
Clones of processes in the “Task Manager” overload the processor and “eat up” the computer’s RAM
- Unexpected failure (wear, failure) of internal or external drive(flash drives, memory cards) from which the application was installed. A very rare case.
- Unreliable connection between the PC USB port and any of the drives from which the installation was carried out, USB speed reduced to standard USB versions 1.2 when Windows displays the message: “This device may perform faster when connected to a Hi-Speed USB 2.0/3.0 port.” Check the port operation with other drives, connect your drive to another USB port.
Connect your drive to a different USB port to resolve the “This device may perform faster” error.
- The program downloads and installs other components that you forgot to exclude in your haste. Yes, application Punto Switcher offered “Yandex.Browser”, “Yandex Elements” and other software from its developer Yandex LLC. The Mail.Ru Agent application could download the Amigo.Mail.Ru browser, the [email protected] informer, the My World application, etc. There are many similar examples. Every promoted developer strives to impose the maximum of his projects on people. They receive money for installations and conversions, and there are millions of users, so impressive amounts for installing applications grow.
When installing programs, you should uncheck the boxes next to the settings that suggest installing components you don’t need.
- The game you like is multi-gigabyte and single-player. Although game manufacturers make them online (this will always be fashionable, such games are most in demand), and scripts are loaded over the network, there is still a chance to come across a work in which there are dozens of local levels and episodes. And graphics, sound and design take up a lot of space, therefore installing such a game can take half an hour or an hour, no matter what the version of Windows is, no matter what performance capabilities it conceals: the speed of the internal disk - hundreds of megabits per second - is always strictly limited . These are, for example, Call of Duty 3/4, GTA5 and the like.
- Many applications are running both in the background and with open windows. Close the extra ones. Clean the list of startup programs from unnecessary ones using the “Task Manager”, the system folder “Startup” or third party applications, created to optimize performance (for example, CCleaner, Auslogics Boost Speed). Remove unused programs (see instructions above). Applications that you still do not want to delete can be configured (each of them) so that they do not start on their own - each program has its own additional settings.
CCleaner will help you remove everything unnecessary programs from "Startup"
- Windows has been working for a long time without reinstallation. A lot of system garbage and unnecessary personal files that are of no value have accumulated on drive C. Perform Disk Check, Disk Cleanup, and Windows registry from unnecessary trash from already remote programs. If you use classic hard disks, then defragment their partitions. Get rid of unnecessary files, which your disk may be full of. In general, put things in order in the system and on the disk.
To get rid of system junk, perform a disk scan and cleanup
Managing programs in Windows 10 is no more difficult than in previous versions of Windows. Apart from the new menus and window designs, everything is done almost the same as before.
When preparing to install Windows 10 or during the process itself, problems may arise that prevent you from completing the update procedure. There are times when the installation freezes, is interrupted, displays an error, and other similar situations, from which you can recover yourself using the instructions below.
Problems before system installation
To install the system, you need installation media, which is recommended to be created using the official Microsoft program. After you install it, go through the first steps with choosing parameters and system capacity, you will be asked to choose which of the connected media to turn into installation media. The list provided by the program may not include the flash drive that you wanted to use for further Windows installations 10. This can happen for the following reasons:
- The flash drive was not properly prepared. The flash drive must be empty, formatted in FAT32 or NTFS format and have at least 4 GB of total capacity. If at least one of the parameters is not met, then the Windows 10 setup program will not see the flash drive;
- The USB port into which the flash drive is plugged is faulty, try moving it to another port and check the result, remembering to restart the program;
- restart your computer, maybe there are some things being done with the flash drive unfinished operations, so you can’t work with it, and after restarting the device they will all end;
- check whether the computer itself sees the flash drive, if not, then the problem and the reason lies there;
- if all else fails, then replace the flash drive or use any other method of turning it into installation media, for example, download a system image and burn it manually.
Endless updates
If in the process of creation bootable media With the new operating system, updates take forever to look for, you need to close the update center:
Problems during the installation process
All of the following errors and problems occur during installation: freezing, interruption, incorrect outcome of the process, etc.
The disk contains an MBR partition table
This error occurs when selecting a disk or partition designated for installing the operating system itself. It appears due to the fact that the hard drive is formatted in a format that does not correspond to the mode set in the BIOS. There are two ways to get rid of this error: change the operating mode in the BIOS or reformat the disk. The second option is recommended, since the mode selected by default in the BIOS is the most optimal. You can reformat the disk in the standard way, but at the same time losing all data from it, or using a third-party program, interrupting the installation process, but saving all the information.
 Error "Installing Windows on this disk impossible. The selected disk contains an MBR partition table."
 Changes to BIOS settings
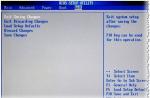
By default, EFI mode is activated in the BIOS, which only works with disks in GPT format. Since your drive is in MBR format, you will have to change the mode to Legacy. To do this, turn off the computer, start turning it on and as soon as the first signs of booting appear, press the F11, F12 or ESC key to activate Boot Menu. Which of the possible buttons will be assigned in your case is described in a small footnote that appears on the screen when loading begins. In the drop-down list, you will need to select your flash drive, but without the UEFI or EFI prefix in the name.
 We change the boot order so that the first place is a flash drive without UEFI and EFI
 You can also change the boot order in the BIOS itself, in the Boot or “Boot” section, putting the name of the flash drive in first place without the UEFI and EFI prefixes. After this, all that remains is to exit the Boot Menu or BIOS, after saving the new settings. Done, you can continue installing Windows.
 We put a flash drive without a UEFI and EFI prefix in first place
 Changing the disk format to MBR using the standard method
Format changes will be made via command line. The disadvantage of this method is that you will have to delete all the data on the disks, so copy it to another medium in advance to save it.

Changing the disk format to MBR using a third-party program
To convert using a third-party program, you can use the Minitool Partition Wizard Bootable application, the image of which must be downloaded from the official website of the developer and written to a flash drive formatted in FAT32 format. The advantage of this method is that you don't have to delete data from the disk to convert it.

Once the drive is converted to GPT format, enter the Boot Menu again and boot from the installation media to return to the Windows 10 installation.
The system does not install on the SSD disk
The reason why install Windows on SSD drive It doesn’t work, most likely the reason is that the BIOS operating mode is set to IDE instead of the required ACHI. To fix this, follow these steps:
- While turning on your computer, press the Delete key on your keyboard several times to enter the BIOS. Another button can be used to enter the settings menu, it depends on the model motherboard, but when the computer boots, a footnote appears on the screen that will tell you how to enter the BIOS.
 Entering the BIOS
 - Once you enter the BIOS, you will see either the stock BIOS or a newer UEFI version. There are also possible options for the presence of the Russian language and its absence. Partitions in different BIOS versions may have different names, so your main task is to find the mode switch from IDE to ACHI. In one version of UEFI this is done like this: first go to the Setting section.
 Go to the Settings section
 - Switch to additional settings.
 Open additional settings
 - Open the subsection “Built-in peripherals».
 We enter the section “Built-in peripheral devices”
 - In the “SATA Configuration” block, find the required line and change the mode to ACHI. Done, all that remains is to exit the BIOS, saving all the changes made, and you can return to installing the new OS.
 Changing the SATA mode to ACHI
If changing the mode does not help, then the reason can be looked for in the following parameters:
- There are several disks connected to the computer, this may cause the installation to fail, so leave only one of them and try the installation again;
- The flash drive from which the installation was carried out was formatted in NTFS format, and not in FAT32, suitable for SSD drives. In this case, you need to reformat the media and write the system image onto it again;
- If none of the above helped, then try installing from disk, sometimes this helps solve the problem.
Blue screen appears during installation
A blue screen with text and a description of the error occurs when the installer encounters an insurmountable error and cannot continue the process. In this case, it will automatically erase everything installed files updates and will roll back the system to the moment when the installation procedure had not yet begun.
 Installation aborted due to blue screen
 After the rollback is complete, you can start the installation again. Perhaps this time it will be stable. If not, blue screen appeared again, you need to return to the system already existing on the disk and delete everything in it unnecessary applications and disconnect all unnecessary devices connected to the computer. Most likely, the system cannot install updates correctly precisely because third party programs and devices.
If this does not help, then copy all important information from the disk to third-party media, and go to manual installation, during which you can delete all information from the disk. Do just that, erase all data from the disk partitions and install Windows 10 on a clean partition.
A black screen appears during installation
If during installation of the system a black screen appears on which nothing is displayed or only the mouse cursor is displayed, then there may be several reasons for this behavior of the computer:

But before solving the problem, just wait, the system may still be carrying out the update process in the background. You should only think about solving the problem manually if the black screen does not move for more than half an hour.
Driver Update
- To enter Safe Mode, we will use the Command Prompt. To call it, return to the Windows 10 setup program again, to do this, turn off the computer by holding down Power button for 10-15 seconds and turn it on. Once the program is open, use the key combination Shift+F10 to launch the Command Prompt.
 Activate the command line with the combination Shift+F10
 - Run the command bcdedit /set (default) safeboot network, then the command shutdown /r and, when asked, confirm the action by pressing the Enter key again. The computer will reboot itself and turn on safe mode.
 Run the commands bcdedit /set (default) safeboot network and shutdown /r
 - When the startup is complete, open the device manager, find the video card in the general list and right-click on it and select “Update drivers.” Go through the process automatic update or, if the computer cannot find the drivers itself, download them from the official website of the company that created the video card and install them manually.
 Update video card drivers manually or automatically
 - After the driver update is completed, run a command prompt with administrator rights, run the command bcdedit (default) /deletevalue safeboot to deactivate automatic start in Safe Mode, turn off your computer and return to the Windows 10 upgrade process.
 Run the command bcdedit (default) /deletevalue safeboot
What to do if the installation process freezes
The installation process may freeze at the following stages:
- when the Windows logo appears;
- at the stage of file preparation;
- right during installation, when the screen displays that the process is 0, 10, 99, 32% or another percentage complete.
Keep in mind that the installation process can remain at one percent for up to several hours if the computer is not particularly powerful or is overloaded with files. Therefore, first wait at least two hours, and only if nothing happens after that, you can proceed to manually fix the problem.
It’s impossible to say for sure why the freeze happened in your case, so check all the options that could cause the freeze, one by one:
- Disconnect all unnecessary devices from the computer, leaving only the keyboard, mouse and monitor connected. Also remove any excess SATA cables going to the CD port and USB flash drives.
- Check that the BIOS settings are correct and that the installation media is in the correct format. Remember that the parameters will be different for SSD and HDD disks, BIOS and UEFI, GTP and MBR formats. Somewhere you need to enable ACHI mode, and somewhere IDE, somewhere you need to format it in FAT32, and somewhere in NTFS, and so on. Based on type and format hard drive, as well as the BIOS version, find the specifications suitable for your build on the Internet and install them.
- Before you upgrade to Windows 10, be sure to install all available updates on your existing operating system. This can be done through the built-in Update Center program, which is present in Windows 7, Windows 1, and older versions.
- If the installation freezes when using a USB flash drive as installation media, try installing from a CD.
- Don't forget to make sure that your computer meets the minimum requirements for Windows 10, they are presented on the official Microsoft website.
- If you can’t install the system on top of the old, already installed Windows, then at the step of managing hard drive partitions, format all the blocks and install Windows 10 on a completely blank disk.
- If you are not installing the system on a clean hard drive, then remove the antivirus; it may interfere with the update. Also erase all programs that make changes to the interface and other system parameters of the system.
Error: "Could not create new partition"
When installing Windows manually, sometimes an error appears stating that it is impossible to create or find an existing partition. It appears because there is no unallocated memory or partitions on the disk that could be allocated for installing the operating system. The way out of this situation is to create the necessary partitions manually. This can be done in two ways: by deleting existing partitions and creating new ones, or by reducing existing partitions and distributing freed memory.
 Error "We were unable to create a new partition or find an existing partition"
 Standard method
You can delete partitions and create new ones right in the same window in which you received the error.

Via command line
Using the command line, you can not delete partitions, but compress them without losing the files that are on it.

The installation causes the computer to restart repeatedly
It is normal for your computer to reboot during installation; it may reboot five to six times to get everything configured correctly. But if this operation is repeated too many times, then you need to interrupt the process manually and return to the previous installed system and do the following:

The installation program window does not appear
If you are faced with the fact that the installation program window does not appear, then follow the instructions from the paragraph “What to do if the installation process freezes,” described above in the article.
 The installation window did not appear after booting from a flash drive
 Device drivers not found
An error stating that device drivers were not found appears when you try to install Windows 10 for the following reasons:
- USB0 flash drive is connected to port 3.0 or, conversely, USB 3.0 flash drive is connected to port 2.0. Switch it to the desired port and repeat the installation.
- The system image was recorded incorrectly or was damaged from the start. Rewrite it. Better use non-standard Microsoft program, and burn the image using UltraISO.
- Use a disk for installation, not a flash drive.
Bottom line: Use a different media, port, or image to get rid of this error.
Code errors when installing Windows 10
If errors occur during the installation of Windows, the description of which contains a unique code, then the best way out in this situation is to search for a solution using this particular code. Based on the unique number, which usually looks like 0xc1900101, you can find a solution specifically for your case. If it is not available on the Internet, then contact the official Microsoft support service and tell them this code, they will provide you with instructions for further actions.
 During the installation of Windows 10, an error with the code may appear
 Video: problems during installation of Windows 10 and their solutions
So, if errors occur during the installation of Windows 10 or the process does not complete, freezes or is interrupted, then first of all you need to check that the BIOS, installation media and hard drive are configured correctly. The next step is to check the computer components and drivers for them. The best way out is to clean the disk by formatting and install the system on a clean partition using the official Microsoft program.