Work with the browser for many begins with the home page. Its correct setting will provide increased comfort and quick access to the necessary information. This article will discuss how to change the start page in Yandex.Browser.
Since Yandex.Browser is based on the Chromium engine, its interface is as similar as possible to Google Chrome. And despite some changes made by Yandex developers, browser control is identical.
To change the home page in the browser, open the menu Settings. To do this, click on the button with three horizontal stripes, which is located in the upper right, and select the menu item Settings.

In the menu that opens, you need to find the section Where to start?

The browser to choose from offers, let's say, 2.5 settings. First option - Open quick access page. By choosing this method, this window will appear when the browser is launched:

These are the default windows, with further use of the browser, they will change depending on the user's preferences. Unnecessary windows will be removed and replaced with tabs with frequently used sites. The user himself can also manage them: move them in all directions, remove unnecessary windows, add and pin interesting pages.
Second option - Restore tabs opened last time. That is, restoring the last session. Convenient for users who constantly keep the same sites open (for example, news or social networks).
And in addition to this item, there is a setting - Open www.yandex.ru if there are no tabs. That is, if all the tabs were closed before the browser shutdown, then the next time you start the program, the start page will be the Yandex search service.
Unfortunately, the browser does not have the ability to set the desired site as the start site. This was probably done to ensure that people use Yandex services exclusively. However, the "Scoreboard" function provides more opportunities with the help of which it is possible to get to your favorite site with one click.
Recently, when installing most programs, you can observe the presence of the Yandex.Bar service in the installation package. It would seem that at one of the stages, the corresponding marks can be removed, but sometimes you can simply forget about their presence and install not only this service, but also make Yandex the default web page.
You will need
- Internet browser.
Instruction
when you click the + sign (new tab), the search engine page appears - this is very inconvenient when using the quick start panel. At the moment, in any browser, you can prevent the display of the page by default or change it to another one.
Before the reader gets acquainted with a detailed consideration of the question of how to remove "Yandex" from the start page, it makes sense to touch on the main reason for the difficulty that many users have, the name of which is naive inattention. Indeed, when installing this or that software, many of us do not even pay attention to the fact that the installation windows have some kind of "consent checkbox". Recklessness and short-sightedness subsequently have a not entirely favorable result. Now in detail about everything.
Race for the championship
Each developer of an Internet product strives to occupy the highest level of demand. The question that arises is: "How to remove Yandex from the start page?" - the result of the inventive cunning of programmers. Agree, the more difficult the decision, the more time it takes to resolve it. As a result, seeing inexperience, the user becomes a "voluntary hostage" of the scenario of the Internet game "Yandex: who is not with us, will be ours!" imposed by someone. Let me free you from the excessive care and effective obsession of professional service developments. To your attention five different ways to remove "Yandex" from the start page. Let's start!
Standard option number 1. When not everything had time to "register"
The web browser, no matter which one, has a diverse set of tools in its arsenal: extensions, plug-ins, applications and an integrated configuration environment. The principle of their work is practically no different, but the interface of each of them still has signs of individuality. Therefore, to resolve the issue of how to remove Yandex from the start page, the two most popular browsers will serve as an example.
Google Chrome
In this case, when you start Chrome, those pages that you specified in the corresponding list will be loaded.
- Activate in the section "Initial group" the item "Quick page ...".
- In the paragraph below "Appearance" must be marked with a marker "Show button ...".
- By clicking on the "Change" link, write down the address of the main page (start).
Now, the "Domi" icon will appear at the top of the screen on the left and by clicking on it, you will be taken to the main page, the address of which was specified in the settings.
Mozilla Firefox
- The upper left corner is "Settings", in the drop-down menu, select "Settings" again.
- In the window that opens, in the "Home page" item, enter the required starting address.

Original version #2. "Infected" shortcuts
How to remove the Yandex start page if standard methods are powerless? Check the browser icon:
- Right click on the shortcut.
- Select "Properties".
- In the "Object" checkbox, carefully review the path (directory) of the called browser.
- If you find any "tail" with "Yandex" content, delete the "obtrusive trailer".
Extraordinary Option #3: Host Binding
- Double click: "My Computer".
- Open the system partition of the disk.
- Go to the Windows folder, then system32.
- In the search bar, write etc.
- We open the found file, which, by the way, is located in the system drivers.
- Using a standard notepad, we look at the content of the data. However, they just need to be removed.
- Save your changes and enjoy!

Extravagant option number 4. Influential personality
If none of the above methods have had the desired effect, and everything remains as before ("the uninvited guest" does not leave the browser), most likely, the question of which browser requires "extended" consideration.
Google Chrome
- We go to the settings.
- On the left side of the interface, click "Extensions".
Mozilla Firefox
- Menu "Settings".
- Then "Add-ons" - "Extensions".
Attention: seeing the difficulty of understanding why this or that application is installed, and sometimes the "pest" can disguise itself as anything, just methodically disable them, analyzing the result of your actions with restarting the browser. Having found the "culprit" of your misadventures, delete it.
Final Option #5. Browser "Metastases"
Sometimes the question of how to remove the start page of one or another Internet "invader" is solved quite simply.
- Go to the control panel.
- Then in the menu of installed programs.
- Review the list carefully. A variety of Tool Bar or Conduit applications are the "cancer" of your Internet browser.
- Uninstalling will solve your problem.
Finally
Remember that every search engine is interested in you as a regular user. You can be offered a lot of useful and, in general, free applications, extensions and programs. But if something starts to "strain" you, think about it. Perhaps the answer is somewhere nearby.
Hello everyone So I don't use Google Chrome, but believe me or not, I'm already thinking about switching to it. Something is going on with Mozilla, well, completely incomprehensible. In short, she began to load my processor more, loads it with something, and as I understand it, Mozilla does not really like a lot of tabs. And it so happened to me that I need a lot of tabs to be pinned. In general, be that as it may, sometimes I have to restart this Mozilla ..
In general, it’s hard for me to write this, I am a devoted fan of Mozilla, this is the second browser after Opera 12 and I thought that I would be so good with Mozilla. But apparently not just Google Chrome is gaining popularity…
In fact, Chrome is not so bad, as some advanced users claim. Yes, I know that there is a problem with the fact that it consumes a lot of RAM. But I think that this can be solved with an umbrella. A joke, I mean with the help of a special plugin that puts inactive tabs to sleep after some time. That is, it dumps all the contents of the tabs to disk, it's kind of called swapping.
So, in this article I will answer some questions about Google Chrome, I hope that you can find the answer to your particular question here. Here we go?
How to make Yandex the start page in Google Chrome?
Yes, I think that Yandex, which always uses its own type of software in some way, will of course be very happy if someone wants to make it as a start page .. They even filed an extension for this ... (I’ll write more about this below)
Yandex really seems to be better than Google, but this is my opinion, Yandex is just a purely Russian search engine. And it seems to me that Yandex understands better what we are looking for in it than Google. In the sense that he understands Russian better. I don’t use Yandex so often, I can even say that it’s rare lately, but I confess that it happened that I liked the results in Yandex much more. In general, I think it can still switch to Yandex, as the main search engine?
In general, things like this
So, first we launch Chrome and select the Settings item in the menu:

You can also get into these settings if you just go to this address:
chrome://settings/
Everything, we are in the settings, it's good. Let's start from the start page, there at the beginning of the settings there is such an item as Open at startup, specify the Specified pages here and click the Add button:

The following window will appear:

You see, there I have Google here - if you have something there, then press the cross in front of the address and then, where the input field is, write the Yandex search engine there. It can be either just a light version of ya.ru or a full version of yandex.ru (there is more news there). As they wrote the address of the search engine, then click OK:

That's it, after clicking OK, you can close the browser, launch it again in a second and make sure that the Yandex search engine will now load
But Yandex did something else to make it easier for users, so that nothing needs to be changed there ... You just need to install a special extension! And to do this is very simple, you just need to go to Yandex and click here:

Then Yandex itself will tell you what to click:


That's it, now you will always have a Yandex search engine, don't worry!
How to remove Yandex from the start page in Google Chrome?
Removing Yandex from the start page in Chrome is almost the same as adding it, that is, as I wrote above. But so that I can be sure that you will succeed, then I will still show you how to do it. Look, go to the settings again, you can quickly do this if you go to this address:
chrome://settings/
Now there is such a thing as Open at startup, look, there are two options here - you can choose either to open previously opened tabs, or to open a new tab. That is, if you choose some option, then Yandex will no longer be there at the start of Chrome. But nevertheless, I advise you to delete the start page.
If you suddenly see here that this will be written here:

This means that you have an extension from Yandex for its own start page, then just click Disable extension and that's it
So, to remove the start page, then click the Add button here, this one:
And there will be the address of the Yandex search engine, in front of it, just click on this cross and that's it:

After that, this line with the address will disappear for you and all you have to do is click OK. That's it - you removed Yandex from the homepage in Chrome, cheers!
How to enable NPAPI support in Google Chrome manually?
What is NPAPI anyway? I will not load you with terms, I will not hammer your head, I am not like that. I will say that, as I understand it, this NPAPI is such an interface for connecting some plugins. That is, if there is no NPAPI support or it is disabled, then there may be problems with plugins or some of them will not start at all. It is supported by many browsers, not only Chrome.
Hmm, but I found something else interesting, in short, here's the thing, Chrome only supports this NPAPI up to the 45th version. That is, in Chrome only up to the 45th version there is this NPAPI! This cant is so cant, I don’t even know if I can turn it on or not, well, let's see ...
You need to open Chrome's secret settings, for this go to this address:
chrome://flags/#enable-npapi
Well, what do you think? Look, I have a trick here, because the browser is far from the 44th version, so there is no NPAPI here:

That is, here I held down Ctrl + F, well, to find the setting with NPAPI, it may still be there, but it's not here, period What needs to be done? I will download the 44th version of Chrome and see if I can enable this NPAPI there.
Yes, it was not easy to find this 44th version .. In short, it was not so easy for me to find it, some person posted it on the Google forum, so I thought that it was best to download it from there. Here is the link:
There is version 44.0.2403.157. But you only need to download the offline installer! Another small cant is that there is an English version (later I will write how to change the language). In general, I installed it, everything was normal, this is the 44th version.
Maybe you still have such a jamb that your profile will not start with the old version of Chrome (type error cannot load profile). Well, that is, the profile is from the modern version of Chrome, and you installed the old one, as a result there may be problems, you know? Just in case, copy the profile. But where is the Google Chrome profile stored? The current profile is stored in the Default folder, here is the path to it:
Where VirtMachine is, then this is where your computer name should be. In general, I mean that if anything, you can copy the Default folder completely before you install the old 44th version of Chrome. Just in case, I would say so. Well, if you bet at all. Because I have put
Although, again, it seems that the 44th version is not such an old woman ..
By the way, to find out what version of Google Chrome is worth, then go to this address, everything is written there:
chrome://chrome/
And I decided to check if I can disable NPAPI in it, is it wiring ..?
In general, I entered my own this command:
chrome://flags/#enable-npapi
And here is the result, there is something like Enable NPAPI:

That is, here you just need to click on Enable and that's it, NPAPI will turn on and everything will be fine! Only then you will need to do a reboot and that's it:

So no divorce! I do not think that this version, the 44th, is so bad and I think that it will work normally for a long time. If NPAPI support is critical to you, then you should install it
By the way, Google disabled this NPAPI support back on September 1, 2015 and it's due to security..
Also, if you have any problems with the flash player, well, it does not work and it seems to you that this is due to NPAPI, then look at this link, this is the official Google forum:
There may be useful info for you, and by the way it says about NPAPI
How to enable Russian language in Google Chrome?
Here I have Chrome in English, it's certainly not a tragedy, but it's much better when it's Russian, well, everything is so elementary clear. Not everyone knows English well.
So in Chrome we call the main menu and select the Settings item there:

The settings page will open (by the way, it is also located at chrome://settings/). Here we turn the mouse to the very bottom, there will be something like Show advanced settings, click on this:

Now look for the Languages settings there, and there you click the Language and input setting button:

The Languages window will open, here you need to click the Add button:

Then a menu will appear, here you need to select Russian, so I already chose it here:

After that, it will appear in the list of languages - it must be selected there, then click the Display Google Chrome in this language button:

Then it will be written that they say that in order for the Russian to work, you need to restart Chrome:

In general, we still press this Done button in this window:

Now we close the browser and start it again, open the menu and rejoice, everything is now in Russian:

Where can I see saved passwords in Google Chrome?
Saving passwords is convenient, you don’t need to remember everything, let Chrome remember it for us. But sometimes it happens that you need to look at these passwords, for example, when you forgot your mail password. Chrome remembers him, but you don't, that's such a joke
So, let's go - call the main Chrome menu and select the Settings item there (or just go to chrome://settings/):

Scroll the mouse to the very bottom, click there on Advanced settings:

There will be settings such as Passwords and forms, then you need to click here:

And here you will see passwords and logins, look here:

To see some password, you need to click on it (that is, on these dots) and then the show button will appear there:

After that you will see your password! In order to quickly find some password, enter part of the site in the search field, it will be faster:

That's it, it's simple. To be honest, I thought that Chrome does not have such a function ..
Where does Google Chrome store bookmarks?
So bookmarks are sites that you enter into a special browser menu, to which you always have quick access. Well, I think that this is clear to you. Now about where they actually are. Bookmarks are of course stored in the user's profile folder. So in Windows XP they are stored here:
C:\Documents and Settings\\Local Settings\Application Data\Google\Chrome\User Data\Default\Bookmarks
And in Windows 7 and newer versions here:
C:\Users\\AppData\Local\Google\Chrome\User Data\Default\Bookmarks
At the same time, Bookmarks is not a folder, it is a file! Well, I think you understand. So I took it and checked, my computer is called VirtMachine, I replaced it with the name of the computer and went to this address:
C:\Users\VirtMachine\AppData\Local\Google\Chrome\User Data\Default
And here I see this Bookmarks file, this is all the bookmarks:

I tried to open it with notepad and this is what it showed me:

Well, I'll also show you how to export bookmarks. So look, go to this address:
chrome://bookmarks
Now there is such a button Arrange, you press it and there is such an item at the bottom as Export bookmarks to HTML:


Then this HTML file can also be imported back into Chrome, well, only in the menu you choose not export, but import, I hope everything is clear
How to enable Java support in Google Chrome browser?
I don't have good news for you! Google, starting from version 42, turned off Java support, I can’t say how much this affected the browser, because my sites open normally as before. But I feel that this trick is related to NPAPI (I wrote above) and that all these shutdowns led to the fact that some applications stopped working in the browser. Well, there type of games and the rest. There is only one way out - to install an older version of Chrome, I seem to have installed the latest one, where there is still Java support, this is version 41.0.2272.76.
Java support is important for the correct operation of sites, especially in the multimedia part. If it is disabled, there may be problems, but I don't have any. Maybe because I just look at sites, I don’t play anything there and I don’t listen, well, that is, I just read.
First, make sure you have the latest version of Java, if in doubt, you can download it from here:
There you need to download the installer, then close all browsers and install this Java.
Now for the Java plugin itself, go to this address:
chrome://plugins/
And see if the Java(TM) plugin is enabled here:

As you can see, there is this Java(TV) plug-in here, but this is also the version, not the latest, but the 41st one .. Right now, I already have the 52nd version, how!
Well, these are the pies, why they turned it all off, I don’t understand, but the most interesting thing is that I definitely didn’t expect such frills from Google ...
How to enable incognito mode in Google Chrome?
Incognito mode allows you to leave no traces in the browser, and you know, this is often a rather necessary feature. For example, you came to visit to drink tea, and you want to see something on the Internet, but you would not want anyone else to know about it .. Well, about what you were looking for on the Internet .. That's for this and there is a private mode or incognito, this is the same thing by the way
Private mode literally leaves no traces, but it only works for the browser. That is, the provider still sees which sites you go to, even if you have this private mode enabled, so keep this in mind. It’s just that the provider doesn’t care what you turn on there, it sees the connections of your computer with certain ip-addresses, which are essentially sites, that is, it’s not so difficult to find out the name of the site by ip-address. By the way, I wrote about what the provider sees.
Well, that's enough, but that I didn't start writing something about that ..
Enabling private mode is very simple, look, in Chrome, call the main menu and select this item there:

Then a window will open, it has an icon with which you can always determine whether you are in incognito mode or not. Here is the icon:

Well, that's all, as you can see, everything is simple and easy!
How to transfer favorites from Internet Explorer to Google Chrome?
So you set yourself Chrome, everything is fine, but the bookmarks are left in Internet Explore, what to do now, well, what? Don't worry, Chrome has a function to transfer favorites from IE! Well done developers!
Here's how to do it, open the main menu and select Bookmarks > Import:

Then a menu will appear where you need to select the browser from which you want to import data, and specify what exactly to import:

Everything, then you will only see such a message that everything went fine:

How to clear the cache of Google Chrome browser?
What is the cache for? Look, when you visit pages on the Internet, what are you doing there? You probably read, well, or look, in general, it doesn’t matter. But, most often the text changes on the pages, don't you agree? The design doesn't change every day... Is that why then we have to always load it when we look at the site? This is where the cache comes to the rescue! All data that does not change or does it rarely, then all this is entered into the cache, so that later it is not downloaded from the Internet, but pulled from the cache. And then the same thing to boot, it's not cool!
This is the beauty of the cache, it speeds up the loading of the same pages! As a result, the browser downloads only text and some small things, and all this does not require a lot of Internet. This is me to the fact that with the cache, even the mobile Internet will become a little faster ...
But they say that Chrome is stupid because of the cache, I really didn’t notice this, but users still write about it, there is no smoke without fire .. I don’t know how to explain it, but if anything, then I’ll show you how to clear the cache in Chrome . You can do it, there is nothing complicated here!
So, we call the main Chrome menu and select the settings there:

Now let's go to the history, for this, click here:

![]()
Now look, choose here for the entire period and leave only one checkmark, this is about files in the cache, this checkbox:

By the way, in this window, well, here's where you can clear the cache, you can still get into it by simply going to this address:
chrome://settings/clearBrowserData
Well, that's all guys, I hope that this info was useful to you, all the same, damn it, I tried ..
Good luck and good mood, so that everything is fine with you and that you smile more often
It grows every year, the service creates more and more services and opportunities for users. One of the latest innovations is the Yandex.Zen news feed. According to the announcements of the developers, the service is designed to simplify the search on the Internet and allow you to see only interesting and useful publications. In reality, everything is a little different: the extension is full of ads, large blocks of not very useful information, and significantly consumes system resources. We will tell you how to quickly configure or remove the program not only from the Windows operating system, but also from smartphones and tablets.
Setting up Yandex.Zen in different browsers.
Yandex.Zen is an individual feed with recommendations built into the Yandex browser. The system personalizes the feed based on the sites the user visits. Individual selection of material is carried out on the basis of an analysis of the content read and viewed by the user. For example, if you frequently search for information about sports, the feed will automatically display news and articles on that topic without duplicating information you've already seen.
ADVICE. Analysis of queries and search history does not identify the user. There is no need to worry about the security of the service.
The tape itself is vertical. The title of the recommended article is displayed at the bottom of the screen. To read it, just move it up. The Android system makes it possible to place the ribbon on the notification bar. The advantage of Zen is that the service gradually adapts more and more to the user. Initially, extra recommendations and news may seem intrusive, but the more the system gets to know you, the more useful it will become. Settings allow you to adjust the displayed information and block unnecessary information. The program is constantly being improved and improved. However, for many users, it seems too intrusive. Consider how you can enable, configure and disable it.
Ways to turn on
If you decide that the utility is useful and you want to use it, enabling Yandex.Zen will not be a problem. To do this, just install Yandex Explorer on a computer or smartphone, and Zen will appear automatically. If this does not happen, then perhaps the tape is simply disabled.
How to enable Zen on PC
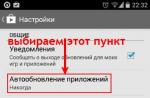
- Click on the "Menu" icon.
- Open the settings tab.
- Launch Appearance Settings.
- Check "Show personal recommendations feed".
ADVICE. If there is no such item, then the matter may be in the updated browser interface. In this case, enable the new interface and restart the browser.
In some cases, you first need to download browser updates. For this:
- Open "Menu".
- We are looking for the item "About the browser" (it can also be called "Advanced", "About Yandex" and the like).
- Update using the corresponding button.
After restarting the program everything should work.

Shutdown methods
If you decide that you do not want to personalize the tape and are ready to remove it from the PC screen, you need to take a series of measures to clean up the browser.
How to remove Yandex.Zen from the start page
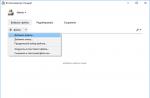
- Open browser settings.
- We are looking for the "Personal recommendations" tab.
- We uncheck.

How to remove an extension from a computer
- Remove all Yandex utilities.
- We clean the registry using any convenient program.
- Signing out of the account
Everything is quite simple, but each browser used has its own nuances. Let's take a closer look at where to click and what to do.
Delete from Yandex.browser
To remove Zen from the Yandex browser, do the following:
- We open the browser itself.
- Find the "Settings" menu.
- Disable the "Show Zen in New Tab" feature.
Thus, the feed will be disabled on the main page as well.
Disable in Chrome
You can disable Yandex.Zen in Google Chrome in much the same way as in the previous paragraph. The difference lies in some features. Firstly, often a personal ribbon is installed in Chrome without the consent of the owner. Secondly, a simple shutdown will not be enough. Additionally, we do the following:
- As in the case of the previous browser, we disable all Zen-related settings in the "Menu" item.
- We change the home page in the same panel.
- We go to the "Extensions" item and delete all installed utilities related to Yandex there.
IMPORTANT. If you delete "Visual masonry", then it will be impossible to restore them. We advise you to double-check manually and remove only what is necessary.

- Next, we change the start pages when adding new tabs. You can do this in the "Open at startup" tab and add the specified addresses in the appropriate paragraph.
- You also need to remove the Yandex service from the specified search engines. To do this, remove everything from the search settings except Google. We click "Finish".
- We close the browser and remove Yandex from the taskbar using the basic Uninstall Programs utility.
Now you can restart Google Chrome and check if the problem is still there.
We clean Opera and Mozilla
The algorithm for disabling Zen in Opera and Mozilla is identical, since the ribbon appears in these browsers only with the installation of visual bookmarks. Most often, this happens automatically when downloading some software that adds bookmarks on its own during installation.
ADVICE. To avoid such situations, remove all unnecessary checkboxes from the installation items.
We are taking the following measures:
- Open the "Settings" menu.
- As in the previous steps, uncheck the box for personal recommendations.
- Disable or completely remove all unnecessary extensions. In the Mozilla browser, this can be done in the "Advanced" tab, in Opera - "Manage Extensions".
You can also use the universal method - the Adguard ad blocker.

Removing Zen on Android
Removing an extension from a phone is much easier than from a PC. To do this, just disable all Zen items in the Android or iOS browser settings.
As we can see, solving the problem is quite simple. If none of the methods helped, then you can simply reinstall the web browser. After the measures taken, do not forget to clean the registry for the normal functioning of the PC and to prevent new problems. We hope this information has helped you. If not, ask questions in the comments!
What is Yandex.Zen. "Yandex.Zen" is an addition to the browser, a feed with articles, photos, videos, etc. All information collected taking into account the preferences of the person using the computer will be presented in the form of a number of small cards. When you click on one of these previews, a new page will open in front of the user, where you can read the article in its original size.
Note! From an etymological point of view, the word "preview" (preview) is a borrowing from the English language.
To enable Yandex.Zen in Yandex.Browser, you will need to download the web browser of the same name. Below you will find instructions for installing this browser.

To customize the news feed, while viewing the information, the user will have to rate each article. If you do not like this or that news, click on "dislike".

Otherwise, like it.

All information will be filtered by the application based on the user's preferences.
Turning off the Yandex.Zen application

Service disabled. Congratulations!
Installing a news feed on Google

Add-on installed. The service is working properly.
Installing the Yandex.Zen news feed in Mozilla

The publication feed is set.
Installing and disabling "Zen" on a mobile phone
You can also follow the news from your smartphone! The user will need to download the mobile Yandex.Browser. To set up the news feed, after activating it, you will need to

Disabling "Zen" in "Google"

The news feed is disabled.
Disabling Zen in Mozilla

The news feed is disabled.
Removing the Yandex news feed
To permanently get rid of annoying news, the user can remove the web browser and reinstall it. So this article will provide instructions for removing Mozilla.
- Click on the "Start" button.

- Click on the "Default Programs" line.

- In the left corner of the screen (bottom), find the phrase "Programs and Features". Click on it.

- In the list that opens, select the browser where Zen was installed. Double click on this software.

- In the window that appears, click the left button of the coordinate device on “Next”.

- Click "Delete".

- Click on the "Finish" button.

- Open another browser.

- Type "Mozilla" into the search engine. Click on the "Find" button.

Enter "Mozilla" in the search engine and click "Find"
- At the very top, find the "Download" button. Click on it.

- In the tab that opens, click on the word "Download" again.

- Open the folder containing the document.

- The GUI will appear. Click on "Start".

- Click on the "Next" button.

- Click on "Next" again without changing the installation type to "Typical".

- Click on the "Install" button.

Note
If you don't want Mozilla to be your default web browser, remove the arrow next to "Use Firefox as my default web browser."

Click on the "Finish" button.

Browser installed. Zen doesn't work.
Video - How to remove Zen from the main page of Yandex