Hello friends! Many articles have already been written by me on what to do if Windows 7 does not boot. But what needs to be done first of all if your computer refuses to start, I have not written yet, or maybe I wrote :). Well, it's okay, it's better twice than never :).
This will be some advice to yourself on how to give first aid to the system in case of its failure. I usually write such tips and describe in them how to restore Windows 7 in case of a specific error. But today I will write how to try to cure the system from the appearance of various errors and boot problems.
If you turn on the computer, and it does not turn on directly. Well, you know how it happens, a certain error appears, a blue screen, or the computer just reboots itself, then you need to try to start the computer with the last successful configuration with working parameters.If we talk about what can cause Windows to stop loading, then there are a lot of options. For example, a failure can occur after installing a program or driver. After cleaning your computer from viruses. After an improper shutdown (when, for example, a power outage). I had that in the evening I turned off my computer normally, and in the morning it no longer starts, and it seems that it did not install anything, but here it is.
In such cases, the first thing to do is try to start the computer with the last known good configuration. If this does not help, then you already need to look for other ways to solve the problem, for example, search by mistake. But as my practice shows, it very often helps to bring the computer back to life. Moreover, all these actions can be done in a few minutes. More details now.
How do I start Windows 7 with Last Known Good Configuration?
Everything is very simple. We restart the computer and immediately actively press the key F8.
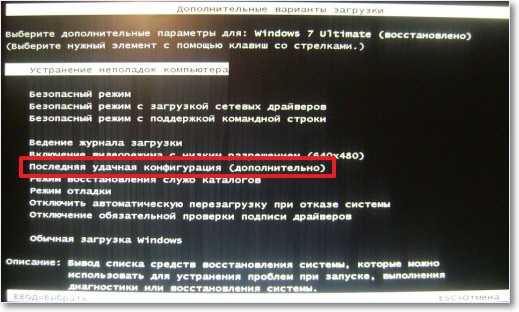
 A black window will appear with a selection of additional boot options. We choose "Last Known Good Configuration (optional)" and press “Enter”.
Unfortunately, our actions are often detrimental to our computer: improper power off, untimely scanning for viruses, system failures and much more, which sooner or later leads to one result - the system stops starting. Undoubtedly, an unpleasant situation, but you can and should fight with it, especially if your computer contains too valuable files - and even on disk C. I will tell you right away that you do not need to rush to reinstall Windows, because there are many other ways to rehabilitate our friend, which we will talk about in this article. Here you will learn how you can restore your system to work without any additional tools and paid programs, using only the basic functionality of Windows 7 or 8. The last and most important thing - don't be afraid. After reading this article, you will always know what to do if Windows does not start. As Gagarin said: "Let's go! .."
We will solve the problem according to the degree of increasing complexity: a black screen opens in front of you. First, try using Last Known Good Configuration. In this mode, the system saves the last successful (and most importantly - working) session, using which the system can come to life again.

Picture 1
If this does not help, select the item "". This item is sewn onto the hard drive that comes from the manufacturer. Those who have had to reinstall the system, having reached disk management (partitioning and formatting), could see the reserved area of about 100 MB. This area is reserved for the backup storage of files on your system. In no case should they be deleted (formatted). Otherwise, hello to the fact that the bootloader " Troubleshooting computer problems Recovery will not start. And in some cases, the system itself.

Picture 2

Figure 3
Restoring computer startup
A menu opens in front of us, in which system recovery tools are available. Here we select the item "". In this menu item, the debugger automatically fixes problems and errors that prevent the system from starting.

Figure 4
In the event that paragraph " Troubleshoot computer problems"You didn't have it, you need to use the installation disk with Windows 7. Boot from under Bios and select" ".
If you do not have a bootable disk, you can burn it on any other working OS. It's a matter of two minutes.

Figure 5
After you have done this, the window shown in the Figure below will be available to you. I will add it again so as not to disrupt the sequence of actions.

Figure 6
We select "" and see that the computer is trying to fix system errors that interfere with the start. The time to fix can be different on different computers. It depends on the technical parameters and the degree of registry corruption.

Figure 7
Then we press the button " Fix and restart". This will be followed by a system reboot. If everything went well, then the system should work again.

Figure 8
Computer System Restore
In the event that Windows 7 does not start, try the item "". Here you will be prompted to select a previously created recovery checkpoint and return to the state when your computer was started.

Figure 9
The following window will open in front of you. Here we just click "Next"

Figure 10
You will see a list of available recovery checkpoints (there may be more than one). I recommend that you check the box “ Show other restore points"In order to see all kinds. Sometimes it happens that the operating point is hidden. Press the button "Next"

Figure 11

Figure 12
Then we press "Finish" and restart the computer. The system should recover to normal functioning, although, in some cases, not to full.
System recovery using an archive
If the previous points did not help, then you can use the menu item "". This approach is a very powerful system recovery tool, provided that the system image has been created in advance. Competent use of this tool will allow you to efficiently and quickly restore operating systems, and most importantly - completely free of charge, unlike its paid counterparts such as Acronis true image. Also, this recovery option will help you rehabilitate the system if you nevertheless deleted the hard disk partition with factory settings.
We select the item " System image recovery»

Figure 13
If you do not have an image, then you need to do the following (on a working computer). We go to the address: ""

Figure 14
After that we select ""

Figure 15
In the next window, you are offered to select a local disk where the archive with the system will be located.

Figure 16
Click "Next" and the system will automatically create and write an image (archive) to the location of the hard disk that you specified earlier. Advice: for storing the image, choose the disk that has enough space and which will not be clogged with files such as music, movies, and the like. It is best to create a separate 50 GB partition at the stage of partitioning the hard disk to store this image.
We put a checkmark over the sections that we want to archive. I recommend that you choose only the system. Press the button "Next"

Figure 17
You will be prompted to archive. Click on the "Archive" button and wait for the end of the process.

Figure 18
After the archive is created, open the folder where it lies. The archive name will be as follows, as shown in the Figure.

Figure 19
Suppose that we stopped at the point shown in Figure 14, and the system image has already been created earlier. Let's try to restore the system. After selection " System image recovery»We are given a window.

Figure 20
Click "Next", after which the computer recovery will begin. Note: All data that was written to the system disk after the image was created will be lost. To save data, you can use the Live-disk or connect your hard drive to another workstation and directly transfer the necessary information.
Recovering your system by creating a "recovery disc"
To do this, again go to the address: " Start-Control Panel-Archiving computer data". We choose " Create a system recovery disc»

Figure 21
After that, in the window, select the item "Create disk"

Figure 22
And we are waiting for the end.

Figure 23
After the image is created, this disk can be used to restore the system as follows. To do this, you need to put the boot from the DVD drive into Bios. Let's suppose that our system has completely "fallen down" and does not show any signs of life.
We insert the disk with the image and wait for it to load (sometimes you need to press any key)

Figure 24
Then the download window appears

Figure 25
The system will automatically try to find the installed copy on the computer (the one that does not start)

Figure 26
Here we choose “ Recovering a computer using a previously created image»

Figure 27
Here we will use the image that is on the computer.

System recovery using the command line
At first glance, this method may seem quite complicated, but it is not. The main thing is not to rush and do everything point by point. Click on the menu item "

Figure 29
Open notepad with the command: notepad. In the window that appears, select: "File-open"


Figure 31
Next, we climb into the C: \ Windows \ System32 \ Config folder. This folder contains the RegBack subfolder with the system scheduler files, which periodically saves the system registry keys.

Figure 32
Delete all files in the Config folder, from the DEFAULT file to the SYSTEM file(you should delete one at a time). Then we go to the RegBack folder and copy these files with the same names to the place of the previously given ones (to the Config folder)

”I explained that when it detects a problem during boot, Windows 7 automatically launches the Startup Repair Tool, which performs diagnostics with little or no user interaction and in many situations allows you to recover from an unbootable system.
Since the publication of this article, many users have shared in the comments their far from satisfactory experience with Startup Repair. On the other hand, many wrote on the contrary that it helped them restore the normal operation of the system. For those who are unlucky, I want to remind you that Startup Repair solves only a few problems, including missing and damaged system files.
As I mentioned in the previous article, if Startup Repair cannot fix the problem, it brings up the System Recovery Options menu with a list of tools that you can use to diagnose and repair your system. In this article, I will show you how to invoke this menu yourself, and describe each tool in it.
Calling up the System Recovery Options menu
You can open the System Recovery Options menu in different ways, depending on your specific situation.
If Windows does start loading, you can try to invoke the System Recovery Options menu manually from your hard drive.
... If Windows does not even start, you can invoke System Recovery Options by booting your computer from the Windows 7 installation DVD.
... If you have a System Repair Disc, boot your computer from it and open the System Recovery Options menu. I will talk about creating a system recovery disk another time.
Let's say that Windows starts booting, but it does not finish. To open the System Recovery Options menu in this situation, turn off the computer and then turn it on again. After boot-up, when you hear a beep to indicate that Windows starts loading, press and hold the key.
The Advance Boot Options screen (Figure A) appears. Select the "Repair Your Computer" option. As follows from the description at the bottom of the screen, this option displays a list of tools that you can use to diagnose, fix boot problems, and restore your system. Click to continue.
Figure A. Pressing a key when Windows starts up will display the Advanced Boot Options screen.
A message appears stating that Windows files are downloading, followed by a boot screen with a green progress bar. After a while, a dialog box will open asking you to select a keyboard input method (Figure B). Click Next.

Figure B. If you are using English, just click Next.
The login window will appear as shown in Fig. C. Use an account with administrator rights to log in.

Figure C. Use an account with administrator rights to log in.
After that, the "System Recovery Options" menu will appear, shown in Fig. D.

Figure D. The System Recovery Options menu lists tools that you can use to diagnose, fix boot problems, and restore your system.
Options
As you can see, there are five options in the System Recovery Options menu. Let's consider them in more detail.
... Startup Repair. If this tool does not start automatically when the download fails, it should be used first. Please note that it only fixes a few problems, such as missing or corrupted system files. Hardware malfunctions — such as a hard drive — are not remedied by this tool.
... System Restore. This tool allows you to restore the previous state of Windows system files without in any way affecting data files - emails, documents, photos. To provide this opportunity, the utility constantly monitors the state of the operating system for significant changes, which include the installation of applications, drivers and updates. If such a change is foreseen, the utility automatically creates a restore point - in fact, a snapshot of the system state that includes important system files and certain fragments of the registry. System Restore stores multiple different restore points at once, allowing you to roll back your system to any of its saved states. Therefore, System Restore can also be used in the event of a boot failure - just select the most recent restore point.
... System Image Recovery. If, for any reason, System Restore does not work, and you have a relatively fresh image of the operating system on your hard drive, you can restore Windows from it. The system image includes all system files and settings, programs and user files. Please note that the entire system is restored from the image, therefore all current programs, settings and files will be replaced by the previous versions saved at the time of the system image creation.
... Windows Memory Diagnostic. If, in addition to boot problems, you experience application and operating system crashes or STOP errors, you can use the Windows Memory Diagnostic Tool to check RAM modules for faults. The diagnostic tool writes specific values to memory and then reads them out to ensure that the data has not changed.
... Command Prompt. When this option is selected, various command line utilities are available for diagnosing and restoring the system.
What do you think?
In the following articles, I will explain more about the tools from the System Recovery Options menu. Have you ever used them? Share your experience in the comments!
There are often cases when after installing a program, driver, accidentally deleting a system file or a virus attack, the Windows 7 operating system starts to "slow down" or stops functioning altogether. If there is no important information on the computer, then you can simply reinstall it. Otherwise, System Restore will help you. This tool returns the OS with all data available on the hard disk to a usable state.
Windows 7 System Recovery Methods
The developers of Windows OS provide a number of standard recovery methods, but all of them do not provide one hundred percent guarantee. Therefore, be prepared that you may need to use several resuscitation methods one at a time.
You can restore the operating system Windows 7 to work using:
- applying the last good configuration;
- safe mode;
- restore points.
Using Last Known Good Configuration
This Windows resuscitation tool is the easiest to use, so you should use it first. The sequence of work will be as follows:
After completing the above steps, data is automatically restored from the OS registry and the operable parameters of the available drivers. If this method fails to start the system, go to the second method.
Safe Mode is an effective Windows resuscitation tool
Safe mode is a special version of the operation of operating systems, in which the installed programs are not automatically launched, as during a normal Windows boot. In this case, only those drivers are activated, without which the operation of the OS is impossible.
This tool is launched in the same way as the last working configuration, that is, using the F8 key. When you enter the system in this way, the screen resolution will change to 800x600. This is normal, so don't worry.
The following recovery procedure is presented below:
- The Windows 7 boot disk is inserted into the DVD drive and starts up. The build of the system you are using should be the same as on your computer. Therefore, if possible, take the same disk that you used when installing the operating system.
- When the message about autostart pops up, click "Cancel".
- We open the command window "Run", which is located in the "Start" menu.

- We enter the command for checking the functionality of the system files "sfc / scannow".

- Some time after activating the search for executable files process, all damaged or deleted system data will be copied from the DVD and restored.
- If you want to follow the progress of the recovery, you need to enter the command line by entering the command "cmd" in the "Run" window. After that, "sfc /?" Is written in the line. You must log in to the command line as an administrator, otherwise you will not receive the required information.

- If the data on the command line will be displayed in the form of hieroglyphs, then you will additionally need to enter the properties and select the required language there.

Using a restore point
Another effective means of reanimating the Windows system is the use of restore points. The principle of this function is based on the fact that after a certain period of time the existing OS configuration is written to the hard disk. If you encounter any software problems, you can use the saved points and restore your computer to work.
How to restore your Windows 7 system on a laptop, a black screen appears when booting, the recovery environment does not work, I deleted all the hidden partitions, there is no original disk. Spent a lot of time, tell me what to do now, or at least how to insure myself against such situations in the future, preferably without using paid data backup software. Ilya.
How to restore your Windows 7 system
Unfortunately, there are enough reasons for this trouble, ranging from incorrectly written drivers, harmful actions of a virus, file system errors and ending with our erroneous actions when working with a computer, you do not need to be afraid of such problems, you need to learn how to deal with them effectively.
Let's think how to restore windows 7 system, as well as insure ourselves for the future against possible troubles using the backup and recovery tools built into the operating system. We will learn how to restore Windows 7, without using third-party backup programs, even when the System Recovery Options are not loaded and the F-8 button is useless.
- Friends, if our article does not help you, then check out others on this topic, for example: in it you will learn how to restore a non-boot system using different command line utilities, the first is Bootrec.exe with the commands / FixMbr and / FixBoot or the utility bootsect / NT60 SYS, as well as Bootrec.exe with the / RebuildBcd parameter, these utilities can be run from the recovery environment or from the Windows 7 recovery disc. Another article will teach you how to restore a damaged or deleted bootmgr boot loader itself. This article will show you how to recover your operating system with System Restore disabled and much more.
- If Windows 7 freezes at startup or suddenly restarts, or suddenly may show a blue screen with an error, then all of these problems may be due to numerous file system errors. How to fix the situation, even when the operating system does not boot due to these errors, is written in this article.
- Well, eight articles from the section will give you a detailed understanding of all the built-in recovery tools in Windows 7: restore points, previous versions of files, creating a system image and a recovery disk, and so on. So, let's begin.
Windows 7 has in its arsenal a fairly powerful and good tool-> Recovery environment, which is created automatically when installing Windows 7 in a hidden partition and contains five other tools that solve numerous malfunctions and problems.
- Note: If you learn how to use Windows 7 recovery tools correctly, which is not difficult, you can do without additional and paid data backup programs.
You can start the recovery tool by pressing the F-8 button on your keyboard immediately after starting your computer. After that, the Advanced boot options menu will open in front of you: Troubleshooting computer problems, then Safe Mode, Safe Mode with loading network drivers, etc.
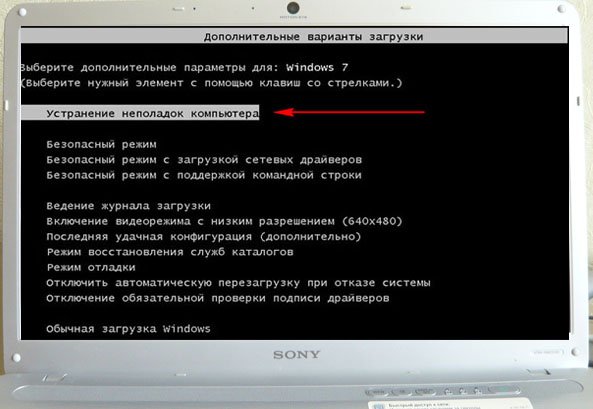
The first thing to do is apply Launch recovery(Automatically fix problems preventing Windows from starting)

Desired digression: After pressing the F-8 button when the computer boots, you may not have the> item, but only Safe Mode, and so on, the question arises why.
When installing Windows 7, the recovery environment partition is created automatically and is located in the root of the drive (C :) in the Recovery folder. You can also see in the Disk Management window - a separate, hidden partition of the hard drive, it has only 100 MB in size, it is used to store boot configuration files (BCD) and the system boot loader (bootmgr file).
You can see it on Computer-> Management-> Disk Management. In no case should you delete this section (many people delete it out of ignorance), otherwise you will not start the recovery environment, that is, the item Troubleshooting computer problems you will not, and in more severe cases, you simply do not boot the system.

On the lower screenshot, you can see another hidden partition, with a volume of 9.02 GB, this is a hidden recovery partition with the factory settings of my laptop, you may have it larger or smaller. It is also better not to delete it, if necessary, you can always restore Windows 7 from it.

What to do if you do not have a partition with the recovery environment and when you press the F-8 button in the Advanced Boot Options menu, the item Solving computer problems does not appear? How then to restore the Windows 7 system?
The installation disk with the Windows 7 operating system can save here. You can run the recovery tool by booting from the original Windows 7 installation disk by selecting at the very beginning the item System Restore... If you do not have an installation disc, then you can use it (you can make it in any running Windows 7) in five minutes, then you can also boot from it and do the same.


So, we still got to the System Recovery Options, either using the F-8 button and the Troubleshoot item, or the Windows 7 installation disc or Windows 7 Recovery Disc.
In the Select System Restore Tools menu, select the first:
Launch recovery-> an analysis of malfunctions interfering with the normal loading of Windows 7 will occur and their further correction for the normal loading and functioning of the operating system. In the process, we may be warned that problems have been found in the boot parameters, click Fix and restart.
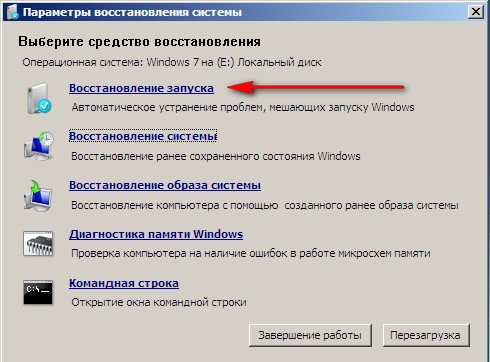


System Restore-> with the help of this function, we can, if we have it enabled, and roll back to the time when our Windows 7 worked fine and loaded, everything is simple here.


-> I personally use this tool, with skillful use it can replace paid data backup programs, if interested, read on.

What is it good for? It will help when you do not have the original Windows 7 installation disk and you deleted the hidden partition with the factory settings of your laptop, but that's not all.
Sometimes there are situations when, for various reasons or due to the actions of a virus, you will not be able to load the operating system at all or many ask How to restore Windows 7 system, even if the menu with Additional boot options is also unavailable. Reinstall the operating system again?
Therefore, immediately after installing Windows 7 on your laptop or computer, we create using this function-> System image recovery, the archived image of our Windows 7 on the hard disk, we take care of it. Be sure to create a Windows 7 Recovery Disc (see below), it will help you use the System Image if the Advanced Boot Options menu will not load.
Go to Start -> Control Panel->Archiving computer data.

We choose System imaging

then select the Local disk on which we will store the system archive. In my case, Local disk (E :), if you have several hard disks in the system unit, then of course it is better to place the backup on the hard drive where the operating system is not installed.


Note: You may notice that I have two operating systems installed on a laptop, so the backup program selected two Local drives.

Click Archive and the process of creating an archive with our Windows 7 will begin.
Created, it will look like this.

Now, if necessary, you can deploy the archive with Windows 7 to your computer in 20-30 minutes. It will be better if you copy the archive with the system additionally to a portable hard disk, this will make you doubly safe.
Let's imagine that we cannot start Windows 7 and deploy the backup we created, do it together.
Launch Windows 7 Recovery Tool by pressing the F-8 button on the keyboard immediately after starting the computer. The Advanced Boot Options menu opens, select Troubleshoot computer problems.

System image recovery


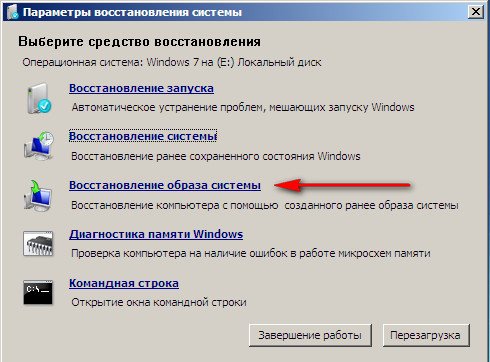
Use the last available system image


Of course, all our data on the Local Disk, where the operating system is being restored, will be deleted, so you can pre-boot from any Live CD and copy what you need.
How else can you restore your Windows 7 system? Of course, using the Windows 7 Recovery Disc. Let's create Recovery disk, which can be used to boot the computer, it will contain recovery tools with which you can restore Windows 7 boot faults, as well as restore the operating system from an archive copy that we created in advance.
Important: The system bitness is important for the recovery disk, you can use a 32-bit recovery disk for any 32-bit Windows 7, and a 64-bit recovery disk for any 64-bit Windows 7.
Let's go again Archiving computer data
Create a system recovery disc, insert the DVD-disk into the drive, press

Create disk


When the Windows 7 bootable Recovery Disc is ready, put it in a safe place.
In order to restore Windows 7 from the Recovery Disc, you do not need, in principle, any working operating system at all. You will only need to change the boot priority to the floppy drive in the BIOS of your computer, insert a recovery disc into it and restore your Windows 7 using the archive. Many here can draw an analogy with data backup programs and this is correct, they work on the same principle, only here is the functionality they have, of course, more convenient.
- If you do not know how to change the boot priority in the BIOS, read our articles and
Recovering Windows 7 from the Recovery Disc. I am showing you how to do it. Let's say we are in trouble, we cannot start Windows 7, when we press F-8 on the keyboard immediately after starting the computer, nothing happens. We cannot get into the menu with Additional boot options and an error message is displayed. In this case, the system archive on the hard disk is not available to us. It was this kind of trouble that happened to our reader Ilya, who wrote us a letter asking for help.
In this situation, many reinstall Windows 7 from scratch, but not you and me, because we have System recovery disc.
We insert it into the floppy drive and reboot, set the BIOS to boot from the floppy drive, as I said the boot disk, the System Recovery Options program starts.
Press Enter until the offer to boot from disk disappears.