But what to do if you don’t want to buy the same Acronis, you’re too lazy to tinker with all sorts of clonzillas, and make a complete clone of the system disk for the purpose of, say, transferring it to a new one (or HDD), or maybe, let’s say, putting it on a shelf as a static backup?
Let's get a look.
How to make a full copy of a disk - SSD or HDD
Well, let's figure it out. We will talk, as you understand from the subtitle, about the HDClone program, which has a free version, supports the Russian language, is incredibly easy to use, and also has pleasant functionality.


When you first start, they will unobtrusively tell you that you can get more goodies if you buy one of the extended versions of the program. You can safely ignore this information (or study it on the developer’s website) and click the “Close” button.
The main window of the program is simple, concise and provides access to its functionality. The functionality in the free version is simple:
- Disk cloning (we will consider this);
- Creating a disk image;
- Creating backups (including backups not of the entire disk, but of partitions);
- Testing tool;
- Sector-by-sector disk browsing tool.
Everything is done extremely simply and literally in two clicks, but let’s still consider, for example, creating a complete copy of one disk to another (let’s say we need to transfer Windows from HDD to SSD), for which we click on the appropriate button.
In the first step, we will be asked to select the source disk or partition that we want to copy.
It is logical that at the second stage they will be asked to select the disk (or partition) to which we want to make a copy.
Now you will be prompted to configure partitions. Most often, this is not necessary and a tick is enough" Resize partitions proportionally", but if suddenly you need some adjustments, you can do it here.

It goes without saying that a warning will appear stating that the data on the disk where cloning will be performed will be completely deleted. It is worth taking it seriously so as not to lose anything valuable.
Next, if you did everything correctly (however, even if you did it incorrectly), the disk cloning process will begin. During it, you will be reminded once again that there are paid versions that allow you to copy faster:

Time, of course, is money, but with such a process and difference, I still choose money, especially since while the process is going on, you can do other useful things.


At the end of the process, you will be asked to adjust the partition (this is indeed necessary). If you don’t understand, then you can use the automatic option, but for those with hands, there is a manual setting.

At the end you will be able to see the result, as well as see some details. At this point the process can be considered completed.

Additional functionality
What else? Well, perhaps I’ll say that in the main window of the program, in the lower right corner, you can call up the settings menu (by clicking on the wrench icon) and create a bootable USB/CD/DVD media, which is no more difficult to manage than the program itself, and also look at the instructions and do other little things.
The SpeedTest section, as mentioned, allows you to test disks for the speed of the media in sequential and random reading (although in my opinion, this is not enough and it is better to use it).
Well, DiskView will allow you to look indecently deeply, right into the very sectors of any HDD/SSD media. If, of course, you know why it is needed.
That's probably all for now.
Let's move on to the afterword.
Afterword
This is such a wonderful tool that, it seems to me, will be useful to anyone who cares about their data and/or who has ever faced the need to move from disk to disk (to the same SSD).
As always, if you have any questions, thoughts, additions, etc., then welcome to comment on this article.
Replacing a conventional hard drive with an SSD can significantly improve operating comfort and provide reliable data storage. This is why many users try to replace the HDD with a solid-state drive. However, after replacing the drive, you need to somehow transfer your operating system along with installed programs.
On the one hand, you can install everything again and then there will be no problems with moving to a new disk. But what to do if the old one has about a dozen programs, and the OS itself is already configured for comfortable work? It is this question that we will answer in our article.
So, you purchased a brand new SSD and now you need to somehow transfer the OS itself with all the settings and installed programs. Fortunately, we don't have to invent anything. Software developers (as well as the developers of the Windows operating system) have already taken care of everything.
Thus, we have two options: either use a third-party utility or standard Windows tools.
Before moving on to the instructions, we would like to draw your attention to the fact that the disk to which you will transfer your operating system must be no smaller than the one on which it is installed.
Method 1: Transfer OS to SSD using AOMEI Partition Assistant Standard Edition
First, let's take a closer look at the method of transferring an operating system using a third-party utility. Currently, there are many different utilities that allow you to easily transfer an OS. For example, we took the AOMEI Partition Assistant application. This tool is free and has a Russian interface.

- Among the large number of functions, the application contains a very convenient and simple wizard for transferring the operating system to another disk, which we will use in our example. The wizard we need is located on the left panel in the “ Masters", to call it, click on the command " Transfer OS SSD or HDD».
- A window with a small description appeared in front of us, after reading the information, click on the button “ Further" and move on to the next step.
- Here the wizard prompts you to select the disk where the OS will be transferred. Please note that the drive must not be partitioned, that is, it must not contain partitions or a file system, otherwise you will get an empty list at this step.
So, once you have selected the target disk, click the “ Further" and move on.
- The next step will be marking the drive to which the operating system is transferred. Here you can change the partition size if necessary, but do not forget that the partition must be no smaller than the one on which the OS is installed. Also, if necessary, you can specify a letter for the new partition.
Once all the parameters have been set, proceed to the next step by clicking the " Further».
- Here the wizard prompts us to complete the setup of the AOMEI Partition Assistant application to migrate the system to an SSD. But before that, you can read a small warning. It says that after a reboot, in some cases the OS may not boot. And if you encounter a similar problem, then you need to disconnect the old disk or connect a new one in place of the old one, and the old one in place of the new one. To confirm all actions, press the button “ End» and complete the wizard’s work.
- Next, in order for the migration process to begin, you must click the “ Apply».
- Party Assistant will display a window with a list of pending operations, where we just have to click the “ Go».
- This will be followed by another warning, where by clicking on the “ Yes", we confirm all our actions. After this, the computer will restart and the process of transferring the operating system to the solid-state drive will begin. The duration of this process will depend on a number of factors, including the amount of data being transferred, the speed of the HDD and the power of the computer.


After the migration, the computer will reboot again and now all that remains is to format the HDD to remove the OS and the old bootloader.
Method 2: Transfer OS to SSD using standard Windows tools
Another way to migrate to a new disk is to use standard operating system tools. However, you can use it if Windows 7 and higher are installed on your computer. Otherwise, you will have to use third-party utilities.
Let's take a closer look at this method using Windows 7 as an example.
In principle, the process of transferring an OS using standard means is not complicated and takes place in three stages:
- creating a system image;
- creating a boot drive;
- unpacking the image to a new disk.
- So let's get started. In order to create an OS image, you need to use the Windows tool " " To do this, go to the menu “ Start" and open the "Control Panel".
- Next, you need to click on the link “ Backing up computer data" and you can proceed to creating a Windows backup. In the window " Archiving or restoring files“There are two commands we need, now we will use the creation of a system image, for this we click on the corresponding link.
- Here we need to select the drive on which the OS image will be written. This can be either a disk partition or a DVD. However, it is worth remembering that Windows 7, even without installed programs, takes up quite a lot of space. Therefore, if you decide to burn a copy of the system to DVD, you may need more than one disc.
- Having selected the location where you want to save the image, click “ Further" and move on to the next step.
Now the wizard prompts us to select the sections that need to be included in the archiving. Since we are only transferring the OS, we don’t need to select anything; the system has already included all the necessary disks for us. Therefore, click " Further" and move on to the final step.
- Now you need to confirm the selected archiving options. To do this, click " Archive
- After a copy of the OS has been created, Windows will prompt you to create a bootable drive.
- You can also create a drive using the command “ Create a system repair disk" in the window " Archive or restore».
- At the first step, the bootable disk creation wizard will prompt you to select a drive in which a blank drive should already be installed for recording.
- If there is a data disk in the drive, the system will offer to clear it. If you use DVD-RW for recording, then you can clean it, otherwise you need to insert a clean one.
- To do this, go to “ My computer"and right-click on the drive. Now select the item “ Erase this disk».
- Now let’s return to creating a recovery drive, select the desired drive, click on the “ Create disk" and wait for the process to complete. Upon completion, we will see a window like this:
- Reboot the computer and go to the boot device selection menu.
- Next, the OS recovery environment will be loaded. At the first stage, for convenience, select the Russian language and press the button “ Next».
- Since we are restoring the OS from a pre-prepared image, we move the switch to the second position and click “ Further».
- At this stage, the system itself will offer us a suitable image for recovery, so, without changing anything, click “ Further».
- You can now set additional parameters if necessary. To go to the last action, press the button “ Further».
- At the last stage, we will be shown brief information about the image. Now you can proceed directly to unpacking to disk, to do this, press the button “ Further" and wait for the process to complete.


Attention! If your work machine does not have writeable drives, you will not be able to burn the optical recovery drive.


this indicates that the disk was successfully created.
So, let's summarize. At this point, we already have an image with the operating system and a bootable recovery drive, which means we can move on to the third and final stage.
This can usually be done by pressing the F11 key, but there may be other options. Typically, function keys are listed on the BIOS (or UEFI) start screen, which is displayed when you turn on the computer.


After this, a search for installed systems will be performed.


At the end of the process, the system will automatically reboot and at this point the process of transferring Windows to the SSD can be considered complete.
Today we looked at two ways to switch from HDD to SSD, each of which is good in its own way. Having familiarized yourself with both, you can now choose the one that is more suitable for you in order to quickly and without data loss transfer the OS to a new disk.
There are many instructions on how to transfer windows to an ssd, but they all relate to desktop PCs and the process of transferring the operating system to a laptop is technically different due to the architecture of the laptop itself. If on a desktop PC you can simply connect a new SSD drive to any SATA port, then on a laptop you will need one of two devices - also known as a hard drive pocket, with which you can install a second HDD in the laptop. Or a special one with which you can connect any SATA storage device via a USB port.
In the first case, it is quite logical to buy optibay along with a brand new SSD in order to install a replaceable hard drive in place of the DVD drive. If you use an optical drive and sometimes need it, you can buy an adapter with which you can connect the optical drive via a USB port. And in this way, with the help of optibay, you installed two hard drives in your laptop and now you can clone the drives. But what should you do if, for example, you have an ultrabook that initially does not have an optical drive or you do not need a second hard drive - in this case, you need a SATA to USB adapter.
My main goal is to use free programs to transfer windows to ssd, or trial versions that allow you to clone without having to purchase the full version of the program. You will not need to look for any hacked versions of programs that can harm your computer.
How to transfer windows to ssd
We've figured out connecting the second drive, now let's move on to the actual transfer of windows from hdd to ssd.
Let's look at 3 free programs for transferring the system to an SSD: Acronis TrueImage, EaseUS Todo Backup, Samsung Data Migration.
To work with the Acronis TrueImage and EaseUS Todo Backup programs, it doesn’t matter what manufacturer or model of your SSD drive it is, and it doesn’t matter what hard drive the Windows or Linux operating system will be cloned from. The main thing is that the amount of data transferred from the hdd to the ssd matches, that is, if your “drive C” takes up about 180Gb of free space, and the new SSD drive is only 120Gb, then you will need to transfer or delete unnecessary files up to a volume of 110Gb, because for normal operation the system needs at least another 10Gb of free space on the “C drive”. The cloning process is similar for any Windows 7/8/8.1/10 system and any Linux distribution.
Transferring windows to SSD using Acronis True Image
Go to the site acronis.com and download the trial version of Acronis True Image
We install Acronis TrueImage itself on your laptop and launch the program. In the “tools” section there is a disk cloning function, but it is not available in the trial version of the program, so we will perform cloning by creating a system backup.
Go to the “Backup” section and select the backup source; you can first specify the name of your copy.
At this stage, you can select the entire computer with all disks or selectively, exactly those disks and partitions that contain the operating system.
-min.jpg)
By selecting “disks and partitions”, select the partitions that you want to transfer to your new ssd drive. In my case, “drive D” is not needed on the new SSD, so I uncheck it and leave the partitions only with Windows. Click on OK.
-min.jpg)
Now we select the location where the backup will be recorded. Click on “Browse” and set the location for the backup copy.
-min.jpg)
It is recommended to save the backup image to drive D, but if in your case it is not possible to save to drive D, you can save to drive C, and the restored copy on the new SSD drive will not contain the backup image itself.
-min.jpg)
Having selected a partition, click on “Create a copy” and wait for the process to complete; this will take from 10 minutes, depending on the volume of your data.
-min.jpg)
Now that a copy of your disks has been created, let's start transferring them to the SSD drive. Go to the “recovery” tab and click on “recover disks”.
-min.jpg)
You will be given a choice of disks or partitions. You can select specific partitions to restore or go to select disks and restore the entire disk.
-min.jpg)
My laptop has Windows 8 pre-installed with recovery partitions, which I also want to transfer to an SSD, so I’ll choose to restore the entire disk with all the partitions it contains. In the next window, select your SSD to which the system will be transferred. Finally, click on “Restore”. You can choose to turn off your computer after the recovery is complete.
-min.jpg)
As you can see, the recovery partitions were copied one-to-one; the Windows partition on the SSD drive became larger, because the remaining free space was redistributed to the disk with the operating system.
-min.jpg)
After the recovery is successfully completed, you can install the SSD in place of the old hard drive and turn on the laptop. If for some reason Windows does not boot from the SSD, go into bios and set your new SSD as the main device to boot the operating system.
Transfer Windows from HDD to SSD using EaseUS Todo Backup
Go to the site easeus.com and download the Todo Backup Free program. In the pop-up window, enter any email and in the next window download the free version of the program. Install the program on your laptop. At the first pop-up window that requests activation, click on the “Later” button.
The program in free mode provides two ways to clone your data “Clone” and “System Clone”.
-min.jpg)
In the "Clone" mode, you can only clone the entire hard drive, without the ability to select a specific partition of the disk. This approach may not be convenient if your HDD has a “D drive” that does not need to be transferred to a new SSD drive.
-min.jpg)
In the "System Clone" section you can clone partitions with the operating system. The program itself will select a partition with Windows and all additional partitions for its operation; you only need to indicate the target SSD disk to which the system will be transferred.
-min.jpg)
Transfer windows to SSD using free Samsung Data Migration program
Please note that the Samsung Data Migration program will only work if the system is transferred to a Samsung SSD drive.
Go to the site where you can download the program Samsung Data Migration and in the drop-down menu under the inscription “DATA MIGRATION” we download the Data Migration Software program itself.
Below you can see how to use this program. The guide describes all cloning steps and supported SSD media. The program works under any operating system and transfers Windows XP SP2, Windows 7, Windows 8 / 8.1, Windows 10 with any 32bit or 64bit.
Samsung Data Migration is completely free and very easy to use. When launched, the program itself selects the source disk with the operating system and the final SSD disk to which Windows will be transferred. You can easily add or remove additional partitions from the original disk, and resize them on the fly on the SSD disk.
-min.jpg)
There is also a very useful advanced cloning feature - if the size of the original disk is larger than the size of your new SSD. In this case, the program offers to exclude the files you have selected that will not fit on the new drive and after transferring the system to an SSD, the program will offer to copy these files to another drive.
-min.jpg)
I don’t see any point in further disassembling this program, because each step is very carefully described in the instructions that are attached.

Installing an SSD – one of the most effective methods that can breathe “second life” into a computer even with not the latest configuration. The operating system accesses files faster and becomes much more responsive to user actions. At the same time, it is absolutely not necessary to install and configure the OS and software from scratch. In this article we will talk about how to transfer Windows 10 to an SSD without losing data.
Microsoft does not provide special tools for cloning in the system. However, Windows 10's built-in capabilities allow you to do this.
Media preparation
According to the official recommendations of the company's technical support, we will need an additional, third, hard drive. Unlike those connected via USB, SSDs intended for internal placement are not pre-formatted. As a result, they are detected by the computer, but are not displayed in the OS. To clone Windows, you first need to make all drives visible.
- We mount the drive in the PC and turn it on. Having opened the file manager, we see that the OS has recognized only the system partition.

- Using the Win + X key combination, call up the “Power User menu”. Let's move on to the designated point.

- The Disk Management Manager opens with an initialization window. At this point, the user must select a partition table. For x32 bit systems, only MBR is needed. For users of x64 bit versions of Windows, GPT is better suited.

- Having decided on the partition table, let's format it. Both drives must have the NTFS file system. By clicking on the unmarked area, we call up the context menu. Select the item marked in the screenshot.

- The Create Simple Volume Wizard is activated. We will perform further actions following his prompts.

- We do not change the volume size, but create one using the entire available volume.

- The letter is assigned automatically. Since the placement of disks in the system is temporary, only for the period of cloning, we will leave it unchanged.

- At this stage we set a text label. For convenience, let’s give the intermediate HDD the name “Backup”.

- At the last step, the wizard displays the parameters specified for the drive in the form of a list. We complete the work by clicking on the “Finish” button.
 We perform a similar operation with the new SSD, giving it the name “NewSSD”. By opening Explorer, we make sure that all of them are visible from under the OS.

At this point, the preparation of media for cloning can be considered complete.
Intermediate copying
The next step to move Windows to a new “location” is to create an intermediate copy.
- The tool we need is located in the classic control panel. Let’s run it by entering “control” in the “Run” system menu. To do this, press Win + R.

- Open the element indicated in the screenshot.

- In the quick navigation area, select “Create a system image.”

- The wizard that launches prompts you to determine the storage location. Using the drop-down menu, we specify the intermediate hard drive, which we named “Backup”.

- At this stage, the system shows us what data will be included in the finished image. We agree and move on to the next step.

- We complete the wizard by clicking the “Archive” button.

- An image of the system HDD is being created.

- The operation is not accompanied by time stamps. Its duration depends on the amount of data being stored. Once complete, we will be prompted to create a rescue disk.

If you have Windows 10 installation media, you can skip this step. Otherwise, you will need a flash drive with a capacity of at least 8 GB.
Transfer to SSD
At the last stage, the old HDD can be removed from the computer, leaving the drive with the backup copy and the new SSD prepared for transfer.
- The download is performed from the installation media with the Windows distribution. After checking the language settings, move on.

- At this stage, instead of installation, select recovery mode.

- In the action selection window, go to the marked item.

- In the Advanced Options area, the section you want is framed. Having selected it, we launch the recovery wizard. Since we are performing a full migration, the next step is to validate the solutions offered by this mode.

- Having received the last warning, we activate the recovery procedure.

At the final stage, the computer will automatically reboot and the operating system will start from the solid-state drive. Reactivation is performed without user intervention after checking the hardware configuration.
Disk cloning programs
As we saw in the example given, it is possible to clone Windows 10 using system tools, but the procedure is lengthy and labor-intensive. Sometimes it is faster and easier to reinstall the OS from scratch than to look for a disk suitable for intermediate backup.
Against this backdrop, applications specifically designed to facilitate migration look great. The average user does not need disk cloning on an industrial scale. In most cases, this is a one-time operation. For this reason, we will only consider software that has free versions or allows you to perform the necessary operations during the trial period.
Macrium Reflect
The program is published by Macrium Software in several editions. Free Edition allows you to transfer the OS directly, without intermediate media.
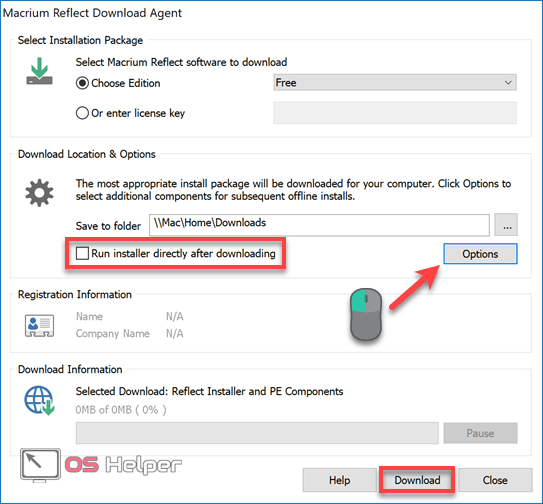
- Installation is performed using the Download agent. The user can first select the required components using the “Options” button. By clicking “Download” we begin the download. The circled “Run installer” box has a check mark by default. If you do not remove it, the program will begin to install automatically after the components are downloaded.
- We check the correctness of the architecture: it must correspond to the bit capacity of the installed OS. Select a “clean” installation from the drop-down list. Such a distribution will not include tools for creating a boot disk and disaster recovery.

- The main window of the installed Macrium Reflect displays the disk structure available on the PC. The boxed option opens cloning options.

- At the top is the original datum disk. At the bottom of the window, select the target SSD. The section marked “3” contains advanced copy settings.

- You don't have to change anything here. The default smart copy option is suitable for any user. During the transfer process, the file system will be checked and the TRIM function will be automatically enabled.

- After checking all the options, click the highlighted button to copy the existing structure to the new drive.

- By clicking “Next” we launch Migration master, which will give us detailed technical information about each partition of the disk being created.

- At the final stage, remove the crossed out check mark. She is responsible for creating a recurring schedule, while ours is a one-time operation.

- Before the transfer begins, Macrium Reflect will warn you that the data on the drive specified in the window will be completely destroyed. We agree and wait for the process to complete.
 As a result of these steps, we receive a valid licensed copy of Windows on new media.

You can remove the old disk and start working on the SSD without reinstalling the system.
Acronis True Image
Another program worthy of attention is Acronis True Image. It differs from other products of this company in the ability to perform cloning operations during the trial period. For example, Acronis Disk Director allows you to do this only after purchasing the full version. True Image is limited by the need to use intermediate media.

The declared on-the-fly cloning option becomes available in the full version of the program.
- You can use any suitable sized USB drive as an intermediate one. We connect this to the PC and specify it as a storage location.

- We start the procedure for creating a backup copy.

- Go to the “Recovery” tab. Select the target disk in the window and press the button marked “3”.

- To perform cloning, open additional options.

- Check the source – a backup copy of the current disk. Select the destination disk from the drop-down menu – new SSD. We start the transfer process.

The operation is performed in the background and its progress is displayed in the system tray. When the transfer of Windows 10 to SSD is completed, the program automatically makes adjustments to the bootloader.
Manufacturers' software
Samsung, one of the leaders in the production of solid-state drives, has created its own software to make it easier for users to migrate the system. The proprietary utility is free, but only works with manufacturer’s disks. The list of supported SSDs can be found on the official page, where Samsung Data Migration is available for free download.
Transfer issues
There are no system restrictions for working with SSDs. Microsoft provided full support for SSDs with the release of Win 7. However, the transition may be difficult for laptop users. Manufacturers are reluctant to allow changes to the factory configuration.
As a result, some top MSI and ASUS models do not allow HDD replacement. The user will not be able to install a cloned SSD into it, since the laptop refuses to work with it. The only way out is to contact the manufacturer’s technical support to find out in advance the possibility of an upgrade and supported drive models.
Finally
The capabilities that the user receives when using free cloning programs are enough for a one-time system transfer. In terms of functionality, they are somewhat inferior to professional tools such as Paragon Migrate OS to SSD, but they get the job done.
Video instruction
For those who want to learn more about how to use programs for migrating to an SSD, below is an overview video.
And then restore them in a clean installation of Windows. However, I'm sure there will be people who will want to move a carefully configured system from one drive to another. Initially, I did not plan this post, but having received another question by mail, I decided to cover this simple process on the blog.
There are special programs for disk cloning (for example, Acronis or Paragon). In them, the marketing focus is often on transferring the system from HDD to SSD, as in the title of this guide :) However, you can solve this problem using free Microsoft tools, without unpleasant surprises, and my instructions apply to any disk types.
I want to emphasize that this guide describes the process of cloning a system and moving it to another drive within the same PC. Transferring the system to another PC (even with the same hardware configuration) is only supported for images generalized using the sysprep utility. Formally, Microsoft does not support cloning without sysprep at all (even with third-party software). In my proposed method, support is hampered by several technical limitations, but I do not consider them significant for home PCs.
Today on the program
You will need...
First, let's define the terminology. Where you see the phrases “installation disk”, “Windows PE disk”, “recovery disk”, you can equally well use either an optical disk (CD/DVD) or a removable USB disk (flash drive).
So, you need:
- Environment in any form. It could be:
- Windows installation disk
- recovery environment on the recovery disk that matches your operating system (see instructions for Windows 7 or Windows 8 and later)
- Windows PE 3.1 or 4.0 disk you created
Why imagex and where to get the utility
With the release of Windows 8, the imagex utility has been deprecated, and Microsoft now recommends using DISM. However, imagex works and is still supported, while DISM requires you to create a bootable Windows PE disk with the .NET Framework and PowerShell, which complicates the process.
If you prefer a GUI, there's Gimagex, but I try not to add extraneous factors to the OS deployment process. The imagex utility can be downloaded as part of the ADK by installing deployment tools only about 50MB (thanks, Semyon Galkin). Once installed, you will find imagex in Program Files (x86)\Windows Kits.

There is an alternative and very interesting way - you can receive a link to the utility by mail from Microsoft by requesting it from the knowledge base article KB2525084.
Capture the system partition into a WIM image
Boot into Windows PE and run all the commands in its console. To reduce image size, page and hibernation files, as well as the Recycle Bin and shadow copies are automatically excluded during capture. If you want to exclude some other folders or files, create an imagex configuration file. You will definitely need it if you are using Windows Subsystem for Linux ( WSL) in Windows 10 - you need to add the %LOCALAPPDATA%\lxss folder to the exceptions (see also KB3179598).
Command line option /compress maximum You can slightly reduce the size of the image. I don’t use it because maximum compression delays the process, and I have no problems with free space to save the file.
At the end of the procedure, turn off the PC and connect the SSD in place of the HDD. The hard drive can be connected to a different connector.
Preparing the SSD for applying the image
The task comes down to creating a new partition in Windows PE. For SSDs, proper biasing is important to avoid performance degradation and shortened drive life. The installer automatically sets the offset to 1024KB, which is easy to verify. When creating partitions on a blank disk using the diskpart utility, the same thing happens, but in my commands the offset is specified explicitly to avoid accidents.
Here is a minimum set of partitions that is suitable for all supported Windows operating systems (a Windows RE partition is not created). Run the following commands sequentially in the Windows PE console. They imply that one main partition will be created on the SSD, occupying the entire disk.
Diskpart:: display a list of disks list disk:: select a disk (instead of N, specify the SSD letter) sel disk N:: clear the disk of partitions (erases all data) clean:: convert the disk to MBR convert mbr:: create a primary partition with an offset of 1024KB create partition primary align=1024:: make the partition active (nbh for booting from it) active:: format in NTFS, set the disk label format fs=NTFS label="Windows" quick:: assign a letter to the partition assign letter=W exit
Now you are ready to apply the saved image to the SSD.
Applying an image to an SSD
This operation is performed in Windows PE with one command:
Imagex /apply E:\migrate.wim 1 W:
- E:\migrate.wim— path to the saved image
- 1 – the index of the single image in the WIM file you created
- W– SSD drive letter in Windows PE, assigned a little earlier in diskpart
Your letters may be different, of course.
Setting up booting into a cloned system
MBR partitioning
Utility bootrec available in Windows PE when booted from the installation disk, but it may not be included in the built you Windows PE disk.
Bootrec /rebuildbcd
This command looks for installed Windows on all drives (equivalent to the /scanos parameter) and offers to add systems that are not there to the BCD. Pressing Y adds the OS to the boot store, and N rejects the offer.
It also makes sense to immediately run two more commands:
Bootrec /fixmbr bootrec /fixboot
GPT partitioning
In the GPT partition, the files necessary to boot the system are copied to the EFI (FAT32) partition with one command:
Bcdboot W:\Windows
Here W is the drive letter to which you transferred the OS.
This completes the transfer process. After restarting your PC, you will see the system that you transferred to the SSD in the boot manager list.
What to do if both drives were connected when creating the image
I warned above that it is better not to do this. In this case, the drive letters in the cloned system are mixed up, although this can be easily corrected in the registry (thanks to reader Artem for the addition). This is the picture observed after loading into the cloned OS. The system is booted from drive D, and profiles and programs are launched from drive C.
To fix this you need rename drive letters in the registry. In fact, you need to swap the letters in the names of the registry parameters corresponding to the problem drives (you don’t need to touch the values).

In this example, you must first change \DosDevices\C: V \DosDevices\K:, after which the name will be freed for renaming drive D.
Actions after cloning
Take a Windows Performance Assessment
Running an assessment will tell the system that it is installed on an SSD. As a result, Windows will apply the appropriate settings - from sending TRIM commands to disabling SSD defragmentation (a must for Windows 8 owners).
Set up a download manager
I cannot provide all possible multiboot configurations, but in any case, at the end of the process, you will have two systems with the same names (old and new) displayed in your boot manager. I will give some examples of commands that may be useful to you.
The command displays information about the systems displayed on the boot manager screen bcdedit. In its results, the system identifier (ID) is indicated by the parameter identifier. The system you are currently booted into always has an ID (current).
These examples assume that the commands are executed in new system.
Renaming a New System Entry
Bcdedit /set (current) description “My New Windows”
Bcdedit /default (current)
Deleting an old system entry
Bcdedit /delete ID
If you are unable to boot into the cloned system or need help setting up the boot manager, please write here following the thread rules.
Discussion and poll
From previous surveys, I know that most readers have already acquired an SSD. This survey will show you how you approached the issue of installing the system on a brand new drive.
If you transferred the system, write in the comments what software you used for this. I know some of you have already talked about this in other posts. But then it was off-topic, but now this will help other readers looking for information on the topic!