Have you opened the images on your PC? For this you need a special viewer program. What software should I use to make my work convenient? Is it possible to get by with standard Windows tools? Let's look at the best photo viewer for Windows 10.
It turns out that the latest versions of Windows have a Photos app. It opens photos, creates albums, edits pictures.
Older versions of the OS used the Image Viewer app. Install it in addition to the existing Photos utility. Let's look at how to activate a classic application.
How to enable the standard photo viewer in Windows 10
This is done in two ways:
- Using "Registry Editor";
- Alternative way.
Method No. 1
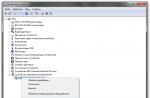
In Windows 10, the standard photo viewer is activated using registry settings. Press “Win + R”, then enter the command “regedit”. 
Find the _LOCAL-MACHINE branch. Further, as in the screenshot. 
Here are the formats that will open by default. For me it is “TIF” and “TIFF”. How can I add other extensions so that all graphic formats open by default?
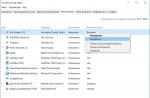
Right-click on an empty space in the right window, create a string parameter. 
Next we write the name and value. As in the screenshot. 
We perform similar actions for other formats.
Another way
If you are not very versed in OS settings, use the WinAero Tweaker application. Download the archive at: https://winaero.com/request.php?1796. Installation is simple and will not cause any difficulties even for novice users.
After opening, on the left we find the item “Classic Apps”. Select “Photo Viewer”, click “Activate”. 
The result will be the same as in the method discussed above.
Free photo viewer for Windows 10
In addition to Microsoft developments, use third-party software. Let's look at the TOP 5 best free applications. Use them as an alternative to the standard viewer. In addition to viewing, they have functions: rotation, red-eye removal, resizing, converting, printing.
FastStone
Free program with a clear interface. The developers have added built-in tools that allow you to: remove red eyes, edit size and color, convert files. 
The developers suggest using the regular or portable (no installation required) version. Program characteristics:
- View photos;
- Digital photo editing;
- Batch processing;
- Slideshow creation;
XnView
Use XnView for free for non-commercial use. Supports 500 formats, allows you to convert files. Allows you to watch videos and listen to music. The interface is simple. There are many built-in tools.
Peculiarities:
- Supports 500 formats;
- Built-in editing functions;
- Using filters and effects;
- Screen capture function;
- Convert file to 70 different formats;
- Working with plugins.
 IrfanView
Fast photo viewer for Windows 10. Consumes minimal OS resources. The developers suggest installing the regular or portable version.
For Russification, install additional languages. Go to: http://www.irfanview.net/lang/irfanview_lang_russian.exe to download the installer. Next, run it and select the program folder during installation. Then the installer will do everything himself.
 The Russified version will launch.
What the program can do:
- Play video and audio;
- Working with text formats;
- Batch renaming of files;
- Sideshow creation;
- Working with plugins to help expand functionality.
Ashampoo Photo
This handy Windows 10 photo viewer allows you to view, edit and convert files.
In the free version, in order to use the program without restrictions, enter your email address when you first start it. To confirm your registration, follow the link that will be sent to your email.

Peculiarities:
- View photos in archives;
- Slideshow mode;
- Bookmarks for photos;
- GPS support in the photo.
Conclusion
The TOP 5 viewers reviewed are the best programs in this class. Which one to work with depends on your personal preferences. Use the software described above if the standard photo viewer in Windows 10 does not suit you.
Windows 8 introduced two applications for viewing photos. One was used on touch devices, the other, familiar to Windows 7 users, could be used on traditional PCs and was called Photo Viewer. The application is fast, convenient and belongs to the category of “why fix something that isn’t broken.” But in Windows 10, Microsoft has greatly complicated the process of restoring this application and not everyone likes the new application, and it does not work in the best way. Enough tolerating this! Here are the instructions for your attention: How to get photo viewer back in Windows 10.

Windows Photo Viewer in Windows 10.
This procedure can be done in two ways:
- Using a third-party application WinAero Tweaker.
- By editing the registry manually.
How to Bring Back Windows 10 Photo Viewer Using WinAero Tweaker
This is an easy method that will require literally 3 minutes of your time.

WinAero Tweaker window
- Download the app.
- Agree to the terms of use and scroll down the list of tweaks.
- Open "Activate Windows Photo Viewer" and click the button with the same inscription.
- The system will now open a window for setting up default applications.
- On the left side of the screen, find "Windows Photo Viewer" and select "Set this program as default."
- All photos will now open in the default Windows photo viewer.
Windows 10 Photo Viewer via Registry Editor
More complex and more suitable for experienced users.
- Open Registry Editor (press Win+R and type regedit).
- Go to the next thread: HKEY_LOCAL_MACHINE\SOFTWARE\Microsoft\Windows Photo Viewer\Capabilities\FileAssociations. If this thread doesn't exist, just create it.
- Create the following values:
".bmp"="PhotoViewer.FileAssoc.Tiff"
".dib"="PhotoViewer.FileAssoc.Tiff"
".gif"="PhotoViewer.FileAssoc.Tiff"
".jfif"="PhotoViewer.FileAssoc.Tiff"
".jpe"="PhotoViewer.FileAssoc.Tiff"
".jpeg"="PhotoViewer.FileAssoc.Tiff"
".jpg"="PhotoViewer.FileAssoc.Tiff"
".jxr"="PhotoViewer.FileAssoc.Tiff"
".png"="PhotoViewer.FileAssoc.Tiff" - Now go to Computer Settings - System - Default applications - Set defaults by application.
- Find Windows Photo Viewer and enable it as default.
Do you like the new app or will you go back to the old photo viewer in Windows? Share with us in the comments below.
When installing the Windows 10 operating system, the user encounters a problem. Microsoft has deprived users of a popular program that provided high-quality, fast and convenient image viewing. Users were offered an alternative. The program is called "Photos". Despite the fact that this tool is not inferior to the photo viewer in terms of functionality, and even slightly superior, many users did not like it. The point here is the convenience and design of the program. Many conservative users want to return to their previous photo viewing, as in the old and familiar Windows 7. Below are several quick and easy ways to install the familiar, old gallery for your computer with the newest operating system.
Returning the program for viewing pictures after updating the OS to the latest
When updating the system, the photo viewer does not disappear and is not hidden in the system in any way. You can easily find it in the list with programs and use your usual gallery application. To do this, you need to perform a number of simple steps:
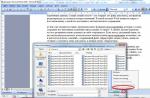
- Right-click on absolutely any image that has been downloaded to your computer’s hard drive, and in the window that appears, select “Open with.”

- A list will appear in which you can find a gallery from old systems. To open a photo once using this program, just click on it.

- To always open all photos of this type using the “Photo Viewer”, you need to click on the line “Select another application”. The line is below all other applications.

- In the window, select the program we need. Next, you need to make sure that the program always opens images, and not just once. Click on the line “Always use this program to open such files” (also any other graphic ones, you need to install them separately).

After this simple procedure, everything will open normally and correctly, just like in Windows 7.
Installing the usual photo viewing for everyone when installing Windows 10 completely
If you have installed Windows 10 on your computer and want to return to the usual method of viewing photos, then this is not so easy. In Windows 10, Microsoft programmers hid the beloved Photo Viewer program. If you try to set this as your default photo viewer, you simply won't be able to find the app you need. However, it is quite easy to return it.

Bringing Back the Photo Viewer with Winaero Tweaker
Interesting! Winaero Tweaker is usually used to configure the functional component, including the program allows you to use various hidden functions for the needs of users. In addition, there is no need to install the program; it will be able to launch and work normally directly from the folder.
To return the usual photo viewing using the Winaero Tweaker utility, we need:

After that, in your Windows 10, all supported files will be opened in the familiar and beloved gallery from Windows 7.
Installing an alternative program for viewing graphic files
If you don't like the new Photo program because it's slow and unstable, has a bad and unusual design, or for various other reasons, then you can return to the old gallery you're used to with a few simple steps, or go a different route.
The easiest way to solve this problem is to simply download any other user-recommended program for viewing photos from third-party developers.
On the Internet you can find hundreds of different programs for viewing photos of all known formats and working with them. Perhaps you will find a program that you like even more than its Windows 7 counterpart.

Interesting! Modern applications are able to offer the consumer truly enormous functionality, a beautiful and intuitive interface, as well as fast and safe operation. Some galleries even have their own small cloud storage where you can upload your photos, and they are not afraid for the safety of your computer’s hard drive.
Enabling Photo Viewer via Powershell

Let's figure out what Powershell is and for what purposes it is used. In essence, this is a much more functional and advanced “Command Line” from older versions of the operating system. Experienced users and programmers can work through this application with services and any processes in the operating system. But, unfortunately, it will not be so easy for ordinary users to figure this out. Using the command line analogue, we can do what we need - install the usual image viewer.
To enable Photo Viewer from older systems via Powershell we need:

You can find teams on the Internet, but we do not recommend using this method if you are not confident that you can do everything efficiently. To be on the safe side, be sure to make a restore point or system backup.
After inserting all the required lines, accept the changes and the desired result will be achieved. This is a fairly simple but dangerous method that requires virtually no action from you.
What to do if you can’t open a graphic file
In any gallery, whether it is simple, understandable and proven from “Seven” or this new “Photos” application, which recently appeared on computers and most users found it inconvenient, unexpected problems may arise with viewing photos. They simply won't start, and you won't be able to fully use your computer.

Let's think about what can be done in such a situation and look at a detailed solution to problems using the example of different operating systems
Problems with Photo Viewer in the "seven"
A fairly common problem is that Photo Viewer cannot open the file you need. Users are looking for solutions to this problem. Here is a solution to this problem:

Video - How to recover damaged files
If your operating system was working fine just a few weeks ago, then all you need is . This can only be done if you have ever created a special point on your PC to which you can roll back the system, or if this was done automatically by your system. If it doesn't exist yet, we recommend creating it. After all, the useful System Restore program can correct any violation related to the operation of the operating system itself.

Another way to restore normal photo viewing is to touch the registry
Many useful settings and options are found in the registry. Parts of some applications may remain here due to a failed system uninstall. Therefore, we will try to solve the problem through the registry. For this:

Resetting the application
The first thing that is recommended to do if any errors occur with the Photos application is to reset its settings. The essence of the method is that all its data will be erased, and you will start using the running application again. The method is very simple and often turns out to be effective.

So, we looked at some very simple ways that will allow you to use photo viewing in the new Windows 10, which is familiar to everyone. We also learned how to solve problems related to viewing photos in Windows.
Video - Photo Viewer in Windows 10
The program for viewing images in Windows 7 is installed along with the system and does not require additional configuration. To start viewing an image, you just double-click the left mouse button on the photo icon. An application window will open in front of you and the desired picture will be shown.
The program window contains basic tools that allow you to manage settings and set basic parameters for the image.
If you wish, you can enlarge or reduce the size of the photo using the mouse wheel or the magnifying glass icon at the bottom left of the screen. Click on the zoom icon and left-click the area you want to zoom in on. To reduce, click on the arrow next to the magnifying glass icon and select “Reduce”, then select the desired area in the same way with the left mouse button.
To move to the next picture in the images folder, click on the right arrow. To view the previous picture, click on the left arrow. The central button allows you to start playing a slideshow from the images available in the catalog in full screen. To print a picture, use the “Print” button at the top of the program window. If you want to delete a picture, use the cross button in the lower right part of the program window. Confirm the deletion operation by clicking on the “Yes” button in the dialog box that appears.
Opening through alternative programs
You can view Windows 7 photos through alternative photo viewing apps. Their advantage is the ability to use a wider range of tools when viewing and editing. Among the most multifunctional programs are Picasa, ACDSee, FastStone Image Viewer, XnView, IrfanView.
The programs can scan the file system for photos, and then sort them into categories, apply filters, change colors and create small slideshows.
Study the proposed programs and download them to your computer by visiting the developer’s official website. Run the file received for installation. Complete the installation by following the application instructions. After completing the procedure, right-click on the photo you want to view, and then click “Open with”. Select the program you installed from the list, and then click “Ok.” You can start viewing and editing the image.
The problem where Windows Photo Viewer can't open an image is one of the most common in the media field. There are several options for eliminating the error, which we will consider in this article.
Causes of the problem
There is no main reason why the photo viewer stops functioning normally. Most often the problem is caused by:
- exposure to viruses;
- file association problem;
- system library failure.
Solution
Let's look at each of the reasons and ways to solve them.
Note! All steps specified in the article apply only to the Windows 7 operating system.
Virus check
There is no universal protection against viruses, especially since you can infect your computer without knowing anything about it. In most cases, such malware is the main factor in such malfunctions.
To fix this problem, scan your computer with an antivirus or use a portable program like “Dr. Web CureIt!”, on the example of which the following instructions are written:
Note! The appearance of the program may differ from the screenshots given due to its updates, but the principle of operation remains the same.
- Launch the downloaded version of “Dr. Web CureIt! "
- Confirm your consent to send computer scan statistics to Doctor Web by checking the appropriate box (otherwise you will not be able to use the program) → Click “Continue”.
If you see a message that the virus databases are out of date, download the program again and run it. - Click the “Start scan” button to start scanning Windows system partitions.

Advice! If you want to scan the entire computer, select objects to scan by clicking the corresponding button. In the list of objects, first select drive C. This way you will save your time, because in 90% of cases viruses affecting the system are located on it, but not on other drives.
- General information about the progress of the scan and the list of threats found will be displayed in the window. You can pause or interrupt the program process.

Attention! When checking system processes and RAM, pausing the scan is not available!
- Detected threats will be displayed in the window. To eliminate them, click the “Disarm” button.

After that, restart your computer and check if the image viewer problem is resolved.
Setting up a file association
Often, updating the system or installing individual programs can cause a file association failure. Each application has a database containing a list of supported file extensions. Sometimes items in this list are disabled.
This manifests itself in the fact that the image is not opened by the default program. To correct the situation, do the following:

This method is only suitable for files with a specific extension. To restore the correct file association for all types of images, follow these steps:

Check again if the program can display photos or images.
Troubleshooting a library crash
Sometimes the system crashes with the shimgvw.dll library, which is responsible for the operation of the photo viewer, so you need to re-register it, and then check the system files.

After that, check the opening of the images again.
conclusions
The considered problems with the Windows Photo Viewer not working have not the simplest, but comprehensive solutions.
To check your computer for viruses, use an antivirus, including a portable one. Before you re-register the system library and scan system files for problems, make sure that the image viewer has all the required file associations.