Sometimes, when you try to open a folder, you may receive an error message. Let's see what can be done if there is no access to the folder.
The reasons why a folder cannot be opened are very different, but I will try to tell you about each of them and instruct you on what to do in each case if access to the folder is denied. To begin with, I must say that everything the following actions must be performed using account administrator.
You are not the owner of the folder
After reinstallation or Windows updates you may no longer be on the list of folder owners, so the system quite rightly prevents you from reading files that do not belong to you.
Now I will tell you how to access the folder in this case. First, go to the "Control Panel" menu item and select "Folder Options" or "Folder Options" there, depending on the system.
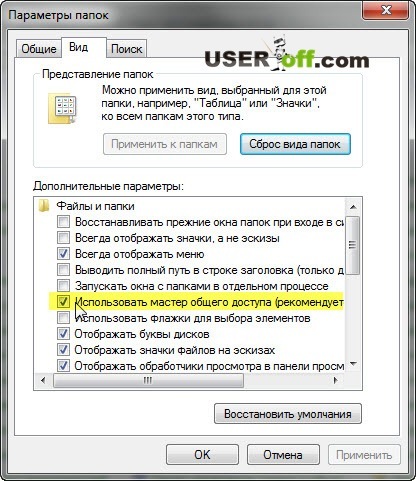
In the "View" tab, we find the item "Use the sharing wizard (recommended)", if you have Windows 7 or XP, if Windows 8 - "Use simple general access to folders (recommended) ", uncheck the box, click" OK ".
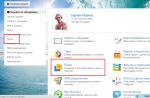
Now right-click on the folder and select "Properties" from the drop-down menu. In the "Security" tab, click on "Advanced" and in a new window click on the "Owner" tab at the top of the window. At the bottom left, click "Change".


It is possible that you will not have such a tab. Then you need to go to safe mode and then follow the steps described below.
In the window that opens, select the name of the user whom you want to allow access and click "OK". To get access not only to the folder, but also to all files and folders inside, we selected the item "Replace owner of subcontainers and objects" and then click "OK".

As you can see, there is nothing difficult. The very bottom line is that the owner of the folder has changed and in order to fix this, you need to indicate yourself as the owner. It's different when you encrypted the data and after reinstall Windows decided to open this folder. Then the head may just explode, and your problem is solvable and you shouldn't worry! Hopefully, after following my instructions, you are no longer denied access to the folder you need.
By the way, if such an error appears when you open a flash drive or disk, then be sure to check your computer for viruses.
Here's another option, from the person who posted the video:
The hosts file is text file containing information for the browser (and other programs using the Internet), which is a comparison of the names of sites and ip-addresses of their servers, through which the browser accesses the site. When you enter the site name in the address bar of your browser, it checks the content hosts file(by default, there are no entries in it), and then contacts the DNS servers (specified in the settings of your network card), which tell the browser to which ip-address to send the request. If there is a site name entry in the hosts file, then the browser goes to the ip-address specified in this file. Why do you need to know how to edit the hosts file in Windows 10 when access is denied? For example, to eliminate the consequences of a virus attack or to prevent users from going to certain sites. Denying access while editing means that you do not have the necessary rights. All about this in more detail - below.
How to easily edit the hosts file in Windows 10 when access is denied?
As with other operating systems Windows family, the hosts file in Windows 10 is located at C: \ Windows \ System32 \ drivers \ etc... If you have enabled the display of file extensions ("Control Panel" - "Explorer Options" - "View" - uncheck "Hide extension for registered file types"), then you will notice that the hosts file does not have an extension. 
Hello dear friends! When working with folders and files, I often have one problem. It manifests itself in the fact that when you try to delete, insert or rename some folders, the message “ Access denied", For me personally, it is, well, very annoying. I am sure that every second person has come across this for sure and will clearly understand what I am talking about.
The most surprising thing is that I am the administrator of the computer, and as you know, the administrator has full access to the computer and can delete, edit any file or folder. But, sometimes there are some cases in which the folder becomes inaccessible. For example, after reinstalling Windows or after copying it from an external drive to the HDD of a computer.
In general, let's see what you can do if you receive an "Access denied" error to a folder when performing any action.
Returning access to the folder on the "Access Denied" error
This example will work for all operating systems. But, Windows XP has one small snag. Before you start performing the basic steps to get the rights to a folder and get rid of the "Access Denied" error, you must turn off the simple view of file sharing in the folder properties. For all other operating systems, this value is disabled by default.
So, to disable sharing, go to some folder or to " My computer"And in the top menu we find the property item. By clicking on it, a drop-down menu will appear, where we click on "".

Further, clicking on the tab " View", In the list of parameters we look for the line" Use simple file sharing(recommended) ". And to save the edited parameters, press the button " OK».

Basic steps to fix the "Access denied" error to the folder
We find the folder to which we need to get full access for editing, and click on it with the right mouse button, where in the menu that appears, select "".

Now, click on the tab “ Security"Where we find and click on" Additionally».

Now, separately for each operating system... Let's start with Windows XP and Windows 7, since these operating systems have the same owner assignment setup.
Windows XP and Windows 7:
Pressing " Additionally”, A window for configuring security settings will appear. And already there we go to the tab “ Owner", In which we click on the button" Change».

Further, we will see information about who is the current owner and a list of users who can be appointed by this owner. Since I want to indicate my account as the owner, I designate it by clicking on it with a bear. Also, to become the owner of all the files contained in the folder, check the box next to “ Replace owner of subcontainers and objects ”. Next, click " OK»To apply all parameters.

If the error "Access is denied" to the folder reappears. We are trying to select a group of administrators, it will also work, because our account has full administrator rights, and thus gets from the list of users of this group.

Windows 8:
As of Windows 8, the file owner setting has been slightly changed here.
So, going into the security settings setting, we see that immediately above the name of the owner of the selected folder or file is displayed. And in order to select another user as the owner, click on the button " Change».

A window for selecting users will appear, where we must specify the name of the account to which we want to transfer rights. For example, my account is called "Igor" so I enter it in the field of selected objects and click the button " Check name". If everything was spelled out correctly, the name of the computer should appear in front of the name, it looks like this to me: “ MSI-Z77 \ Igor", And, as always, save the changes with the button" OK».

Now, you can do whatever you want with the folder, since all the rights to the folder now belong to you. And the error about the denial of access to the file will disappear forever. I would like to mention that on many computers the “Administrator” can be used as an account, so if you did not create an account during installation, then use it. In any case, if you have any questions, we leave them in the comments and we will definitely find answers to them.
What to do if "Access is denied" to the folder appears: 10 comments
Hello, turning on the computer, I found on the monitor the absence of all icons, (Windows7) a plate listing where exactly I was denied access and the keyboard's unwillingness to "speak" Russian. All the desktop folders were in the administrator's folder, the office programs were “access denied”, and Chrome worked fine, there was access to mail. First, I adapted the documents I needed to transfer to the mail.ru cloud and there they were safely opened and even printed.
I read a lot of tips on the Internet on how to restore normal operation, and t. To. the time was later I decided to tackle this problem in the morning, but just in case I downloaded free utility Dr.Web and set the check for the night. The check ended and I turned off the computer. Turning it on in the morning, I found that everything worked fine, even the keyboard "spoke" in its native language.
Thanks, it helped on win 7, but a lock appeared on the folder and it is systemic. I solved the problem by copying the content to a new "Normal" folder and deleting the old folder with confusing settings. Suspicion fell on the program parental control Time Boss. I put a ban on entry for another account, but as it turned out, it closed for everyone. When the settings were removed, nothing changed. Even in DOSe I could not get into it.
Hello, I can not delete the current account, it writes access denial what to do please tell me
It may happen that after reinstalling Windows or for some other reason, the system will refuse you access to some folders or files on local drives, especially if one of these disks has previous version Windows.
But what if, say, you have important files on your old desktop or in the downloads folder, or in the documents folder, or in some other special place? This article addresses this issue and presents two ways to return access to such folders or files. For example, the suggested solutions were performed on Windows 10, but the following is true for Windows 8 and Windows 7.
The first way
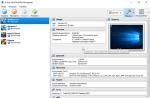
Right-click on the restricted folder and select context menu"Properties". In the opened folder properties dialog box, switch to the "Security" tab, then in the "Groups and users" list, find the item with the name of the account under which you are logged in and click on it with the mouse. In the bottom field you can see the folder permissions.

You may also not see your account listed as shown in the picture above. In any case, click on the "Change" button to change the access rights of your account to the folder. If your account is listed in the upper field, skip this paragraph and read on, otherwise click on the "Add ..." button.

In the dialog that appears, type in the bottom field the name of your account, click on the "Check Names" button.


Select the item with the name of your account in the upper field, and in the lower one, put a checkmark in front of the item "Full access", then click the "Apply" button.

If, while applying the parameters, you see the message:
Error applying security settings to ... Failed to enumerate objects in container. Access denied.

or message:

Then close all dialog boxes and try the second method.
Second way
Right-click the restricted folder and select Properties from the context menu. In the folder properties dialog box that opens, switch to the "Security" tab, then click on the "Advanced" button.

In a new window in the owner line, click on the "Change" link, if you need to enter your account password, enter the password and confirm the action.

A dialog box for finding and adding an account will open, the same as in the first method described above. Type your account name in the very bottom field and click on the "Check Names" button.
The system will find and format your account name. Click on the "OK" button to add the found account.
The dialog box will close and in the previous window, in the "Owner" line you should see your account name. Be sure to check the Replace owner of subcontainers and objects checkbox under it to access all subfolders and files in the folder you are trying to access, then click the Apply button.

Agree with the warning that you want to replace the permissions for this folder so that you have full access rights by clicking on the "Yes" button.

In the next informational message, also click the "OK" button.

As a result, you should see in the owner change window only one item with the name of your account.

Click OK and close the main folder properties dialog box by clicking OK.
Everything! The folder should open as usual.
The "bootrec / fixboot access denied" message in Windows 10 often prompts users to fix the error. Let's analyze the reasons and the sequence of actions.
The appearance of a message like "bootrec / fixboot access denied" appears, most often due to incorrect actions of the users themselves. For example, when trying to resize a disk. However, sometimes this error appears after a system update or virus exposure.
Denied access to bootrec / fixboot means that the boot record is corrupted. There can be many reasons for this damage. In addition to the naughty knobs trying to tweak the boot manually, the boot record can get corrupted, for example, if the computer was turned off while downloading an update. Or with sudden power surges, when the power supply could not cope with holding the load.
Action on error "bootrec / fixboot access denied"
First of all, to fix the corruption of the boot record and fix the "bootrec / fixboot access denied" message, you will need a boot Windows disk 10, USB or other operating system media.
After installing the boot disk, you need to restart your computer.
When the system boots, click on the "System Restore" or "Repair your computer" button in the lower left corner of the screen.

V command line you need to sequentially enter the following commands:
- bootrec.exe / rebuildbcd
- bootrec.exe / fixmbr
- bootrec.exe / fixboot
After that, you need to exit and reboot the system.
In most cases, this sequence of steps will resolve the bootrec / fixboot access denied error. If the message appears again, repeat the entire sequence of actions, but add one more command at the end:
- bootsect / nt60 SYS
- hit enter and reboot.
Once again, note that the "bootrec / fixboot access denied" message in Windows 10 indicates problems with the Master Boot Record, so experimenting with fixing them must be done carefully and expertly.
Please take the survey below the article if you used the proposed method