2.1.1.3. Create your own (custom) Word 2007 document template
By default, a new document (Document 1) in Word 2007 is created based on the basic template Normal.dotm, in which text is entered in the Normal style with the following formatting options: typeface - Calibri, font size (size) - 11 pt. , character alignment - Left, line spacing - multiplier 1.15 in., After paragraph spacing - 10 pt.
But at present, the documentation mainly uses serif fonts such as Times New Roman, font size - 14 points, paragraph parameters: text alignment - to the width of the page, first line indent - 12.5 mm, line spacing - One and a half, etc. ...
In order to create a document with the above formatting parameters in Word 2007, you must either reformat the document you create, or change Normal.dotm. But changing Normal.dotm is impractical because all Word 2007 documents and document templates are based on it.
To get out of this situation, you can create a custom template with the required formatting parameters and create new documents based on it.
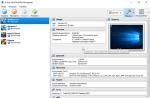
To create such a template, in the open window of the Word 2007 application, click on the "Office" button and select the New command, the "Create document" window will open (Fig.2.1.3.1).
Rice. 2.1.3.1
In the New Document window (Fig. 2.1.3.1), select the My Templates group, the "New" dialog box (Fig. 2.1.3.2) will open, in which the "New Document" template (Normal.dotm template) is displayed.

Rice. 2.1.3.2
In the New window, select the New Document template and set the radio button to the template position, and then click the OK button. The application window opens with an empty template "Template1".

Rice. 2.1.3.3
In the application window Template1 on the ribbon, you need to set the font: Times New Roman, font size - 14 pt., Paragraph parameters: text alignment - to the width of the page. Next, you need to open the "Paragraph" dialog box and set the parameters: the first line indent is 12.5 mm, the spacing before and after the paragraph is 0, the line spacing is 1.5 lines.
After changing the formatting parameters, you need to save the template, for this you need to click on the "Office" button and select the "Save As" command, the Save Document dialog box will open.

Rice. 2.1.3.4
In the Save Document window, select the Templates folder to save the template, file type - Word Template (the extension of this template is .dotx, i.e. without macros and programs), enter the file name, for example Standart_TNR, and click the Save button. After saving, close the application window with the created template.
To create a new document based on the created template Standart_TNR, in the open window of the Word 2007 application, click on the "Office" button and select the Create command. In the Create document window that opens, select the my templates group, the Create dialog box will open, in which you need to select the Standart_TNR template, set the radio button to the document position, and then click the OK button.
An empty document based on the created template Standart_TNR will be displayed in the opened application window, into which you can enter text, insert tables, pictures and other objects.
If you often create a certain type of document, such as a monthly report, sales forecast, or presentation with a company logo, save it as a template so you can use it as a starting point, instead of creating a file from scratch every time you need it. Start with a document you have already created, a document you downloaded, or a new template that you have customized.
Saving a template
Advice: To change the location for automatic saving of templates, on the tab File select item Options, click a category Preservation and specify the path to the desired folder in the field Default Personal Templates Location... All new templates will be saved in the specified location, and if the tab File select team Create and go to the category Personal, templates from that folder will be shown.
Editing a template
To update your template, open the file, make the necessary changes, and save the template.
Click File > Open.
Double click the item A computer(or This computer).
Go to folder Custom Office Templates which is located in the folder The documents.
Click the template and click the button Open.
Make the necessary changes, and then save and close the template.
Creating a new document using a template
To create a new file based on a template, click the button file > create > Customizable and select the template you want.

Note: If you're using Office 2013, this button might be called " personal", but not " Custom".
Using templates from previous versions of Office
If you created templates in an earlier version of Office, you can use them in Office 2013 or 2016. To do this, first move the corresponding files to the Office Custom Templates folder so that they are available in the application. Use the Fix it tool to quickly move templates.
If you think the current document is a template, you can save it under a different name to create a new document based on the current one. If you want to create a document, for example, open it in Word for the web, go to file Word for the web Save as and create the document you started with this copy.

On the other hand, if you are thinking which templates you see by going to the section " file Word for the web create"and then no, you cannot create them in # a0.
Instead, do the following.
If you have the desktop Word application, use the command Open in Word in Word for the web to open the document in Word on your desktop.

Create a template in Word. You can use your template for new documents by selecting the command File > Create in the Word desktop app. If you store documents online, you can edit them in Word for the web.
In this article, I will walk you through the ways to create templates for permanent WordPress pages. Each method has pros and cons. But before you start, let's briefly explain what pages are and how they differ from posts.
In WordPress, you can create pages (page) and posts (post). They differ in that the records: get into the feed on the main page; for entries, categories are indicated; records cannot be tree-like, and pages: are used for such content as "About me", "Contacts", "Sitemap"; do not have categories, but have a tree structure. Entries are usually intended for chronological information (by time of addition), and pages for a tree structure are not time-dependent. For example, this article is published as a "entry" under the "Code" heading, and links in the header menu lead to: Functions.
Pages are like posts - they are located in the same database table and have almost the same data: title, text, additional fields, etc. Both are records, but of different types: the pages are tree-like and are organized by creating parent and child pages, and the records are combined by headings and tags. In WordPress, you can create additional post types, tree-like or not.
Creating pages in WordPress
Often, you need to create a separate page template to display information differently from other pages. When creating a page template in WordPress, you can completely change the page: remove the sidebar, footer, header, you can change the page beyond recognition. For example, on this site, the page on which the WordPress file codes are displayed is changed.
Method 1: a page template through a file with an arbitrary name and connecting it in the admin panel (classic way)
This is the most common way to create a page template in WordPress. To do this, you need to create a .php file, for example, tpl_my-page.php in the theme folder and at the very beginning of the file write a note that the created file is a template for pages:
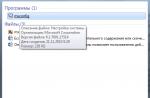
Now, when creating a page in the admin panel in the "Page properties" block, we will be able to select a "template":

Since WordPress 4.7. such page templates can be created for any post type, not just page. To do this, supplement the comments with the line: Template Post Type: post, page, where post, page are the names of the post types to which the template belongs.
/ * Template Name: My template page Template Post Type: post, page, product * /
Advantages:
- Only records with the specified template can be retrieved. For example, you can display all pages with the "Services" template (file servises.php). This is sometimes convenient. The name of the template file is stored in the _wp_page_template metafield, so to display pages with the specified template, you need to create a query by the meta field (see WP_Query).
Having created one template, we can conveniently apply it to different pages. For example, you can create a template without a sidebar and use it on different pages.
Disadvantages:
After creating the template file in the theme folder, you need to go to the admin panel and install the template for the page. This is not always convenient when developing. Therefore, if you intend to use the template for only one page, use the second method.
How it works:
When you go to the admin panel on the page for editing a tree-type post, WordPress scans all template files for the line:
Template Name: ***
The line can be located anywhere and in any way in the file.
All files with similar lines are collected and displayed in the template selection in the "Page attributes" block.
When the page is published, the name of the template file or default is written in the _wp_page_template custom field if the template is not specified:
Wp_page_template = default
_wp_page_template = tpl_my-page.php
Next, when the user visits the page, WordPress will check the _wp_page_template meta field, if the template is installed, then the template file is used. Otherwise, the search for the page template continues through the hierarchy.
Method 2: page template through a file with a specific name (template file hierarchy)
When a page is created, a shortcut is set for it (slug, alternative name). It is used in the url page. And it can be changed:

To create a template this way, you need to find out the page slug and create a file in the theme folder. Let's say our slug is equal to contacts as in the picture, then we'll create a page-contacts.php file in the theme. and fill it with the necessary code (you can copy the content from the page.php template file and edit it for yourself). That's it, now when we visit the page, we should see a new template. Similarly, you can take the ID (let it be 12) of the page and create a file page-12.php.
Advantages:
There is no need to go to the admin panel and install the template file. The template starts working immediately after the file is created. Convenient when developing.
Disadvantages:
The template is created only for one specific page. Depends on the page slug, if it changes the template will not work. If you use ID, then the dependency on the slug disappears, but it becomes unclear in the theme file which page the template belongs to (if there are several templates with ID).
Practically useless when writing templates, and even more so plugins. It can be used when editing your site in which the slug or page ID is known in advance.
How it works:
WordPeress chooses which file to use in the following order (files must be at the root of the theme):
- (any_name) .php (when a page template is used)
- page- (post_slug) .php
- page- (record_id) .php
- page.php
- singular.php
- index.php
Method 3: page template through the "template_include" filter (coding)
This is an advanced method, it is more complex, but together with the complexity it opens up wide possibilities. Using this method, you can set a template for any page, post, category, any publication on the site or, in general, a group of any publications. See examples with description:
// the filter passes the $ template variable - the path to the template file. // By changing this path we are changing the template file. add_filter ("template_include", "my_template"); function my_template ($ template) (# analogue of the second method // if this is a page with a portfolio slug, use the page-portfolio.php template file // use the is_page () conditional tag if (is_page ("portfolio")) (if ($ new_template = locate_template (array ("page-portfolio.php"))) return $ new_template;) # template for a category group // this example will use a file from the theme folder tpl_special-cats.php, // as a template for categories with ID 9 , the name "Uncategorized" and the slug "php" if (is_category (array (9, "Uncategorized", "php"))) (return get_stylesheet_directory (). "/tpl_special-cats.php";) # template for writing by ID // the template file is located in the plugin folder /my-plugin/site-template.php global $ post; if ($ post-> ID == 12) (return wp_normalize_path (WP_PLUGIN_DIR). "/ my-plugin / site- template.php ";) # template for pages of arbitrary type" book "// it is assumed that the template file book-tpl.php is in the theme folder global $ post; if ($ post-> post_type ==" book ") (return get_stylesheet_ directory (). "/book-tpl.php"; ) return $ template; )
Such code should be placed in the theme's functions.php file or in a plugin, or connected in some other way. As you can see from the example, during the template_include filter, conditional tags are already working, global variables are set: $ wp_query, $ post, etc.
Advantages:
- It is possible to create a template when writing a plugin.
You can set a template for any page or group of pages. Almost complete carte blanche in action.
Disadvantages:
The need to write code and connect it separately (for example, in the theme's functions.php).
As I already reported, this article was first published on the Computerra-Online website on July 26, 2006. Now it is possible to place it on your home site.
Read, try, and if you have any questions - ask in the comments. And, of course, criticize and / or complement.
Quite often, in the course of our activity, we create documents of the same type: acts, orders, letters, contracts, term papers ... All these documents, as a rule, contain some text or graphic elements: titles, details, logos, etc., repetitive in every document.
An inexperienced user, creating a new document, is either forced to use and edit an existing document containing these elements, or simply copy certain elements into a new document, again, from an old file. Moreover, realizing that in this case, editing is inevitable.
Sample defines the basic structure of a document and contains document settings such as auto-text elements, fonts, assigned keyboard shortcuts, macros, menus, page setup, formatting, and styles.
(From Word Help)
This routine can be reduced to a minimum by creating a document based on a template. Sometimes templates are also called "fishes". However, whatever you call it, templates really allow you to significantly increase work efficiency.
A template can be created in two ways: by taking as a basis any document with all the elements present, or by starting from scratch, independently including the necessary elements into it.
I will tell you how to create a template from scratch, since this way it will be easier to understand the whole process than to modify the existing file. As an example, we will create a simple official letter template.
So let's get started.
- Let's create a blank document.
- Let's save it right away. Let's go to the menu File(File) and select the command Save as...(Save as ...). The Save Document dialog box will open, in which we need to select in the field File type(Save as type) type Document Template (* .dot)(Document Template (* .dot).
- We determine which elements (text and graphics) and where exactly will be located in the document.
By default, the Templates folder will open, in which all templates are saved. Give the file a name and click Save.
As a rule, all official letters contain such elements as: the name of the organization, logo, details. The text of the letter itself may contain a polite appeal to the recipient of the letter and, in fact, the text of the letter itself. At the end of the letter, the name of the position of the head of the organization with his signature is given.
Let's take a similar structure of the letter as a basis.
We will place the name of the organization at the top of the document in the center. For this:
Thus, we have created a permanent (immutable) part of our template, the so-called "header". Now let's move on and create the fields in which you will later substitute your data.
On the left side of the template, under the "heading", double-click and type the name of your city, for example: Moscow. Then, in the opposite (right) part of the template, double-click again and insert the date in the place where the cursor blinks. For this:

If you have a given text (read: field) displayed as normal text without shading, then I recommend making such a shading. This will allow you to later easily define the required fields for entering your data in the document.
To do this, go to the menu Service(Tools) and select the command Options(Options) and tab View(View) in group Show(Show) select from the list shading fields(Field shading) option always(Always).
Below you can additionally insert a similar field of the recipient's address and his position.
All we have to do now is insert a greeting message to the recipient of this letter, the text of the message itself and the sender's signature below.
Try to insert these fields into your template yourself, based on the instructions above.
For example, you can take a look at the screenshot of the template that I got.

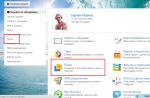
Now, to use this template to create a letter, you need to go to the menu File(File) and select the command Create(New). The Task Pane will appear on the right, in which you need to select the option Common templates(On my computer). A window with available templates will open. Choose your template and click OK. A new document based on your template will be uploaded to Word. Add your data to fields and enjoy automation.
And if you have questions, then ask. I will try to answer them.
Templates allow you to customize all the necessary parameters that you want to pre-apply to document layout, styles, formatting, tabs, text template, etc. Then you can easily create a new document based on this template.
When you save a document as a template, you can use this template to create new documents. These new documents contain all the text (and images and other content) that the template contains. They also have the same settings, sections, and page layout styles as a template. Templates can save you a lot of time when you create multiple documents that need to have a consistent layout, format, and some template text.
How to save a document as a template
The first thing you need to do is create your document the way you want the new documents to look. Separate text (and images, etc.) down to the template material you want to display in new documents. Next, customize the page layout (fields, sections, columns, etc.), as well as any formatting and styles you want to use.
Once you have the document you want, it's time to save it as a template. Open the File menu and then click Save As.


After entering a name for your template, open the drop-down menu using the Name field and then select the Word Template (* .dotx) option.


You have saved your own Word template.
How to create a new document based on a template
After you have saved your own template, you can create new documents based on it. The easiest way to do this is to simply start Word.
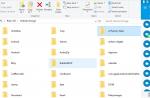
Its popup screen shows a bunch of templates that are built-in or downloadable. At the top of the window, click on the PERSONAL link to display your own templates. Then all you have to do is click on the template you want and Word creates a new document based on it.

By default, Word likes to save templates in Documents \ Custom Office Templates, where they will appear along with templates that you create in any other Office application.

When you save the template, you can choose a different location if you like. The problem is that if you save it elsewhere, Word may not be able to see it and display it as an option on the splash screen. If this is not very important to you, save them anywhere. You can create a new document based on a template simply by double-clicking the template file.
You can also open the template in Word so that you can edit it by right-clicking the file and then choosing Open from the context menu.
If you need an even more organized approach, you can change the default location. This allows you to save templates where you want (although they still need to be in the same place) and have access to them from the Word splash screen.
From the File menu, choose Options. In the Word Options window, select the Save category on the left. On the right, enter the path where you want to save the templates in the Default Personal Templates Location box. Click "OK" when done.

After all, Word templates are functionally similar to regular Word documents. The big difference is how Word handles these files, which makes it easier to create new documents from them.