Greetings to all!
Today I would like to tell you how you can take screenshots in linux Ubuntu.
Screenshot software for linux Ubuntu - Shutter.
What Shutter can do:
- Screenshots of the selected part of the screen;
- Screenshots of the entire screen;
- Screenshots of sites, even if they do not fit on the screen;
- Edit screenshots (crop, overlay watermarks, blur private information);
- Apply various beautiful effects to the taken screenshots;
- Sending images to photo hosting.
Program installation
The program is available through the Ubuntu Software Center. But there is not the latest version available. At the moment, the latest version is 0.93.1, while USC only has 0.90.1. To install version 0.93.1, you need to connect an additional repository.
Open the Dash menu, enter ter in the search box and launch the "Terminal".
After the $ sign, enter the following command and press the "Enter" key
To add an additional repository, we need additional privileges, and the system will ask you to enter our user's password. We enter it and press the "Enter" key.
The system will clarify the need to connect an additional repository. We confirm this by pressing the "Enter" key.
Let's make sure that the addition was successful.
Let's update the package list and start the installation. To do this, enter the following command into the command line and press the "Enter" key.
sudo apt-get update && sudo apt-get install shutter
The package installer will check our system and ask for confirmation to install additional packages. Enter "Y" and press the "Enter" key.
After the end of the installation process, we will return to the command line, which will end with a "$"
Program setting
Open the Dash menu, enter "shutter" in the search, and launch "Shutter".
So that when you press the "Prt Scr" key to open the "Shutter", we will make changes to the system. Let's open the "System Settings" and select the "Keyboard" item.
Select the "Key combinations" tab, the "Additional combinations" item and press the "+" key to add
Add “Shutter” to the Name field, and “shutter -f” command to the fields, press the “Apply” button.
Now we have a new command, but it is still "Disabled". To enable, click on the inscription "Disabled" and the "Prt Scr" button on the keyboard.
The system will warn us that this combination is already in use. Confirm the override by clicking on the "Override" button.
Now when you press the "Prt Scr" button on the keyboard, a screenshot of the screen will be taken and the image will open in the "Shutter" program.
To edit the image, click on the "Edit" button.
The left panel contains buttons for editing tools. To save the image, click the "Save" button.
We have discussed how to install Shutter screenshot software and its capabilities. We also discussed how to create a screenshot of the desktop using it. And if there are any incomprehensible questions on this topic and there are suggestions, then I ask them to write them in the comments. Bye everyone!
When using gadgets, be it a miniature smartphone or a brand new computer, we often need to save an image that cannot be downloaded. The function of saving a screenshot on the phone is familiar to everyone: pressing a couple of buttons at the same time gives the result we need in just a couple of seconds. With a computer, things are much more complicated.
There are a lot of ways to take a screenshot at the moment, for this there are special applications that are very simple and convenient to use. In addition, each operating system has special built-in functions.
How to take a screenshot on Windows
Screenshot using the Print Screen key
Windows has a Print Screen button for these functions. Most often it is signed as PrtScr or PrtSc. This inconspicuous key is located on the right of the keyboard.
After pressing the button, the drawn picture is automatically saved in the buffer. On some portable devices, a combination of the PrtScr and Fn keys is possible, with a further selection of the save folder.
Another property of this operating system is the preservation of the active window when you press PrtScr and Alt.
"Scissors"

In the Windows program menu, you will find the Scissors tool. It is included in a set of Windows Vista, 7, 8, 10.
With its help, it is possible to save the part of the working area you need in such formats as png, jpeg, gif, html, while you can use the "Pen" and "Marker" functions.
Downloadable applications
Joxi
A free application similar in functions to LightShot, only it has one big advantage over it - the ability to share pictures in social media. networks. You can download it from the official Joxi website

How to take a screenshot on MacOS
This operating system allows you to take different types of pictures using its own capabilities.
Snapshot the entire area to the desktop
To use this function, we combine the keys Win + Shift + 3... So, we get a screenshot saved on the work area.
To clipboard
To get the file into the clipboard, you need the combination Win + Ctrl + Shift + 3.
Partial Screenshot
Win + Shift + 4 allows you to define the desired area of the window, while the resulting fragment will be saved on the desktop.
By the nature of my work, I need to constantly take screenshots, it's not difficult to do this, since there are a lot of programs in Linux and Windows for this. But this is just for those who know about these programs and know how to work in them. But as statistics show, thousands of people are constantly interested in how to take a screenshot of the screen on a computer?
How do I take a screenshot of the screen in Windows?
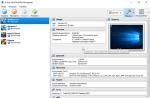
There are many good programs for this business, but I am most impressed by FastStone Capture ... We follow this link and download one of the versions of the program: either a regular installer or a portable version of the program. After starting the program, a small window will appear on the screen:
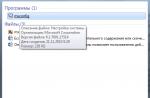
The program has many settings, it makes no sense to describe all of them, I will pay attention to only one - the format in which the screenshot will be saved.
If you are going to insert screenshots into articles of the site, then ALWAYS set the JPG format, since the picture in this format with the same quality weighs several times less compared to the PNG format. But even if you just want to post a picture on a social network or send it to someone, then with a smaller size it will be much faster.
That's all, there is even nothing more to write here, since everything is very simple and understandable, but if you have questions, then write them in the comments.
How to take a screenshot on a computer in Linux?
Everything is not so complicated in Linux, but you also need to know the necessary tools. The easiest way to take a screenshot of the screen is to use the SCREEN SHOT utility, which is installed by default in many distributions.
Go to APPLICATIONS - STANDARD - SCREEN SHOT and run the program.
Everything is also obvious here: we put a tick in the right place, depending on what we want to do, we set a delay and let's go! I most often use this particular program, as it is very easy to work with it.
But this program has one drawback: it only saves screenshots in PNG format and therefore I constantly have to convert them to JPG. It seems like little things, but still it's too much time.
Therefore, recently I started using a cooler program - Shutter... You can install it this way:
Sudo apt-add-repository ppa: shutter / ppa sudo apt-get update sudo apt-get install shutter
After that, go to APPLICATIONS - STANDARD - SHUTTER and run the program.
Here in the top menu we also see three already familiar buttons, we press any of them, the window will disappear for a while and then reappear, but in it you will see the resulting screenshot - like this:
The program has many settings, and sometimes very useful ones. For example, today I needed to solve a problem: how to take screenshots from a map quickly, but so that they immediately be 500x200 pixels in size? You can crop everything later, but you need to take a lot of such pictures, and again, this is time.
And in this program, all this is done very simply: go to the settings and set the exact size of the picture that we will take.
After pressing the button, a window of the dimensions we need will appear, you drag it to the desired area and press ENTER. And that's all.
The program also has a built-in editor in which you can do a lot of useful things - I clicked on all the buttons to understand what they are for, and here's what you can do approximately:
Highlight, paint, sign, blur, and more. I think that I will be actively using this soon, since it is convenient, you do not need to deliberately go into a graphic editor, like. An overview article about Shutter is available at HABRE, you can read in addition.
In conclusion, I want to mention one more program that can be used to take screenshots - Kazam... But I will not describe this program, as I described it in the article, since this is its first and more important function for me. Kazam is pretty primitive in terms of screenshots:
You can install this program with the command:
Sudo apt-get install kazam
Perhaps there are other programs in Linux for taking screenshots, but even these are more than enough. But if you know how to take a screenshot on your computer in some other way, it will be interesting to listen to.
How to take a screenshot on Android?
But this question is still open for me, since I have not yet been able to find an intelligible program. Someone makes screenshots just by pressing the minus button and the shutdown button, but I can't do that, maybe the firmware is wrong?
I also installed different programs, but did not find anything good. It will probably be easier for me to make screenshots from it.
If you know how to take a screenshot on a tablet, I would be grateful for your advice.
Did not find an answer to your question? Use search ...
14 comments
14 comments to the article "How to take a screenshot of the screen?"
Yes, you can also take a screenshot by pressing Alt + PrtSc - but this is too primitive!
It's even easier to press the Print Screen key.
Your link: "" In conclusion, I would like to mention another program that can be used to take screenshots - Kazam. But I will not describe this program, as I described it in the article HOW TO RECORD VIDEO FROM THE SCREEN "" - leads to a page with another program.
Sorry, wrong, corrected. Although in that article, in truth, I did not write much about this program, although everything is so simple there that there is not much to describe.
I'm just trying to learn Linux, I won't comment on anything. And in Windows - the FastStone Capture program presented is the BEST, it is checked. Along with the fact that it is more stable than all similar programs, simple and Russian-speaking, with its help, video is removed from the screen with good sound. One minus - only in * .wmv format
You can also use the gnome-screenshot program, install - sudo apt-get install gnome-screenshot, and use it.
Thank you, but this program is mentioned in the article, just about its shortcomings :) #linux
It turned out that image editing in Shutter does not work in Linux Mint. You need to install the library:
sudo apt-get install libgoo-canvas-perl
"" prostolinux writes:
It turned out that image editing does not work in Shutter in Linux Mint .... ""
this is not entirely true - if you install the Shooter through the "program manager", then editing is really not active, but if you install it through the Terminal with the commands from this article, everything works right away ...
(I have Mint 17 mate).
Hello. Mint 18.2, editing does not work like in the comments above. But I installed it with the repository when trying to install the library:
The latest libgoo-canvas-perl package (0.06-2ubuntu1) is already installed.
But editing still doesn't work. What is the reason and how can you fix it?
The article is already two years old, maybe something has already changed, but earlier it helped, apparently, some other library is missing.
You can see user comments on the official page of the program http://shutter-project.org/downloads/ so for sure there is an answer, and I hope you installed the program from their repository.
Thanks for the answer. The edit worked ... and it hasn't done anything since that moment. Yes, I installed it as expected, through the repository. I wanted to demolish the shooter and put on a hot shot, but decided to check it out just in case. Apparently, this version of mint is still damp, maybe it was buggy then.
Everything can be, in general it is better to sit on stable branches if the computer is needed for work.
Well, mint on lts from ubuntu, debian is of course the standard of stability, but it is too conservative or something ... Mint is on the home laptop, I needed a screenshot editor without any bells and whistles, I can't run the gimp, everything is too cumbersome there. For work, it is on another computer Windows 7, there are office programs that have no analogues in Linux. And for home tasks it is worth keeping Windows only for gaming purposes, and for the rest of Linux distributions behind the eyes, and there is no fuss with cleaning, antiviruses.
Screenshot(screenshot) is a static image (static - no motion) that captures a screenshot, a single window, or a selected area.
What is a screenshot for?
The applications for screenshots are many. They are needed to insert the made picture on blogs, websites, forums, social networks, provide problems in the technical support of various services, cheat sheets for the exam, to the map, etc.
Most distributions Linux, the same as Windows a screenshot of the entire screen can be taken by pressing a key Print:

To create a snapshot of a separate active window, you need to use the keyboard shortcut Alt + Print.
In addition, in every desktop environment Linux there is a program for creating screenshots installed by default. V Gnome / Ubuntu- this is GNOME Screenshot, v KDE - KSnapshot, v Xfce - Xfce4 Screenshooter etc.
All of these programs take a screenshot of a single window or a selected area. For example, in Ubuntu - Screenshot:

Note... What is convenient Screenshot v Ubuntu, this is because the program does not have to be opened, it is enough to fix its icon on the panel Unity, right-click on it, select the desired option from the context menu, the picture will be taken and all that remains is to save it by pressing the button Save in the desired folder:


V Linux, for terminal lovers, there is also a terminal utility for taking screenshots - Scrot, which is present in the repositories of almost all distributions.
Scrot (SCR eensh OT) has been considered for many years as one of the most powerful screen capture tools for Linux... The utility supports all the standard features: delay, selection of the capture area, and even capture from multiple screens. Lots of Linux programs to take screenshots including Shutter, based on Scrot.
For installation Scrot v Ubuntu and derivatives, run the following command in the terminal:
sudo apt install scrot
Screenshot from Scrot.
To do this, just run the command in the terminal:
A preview of the screenshot of the entire screen will be displayed by default in your Home folder.
A snapshot of a split window or selected area is taken with the argument -s:
scrot -s
After executing the command, click on the selected window to create a snapshot of a separate window, and to take a snapshot of the selected area, select the desired area with the mouse cursor and press Input.
Other possibilities Scrot, can be viewed by running the command:
scrot -h
Apart from these utilities, in Linux there are programs that take pictures, edit them and immediately create a link to the picture for insertion on a blog, website, etc. literally in two or three clicks.
Screenshoter Joxi is a fairly popular application for taking screenshots and editing them instantly. Allows you to take a screenshot of the selected area, add text, arrows, lines to it, apply a blur effect and much more.
In addition, the program has its own "cloud" storage - Joxi.ru where all screenshots taken by the user are automatically saved.
Install Joxi from the home page of the program at the following link: http://joxi.net/download/linux
After installation open Joxi from the system menu:

You will be prompted to register on your own hosting Joxi:

After registration, you can use the program. Go to Settings, select the Russian language so that there are no difficulties with the program:

After that, the context menu of the icon Joxi will be displayed in Russian:

After you select the appropriate option and take a snapshot, an editor for editing the snapshot will appear below:

When finished editing or no changes, click on the blue checkmark button to save.
Now two parameters will become active in the context menu of the icon on the panel: Open last link and Copy last link... It is enough to copy the link to paste it on a blog, website, etc.
2.5CM Uploader
5CM Uploader- cross-platform (Windows, MacOS and Linux) program for uploading screenshots to hosting in three clicks. Saves time if you need to share images.Program 5CM Uploader I was bribed by its capabilities not only to take and edit pictures using various features, but also by the speed, as well as upload pictures to the hosting and receive the code directly in the program window.

Program management 5CM Uploader produced from the indicator in the tray, since it does not have an application launcher icon:

After the picture is taken or you have opened any other picture in 5CM Uploader, move the pointer over the picture and you will see two pop-up icons: pencil and scissors... Clicking on the pencil opens the editor, and clicking on the scissors allows you to crop the picture:

After editing the snapshot or without changes, click on the button Download and links to the snapshot will be displayed immediately below the snapshot: direct link, BBCode(for forums) and Html(for blog or web).
As you can see, the program is quite simple to manage and get links without registration.
Install 5CM Uploader also available from the official website of the program at the following link: http://img.5cm.ru/
As I explained above, u 5CM Uploader there is no launcher icon, so you won't find it in the system menu. It is launched from the terminal with the following command:
5up & exit
In order not to constantly run 5CM Uploader every time you log into the system, so that the icon is displayed in the tray, it is better to register it in Startup applications in the following sequence:

3. Shutter
And finally, my favorite program that I constantly work with to create images on this site is Shutter.
Shutter- a tool for creating screenshots, editing and sharing them in the public domain.
Shutter Is a multifunctional program that allows you to take screenshots of a window, part of the screen, the entire screen, or even a website, then add various effects to it, draw on it, and at the end upload a screenshot to an image hosting website. And all this from one program window!
Shutter is in the repositories Ubuntu from where you can install it or run the command in the terminal to install:
sudo apt install shutter
Note... I do not know for what reason, but in Linux Mint by default, the library is not installed with the program libgoo-canvas-perl responsible for editing the picture, i.e. without it, button Edit will be inactive. If you install Shutter v Linux Mint, you need to install this library:
sudo apt install libgoo-canvas-perl
After the installation is complete, run the program from the system menu and pin the icon Shutter on the panel Unity(Ubuntu).
To take a picture, you do not need to open the program, right-clicking on the icon opens a context menu with various options:

For example, select the option Capture an area of the screen(screen area selection), use the cursor to select the preferred screen area and press the key Input:
Each user had to take a "screenshot" at least once - a snapshot of what is currently displayed on his computer screen. Perhaps it was a snapshot of a city map, a photo of an error generated by the program, or a photo of a personal desktop.
It would seem that making a "screenshot" is not difficult: just press the Prt Scr key on the keyboard (both in Windows and Linux). However, pressing the "Prt Scr" button saves a snapshot of absolutely the entire desktop - with minimized program windows at the bottom of the screen, with browser page tabs at the top. Therefore, after the "screenshot" has been taken, the second, more laborious stage of work begins for the user - cutting off unnecessary parts of the picture in a graphics editor.
In order to exclude an extra step from the "photographing" process, there is a Gnome-screenshot program - an analogue of the ScreenshotMaker program in Windows. You can find it in the menu item "Applications" - "Standard" - "Screenshot" (Gnome-screenshot).

After clicking on the specified line, a window with the title "Screenshot" appears on the computer screen, which prompts the user to choose a suitable "photographing" method for him:

- Capture the entire desktop. This command is analogous to the command performed by the "Prt Scr" button.
- Capture the current window. When you select this command, Gnome-screenshot will "take a picture" of the window of only the program that is currently active. For example, if there is an ICQ dialog box on top of a browser and a text document, Gnome-screenshot will only take a snapshot of the ICQ correspondence.
- Select capture area. This command only makes sense in conjunction with the Capture After Delay command. With the help of it you can set the period of time during which the user will have time to select the area of the screen necessary for "photographing".
After clicking the "Take Screenshot" button or after the specified time has elapsed, the "Save Screenshot" window will appear on the computer screen. With the help of a separate button, the finished "screenshot" can be saved to the clipboard. In addition, you can give it a name and save it in any convenient folder.
Gnome-screenshot also lets you take screenshots in Linux with two special effects:
- A shot with a cast shadow.
- Picture with a frame.
You can also ask the Gnome-screenshot program not to erase the mouse cursor from the snapshot by using a separate checkmark opposite the words "Include Pointer". This can be useful, for example, when "photographing" a program error, when highlighting a keyword in a sentence, or when specifying the desired point on the map.
For ease of use, the Gnome-screenshot icon can be positioned on the top panel of the desktop. For this you need:
- Go to the menu item "Applications" - "Standard" - "Screenshot".
- Drag the selected (highlighted in orange) line to the top command bar of the desktop.
Installing screenshot software in Ubuntu
Installing Gnome-screenshot via App Center
Gnome-screenshot are part of the gnome-utils package. To install it, you must enter in the Application Center search gnome-utils.
(about the general principle