After five years of working with Fiber Channel storage area networks (SANs), I have been deeply puzzled by the advent of iSCSI: what it does and, more importantly, how it works, and how iSCSI can be used to solve real-world user problems. So, after several strenuous months of talking with many experts on this topic, I present in this article a few of my own views on iSCSI.
What exactly is iSCSI?
iSCSI sends SCSI commands in IP packets. In more detail, iSCSI is designed as a protocol for a storage initiator (usually a server) to send SCSI commands to an executor (usually a tape or disk) over IP.Other protocols: FCIP - Sends Fiber Channel blocks over IP, essentially extending Fiber Channel connections; actually has nothing to do with SCSI. On the other hand, iFCP provides mapping of FCP (serial SCSI over Fiber Channel) to and from IP. In other words, it offers a Fiber Channel (fabric) interconnect protocol that allows connections over IP.
In other words, iSCSI is a SCSI over IP protocol that connects the server to the storage. Other protocols provide Fiber Channel to Fiber Channel interconnection with varying degrees of intelligence.
How do iSCSI devices find each other?
In the case of regular SCSI connections and Fiber Channel loops, the device discovery method is quite primitive. For Fiber Channel (fabric) networks, there is a necessary service called a Simple Name Server, or simply a domain name server that works with hundreds or thousands of devices. But in IP, theoretically, there could be several million devices.There are two iSCSI device discovery mechanisms currently in use in the IP world. The first is SLP (service locator protocol) - a protocol of the TCP / IP family that allows automatic tuning various resources. This service discovery protocol has been around in the IP world for some time. Recently, however, many vendors, including Microsoft, have begun to develop a new protocol - Internet Simple Name Server. In simple terms, it was based on the principles of a simple domain name server for Fiber Channel and then scaled up to the extent that it can handle the size of IP networks, while at the same time, without losing the storage features of SLP.
How can iSCSI be used?
There are three main ways to use iSCSI:- Dedicated iSCSI server accessing dedicated iSCSI storage.
- A dedicated iSCSI server accessing Fiber Channel attached storage via an iSCSI-to-Fiber Channel router.
- Fiber Channel server accessing iSCSI storage via a Fiber-Channel-to-iSCSI router.
So which is the most likely and / or practical to use? To answer this question, you need to step back a little and remember that networked storage requires flexibility, using products in different ways. Today, the use of iSCSI in servers is relatively new but simple given Microsoft's support for Windows Server 2000 and 2003.
For this reason, one way to use iSCSI is to use iSCSI servers attached to existing Fiber Channel storage through an iSCSI-to-Fiber Channel router, most likely on a Fiber Channel SAN. This means that the same ports on the same storage arrays can provide storage service for both Fiber Channel and iSCSI servers. As such, it allows you to get more value out of SAN and Fiber Channel storage than you have, and you can do it right now — the market has all the products you need.
According to my assumptions, similar events will occur in the NAS market, in fact, they are already happening. Since NAS devices already connect drives to IP networks, sharing services over the network file system(NFS) and / or the Common Internet File Access Protocol (CIFS), it is easy for the NAS to transfer block-level data over the same ports using iSCSI, again allowing you to reuse existing storage solutions in a new way.
There are several other - interesting and non-standard solutions waiting for the emergence of storage specialized exclusively for iSCSI, which can work perfectly in a new place where storage consolidation has not yet been carried out, and there are only products of one solution.
Who Will Use iSCSI?
As a Fiber Channel expert with several years of experience, I unfortunately have to point out to the Fiber Channel world that iSCSI can run at wire speed and can definitely run as fast as any normal server running tasks. any normal application. For the IP community, it is necessary to note the significant prevalence of Fiber Channel, especially when comparing their number with the number of 1 GB network ports, rather than with the number of other network ports. The Fiber Channel community needs to point out that while many storage and even a significant number of powerful servers are connected to Fiber Channel, there are a number of unconnected Unix servers and a huge number of Intel servers that do not work with Fiber Channel.So iSCSI can work for everyone, but perhaps the largest potential market is Intel servers, and high-density and ultra-thin servers (Intel or otherwise). In addition, iSCSI can sometimes be used for high-performance servers, in the case of remote offices to access the central datacenter via a SAN, and in other cases where it is too early to use Fiber Channel, after all, there are still many offline servers and storage. data.
NIC, TOE and HBA: When Should You Use Them?
In conclusion, there are three approaches to server connection:- Standard interface card (NIC) with iSCSI driver
- TOE (TCP Offload Engine) NIC with iSCSI driver
- Host Bus Adapters (HBAs) designed for iSCSI by traditional Fiber Channel adapter manufacturers.
The key point here is that, unlike Fiber Channel adapters, iSCSI pricing ranges from low (free) to high performance (accelerators) and thus can be tailored to meet application requirements. Also, the output load capacity (fan-out or oversubscription) allows the use of more economical Ethernet ports (both fast and GE) instead of dedicated FC switch ports, which further reduces costs. With iSCSI TOE cards priced at $ 300 or less, host connection costs are significantly lower than with FCs, even for TOE performance.
Since FC can run at 2Gbps, Fiber Channel is preferable for high-end servers (2Gb Ethernet doesn't exist), although to be honest, there aren't many servers out there that use this bandwidth, even on Fiber Channel. Of course, from a storage perspective, 2Gbps is more likely to be used until we see 10GB FC or even 10GB Ethernet / iSCSI ports. iSCSI opens the door to hundreds and thousands of servers, especially Intel systems, many of which may be less demanding, and many more will still benefit from networked storage.
Only time will tell exactly what will happen, although one thing is for sure - this will be a very exciting year for networked storage and for iSCSI.
In the data centers of the world, storage area networks (SAN) large throughput have become the minimum standard. While cloud service providers and virtualization also continue to have a huge impact on the technology world, the need for even more SAN storage is becoming apparent.
Most SAN hardware consists of a minimalist controller (or set of controllers) and a large collection of high-capacity drives that are configured for high availability and data integrity.
Many of these specialized products are made by large vendors such as Netapp, Dell Equalogic, HP Storageworks, or EMC, and have price tags that only the largest enterprises can afford.
In reality, these devices are nothing more than arrays of large hard drives and the controller provides space on these hard drives to network clients. There have been many technologies over the years that provide this functionality, or similar functionality, at a significantly lower cost.
V the Debian GNU / Linux distribution packages are provided that allow a Debian system to serve an enterprise-level SAN storage device for a fraction of the cost! This allows every major home user or large data center to take advantage of SAN storage without having to spend a fortune on their own vendor solution.
In this article, we will look at how you can set up a Debian 9 (Stretch) system to serve disk space using a system known as Internet Small Computer Systems Interface or iSCSI . iSCSI Is a standard based on Internet Protocol (IP) to ensure the storage of blocks ( hard disk) for other systems. iSCSI works on the client server model, but uses different names to distinguish client from server.
In iSCSI terminology, a server serving " disk space", known as " Target objectiSCSI"And the system requesting / using disk space is known as Initiator iSCSI. In other words, " Initiator"Requests a memory lock from" Target».
Setting up the environment
This tutorial will walk you through a basic setup involving a simple server iSCSI (target) and customer (initiator), both of which work with Debian 9 (Stretch) .
Debian iSCSI Target: 192.168.56.101/24 Storage: Contains two additional hard drives for use as storage for the iSCSI installation. Debian iSCSI Initiator: 192.168.56.102/24The network can be viewed below:
Debian iSCSI Network Diagram
Debian iSCSI target configuration
In the world iSCSIgoal considered the host that contains the storage devices to be used initiator .
In this article, as goals a server with an IP address is used 192.168.56.101 ... All configurations will be done on this node for this section.
The first step is to install the necessary packages to enable the Debian system to serve iSCSI targets... This software package is known as Target Framework (TGT).
Another element that is used for this tutorial is Logical volume management (LVM) tools like logical volumes (LVS) will be used as the storage base for the target device.
Both packages can be installed using the following commands.
# apt-get update # apt-get install tgt lvm2
Once the packages are installed, LVM will be used to prepare hard drives for goals for use as iSCSI LUN... The first command is used to prepare disks for inclusion in an LVM setup. Be sure to change the command as needed for different scenarios!
# lsblk (Used only to assert disks used when creating LVM) # pvcreate / dev / sd (b, c)  Confirming and creating LVM
After the disks have been prepared using the command " pvcreate", It's time to create volume group from those specific drives. Group volumes required to create logical volumes which will later be used as storage iSCSI .
To create a group volumes command required vgcreate ‘.
# vgcreate tecmint_iscsi / dev / sd (b, c) # vgs (Only required to confirm the creation of a volume group)  Creating a volume group in Debian
Note the above output that the system is reacting to the fact that volume group was created, but it is always a good idea to double check as shown above with the command “ vgs". The capacity of this volume groups is only 9.99 GB... Although this is a particularly small group of volumes, the process is the same for large drives!
The next step is to create a logical volume that will act as a disk for the client iSCSI (initiator). This example will use all volume group, but this is optional.
The logical volume will be created using the command lvcreate .
# lvcreate -l 100% FREE tecmint_lun1 tecmint_iscsi # lvs (Just used to confirm the creation of a logical volume)  Creating a logical volume in Debian
The above command " lvcreate"May be a little confusing at first, but the breakdown is as follows:
- lvcreate is the command used to create a logical volume.
- -l 100% FREE- Create a logical volume using all the free space of the volume group.
- -n tecmint_lun1 Is the name of the logical volume to be created.
- tecmint_iscsi- the name of the volume group to create the logical volume inside.
After creation logical volume it's time to create an actual LUN(room logical device). LUN will be a storage device that initiator will connect and use later.
Creation LUN very simple and only requires a few steps. The first step is to create a configuration file. This file will be located in catalog ‘ /etc/tgt/conf.d‘And for this article it will be‘ TecMint_iscsi.conf ‘.
Use a text editor to create this file.
# nano /etc/tgt/conf.d/TecMint_iscsi.conf
Inside this file, all the necessary configuration information will be configured for this LUN... There are many options that can be placed in this file, but for now, a basic one will be configured. LUN with mutual Handshake Challenge Authentication Protocol (CHAP).
The LUN definition will exist between the two " targeted»Statements. For more options that can be performed on the target expression, see the man page for the file " target.conf"By issuing" man 5 tasks.conf ».
There's a lot going on there. A quick explanation may be helpful to most.
- The first the line starts with a specific ISCSI LUN configuration. In this case LUN marked as " iqn.2018-02.tecmint.com:lun1". Part " iqn"Indicates that this will be the name assigned by iSCSI. " 2018-02 "Is an arbitrary combination of dates. ‘ tecmint.com'Is the domain this LUN belongs to. Finally, " lun1"Is used as a name for this specific purpose.
- The second the line above illustrates the comment. Comments can exist in target configuration files and must be pre-marked with the symbol " # ».
- Third the line where the actual amount of memory to be used by the initiator exists. In this case, the vault backup will be the logical volume that was created earlier in the tutorial.
- Fourth string is the IP address that is expected from the initiator. While not a required configuration item, it can help improve security.
- Fifth incoming username / password line. Like the initiator address above, this parameter is also not required, but can help protect the LUN. Since this guide also covers iSCSI mutual CHAP, this parameter is required. This line specifies the username and password that is expected from the initiator for the initiator to connect to this LUN.
- Sixth If the string is username / password, then the purpose is to provide the initiator for mutual CHAP authentication to take place. Typically this parameter is not required, but this article covers CHAP mutual authentication, so this parameter is required.
- The ending line is the closing statement for defining the target. Notice the trailing slash before the target word!
Once the appropriate configurations have been selected for the LUNs, save the changes and exit text editor... If you are using nano, press ctrl + o to save and then press ctrl + x to exit nano.
 Creating a LUN configuration file
 After creating the configuration file, the service tgt must be restarted, so tgt knows about new purposes and related configuration.
This can be done with one of the following commands and depends on the init system you are using.
# service tgt restart (For sysv init systems) # systemctl restart tgt (For systemd init systems)
After restart tgt it is important to make sure that iSCSI target becomes available according to the created configuration file.
This can be done with the command tgtadm .
# tgtadm --mode target --op show (this will show all targets)  Show all iSCSI targets
This completes the configuration goals... The next section will work through configuration initiator .
Debian iSCSI initiator configuration
The next step in using the previously configured iSCSI targets is the configuration iSCSI initiator .
As initiator this article will use another Debian system 9, but any system that can use the iSCSI protocol can connect to the previously configured target; this can include hypervisors like XenServer / ESXi or other distributions like Red Hat, Debian or Ubuntu.
The first step in this process for this Debian initiator is to install the appropriate packages for iSCSI .
# apt-get update # apt-get install open-iscsi
After apt finishes configuring packages open-iscsi, configuration can start iSCSI initiator... The first step is to connect with aim obtaining initial configuration information for a prepared target.
# iscsiadm -m discovery -t st -p 192.168.56.101
When this command is run it will reply back with the name lun, configured earlier for this particular host. The above command also generates two files for newly discovered LUN information.
 Connect the target iSCSI server
 Now for the file created for this node the information should be configured CHAP, so that this iSCSI target was really available initiator .
Technically, this information can be configured for the entire system as a whole, but in the event that the host connects to different LUN with different credentials, placing those credentials in a node-specific configuration file can mitigate any problems.
The node configuration file will exist in the " / etc / iscsi / nodes /”And will have a directory for each LUN. In the case of this article (note that changes will change if names / IP addresses are changed).
# /etc/iscsi/nodes/iqn.2018-02.tecmint.com\:lun1/192.168.56.101\.3260\,1/default
You can use any text editor to work with this file.
# nano /etc/iscsi/nodes/iqn.2018-02.tecmint.com\:lun1/192.168.56.101\.3260\,1/default
Inside this file there will be several already configured parameters for the corresponding goals, which were determined during the command " iscsiadm"Performed earlier.
Since this target / initiator Debian installation uses mutual CHAP, some other parameters need to be changed and added to this file and then login to iSCSI target .
Changes to this file:
Node.session.auth.authmethod = CHAP #Enable CHAP Authentication node.session.auth.username = tecmint-iscsi-user #Target to Initiator authentication node.session.auth.password = password #Target to Initiator authentication node.session.auth .username_in = debian-iscsi-target #Initiator to Target authentication node.session.auth.password_in = secretpass #Initiator to Target authentication
The above options will enable this goals authenticate initiator, and also allow initiator pass authentication goals .
There is another option in this particular file that might need to be changed depending on the admin settings, and that is the ' node.startup ».
If after this guide the parameter “ node.startup"Will be set to" manual"At this point. This may not be desirable. If the administrator wants to iSCSI target was connected at system startup, change " manually" on " auto »:
node.startup = automatic
After making the above changes, save and exit the file. At this stage, the service open-iscsi initiator needs to be restarted to read these new changes and connect to iSCSI targets .
This can be done with one of the following commands, depending on the init system used.
# service open-iscsi restart (For sysv init systems) # systemctl restart open-iscsi (For systemd init systems)  Restart Open iSCSI Initiator
Note that in the green box above, iSCSI initiator was able to enter goal... To reaffirm that iSCSI target really available initiator, we can check the system for additional disk drives which are available using the command lsblk and checking the output for additional drives.
# lsblk  Checking the iSCSI Target Disk
Another command that can be used initiator to confirm the connection to goals,- this is iscsiadm as such:
# iscsiadm -m session Handshake with ISCSI target
The last place to confirm the connection will be on the goals using the command " tgtadm»To list any iSCSI connections.
# tgtadm --mode conn --op show --tid 1
 ISCSI connection list
From now on, the newly connected device iSCSI can be used like any normally attached disk! Partitioning, file system creation, installation and / or permanent editing can be handled normally.
One big care to be aware of with devices iSCSI, is that if iSCSI target contains important filesystems that are required at boot time initiator, be sure to use the entry “ _netdev" v file « / etc / fstab”To ensure that the iSCSI device is connected before the system continues booting!
I write first of all for myself, but if it will be useful to someone, it will be good too.
The task is to organize shadow copying on a file-sharing server, the volume of the partition is 1TB. To create shadow copies, you need one more partition of at least 1TB, but you need to find funds, buy hard drives in a rack, in general, not quickly, but you need it yesterday. There is a Netgear ReadyNAS NAS with RAID-5 onboard and a lot of free space. The only nuance is that in order to create shadow copies, you need a local volume, and not a network drive. And here iSCSI comes to the rescue, I will not describe what it is, who needs to read it on Wikipedia, and who needs to think, and so they know what it is. In a nutshell, the protocol allows you to make a network drive a local volume.
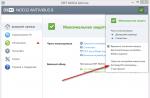
So first, go to the ReadyNAS admin panel and on the iSCSI tab, click Create a new LUN
It is worth paying attention to the parameter Providing the Thick option - thick, will allocate the entire volume for the LUN at once, the Thin option - thin, will allocate as it is full. The first option is faster, the second is more convenient, but it's up to you.
After we have created the LUN, on the same tab, click Create a new group... We set the name of the group and the target resource.
Small digression
IQN is a special format name iqn. ... : that is unique to each iSCSI device on the SAN. Where:
year-mo- year of domain name registration;
reversed_domain_name-domain name written in reverse;
unique_name- a unique device name, for example, the target here will contain the name you specified, and the initiator will contain the hostname.
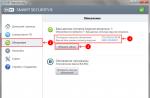
To find out the name of the target resource, let's move to the server to which we are going to connect the disk. Further Control Panel - iSCSI Initiator... In the window that appears, go to the tab Configuration and copy the name of the initiator from there.
We go back and fill in the field. After that, go to the properties of the group, click on the plus sign to create an initiator, then enter the name of the initiator that we copied a little earlier to compose the name of the target resource.
In the password field, enter the password by which you will be authorized ISCSI Initiator... We press create and install a daw allow.
Back to the initiator server again, go to the tab Detection, we click to find the portal, in the appeared field we write down the address of our ReadyNAS.
In the same window (where we enter the address), click Additionally in the tab General introduce Name from the previous step and Secret is the password from the previous step.
On the same tab, you can select the adapter with which the connection is made, the initiator address and the address of the final portal (I have it gray, because I took a screenshot on an already configured system, it will be active for you).
After we have configured the portal and authorization on the tab End objects you can see our LUN, click To plug if it is not connected yet and go to the tab Volumes and devices.
Click there Auto tuning and our LUN is added as local volume... All you can go to Disk Management and configure it as you like.
Continuing the topic of useful use of old server hardware, this time let's talk about using the model server IBM System x3200 4362 as a network storage accessible via the protocol iSCSI as iSCSI Target... V we have already considered such a server as a backup storage virtual machines with software deduplication from Quadstor ... However, in our case, the situation was aggravated by the fact that at some remote sites where it was deployed , virtual machines that were backed up over time received an additional disk for storing content for the distribution point SCCM ... And, as you know, the contents of disks that are used for content distribution in SCCM can change very actively at times (new updates are downloaded , expired updates are removed, some deployment software is loaded, etc.). Therefore, given the fact that the software used Veeam Backup Free Edition does not allow to exclude individual virtual disks belonging to this VM from a backup copy of a virtual machine, it was necessary to solve the issue of increasing disk space on these same IBM servers. In parallel, the question arose about the usefulness of deduplication, which in the case of frequently changing content loses its efficiency.
The "cherry on the cake" in the described situation was that the server, which is used in our case as an iSCSI Target (from the Quadstor implementation), has a very modest disk cage - only 4 SAS / SATA 3.5 "slots, two of which occupied by the host Linux OS.
Here we will consider one of the possible solutions to the set of problems and limitations described, which consists in replacing a full-fledged installation of Linux with a bootable from a USB drive and running in random access memory specializedLinux distribution of the project Enterprise Storage OS (ESOS). At its core, ESOS is a modern Linux kernel optimized for working in RAM with integrated project software. , an example of the use of which, we have already .
The general plan of events will look like this:
- We remove the small-capacity disks on which the host OS is installed from the disk basket, and put in this place the disks of the larger capacity (all disks in the basket will be of the same capacity)
- At the hardware RAID controller level, we define each of the four disks connected to the disk cage as an independent device.
- Preparing a bootable USB drive with ESOS
- We boot the server with ESOS and create a software RAID array from all the disks in the recycle bin.
- Configure iSCSI Target in ESOS and connect the disk on the server side of the iSCSI Initiator
- Configuring additional network connection between servers and enabling Multipath
Server configuration
In our example, we will consider building the simplest configuration using iSCSI of two servers, one of which serves as a target iSCSI Target on the base ESOS v 1.3.5 and the other acts as the initiator host iSCSI Initiator on the base Windows Server 2012 R2... To improve availability and performance, a multipath connection will be established between the target and the initiating host ( multi-path). To separate iSCSI traffic from server management traffic, an additional two-port network adapter is installed in each server.
1 ) Server under the iSCSI Target role(KOM-AD01-ESOS01)
Model Server IBM System x3200 4362 with a disk cage for 4 LFF HDD SAS / SATA drives and an additionally installed network adapter HP NC380T PCI Express Dual Port Multifunction Gigabit Server Adapter (394795-B21). This server will run ESOS bootable from a USB stick. All 4 disks from the server's disk cage will be used in ESOS to organize a software RAID array, which in turn will be presented to the initiator host.
2 ) Server for the role iSCSI Initiator (KOM-AD01-VM01)
Model Server HP ProLiant DL380 G5 acting as a host Hyper-V virtualization OS-based Windows Server 2012 R2 Standard... In addition to the basic configuration, a network adapter is additionally installed in the server HP NC380T PCI Express Dual Port Multifunction Gigabit Server Adapter (394795-B21). The disk connected to this server from ESOS server via iSCSI protocol will be used for backup tasks of Hyper-V virtual machines.
The simplest scheme for connecting the network interfaces of servers will look like this:

Configuring a RAID controller on an IBM server
Regardless of the server model and RAID controller used in our case, we can say that the use of the ESOS distribution kit, which does not require a dedicated disk for its operation, in any disk configuration will allow using all the disk basket resources for the useful disk volume. In some situations, this argument can be significant.
In our example, 4 identical SATA drive 7200 1TB.
In order to decouple ourselves from the very modest capabilities of the hardware RAID controller that our server is equipped with, and in the future to use the capabilities of building a software RAID array based on ESOS, we need to make each disk look like a separate physical device for ESOS. Therefore, in the built-in utility for managing the RAID controller, we delete all existing logical RAID disks so that each disk is presented as a separate device.

Some RAID controllers, such as the HP Smart Array, do not allow mapped disks to be translated as standalone disk devices. In such cases, you will need to create a separate RAID-0 volume for each separate disk. In our case, everything is simpler, since the controller installed in our server LSI Logic SAS1064ET is rather primitive and shows all disks as separate devices, unless those disks are included in the hardware RAID.
Preparing ESOS USB Boot Drive
Download the latest up-to-date ESOS version of the stable branch (branch 1.x.x) from the project page ESOS - Package Downloads ... On the same page, you can find a description of other ESOS branches (master - under development and 0.1.x - obsolete).
In the process of writing this article, the version used was 1.3.5 (25.01.2018 ) available at the link esos-1.3.5.zip ... By the time of publication, I have already managed to work with the newer version 1.3.6 (04/12/2018).
Since ESOS is a RAM-oriented system, it will start from an external drive connected via a regular USB port. That is, we need a USB drive with a size of 4GB and more. If you plan to use the master branch, then for a successful update between versions, according to the recommendations of the document Upgrading , the USB stick may require up to 5GB of additional space. In our case, for ESOS we have successfully used drives of varying degrees of "basement" in size from 8GB and more.
Default credentials:
- Username: root
- Password: esos

When you log in, a special shell is automatically launched Text-based User Interface (TUI), which simplifies the work with the system as much as possible. The upper area of the TUI contains the main functional menu that allows you to perform all the basic tasks of configuring the server as storage for SANs.

The primary tasks of the initial setup are to change the default user password. root and network configuration, for the possibility of remote work with the system.
Go to menu items System > Change password and set a new password for the user root.

Then go to System > Network Settings and select the item for configuring basic network parameters General Network Settings
In the form that opens, specify the host name, DNS domain name, IP address of the default gateway and addresses of DNS servers.
After the change network settings, ESOS will offer a network service restart for the changes to take effect. Until we have made all the minimum network settings, we can refuse to restart the network service.

Let's go back to System > Network Settings, select the network adapter that will be used for remote control ESOS and configure the IP parameters. In our example, the configuration is static and the ESOS management interface is set to IP address 10.1.2.201/24. The network mask and broadcast address, as I understand it, must be specified, otherwise errors may occur when saving the settings.

After saving the changes made, we will again receive a question about rebooting the network. Now we will answer this question in the affirmative.

The network will be restarted and, in case of successful application of the specified settings, we will be able to remotely connect to ESOS via SSH protocol.
As part of this post, we are skipping other settings found in ESOS, such as setting the time, sending mail configuration, managing additional users, etc. Instead, we will focus only on those points that are relevant in the context of our task. However, before connecting to our ESOS server via SSH, I would like to make a small cosmetic digression regarding the TUI color scheme.
There are two color schemes in the TUI ESOS interface - the standard light one, kept in blue and turquoise tones, which is shown in the screenshots above, and the alternative - dark, kept in the best traditions of the "dungeon with a candle". Neither option, in my opinion, is successful, since with remote connection to the server console with reduced color rendering (for example, when connecting via the ), in some places of the TUI there is an effect of text merging with the background. And if you connect to TUI ESOS using the PuTTy SSH client from a Windows system, then the standard color schemes generally turn, in my opinion, into something "acidic".
Since we will work with ESOS mainly, of course, using a remote SSH connection, then, in particular, for the PuTTy client there is a simple solution - using custom color schemes on the side of the SSH client for every taste and color. We considered examples of such a setting earlier in the post. ... Next, to work with ESOS via SSH, we will use the PuTTy schema - Twilight.
Creating a Software RAID in ESOS
After completing the initial basic ESOS configuration, proceed to the configuration disk system server. Let's create a software RAID-array (implemented on the basis of Linux Software RAID/mdraid) of the 4 discs at our disposal. To do this, go to the menu Software RAID > Add Array

In the list of block devices available for inclusion in software RAID, we mark the disks from which we will create a RAID array.

After selecting the disks, click Enter... The RAID setup screen appears. Give the array a traditional name mdraid, for example md0... Let's choose a RAID level (in our case, it's RAID5) and a block size. In our case, the array is assembled for the tasks of backing up large files of virtual machine disks, so we chose the largest block size.

After pressing the button OK the initialization procedure for the RAID array will start. Go to the navigation menu in Software RAID > Linux MD Status and check the status of the created RAID array.

Here we can wait for the complete completion of building the RAID array, or we can continue configuring our server, since in fact the disk capacity of the array is already available to us.
ISCSI Target Configuration
In order for the disk capacity of the RAID array created by us to be presented to the virtualization host via the network via the iSCSI protocol, on the ESOS server, you need to create iSCSI Target... To do this, in the navigation menu, go to Targets > Add iSCSI Target... In the form for creating a goal, we will indicate the name iSCSI Qualified Name (IQN).

In our case, we used the default name in the format iqn.2018-03.esos.<имя сервера>: The only thing I changed in the name was to remove the colon at the end of the name.
Once saved, the iSCSI Target information will appear on the ESOS main screen, but the target will be disabled.
To activate the target, go to the navigation menu in Targets > Enable/Disable Target, from the list of goals, select the goal we just created and change it in its properties Disabled on Enabled.

Make sure that the target status information has changed on the main TUI screen.

From the list of broadcast modes of devices, the description of which can be found in the document36_Devices_and_Mappings - SCST I / O Modes , select the mode of interest to us. In our example, the mode is used vdisk_blockio which provides direct access to block devices and eliminates the use of intermediate Linux caching mechanisms.

After selecting the mode, a window for selecting the block devices possible for this mode will open. We select our RAID array.

After that, the form for configuring the SCST parameters for the virtual block device will open. vdisk_blockio... We will indicate any short and understandable name of the device. This name will be further displayed on the side of the virtualization host acting as an iSCSI Initiator in the device manager. Therefore, for the name I used the abbreviated host and RAID device name - ESOS01-MD0. The rest of the parameters can be left at their default values.

We save the settings of the virtual block device and go to the description of the hosts that are allowed to connect to the iSCSI Target we created. But before we can describe the hosts, we need to create a host group. Go to the menu Hosts > Add Group

Select the iSCSI Target we created earlier, to which the created host group will belong.

Set any host group name, for example Group1, and click Enter

So, the host group has been created and bound to the iSCSI Target. Now we need to describe each host that will act as iSCSI Initiator with the assignment of this host to the created host group. In our case, there will be only one such host - our virtualization host Hyper-V OS-based Windows Server 2012 R2.
Before adding the initiator host to ESOS, find out its name. Initiator Name on our virtualization host. You can find (and, if desired, change) this name in the Windows Server Control Panel by calling the applet iSCSI Initiator and opening the tab Configuration

As you can see, in our case, the hostname of the initiator is iqn.1991-05.com.microsoft:kom-ad01-vm01.holding.com.
Return to TUI ESOS and add the initiator host to the menu Hosts > Add Initiator

In this case, we will be asked to which SCST Target the added host belongs. We select the only goal that we have previously created and included.
Then we select the previously created host group to which the newly added initiator host will be bound.

And finally, enter the IQN of the initiator host, which we found out earlier, and click Enter

So, at this stage in ESOS we already have a created SCST target (in our case, an iSCSI Target), we have a virtual SCST block device (a software RAID array is broadcast), we have described a group of hosts and an initiator host (iSCSI Initiator) is bound to this group ... Now we just need to map the SCST virtual block device to the host group. To do this, go to the navigation menu in Devices > Map to Host Group.
 Select the SCST virtual block device.

Selecting the SCST target.

Select the host group to which the initiator host was included.

Next, the configuration form will open LUN-a, which will be broadcast to the network. Specify the LUN number (by default, the first broadcast LUN is assigned the number 0) and save the settings by clicking OK.

You can view the final configuration of the broadcast of virtual SCST devices by going to the menu Devices > LUN/Group Layout


Now let's decide how to separate the iSCSI network traffic from the ESOS server management traffic. We will do it in such a way as to completely separate these types of traffic across different network interfaces.
To do this, we will configure on the ESOS server side and on the iSCSI Initiator client side separate network interfaces with IP addressing different from the addressing used for server management. For example, in our case, the 10.1.2.0/24 network is used to manage the servers, so to separate iSCSI traffic, we use a small dedicated subnet for 6 hosts - 192.168.168.0/29 (at the network equipment additionally you can isolate this network into a separate VLAN).
First, let's configure a dedicated iSCSI network interface on the ESOS server side by going to the navigation menu under System > Network Settings and selecting the appropriate network adapter.

Let's set the static IP address 192.168.168.1/29 on this interface, indicate the subnet mask, broadcast address and increased size MTU- 9000 (technology Jumbo frame must be supported by the network adapter) to improve performance when transferring large amounts of data.

When saving the settings, we will answer in the affirmative to the question about rebooting the network (all network connections from ESOS will be temporarily lost).

Upon completion of the network reboot procedure, we will receive a summary of the status of applying the new settings.

Now let's move on to setting up on the initiator host side.
ISCSI Initiator Configuration
On the side of our virtualization host on Windows based Server, to which we will receive disk capacity from the ESOS server via the iSCSI protocol, we will configure a dedicated network adapter for use in working with the iSCSI protocol.
Disable everything except what we may need on this dedicated interface when working with iSCSI. For example, let's leave only protocol support TCP/IPv4 and QoS.

By choosing a protocol TCP/IPv4 by button Properties set the IP address from the network that we defined for iSCSI traffic, for example 192.168.168.3/29. Leave the address of the default gateway and DNS servers empty. Open advanced settings with the button Advanced.

In the tab DNS disable the default DNS registration option, and on the WINS disable support LMHOST and NetBIOS over TCP/IP.

Let's return to the main tab of the properties of the network interface and call the dialog for configuring the parameters of the network adapter by clicking Configure.

In the form that opens, on the advanced settings tab Advanced find the option to support large packages Jumbo packet and select the maximum possible value (in our example, it is 9014). In the tab Power Management disable the ability of the system to disable this network adapter in power saving modes - Allow the computer to turn off this device to save mode.

Close all windows and save with the button OK.
Now let's check the availability of the ESOS server through the dedicated network interface. First with the utility tracert to ensure that traffic is routed directly between servers.
tracert -d 192.168.168.1Then using the utility ping by enabling the prohibit fragmentation flag (option - f) and specifying the size of transmitted packets (option - l)
ping 192.168.168.1 -f -l 8000
In the event that somewhere, for example on the switch to which the ESOS servers and our initiator host are connected, support is not enabled Jumbo frame, we can get messages " Packet needs to be fragmented but DF set. "In our case, the test was successful, so you can proceed to the procedure for connecting an iSCSI disk.
Let's go to the Windows Server Control Panel, call the applet iSCSI Initiator and opening the tab Discovery press the button Discover Portal... In the discovery settings window, specify the IP address of the ESOS server from the network for iSCSI traffic and click the button Advanced.

In the form of advanced detection settings, as the local adapter, select Microsoft iSCSI Initiator and the previously configured IP address from the network for iSCSI traffic is 192.168.168.3. Save the settings by clicking OK until we return to the main applet window.
 After that, go to the tab Targets where in section Discovered targets the previously mentioned should appear IQN our ESOS server with the status Inactive... That is, the system has detected it, but it is not connected yet. In order to connect to the iSCSI Target, use the button Connect.

In the connection window that opens, pay attention to the fact that the sign of adding a connected target to the list of favorite targets is enabled - Add this connection to the list of Favorite Targets(for subsequent automatic connection to the target in case of server restart). Press the button Advanced.

In the form of advanced connection settings, we will explicitly indicate the network interfaces from the network for iSCSI traffic, which should be used to transmit iSCSI traffic for this session connection. That is, as Initiator IP select from the list the address of the iSCSI interface allocated on our host 192.168.168.3, and as Target portal IP select from the list the address of the iSCSI interface allocated on the ESOS server - 192.168.168.1.

Close and save the window Advanced Settings and Connect to target and make sure that the connection status has changed to Connected

Let's look at the tab Favorite Targets and make sure that the connected target is on the favorites list.

Make sure that in the "Device Manager" / Device manager (devmgmt.msc) In chapter Disk drives there is an additional SCSI disk with the name that we previously defined on the ESOS server for the SCST virtual block device.
The next step is to initialize the iSCSI-connected disk. To do this, go to the disk management console Disk Management (diskmgmt.msc), select the corresponding disk and switch it to the state Online.

After the disk has successfully changed its status, we will initialize the disk and format it to our liking, for example, to the NTFS file system, setting any volume label we understand. From now on, in the Windows graphical interface, this disk will become available to us for standard file operations.

At this stage, if we look into the console of the ESOS server, we will see information about the connection session of the initiating host at the bottom of the TUI.

This completes the basic setup with the simplest iSCSI configuration.
Simplest performance check
After connecting the disk via iSCSI, it is advisable to carry out at least some simple performance measurements in order to understand what we got in the end and what can be expected from such a disk.
Rely on numbers that when copying large files from local disk server to iSCSI disk shows us windows explorer especially not worth it, since we will not see objective information there. For example, in my case, when copying several large ISO files (with different contents), the speed was designated in the region of 150-160 MB / s, which differs significantly from the real allowable speed of an iSCSI link between my two servers at 1Gbit / s (~ 125MB / s). In addition, the speed, more or less similar to the truth, is displayed when copying the first file, and when copying subsequent files, it increases slightly (perhaps the file system cache and other other caches of different levels are included in the work).

For all sorts of measurements, you always want to use some "native" tools that do not require the installation of additional software, but unfortunately this is far from always possible. On Windows client systems, the utility is used to evaluate the performance of various subsystems, including the disk one. WinSAT ( winsat disk ), but I did not find this utility in Windows Server 2012 R2. That's why
I copied two files, WinSAT.exe and WinSATAPI.dll, from the available Windows 10 x64 client OS from the% windir% \ System32 directory to the same directory on the server. Now you can try using this utility by running it from command line with administrator rights.
Here after the keyword disk the –drive option specifies the letter of the drive we want to test, and the –count option specifies the number of test cycles.

As I understand it, this utility does not allow testing using large data blocks (more than 1MB), that is, it is more suitable for testing situations with big amount small files. In our case, the situation is the opposite - backing up disks of virtual machines involves a small number of files of a significant size.
Another simple tool is the utility Diskspd(DiskSpd: A Robust Storage Performance Tool ), which replaced the utilitySQLIO Disk Subsystem Benchmark Tool (SQLIO) ... We download the utility, unpack it on the server and run it with a set of parameters that correspond to the context of our task.
cd / d C: \ Tools \ Diskspd-v2.0.17 \ amd64fre \ Diskspd.exe -d60 -b1M -s -w100 -t1 -c100G T: \ io1.dat T: \ io2.datThe parameters we use mean:
-d60: Test execution time 60 seconds
-b1M: Operate in 1MB blocks
-s: Perform sequential access operations
-w100: Perform full write test (no read test is performed)
-t1: Number of threads of work with the target (with the file T: \ io.dat)
-c100G: Create 100GB files
At the end, the names of the files generated for the test are listed.
Slightly deviating, I note that at the time of this writing, we use software for the task of backing up Hyper-V virtual machines Veeam Backup & Replication , therefore, when choosing a block size for conducting tests, I will proceed from the specifics of this software. As I understood from the documentData Compression and Deduplication , VBR uses 1024MB blocks in backup operations on a SAN, and this is the block size we will use in our tests.

For comparison, let's run the test again with the same set of conditions, but increase its duration to 5 minutes.

It is clearly seen here that with prolonged load, the indicators noticeably sag. I can assume that this is due to the fact that “ bottleneck”In this case, it moves from the area of the network subsystem to the area of slow disks used on our ESOS server side.
For fans of graphical tools, another simple free utility may come in handy for conducting such superficial tests of the performance of the disk subsystem on Windows. ATTO Disk Benchmark... You can download it from the link: Disk Benchmark ... The interface of the utility is simple and straightforward and there is probably nothing to comment on.

About some more complex testing tools, such as IOMeter , I do not say, since within the framework of our task there is no goal to deal with benchmarks as such. And the indicators of simple tools are obtained only in order to have a basis for comparison in the future, when between the ESOS server and the Hyper-V host we will have not one link, as at this stage of configuration, but two links and the Multipath mechanism involved.
Configuring Multipath
So, we have a disk connected via iSCSI and some basic benchmarks of performance tests, from which we can build on. Now let's try to improve these indicators by adding one more gigabit network adapter to the ESOS server and the initiator host and combining their work using the Multipath mechanism on the initiator host side.
Let's start by configuring the ESOS server. In the main navigation menu, go to System > Network Settings, select an additional network adapter that will be used for one more iSCSI connection and configure the IP parameters. In our example, a static configuration is used and the additional ESOS iSCSI interface is set to the IP address 192.168.168.2/29, and the size is additionally increased MTU.

We save the network settings in ESOS and proceed to configuring an additional network adapter on the side of the initiator host, that is, our server based on Windows Server with iSCSI Initiator.
We configure, by analogy with the first, the second iSCSI interface, setting it to IP 192.168.168.4/29

Disable the previously configured interface with the address 192.168.168.3 (the iSCSI disk will fall off in this case) and make sure that the additionally configured iSCSI interfaces of the ESOS server and the initiator host can see each other.

In the Control Panel applet iSCSI Initiator in the tab Discovery add an additional detection path, specifying a bunch of 192.168.168.2 - 192.168.168.4

Since earlier we created an iSCSI connection to the target without the enabled flag multi-path, then now it will be more correct for us to deactivate this connection and create it again, but with the enabled flag multi-path.
First, remove the previously created connection from startup on the tab Favorite Targets

Now let's go to the tab Targets and disconnect (the disk initialized and connected in the iSCSI system will disappear from Windows)

Then we will reconnect the iSCSI target, but this time with the option enabled Enable multi-path(and don't forget about the button Advanced make an explicit bunch of interfaces 192.168.168.1 - 192.168.168.3 )

After making sure that the target has entered the state again Connected open its properties to add a second connection on an additional dedicated interface

In the tab Targets go to the button Properties to the properties of the connected target, and use the button Add session to set up a second connection.

By the way, here by the button MCS we will be able to make sure that the first established session actually uses the dedicated network interface we specified.
So using the button Add session add an additional connection to the iSCSI Target specifying as interfaces an additional pair of interfaces that we configured earlier (192.168.168.2 - 192.168.168.4 )

Now a record about the second session should appear in the list of sessions.

We will also see the created additional session on the ESOS server side.

On the side of the initiator host, let's look at the Device Manager snap-in / Device manager (devmgmt.msc) and make sure that in the section Disk drives an additional SCSI disk with the same name (ESOS01-MD0) has appeared.

That is, now, on the Windows server side, we actually see the same disk as two separate devices. In order for the system to be able to work with this disk as a single device, using both iSCSI network links to the ESOS server, we need to enable support MPIO for iSCSI... To do this, go to the Windows Control Panel, open the applet MPIO and in the tab Discover Multi-Paths turn on the option Add support for iSCSI devices... After that we press the button Add and we answer in the affirmative to the question about restarting the server.

After rebooting, let's look again at the Device Manager console and make sure that now our iSCSI disk is displayed as single device and has a name ... Multi-Path Disk Device... Let's open the properties of the disk and on the tab MPIO check that the disk is accessible in two ways.

More detailed information we can see the connection routes in the control panel applet iSCSI Initiator.

Here by the button MPIO we will see information about the connections used.

This completes the basic setup of Multipath.
Now, in order to evaluate the changes in the speed of working with an iSCSI disk, which we received as a result of organizing the second link and setting up Multipath, we will conduct a simple test of linear writing of large files to disk, by analogy with what we did earlier:
Diskspd.exe -d60 -b1M -s -w100 -t1 -c100G T: \ io1.dat T: \ io2.dat
Judging by what Diskspd shows us in this case, on average, each file was written at a speed of ~ 225MB / s, which is equal to 1800Mb / s. That is, as a result, we get a speed close to the total throughput of two organized iSCSI links.
The same test, but longer in time (5 minutes):
Diskspd.exe -d300 -b1M -s -w100 -t1 -c100G T: \ io1.dat T: \ io2.dat
The average value of ~ 48.5 MB / s, obtained when working with each file, looks significantly better than the previously obtained 16 MB / s on a single iSCSI link.
Based on these simple measurements, we can understand that thanks to the organization of the Multipath connection, we not only increased its availability, but also received improved performance indicators. And this is good.
ESOS USB Flash Hot Swap
Considering that when assembling the budget solution described in the framework of our example, we could use cheap USB drives, in some cases it may be necessary to replace this drive (for example, if it fails). Considering that ESOS is a Linux system fully adapted to work in RAM, replacing a USB drive is a very simple operation, the correct processing of which is implemented by the developer of this system.
In fact, the drive is replaced in a few simple steps:
- On an already loaded and running ESOS system, at any time, remove the USB drive (the drive that needs to be replaced) from which this system was booted.
- We prepare a new ESOS USB stick using the standard method described in the section “Preparing an ESOS USB bootable stick” above, and install this stick into a running ESOS server.
- We call the procedure for synchronizing the ESOS configuration running in RAM with the file system on the USB drive. Menu item System > Sync Configuration


After that, it is advisable to reboot the server and make sure that the system starts up successfully from the new USB drive. During the first boot from the replaced USB drive, ESOS will perform some service procedures and in just a few minutes the server will be ready to work, having loaded the configuration we configured earlier.
Judging by the description of the document 13_Upgrading , in exactly the same simple way, the ESOS server is updated to more new version, which greatly facilitates the maintenance of such a system.
Conclusion
In conclusion, I want to say that in our example, thanks to the ESOS system, we managed to squeeze the maximum out of the disk basket of an outdated server in all respects and get on the virtualization host a disk capacity that is quite tolerable in performance for the task of backing up virtual machines. And I can only thank the ESOS developer for the work done and wish the project further successful development.
05.10.2012
Want to access your network storage a little faster? Try using the built-in Windows tool. The iSCSI protocol allows you to connect to a remote storage volume over the network as if the volume were a local drive.
Marco Chiappetta. Speed Up Your NAS Device With iSCSI. PC World, September 2012, p. 86.
Want to access your network storage a little faster? Try the built-in Windows tool. The iSCSI protocol allows you to connect to a remote storage volume over the network as if it were a local drive.
ISCSI stands for Internet Small Computer System Interface. SCSI technology (without i) has long been used to connect various peripheral devices to computer systems, but most often it exchanges data with storage devices - hard drives or tape drives. ISCSI allows you to connect to a remote storage volume over the network as if it were a local disk. Simply put, iSCSI translates SCSI commands over IP (Internet Protocol) networks. This technology resembles a virtual SATA (or SCSI) cable and uses a network connection to communicate between the system and the storage volume.
How is iSCSI different from any other network-attached drive with its assigned drive letter? In many ways, the end results will be similar. But thanks to iSCSI, the mounted volume looks like a local block storage device to the operating system that can be formatted to any file system standard of your choice.
An iSCSI interface requires two main components: a network-attached storage (NAS) or server with a volume configured as an iSCSI target, and an iSCSI initiator, which allows the system to be attached to the target.
If you have a NAS device connected to a Windows PC, this is likely to be sufficient. Virtually all NAS servers offer the ability to configure iSCSI targets. And Microsoft has every Windows versions Starting with Vista, there is a tool to create an iSCSI initiator. The initiator can be run on a computer with an operating system version of at least Windows 2000.
To demonstrate how iSCSI works, take a Thecus N2200XXX dual-drive NAS server running a customized iSCSI-capable Linux OS and a Windows 7 Ultimate desktop system. Any Windows-based system creates an iSCSI-capable device when it interacts with the NAS.
.jpg)
iSCSI Pros and Cons
As noted above, the iSCSI network target is represented on the system as a local disk. Therefore, you can not only format it in the file system standard of your computer's OS, but also ensure that applications that require a local disk are launched from the iSCSI volume. This flexibility is very important for small businesses because many programs are not network-aware. ISCSI technology helps to solve this problem.
In some cases, iSCSI can improve performance by connecting large disk arrays to client systems without the need for special hardware and cables (which can help achieve significant savings). However, in this article we will limit ourselves only to a consideration of mid-range consumer systems.
It should be noted that iSCSI technology has certain disadvantages. System setup is not overly complex, but network resource search alone will not be enough to configure the iSCSI target and initiator. To avoid data corruption or loss, only one initiator should be connected to the target at a time. If you are using high-performance servers and disk drives, performance will be limited by the speed of your network connection. Therefore, the best choice seems to be a connection at gigabit speeds and above - slow network connections can neutralize all the benefits of iSCSI.
Installation
The following are the steps you need to take in order to use iSCSI technology with the Thecus N2200XXX NAS. For other devices and servers, the steps will be the same.
1. Enter the NAS server configuration menu, select the RAID mode and reserve space for the iSCSI volume. I used RAID 1 mirroring with two 2TB drives. Half of the available capacity was allocated to the EXT4 file system, and the other half was unused. (In the third phase, the unused capacity was set aside for iSCSI.)
.jpg)
2. After allocating space for RAID, it needs to be formatted. When the formatting process is complete (depending on the drive configuration, this can take several hours), you can start allocating unused space for the iSCSI target. (If all the available space will be reserved for iSCSI, you do not need to format the disk array at this stage.)
.jpg)
3. Now let's configure the iSCSI target. I first clicked on the Space Allocation link in the Storage menu in the left pane, and then clicked the Add button on the iSCSI target tab. A new window appears on the screen in which you need to select the desired size of the iSCSI target, activate it and give it a name.
.jpg)
And if you want to add another layer of security, at the same stage you can configure the parameters of the Challenge Handshake Authentication Protocol (CHAP).
4. If you decide not to allocate all of the available space to a single iSCSI target, you can assign Logical Unit Numbers (LUNs) to multiple targets. This will allow multiple systems to be connected to a single NAS device or server, and each client system will receive its own iSCSI target.
Setting up the target
After the iSCSI target is created, you need to connect to it through the iSCSI initiator on the client PC with operating system Windows. Click the Start button, type iSCSI in the search box and press the key (or go to the Start menu to Control Panel and under System and Security select Administrative Tools and then iSCSI Initiator). If a message appears on the screen stating that the iSCSI service is not running, enable it to start, and the iSCSI initiator properties window appears on the screen.
Go to the Discovery tab and click the Discover Portal button. In the window that opens, enter the IP address of the NAS device or server hosting the iSCSI target. You do not need to change the port number (unless the iSCSI port number was previously defined). By default, the system suggests port 3260. If you have previously enabled CHAP authentication, you must click the Advanced button and enter your CHAP credentials. Otherwise, click OK and the IP address of your NAS device or server will appear in the list of target portals.
If the target is not in this list, make sure the IP address is entered correctly and the correct port is open on the firewall.
After the server appears in the list of targets, go to the Targets tab. The iSCSI target you created earlier should appear in the target group in the middle of the window. Click on the object and click the "Connect" button. In the target connection window that appears on the screen, select the Add this connection to the list of favorite target objects option and click OK. Then click OK again on the iSCSI Initiator Properties window.
On a client system attached to an iSCSI target, you must format the target using the same procedure as you would for any local disk. Click the "Start" button, right-click on "Computer" and select from context menu item "Management". In the Storage section of the Computer Management utility, click the Disk Management link. The "Initialize Disk" dialog box will appear on the screen. Make sure that the "Select disk" option is checked and select the desired partition type (I used MBR - Master Boot Record). Click OK.
Follow the prompts on the screen to specify the size of the volume, assign a letter to the drive, and specify the file system and volume label. Click the Finish button. When formatting is complete, a new drive letter will appear. Now you can transfer files and run programs from your NAS drive no matter where it is located.
Performance comparison
To evaluate the performance of my iSCSI-attached remote NAS, I compared the iSCSI target with a standard attached NAS using two benchmarks.
The ATTO Disk Benchmark did not show much difference between a mapped network drive and an iSCSI device, although the drive showed slightly higher throughput. However, this is a relatively easy test that evaluates only sequential data writing.
But the CrystalDiskMark test analyzes the operation of devices in both sequential and random access modes, operating with two files of different sizes. The results showed that the iSCSI target performed significantly faster. The iSCSI device and the standard mapped network drive had the same write speed, but iSCSI reads were 30-40% faster.
Testing has shown that accessing a NAS device and formatting it to resemble a local disk, as well as the ability to run programs, are not the only advantages provided by iSCSI technology. It also accelerates read operations. Thus, if you are dealing with NAS devices at home or in the office, iSCSI will significantly (and completely free) increase their performance.