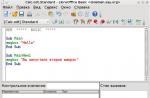
If there is something with which you really do not want to face your operating system, then this is exactly an unexpected failure of hard drives. With the help of backup and RAID storage technology, you can very quickly return all the data to the place, but the loss of the hardware can be very much affected by the budget, especially if you did not plan this.
To avoid such problems, you can use SmartMontools. This is a software package for managing and monitoring storage devices using the Self-Monitoring Analysis and Reporting Technology technology or simply Smart.
Most of the modern ATA / SATA, SCSI / SAS information drives provide SMART interface. The purpose of Smart is to monitor the reliability of the hard disk, to identify various errors and the timely response to their appearance. SmartMontools consists of two utilities - SmartTl and SmartD. Together they represent a powerful monitoring system and warnings about possible HDD breakdowns in Linux. Then the verification of the Linux hard disk is considered in detail.
The SmartMontools package is in the official repositories of most Linux distributions, so the installation is reduced to the execution of one command. In Debian and based on it systems, perform:
aptitude Install Smartmontools.
And for Red Hat:
yum Install Smartmontools.
Now you can go to the diagnosis of Linux hard disk.
Check hard disk in SmartTLL
First find out which hard drives are connected to your system:
lS -L / DEV | Grep -E "SD | HD"
In the outcome there will be something like that:
Here - SDX is the name of the HDD device connected to the computer.
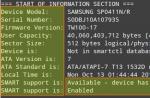
To display specific hard disk information (device model, S / N, firmware version, ATA version, SMART interface availability) Start SmartTL with the Info option and the name of the hard disk. For example, for / dev / sda:
smartCTL --info / Dev / SDA
Although you can and not pay attention to the ATA version, this is one of the most important factors when searching for a replacement device. Each new version of ATA is compatible with the previous one. For example, old ATA-1 and ATA-2 devices will work perfectly on ATA-6 and ATA-7 interfaces, but not vice versa. When the ATA versions of the device and the interface do not coincide, the equipment will not be fully disclosed. In this case, it is best to select the ATA-7 hard drive to replace.
You can start checking the Ubuntu hard disk using the command:
smartTL -S ON -A / DEV / SDA

Here is the option -s. Includes the SMART flag on the edited device. You can remove it if the SMART support is already enabled. Disk information is divided into several sections, in section Read Smart Data. There is general information about hard disk health.
START OF READ SMART DATA SECTION \u003d\u003d\u003d
Smart Overall-Health Self-Assessment Rest Result: Passed
This test may be passed ( Passed.) or not ( Failed.). In the latter case, the failure is inevitable, start backing up the data from this disk.
The next thing you can see when you need the HDD diagnostics in Linux, this is the SMART attribute table.

The SMART table contains the parameters defined for a specific disk by the developer, as well as threshold for these parameters. The table is filled automatically and updated based on the disk firmware.
- ID #- an attribute ID, as a rule, a decimal number between 1 and 255;
- Attribute_name. - the name of the attribute;
- Flag. - attribute processing flag;
- Value. - This field is a normal value for the state of this attribute in the range from 1 to 253, 253 - the best condition, 1 - the worst. Depending on the properties, the initial value can be from 100 to 200;
- Worst. - the worst value of Value for all time;
- Thresh. - the lowest value of Value, after the transition to which you want to report that the disk is unsuitable for operation;
- Type - The type of attribute may be pre-fail or old_age. All attributes by default are considered critical, it is if the disk did not pass on one of the attributes, it is already considered not suitable (Failed) but the OLD_AGE attributes are not critical;
- Updated. - shows the refresh rate of the attribute;
- WHEN_FAILED - Failing_Now will be installed if the attribute value is less than or equal to Thresh, or in "-" if higher. In the case of failing_Now, it is better to back up as soon as possible, especially if the type of pre-fail attribute.
- Raw_Value. - A value defined by the manufacturer.
Now you think, yes smartctl a good tool, but I have no opportunity to run it every time manually, it would be nice to automate all this thing to start periodically and reported me about the results of the inspection. And this is possible using SmartD.
Setting up SmartD and SmartTL for real-time diagnostics and monitoring
The HDD diagnosis in Linux in real time is very simply configured. First, edit the SmartD configuration file - /etc/smartd.conf. Add the next string:
nano /etc/smartd.conf.
/ dev / sda -m [Email Protected] -M Test
- -m.
- -M. - frequency of sending letters. Once - send only one message about the problems with the disk. daily. - Send messages every day if the problem was detected. diminishing - Send messages every other day if the problem was detected. Test - Send test message when you start SmartD. Exec. - Performs the specified program to send mail.
Save the changes and restart SmartD. You must receive a letter of this content on email:

You can also schedule tests in your graphics, for this use the -S option and the regular expression type "T / MM / DD / DN / CC", where:
- T. - Type of test:
- L. - long test;
- S. - short test;
- C. - Test Movement (ATA);
- O. - Offline (test).
The remaining characters define the date and time of the test:
- MM. - month a year;
- DD - day of the month;
- CC - one p.m;
- DN - Day of the week (from 1 - Monday 7 - Sunday;
- MM, DD and CC - indicate from two decimal digits.
The point means all possible values, the expression in brackets (A | B | C) - means one of three options, the expression in square brackets means the range (from 1 to 5).
For example, to fully check the Linux hard disk every working day in an hour of the day Add the following line in SmartD.conf:
DeviceScan -S (L /../../ / 13)
findings
If you want to quickly check the hard disk mechanical work, see its physical condition or perform a more or less complete disc surface scan. Use SmartMontools. Do not forget to perform regular scanning, then you will thank yourself. Have you already done it before? Will you do? Or use other methods? Write in the comments!
Translation source.
The computer is a device whose work is based on the interaction of a plurality of components. Over time, they can cause malfunctions. One of the frequent reasons for defective operation of the machine becomes broken sectors on the disk, so it should be tried periodically. Linux provides for this all the possibilities.
What is broken blocks and why they appear
The block (sector) is a small disc cell on which information is stored as bits (0 and 1). When the system fails to record another bit into the cell, talk about the bit sector. The causes of such blocks may be several:
- marriage in production;
- turning off the power in the process of recording information;
- physical disk wear.
Initially, almost all carriers have disorders. Over time, their number may increase, which indicates the emergence of the device fail. In Linux, test disk on errors is possible in several ways.
Checking Linux disk
The Linux kernel operates several OS, including Ubuntu and Debian. The disk check procedure is universal and suitable for each of them. It is time to test the carrier, it is worth thinking when a large load is obtained on the disk system, the speed of working with the carrier (recording / reading) has decreased significantly, or these procedures are completely errors.
Many are familiar with the program on Windows - Victoria HDD. The developers took care of writing its analogues for Linux.
Badblocks.
Badblocks - disk utility available in Ubuntu and other Linux distributions by default. The program allows you to test both hard disk and external drives.
Important! All terminal commands presented in the article begin with the Sudo parameter, since the superuser's rights are required.
Before testing a disc in Linux, check which drives are connected to the system using the FDISK-L utility. It will also show the sections on them.

Now you can proceed to direct testing on broken sectors. Badblocks work is organized as follows:
badblocks -v / dev / sdk1\u003e bsector.txt
The following commands and operands are used in the record: ·
- -V - displays a detailed report on the inspection; ·
- / dev / sdk 1 - verified section; ·
- bSECTOR.TXT - recording results in a text file.

If there were broken blocks when checking the disk, you need to run the FSCK utility or E2FSCK, depending on the file system used. They will limit information record in non-working sectors. In the case of EXT2, EXT3 or EXT4 file systems, the following command is performed:
fSCK -L BSECTOR.TXT / DEV / SDK1
Otherwise:
fSCK -L BSECTOR.TXT / DEV / SDK1
The -L parameter indicates the program that the broken blocks are listed in the BSEctor.txt file, and it is necessary to exclude them.
Gparted.
The utility checks the Linux file system without resorting to the text interface.
The tool is not initially contained in the distributions of the operating system, so it must be installed by executing the command:
aPT-Get Install Gparted
The main application window displays the available discs. The fact that the carrier is time to test, it is clear on an exclamation mark, located next to his name. The check of the check is made by clicking on the "Check for errors" in the "Section" submenu, located on the top panel. Pre-selected the desired disk. Upon completion of scanning, the utility will display the result.

Checking HDD and other memory applications Application GParted is available for UBuntu, FreeBSD, CentOS, Debian OS, and other other distributions operating on the Linux kernel.
Smartmontools.
The tool allows you to test the file system with greater reliability. In modern hard drives there is a built-in self-monitoring module S. M. A. R. T., which analyzes the drive data and helps determine the malfunction at the initial stage. SmartMontools is designed to work with this module.
Starting the installation is performed through the terminal:
- aPT Install Smartmontools - for Ubuntu / Debian;
- yum Install Smartmontools - for CentOS.
To view information about the hard disk status, a string is entered:
smartTl -h / Dev / SDK1

Check for errors takes different times, depending on the volume of the disk. Upon completion, the program will output the result of the presence of broken sectors, or their absence.
The utility has other parameters: -a, --all, -x, --xall. For more information, certificate is called:

Safecopy.
When the need arises to test the Winchester in Linux, it is worth being prepared for any result.
The SafeCopy application copies data from a damaged device to working. The source can be both hard drives and removable media. This tool ignores I / O errors, read, broken blocks, continuing to work continuously. The speed of execution is the maximum possible that the computer provides.
Comment! The utility is not intended to restore remote files. It takes out information stored in broken sectors.

To install SafeCopy on Linux to the terminal, a string is entered:
Scanning launches as a command:
sAFECOPY / DEV / SDK1 / HOME / Files /
Here the first way denotes a damaged disk, the second is a directory where the files are saved.
The program is capable of creating an image of a file system of an unstable working storage device.
What to do if an error is detected in the Ubuntu system program
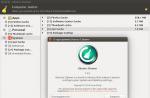
Installing a new software or change system settings can cause a message "An error in the system program" is detected. Many ignore it, since it does not reflect on a common work.

The problem is usually encountered Ubuntu users version 16.04. Test HDD In this case, there is no need, since the problem is rather in the software fail. The message is noting about the unforeseen completion of the program and offers to send a report to developers. With the consent, the browser window will open, where you need to fill out the form of 4 steps. This option causes complexity and does not guarantee the disappearance of the error.
The second way will help avoid the appearance of the message only if it is called by the same program. To do this, with the next alert, you need to install the daw on the option "Do not show more for this program" option.
The third method is to disable the Apport utility, which responds to Linux for collecting information and sending reports. This approach completely eliminates the popup of windows with errors. It is possible to disable only notifications, leaving the collection service in working condition. To do this, you must perform:
gsettings Set Com.ubuntu.update-notifier Show-Apport-Crashes False

The data will continue to be collected in the / Var / Crash folder. They periodically need to be cleaned so that they do not filter disk space:
To fully disable the Apport services, an entry is entered into the terminal:
gKSU GEDIT / ETC / DEFAULT / APPORT
In the text that appears, the value of the Enable field changes from 1 to 0. In the future, in order to enable the service again, the default settings are returned.
Conclusion
To prevent the loss of files, the hard disk and removable media are recommended to periodically test. Linux offers several approaches to solving the problem. A list of utilities are provided to choose from, which detect damaged sectors and ensure the transfer of information to a normally functioning device.
Any computer is a complex device that consists of a variety of components and no one is insured against the failures of any of them. In this article, we will look at how to recognize one of the serious problems with storage devices in a timely manner, whether it is a hard disk or a flash drive, how the disc check is performed on the Linux sectors.
Any drive consists of a plurality of small blocks (sectors) that store information in the form of zeros or units (bits). If, for some reason, the operating system cannot record the bit of information in a specific sector, then it can be considered "broken".
The sector can be broken for various reasons:
- Manufacturing defects
- Turning off the power of the computer while recording information.
- Physical wear of the drive.
A small number of broken sectors is almost on any drive. But it is worth paying attention if their number over time increases. It can talk about the emergency physical death of the drive and you are time to think about replacing it.
Let's look at what utilities in Linux we can check the disk on the Linux broken sectors.
Checking the drive to bidded sectors with Badblocks.
Badblocks is a standard Linu utility to check for broken sectors. It is installed by default in almost any distribution, and it can be checked as a hard disk and an external drive.
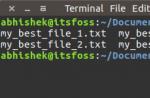
First, let's see which drives are connected to our system and which sections are available on them. To do this, we need another standard Linux utility - FDISK.
Naturally, you need to perform commands with superuser rights:
Parameter -L. We say FDISK utility that we need to show a list of sections and exit.
Now that we know which sections we have, we can check them on broken sectors. To do this, we will use the Badblocks utility as follows:
$ sudo badblocks -v / dev / sda1\u003e badsectors.txt
To check, we specify the following parameters:
- -V. - Detailed output of information on the results of the inspection.
- / dev / sda1 - Section that we want to check on broken sectors.
- \u003e badsectors.txt - Display the result of the command to the file Badsectors.txt.
If, as a result, broken sectors were found, we need to specify the operating system not to record information in the future. To do this, we need Linux utilities for working with file systems:
- e2FSCK. If we fix the section with the Linux file system (EXT2, EXT3, EXT4).
- fSCK. If we correct the file system other than EXT.
We enter the following commands:
$ sudo e2fsck -l badsectors.txt / dev / sda1
Or, if our file system is not ext:
$ sudo fsck -l badsectors.txt / dev / sda1
Parameter -L. We say utility to use a list of broken sectors from the file Badsectors.txt, which we received earlier when checking using the Badblocks utility.
Checking the drive on broken sectors in Linux in SmartMontools
Now let's consider a more modern and reliable way to check the disc on the Linux broken sectors. Modern ATA / SATA, SCSI / SAS drives, SSD have a built-in self-control system. S.M.A.R.T (Self-Monitoring, Analysis and Reporting Technology, Self-control technology, analysis and reporting), which monitors the drive parameters and helps determine the deterioration of the parameters of the drive in the early stages. To work with S.m.a.r.t in Linux there is a SmartMontools utility.
Let's install it first. If your distribution is based on Debian \\ Ubuntu, then enter:
$ sudo apt install smartmontools
If you have a RHEL \\ CENTOS-based distribution, then enter:
$ sudo yum install smartmontools
I had to encounter this problem. My one comrade, which is installed Ubuntu On an old laptop ASUS, and which simply does not want to sometimes turn on the brains, addressed me with such a problem. On his laptop is installed new Ubuntu 12.10 and very often the system simply does not want to boot, throwing into a black screen, or frozen on a purple background. But recently began to pop up such a message, something like "The operating system could not boot. Choose the desired key for further action ... "And then the description is described what you need to click. I already don't remember exactly what keys to press the system, but the point is that for automatic error correction, press the other key for manual debugging other, and to ignore this message is proposed to click the third button. Automatic error correction has not led to anything and the operation of the operating system has not reached a logical completion. So I decided to try the famous team fSCK..
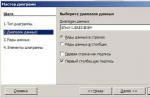
To begin with, you need to boot either from the boot flash drive with Ubuntu (Lubuntu, Xubuntu, Kubuntu, etc.), or from the Ubuntu Live CD disk. Now we need to know what kind of section with Ubuntu, we need to scan to correct the file system. Run the terminal (Ctrl-Alt-T) and execute the command:
Sudo Fdisk -L.
This command will show us all the discs, flash drives that are mounted to the system. I will give an example with my personal computer, not with a laptop of a buddy. That's what happened to me:
[Email Protected]: ~ $ sudo fdisk -l
Disk / Dev / SDA: 640.1 GB, 640135028736 bytes
255 Heads, 63 Sectors / Track, 77825 Cylinders, Total 1250263728 Sectors
Disk Identifier: 0x0009D6F7
/ dev / sda1 * 2048 61442047 30720000 83 Linux
/ Dev / SDA2 61442048 73730031 6143992 82 Linux Swap / Solaris
/ dev / sda3 73730048 1250263039 588266496 83 Linux
Disk / Dev / SDB: 500.1 GB, 500107862016 Bytes
255 Heads, 63 Sectors / Track, 60801 Cylinders, Total 976773168 Sectors
Units \u003d Sectors of 1 * 512 \u003d 512 bytes
SECEM Size (Logical / Physical): 512 bytes / 512 bytes
I / O Size (Minimum / Optimal): 512 bytes / 512 bytes
Disk Identifier: 0xB9FF6F01
Device Boot Start End Blocks ID System
/ dev / sdb1 * 16065 100197404 50090670 83 Linux
/ dev / sdb2 105322201 976771071 435724435+ 5 extended
/ Dev / SDB3 100197405 105322139 2562367+ 82 Linux Swap / Solaris
/ Dev / SDB5 105322203 832110591 363394194+ 7 HPFS / NTFS / EXFAT
/ dev / sdb6 832112640 860755218 14321289+ 83 Linux
/ Dev / SDB7 860758016 862613503 927744 82 Linux Swap / Solaris
/ Dev / SDB8 862615552 976771071 57077760 83 Linux
Partition Table Entries Are Not in Disk Order
Disk / Dev / SDC: 8115 MB, 8115978240 bytes
250 Heads, 62 Sectors / Track, 1022 Cylinders, Total 15851520 Sectors
Units \u003d Sectors of 1 * 512 \u003d 512 bytes
SECEM Size (Logical / Physical): 512 bytes / 512 bytes
I / O Size (Minimum / Optimal): 512 bytes / 512 bytes
Disk Identifier: 0xC3072E18
Device Boot Start End Blocks ID System
/ dev / sdc1 * 32 15847625 7923797 B W95 FAT32
As can be seen from the output of the team sudo Fdisk -L.I have 2 hard drive (SDA) 640 GB and (SDB) 500 GB, as well as a flash drive (SDC) 8GB, with which I actually loaded. I know that my base system with Ubuntu 12.04 is located on the SDA disk, and the section with the operating system is respectively called SDA1.
Now when we know the section to scan, you can actually begin to check it. In the terminal:
Sudo FSCK -Y -F -C / DEV / SDA1
if you see an error, you most likely need to unmount this section:
Sudo umount / dev / sda1
Keys and command parameters fSCK:
y. - Always answer Yes to all questions (there is an alternative: the key P - starts checking in fully automatic mode);
f. - Forced verification of the file system (even if the file system is marked as fully operational)
c. - looking for broken blocks (Bad Blocks), and after notes accordingly
/ dev / sda1 - The device or partition you want to check. Although the team can have another appearance. For example:
Sudo FSCK -P / DEV / SDA1
In this case, only the -p key is added. You just read about all the FSCK command keys and add the keys you need. To learn about all the features of the program, enter in the terminal:
MAN FSCK.
That's what the terminal issued after checking:
[Email Protected]: ~ $ sudo fsck -y -f -c / dev / sda1
FSCK From Util-Linux 2.20.1
E2FSCK 1.42.5 (29-JUL-2012)
Checking for Bad Blocks: 0.00% Done, 0:00 elapsed. (0/0/0 Errdone
/ Dev / SDA1: Updating Bad Block Inode.
Pass 1: Checking Inodes, Blocks, and Sizes
PASS 2: Checking Directory Structure
Pass 3: Checking Directory Connectivity
Pass 4: Checking Reference Counts
Pass 5: Checking Group Summary Information
by admin.
Consider ways to check and diagnose HDD in Linux systems. Information about the operation of the HDD will help analyze the state and, if necessary, replace the failed medium, thereby preventing the collapse of the system or data loss. Additionally, screw the SMART HDD monitoring in our Zabbix monitoring system
We receive a list of connected drives in the system
To determine what and where mounted, performed
See busy place on a particular drive
If there is software. Ludge, check it with the following command
[Email Protected]: ~ # Cat / Proc / Mdstat
Personalities:
mD1: Active RAID1 SDB3 SDA3
965888832 Blocks Super 1.2mD0: ACTIVE RAID1 SDB1 SDA1
9756544 Blocks Super 1.2
Unused Devices:
[Email Protected]:~#
What RAID is set (assembled)
mD0. - RAID device name
sDA SDB. - Included devices in this RAID
- Condition of disks in the RAID array
Install the necessary packages
aptitude Install HDPPARM Sysstat Smartmontools
We look at the speed of reading speed from the drive
With help iostat (as part of SYSSTAT) We analyze the load on our HDD
We look at the output of data on all discs with an interval of 10 seconds
You can define a drive for analysis by adding
With this utility, we define the load on our devices, I / O statistics and interest recycling.
aVG-CPU: % user. % Nice % System % iowait. % steal % Idle 0,16 0,00 1,89 23,75 0,00 74,21
Checking the status of drives
To begin with, we will check our HDD for failed blocks, if necessary, select them and mark them for ignoring.
badblocks / Dev / SDA3 -SV\u003e / root / badblocksda3
Checking for Bad Blocks: 27.93% Done, 36:12 elapsed. (0/0/0 Errors)
/ dev / sda3 - the name of the device being checked
s. - output of interest information
v. - turn on a detailed mode
\u003e / root / badblocksda3 - Write failure sectors to file
Marking BED BEDs (in the future, marked blocks will be ignored by the system):
e2FSCK -L / ROOT / BADBLOCKSDA3 / DEV / SDA3
Bad blocks are labeled, you can work with the disk.
ATTENTION!!! This operation should be performed on an unmounted media or in READ-only mode
ATTENTION!!! The proven device and the device on which the failed blocks will be labeled the same thing!
We receive S.A.A.R.T data about the work of HDD
Where / dev / sdx is the device name that needs to be checked.
You will receive an output of s.m.a.r.t attributes, the value of each of which is well described in Wiki
Monitoring S.M.A.R.T Status Hard Drives in Zabbix
For each of the drives check SMART support
[Email Protected]: ~ # Smartctl -i / dev / sda | Grep Smart
Smart Support IS: Available - Device Has Smart Capability.
Smart Support IS: Enabled
[Email Protected]:~#
If supported but not included, then turn on
smartTl -S ON -S ON -O ON / DEV / SDA
check the status of the team
smartTl -h / Dev / SDA | GREP "TEST" | Cut -F2 -D: | TR -D ""
[Email Protected]: / etc / zabbix # smartctl -h / dev / sda | Grep "Test" | Cut -F2 -D: | TR -D ""
Passed.
[Email Protected]: / etc / zabbix #
In the Configuration File of the Zabbix Agent agent, turn on the SMART check parameter for the disk
UserParameter \u003d HDD_Smart. [*], Sudo smartctl -h / dev / $ 1 | grep "Test" | Cut -F2 -D: | TR -D ""
where HDD_Smart.- key for zabbix element
at sudoers Add recording
zabbix All \u003d Nopasswd: / usr / sbin / smartctl
restarnation sudo and zabbix agent.
In order to be confident in the correctness, logged under the Zabbix user and check the execution of our team
[Email Protected]: / etc / zabbix # SU - Zabbix -S / Bin / Bash
The catalog is missing or unavailable, the login is performed with home \u003d /
[Email Protected]: / $ sudo smartctl -h / dev / sda | Grep "Test" | Cut -F2 -D: | TR -D ""
Passed.
[Email Protected]:/$
On the Zabbix server will create Zabbix Agent ( Active) Data element
Name - Arbitrary
A type - Zabbix agent (active)
Key - HDD_Smart. - for the first disk, for the second, respectively ...
A type - Symbol
And after a while we observe the data