- What settings to change more
-
- Improving Wi-Fi network performance
- Quickly setting up Wi-Fi DIR-300
Probably, in our time there are no longer such users who are looking for an answer to the question of how to change the settings of the router. When changing the provider, all settings are usually specially reset with the reset button, and then the device is configured from scratch. This is exactly what you need to do in order to protect yourself from surprises when working with the Internet. There are routers stitched for a strictly defined provider, which, it seems, is pointless to connect to other Internet providers (cannot be configured). We will not consider this situation, but let's talk about how you can do with a regular router when changing a provider, one that is equipped with the manufacturer's firmware.
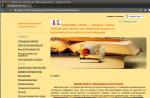
If you want to change the settings of a device (router), then at least you can open its web interface. This is how the interface of the DIR-300 combine looks like, which is configured for Beeline L2TP:
Removing unnecessary items in "Connections"
We used the address 192.168.0.1 and an empty password, and then, on the "Connections" tab, you will need to set a dot in the line that is responsible for the ipoe-connection of the WAN port. We want to delete the line "l2tp" altogether, for which we double-click on it, and on the tab that opens, press the "Delete" button. It remains to save the settings by clicking the button opposite exclamation mark... We now have a ready-to-use DIR-300 router that can be connected to any provider using the DHCP protocol.
What settings to change more
Most likely, simple removal unnecessary connections you will not solve anything. The router is usually configured so that it works as quickly as possible only with a certain provider, and nothing works with any other "providers" when you try to connect to them. What you need to look at in the network parameters of the router:
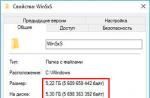
- The MTU value in the DHCP Client (IPoE) protocol settings, which should be equal to 1500, no more and no less
- Same MTU parameter but used in local network(LAN), also set to 1500
- Where IPoE is configured, the MAC address can be cloned (in the company's routers TP-Link setup MAC is placed in a separate tab), and you must get rid of the cloned value.
 Substitute the MAC required by us
There is no need to remind here that after changing the values on any tab, saving is mandatory (however, this is true only for the D-Link interface). As you can see, you can get a completely functional device without even using a factory reset.
The main thing to understand here is that when you change the provider, you do not have to reconfigure everything completely.
But the matter will not be limited to one change of WAN parameters. Sometimes you need to change the MTU value used on the LAN, and when configuring the WAN again, be careful with the checkboxes (at least, do not forget to enable NAT). As for port forwarding (in D-Link routers the option is available on the Firewall tab), you don't need to change anything here! We have chosen the default gateway we need, and all ports will now be broadcast to it, and the user will only need to configure the programs correctly.
How to fix Wi-Fi settings
We talked about the fact that when switching to a new provider, it is not necessary to reset the router parameters, but you can simply change the settings on some tabs. And the reason why it is not recommended to perform a reset is very simple: if the Wi-Fi network is working and is detected by every subscriber device, it is better not to touch its parameters or change it at all.
The only thing, maybe you decide to change the encryption algorithm, as well as the password value, etc. Encryption parameters are available on a separate tab, but in some interfaces these settings are located on the tab that contains the main network parameters (SSID name, range, etc.). Therefore, when setting up encryption in a new way, you need to be careful not to fix anything unnecessary. Let's look at an example.
We continue to configure the D-Link router
Our task is this: we need all subscriber devices to connect to the Wi-Fi network, moreover, they just connect, and not just detect it. The solution looks like this: we change the encryption algorithm to WPA / TKIP + AES, try to connect, if it doesn't work, turn off the MAC filter and try again. The sequence of actions is simple:
First, in the interface, on the Security Settings tab, you need to enable WPA-PSK authentication, set a password and use the TKIP + AES algorithm. Then, you will save the new parameters.
 Changing the Wi-Fi encryption parameters
Second, we try to connect to the wireless network from each of the subscriber devices. If it doesn't work, go to the "MAC filter" tab and disable it (temporarily).
 How to turn off the MAC filter
Third, after saving the settings, we try to connect the devices again. If everything is fine, then you need to add a new value on the "MAC Addresses" tab (do not forget to enable the MAC filter then). In fact, all devices must be connected - there are practically no devices using encryption more primitive than WAP / TKIP now.
Fourth is the strongest encryption, WPA2-PSK with AES, try last.
We wish you successful setup.
A home or even office network harvester is a rather slow device that cannot handle a large number of subscribers. If without encryption, 20-25 devices can be connected to a Wi-Fi network at the same time, then even turning on WPA encryption, these numbers will have to be divided by 2. The question is what exactly is needed - a large number of concurrent subscribers, or the reliability of encryption. In some cases, oddly enough, it is better to use just WPA, and not WPA2 (and it is not recommended to enable the combined mode in principle).
Improving Wi-Fi network performance
There are basic and additional parameters, the change of which cannot cause disturbances in the operation of the wireless segment. Now they will be listed, and whether you need to change them, decide for yourself:
- "TX Power" is the transmitter power adjustment. Select the value that is appropriate for the environment in which the router is operated (numbers are percentages).
- V D-Link interface nothing else can be changed on the above tab. However, other parameters may be available, for example "TX Rate" - the maximum data transfer rate (select the value specified in Mbps).
- Sometimes in the additional Wi-Fi settings, the "Multicast Rate" parameter is available - this is the broadcast rate of Multicast packets used for watching IPTV. You don't need to set too much value here, otherwise IPTV packets will displace everything else from the network.
- Among the basic settings, you can painlessly change the SSID (network name), and nothing else.
 Advanced Settings Tab
This completes the enumeration of the parameters that you can change to benefit from. Usually they are guided by the following logic: if everything works, then nothing needs to be improved.
It remains to say the most unpleasant thing. In difficult or incomprehensible cases, you can also resort to resetting the settings by performing this operation using the web interface (or by pressing and holding the reset button for 10 seconds). However, then you have to select the values of the Wi-Fi parameters by trial and error. Note that the most difficult thing will be to choose the number and width of the used channel. Happy routing!
From time to time in the life of every person there are circumstances that force them to consider changing the Internet provider. This may be due to the low speed of the Internet connection, its instability or an unsatisfactory pricing policy of the provider. Also, such a change may be dictated by a move, when you take a router into your new home that is configured for a specific Internet service provider.
Connecting a network cable from a new ISP to a router configured for a different ISP will be ineffective in most cases. This action will create a Wi-Fi network and connect the device, but will not provide access to the Internet. An exception is possible if the previous and current ISPs use Dynamic IP, and if the current ISP operates without MAC binding. In this case, the Internet starts working immediately after you connect the network cable to the router.
If your router needs to be reconfigured when you change your ISP, you have two options.
- Review the settings of the Internet provider (WAN); or implement new setting After resetting existing settings, it is recommended to start with the first option, which promises much less hassle with settings and saves time.
- Resetting the settings is a last resort, which is advised to be carried out only in case of unsuccessful attempts to implement the first scenario.
How to reconfigure your router for a new ISP
The easiest way to change the router settings after connecting to a new ISP is to set the parameters of the new ISP in the router settings (“WAN” or “Internet” tab) after connecting the Internet cable to the WAN connector (blue connector) of the router. The parameters appear in the contract confirming the provision of Internet services by the provider. In the absence of a document, all the necessary data can be obtained by calling the support phone of the Internet provider.For example, for Tp-Link routers, the settings are changed as follows. Necessary:
 If the operation of changing the settings is successful, the Internet will work with the same network name and password for Wi-Fi. If you still do not have access to the Internet, this may indicate that the new provider is using MAC address binding. In this case, you should:
- Select the "Network" → "MAC Clone" tab in the router settings;
- Clone the MAC address from the computer by clicking on the "MAC Clone" button;
- Save settings;
- Reload the router.

How to completely reconfigure your router
The second way is complete reset router settings and setting new parameters, including data for connecting to the Internet, setting up Wi-Fi, setting up protection for a wireless network, etc. This method helps to get a completely clean router, which will help avoid confusion in settings left over from the previous ISP."Setting WiFi router? Nothing could be easier, Watson! "
Even being a very distant person from the depths of knowledge of all the secrets of the computer world, most likely you still heard about such a concept as Wai Fai! Let's immediately define what this word means. WiFi is a technology wireless transmission information by means of a radio signal. Now it has become widespread, so in order to keep up with the homosapiens of the 21st century, I strongly recommend getting involved in the topic and actively mastering and using it. Customization advantage wifi at home in front of the cable connection is so huge that it makes no sense even to explain it - the Internet and data exchange without wires! No sockets, cords and other last thousand-year-old nonsense - took out a laptop or smartphone (or what else is holding your pocket?) - turned it on and rushed ...
If you are reading this article, then the question of setting up a WiFi router has arisen for you too. Well, let's figure out how to set up WiFi on a laptop and computer with Windows 7 or XP.
I'll make a reservation right away that the sections of the menu in the admin panel of the router, which I will talk about, can be called differently in different models and are located in different parts of the menu - the main thing is to understand the essence of which section what needs to be written.
- So, the first thing you need to do is get a wifi-enabled router. To set up a router to distribute a high-speed signal, it is advisable to purchase equipment with the maximum bandwidth (now there is already up to 450 Mb / s), which is called a reserve. All the features of the choice are described in detail in this blog.
- Turn on the WiFi router and connect two cables to it - one, an Internet cable from the provider, to the “WAN” connector, the other, free on both sides, which came in the kit, to the “LAN” connector.

- Connect the free end of the cable to the computer or laptop from which we will configure the equipment.

- Go to the browser at http://192.168.1.1 or another address indicated on the bottom of the device. Depending on the manufacturer and model, the address may look like 192.168.10.1, 192.168.0.1 or 10.10.0.1 - from those that came across to me personally.

- Enter username and password - usually admin / admin, but may differ. They are indicated in the same place, on the back of the router, next to the address for entering the admin panel.

- In the settings of the router in the WAN or Internet section, select the type of connection, which is either specified in the provider's contract, or recognized by calling the technical support, and enter all the data for access depending on this type. Again, they are all indicated in the contract or accompanying explanatory materials and instructions of the provider.

- In the "Wireless network" or "WiFi" section, set the name for our Wi-Fi (SSID)

- In the security section, set the WPA2 / PSK encryption type and set the password for connecting to WiFi.

- We activate the virtual server mode - DCHP, which allows us to dynamically distribute IP addresses from the specified range.

- Save all changes
Setting up a WiFi router - connecting a laptop
Moving on to WiFi setup on a laptop. Let's look at the example of Wndows 7, although on XP everything will be the same - the only difference is in the names of menu items in the system itself. But above all, keep in mind that the laptop must have a WiFi module - either built-in, which will be notified by a sticker on the case informing about its presence, or some kind of button to activate it.

If it is not there, then you need to purchase and install WiFi adapter- details about the choice of this device.

Possible errors when configuring the router
When self-configuring a router to distribute a wifi signal, beginners often make fairly simple mistakes. I will give a solution to the most common ones.


If all the settings of the router were made correctly, then the Internet should start working wirelessly. Follow the blog updates to find out how to increase the range of the Wi-Fi and much more.
Now on sale there are a huge number of different Wi-Fi routers from different manufacturers. And that's good, there is plenty to choose from. But immediately after purchasing a router, we need to install, connect and configure it. And if the connection process is practically the same depending on the model, then the setup process itself and the page with the router settings may be different even for one manufacturer.
It is very difficult to give detailed and step by step instructions on setting different models... But I'll try. In this article, I will describe in detail and show you how to install and configure a Wi-Fi router. Regardless of what make and model you have. This one-stop guide is suitable for both setting up a new router and reconfiguring it. You can do everything yourself. And it is not at all necessary to pay for customization to specialists.
Entering the router settings. How to enter the web interface?
Each router has its own web interface (site with settings, control panel), which can be accessed through a browser by clicking on the appropriate address.
Important! To go to the router settings and configure it, your device (PC, laptop, smartphone, tablet) must be connected to the router via cable, or via Wi-Fi network. At the same time, access to the Internet on the computer may not be available. You do not need the Internet to enter the control panel!
If you have a high-speed connection on your computer (maybe with the name of your provider), then after connecting through a router you do not need to start it!
To enter the settings, we need find out the address our router and factory username and password for authorization. This information is located on the body of the device itself. It looks something like this:

On a computer, or mobile device which is connected to the router open the browser (Opera, Chrome, Yandex Browser, etc.) and go to the address indicated on the case. Or try 192.168.1.1 and 192.168.0.1.
Important! We enter the address into the address bar, not into the search bar. Many people are confused, and instead of a page with settings, they end up on a page with search results of some search engine.

On the authorization page, you need to specify a username and password. The factory ones are indicated on the body of the device. Most often these are admin and admin. On some models, the default settings are not protected, and immediately after entering the control panel, you need to set a username and password.
Articles that may be useful to you at this stage:
If the settings page has opened, then we can continue. If not, then see the article with solutions to this problem at the link above.
How to set up a Wi-Fi router?
In order to use the Internet through a router, you need at least:
- Set up an internet connection.
- Set up a Wi-Fi network.
In most cases, this is sufficient. I also advise you to change the password that protects the web interface of the router. There are also IPTV settings, USB drives, parental control etc., but not everyone needs them.
In the control panel of almost every router there is a so-called "Master quick setup", aka" Quick Setup ". On some devices, it is opened immediately after entering the control panel. With it, you can step by step configure a Wi-Fi router. Internet connection, wireless network, etc. For example, how it looks like in TP-Link:

You can try it, it's very convenient.
Setting up the Internet. The most important step
The main thing is correctly configure the router to connect to the provider... If he cannot connect to the Internet, then all devices will have a connection "Without Internet access". Many users who try to configure everything with their own hands most often encounter problems at this stage.
Each ISP uses a specific type of connection. Dynamic IP (DHCP), Static IP, PPPoE, L2TP, PPTP. This type of connection must be specified in the control panel of the router, and certain parameters must be set, which are given by the Internet provider.
Important! You must know exactly what type of connection your ISP has. Also, all the necessary data for connection (Username: Password) if needed. As a rule, this information is indicated in the contract that you received when you connected to the Internet.
Some providers bind by MAC address. It is also desirable to clarify this.
If your ISP uses a "Dynamic IP" (DHCP) connection, then the Internet should work immediately after connecting, since this type of connection is set by default on routers.
If the Internet via the router is already working (and you haven't started any connections on the computer), you can skip this section and go directly to the Wi-Fi setup.
When the connection type is PPPoE, L2TP, PPTP, or Static IP (which is very rare), then you need to set the necessary parameters. Usually, this is the login and password that the provider gave you. In the control panel, the section with these settings is most often called: "WAN", "Internet", "Internet".
For example, how it looks like PPPoE setup connections on ASUS router:

Other examples:
Target: so that the Internet through the router works on all devices. Via cable and Wi-Fi. If this has not happened, then it is pointless to continue tuning.
You can always call the provider and clarify what parameters and where you need to specify. They help many by telephone.
Articles that may be useful to you:
Hope you succeed.
Changing Wi-Fi network settings
I highly recommend changing wifi name network and password. It is also desirable to set your region. Everything is simple there. This can be done in the section with the wireless network settings. It can be called in different ways: "Wi-Fi", "Wireless network", "Wireless", "Wireless mode". If you have a dual-band router, then the settings must be set separately for the network at 2.4 GHz and 5 GHz.
- In the "Network name" (SSID) field, you need to write a new name. English letters.
- In the "Password" field (wireless key) create and write down a password. Minimum 8 characters. Protection type - WPA2 - Personal.
- Well, there should be a "Region" field. Change it to yours. IPTV on ASUS routers.
If during the setup process something does not work out for you, you can always reset the settings to the factory settings and try to set everything up again. Find the "Reset" or "Reset" button on the case, press it and hold it for about 10 seconds. The indicators will tell you when the reset has occurred.
You can leave questions in the comments. Only I have a small request, describe the problem in detail. Write your router model. And it’s very difficult to understand and advise something when you don’t understand the question itself. Good luck!
Today, many families have long had a couple of computers or laptops, and sometimes both. Plus to all this, there are also smart phones, and maybe a tablet. And, of course, the center of entertainment for every family member is great. Until a certain point, everything usually goes well, while everyone at home uses their devices, but then there is a desire for something more.
This requires a home wireless network. It helps to get rid of unnecessary wires, to be more mobile, of course, makes all the media content accumulated by family members available to everyone.
Such home wireless network is being organized at help wi-fi a router that broadcasts a signal to many devices that support a wireless connection. Alternatively, you can join the distribution using network cables, but for this you will need to register IP addresses for each connected device.
For greater comfort of access to content, use a NAS server. It can be as separate system unit With several HDD disks and a ready-made box solution. Such home server allows you to wirelessly connect any device and watch HD videos, music, play games and much more, and most importantly, store it all on your disks. The home server is also connected to a wi-fi router.
The most common internet connection options
- Dynamic IP (Automatic IP or DHCP)
- With a static IP address (Manual configuration field WAN IP address setting, mask, gateway ...)
We will consider the 2nd option, with a static IP address. As soon as you select it, the fields for entering the parameters of the static connection - "Setting the WAN IP address", which must be filled in according to the data received from the Internet provider, will become active.
Click "No" and fill in all the fields sequentially.
It should be noted that in this case the IP address and other network parameters are fixed, they should be entered exactly as indicated by the provider.
If you choose the option with a dynamic IP address, or PPPoE or L2TP, then the configuration is simplified and the router will receive all connection parameters from the provider automatically. Only for the last two types of connection it is necessary to specify the name and password that is issued by the provider (or, in rare cases, the "Service name").
Complete the settings by clicking the Apply or Save button.
In some cases, the provider binds the user to the MAC address (physical address) of his computer so that no one else can connect instead. In this case, an attempt to access the Internet using a router will become impossible.
To avoid this, the MAC address of the external interface of the router should be changed so that it matches the MAC address to which your ISP binds you (usually this is the address of your computer's network interface).
This operation is called cloning the MAC address, however, this function in the web interface of the router does not always have the same name.
To clone the MAC address of your computer, which was connected to the Internet with a cable before installing the router, enter it in the MAC field of the "Special requirements of your Internet service provider" section in the WAN section, Internet connection tab.
Save the settings by clicking the "Apply" button.
How to find the MAC address of your computer
To find out the MAC address of the computer and enter it when setting up an Internet connection on the router,
do the following:
1. Click on the computer icon in the taskbar (tray), click "Network and Sharing Center"
and in the window that opens, select "Local Area Connection".
2. Click on the "Details" button to see the MAC address.
The MAC address will be located in the Physical Address field.
Configuring Wi-Fi Settings Manually
If you did everything correctly and specified the correct connection parameters, then after restarting the router you will have access to the Internet from the computer on which you made the settings. Open your browser and type
the address of any website, eg. The site page has opened, therefore, you can proceed
to setting up a wireless network (wi-fi).
In the menu of the web interface of the router, select the "Wireless" section, the "General" tab.
Please note that some routers support a dual-band wireless network (5 GHz and 2.4 GHz). Set up your wireless network in the more popular 2.4GHz band.
Specify the operating mode of the wireless network. The best option is the universal setting, which provides compatibility with both new and old versions of the Wi-Fi standard. It is called Mixed or Auto.
Specify the SSID of the network (The name of the network that will be displayed during scanning) in the field of the same name. Choose a security option in the "Authentication Method" field, I recommend WPA2-Personal, why, read the Wi-Fi heading. Enter your password (or key) in the WPA Preshared Key field. This key and network name (SSID) will be required to configure access to your wireless devices so it is recommended that you save them to a file or write them somewhere in a safe place.
It is recommended to hide the SSID so that your home wireless network was not visible from the outside, but you can still connect to it, since you already know the SSID. To save the settings, click on the "Apply" or "Save" button. By the way, the wireless network in the 5 GHz band is configured in the same way.
Attention! Be careful when updating the router's firmware. The need for it is due to the incorrect operation of the router and communication problems. Carefully read the section of the user manual about the update software router and strictly follow the recommendations. Updating the router's firmware is a last resort; you should not resort to it unless absolutely necessary, since there is no such need during the initial configuration of the wireless network.
P.S. I would be very grateful if you point out the points that need to be analyzed in more detail.