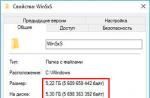
The need to supply power to the adapter for connecting an external hard drive via a USB socket to a personal computer made me recall the JNC LC-200A power supply, which had been gathering dust on the mezzanine for a long time. Voltage of 12 and 5 volts is available, current is abundant. But what can I say - a profile power supply in such situations is always the best option.
He performed his function successfully. I decided not to look for another power source for these purposes, but the abundance of wires coming out of it is embarrassing. And there is only one way out, since I decided to use it all the time - some work is needed.

I disassembled the power supply into separate units, painted the case, drilled holes in the lower part for the terminals and installed rubber feet on the bottom (which I put in the first place, otherwise, while you put it together, you will strip the entire table with iron from the bottom).

I put the terminals for all types of available voltages, let them be. Red "+12", "+5", "+3.3" volts, and black "0", "-12", "-5". Moreover, using their various combinations, you can get a very wide range of constant output voltages.

Took a fee. The wires going to the fan were previously simply soldered - I installed the connector in case it was necessary to disassemble the power supply in the future.

Of the output wires, I left two bundles intact, shortened the rest and combined (in accordance with the color and, of course, the output voltage).

I brought the board back into place, the shortened wires to the terminals, and brought out solid bundles.


I screwed the upper part of the case back into place, left the power connector for connecting hard drives with IDE interface on one output harness, and installed a connector for SATA drives on the other. I signed the power terminals in the simplest and most accessible way - I printed out the necessary designations, pasted adhesive tape on top of the text, cut out and glued them.

The reverse side of the assembled power supply. The power button is located in a convenient niche, it is almost impossible to accidentally turn it on or off. And this is not a trifle, since an unauthorized disconnection of power from a hard external drive connected to the computer can lead to adverse consequences. It is incomparably more convenient to use the modified power supply unit for connecting the ZhVD, I would say even comfortable. Plus to this the possibility of using the power supply and to obtain other very different constant voltages.
Getting different voltages - connection table
| We get | We connect |
|---|---|
| 24.0V | 12V and -12V |
| 17.0V | 12V and -5V |
| 15.3V | 3.3V and -12V |
| 10.0V | 5V and -5V |
| 8.7V | 12V and 3.3V |
| 8.3V | 3.3V and -5V |
| 7.0V | 12V and 5V |
| 1.7V | 5V and 3.3V |
Also, the power supply unit has become more compact and mobile, so there will be a lot of applications for it - the need for a powerful and separate source of various voltages often arises. Project author - Babay iz barnaula.
Hello readers of this blog.
Now we will talk about how to start a computer power supply without a system unit. This is perhaps its only component device that can be turned on separately, and it is not necessary to have special skills.
Do you think that this is not useful to you? Don't jump to conclusions. Read the article and you will find out what benefits even the old one can bring and why it is started independently from the rest of the hardware.

Why turn on a PSU without a computer?
There may be several reasons:
- Your computer doesn't work? There might be a problem with the power supply. Check out this version yourself before taking your PC for repair.

- Iron turns on, but there are failures? Monitor the voltage output by the unit under load.

- Do you constantly hear noise from the system unit? Check the noise level of the cooler by turning it on together with the power unit separately.

- A working power supply unit lying idle from an old computer can be given a second life. It is a strong and versatile device with various voltages.
And you get double the power (increased headroom in watts). This is especially true for gamers or those looking to install additional cooling devices or neon lights.
Or you can power other devices from the power unit, for example, if their native adapters are broken.
What are we dealing with?
The power supply converts the mains voltage to the value that your hardware requires, stabilizes it from interference and provides energy to all other components of the computer.
Previously, these devices were produced in the AT standard, which could be launched directly without any special manipulations. But modern blocks are presented in a more perfect standard - ATX. They have several "pigtails" of wires with SATA and Molex connectors to connect hard drives and a video card, 4-pin or 8-pin power for the processor, and 24-pin (in some models 20-pin) for the motherboard, with which work together.

But don't be intimidated by this complex scheme. It is possible to start the power unit without a motherboard, and it is easy to do it.
Algorithm of actions
Before starting, naturally, your device needs to be pulled out of the system unit. Turning on the PSU autonomously requires the following actions:
- Prepare a regular paper clip to short the wires.
- Regardless of what pinout is in your power supply, find a green wire, it is called PS_ON.
- Now select any black wire.
- Insert one end of a paper clip into the first "exit" and the other into the second.
That's the whole process. Now you can start the power unit separately.

That's basically all, your power supply unit will start without load with such a trick.

Also, if you are going to power from a power supply unit, for example, a car radio, then for this you need a yellow wire, under which a voltage of 12 volts is supplied. "Bite off" it and any black contact from the connector and connect to the power wires of the radio.
I have no doubt that you will succeed;).
Reading time: 3 minutes
There are different situations when you need to start a PC power supply without a computer with a jumper. For example, this is needed to check the performance of the power supply, if you assume that it is out of order. For example, the computer does not respond to the power button, one of the reasons is a faulty power supply.
In this article, we will tell and show you which pins you need to bridge to start the power supply without a motherboard.
Starting the power supply with a jumper
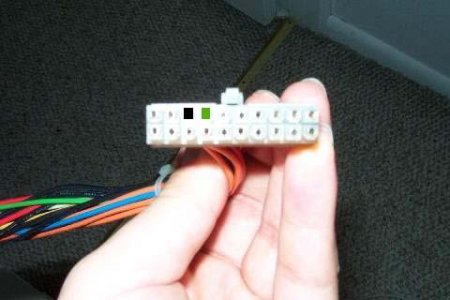
In order to start the power supply with a jumper, you need to close certain contacts. To do this, we take the plug of the power supply, 20 or 24-pin does not matter, we turn it with a latch towards us. Take it in your hands as in the photo below:

Now we count the fourth contact from the left, it is usually green, but it can be different. It is pin 4 on the left that is responsible for starting the power supply.


It is not advisable to start the power supply without any load; it is recommended to connect some device, for example, it can be a floppy drive or a hard disk.
Now everything is ready to connect the power supply to the network. We plug the cable into the power supply and into the outlet. Using the button on the back, if available, turn on the power supply. If there is no button, then the power supply will start itself.

If you did everything correctly and the power supply is in working order, then you will hear how the fan in the power supply started working.
Hello everyone. I hope that you all know perfectly well that such an interesting and useful thing as a power supply unit lurks in the computer system unit. And for us - folk craftsmen, power supplies are of particular value. Surely many have them lying around idle. It happens - they bought a new computer, and spare parts from the old one are gathering dust in the closet. Let's try to find a use for them.
The ATX power supply provides the following voltages: 5 V, 12 V and 3.3 V. In addition, they have good power (250, 300, 350 W, and so on). But here's the bad luck. How do I run it without a motherboard? This is what we will consider in today's material.
Old power supplies, AT standard, were run directly. The ATX power supply cannot be started in this way. But it still doesn't matter. To turn on the power supply, we only need to have one small wiring, with which we will close 2 contacts on the plug.
But first I want to warn you - disconnect all the wires from the motherboard, screws and drives, in case you are smart enough to run the power supply directly in the system unit.
So let's get started. To begin with, we remove our block from the system unit.

One more warning. You don't need to run your block idle. Thus, you shorten his life. It is imperative to give a load. For this purpose, you can connect a fan or an old hard drive to the power supply.

In fact, to start the power supply, you must close the PS_ON contact to zero. In most cases, these are green and black contacts on the plug, but sometimes among the cunning Chinese there are color blind people who are confused in the color coding. Therefore, I recommend that you first study the pinout. It is shown in the following image. On the left is a plug of the new standard for 24 contacts, and on the right is an older one for 20 contacts.

In my case, the older standard (20 pins) will be shown. My color coding is not broken.

To start, I made just such a jumper.

This is how we close our contacts.

If you plan to use the power supply all the time, then for convenience you can make just such a button.
If you want to check the operation of the power supply, but you do not have a computer, then there is one way to do this. All you need is a pair of wires and a single pole switch that stays on or off when you change position. Below we will show you how to do this.
Standard ATX PSUs are not designed to be idle unless they are properly connected to the motherboard. This ensures that they cannot damage computer components if the connector is not fully plugged in or plugged in incorrectly.
Note: under no circumstances switch on the power supply without load! This can lead to its complete failure. The load can be either a resistor or a connected drive, floppy drive, hard drives.
Another problem is that if you connect the power supply to the mains, then it simply does not initialize. It will wait for a trigger signal from the motherboard to turn on (usually the signal is controlled by a button on the front of the computer). The article describes the direct initialization of the power supply by closing the corresponding connectors.
Prepare two long pieces of wire to connect to the switch and power connector (20 or 24 pin connector).
Strip the insulation from both ends of each wire, leaving enough wire to wrap around the power button (or solder). On the other end, expose a strip just enough to make sure it makes contact with the 20- or 24-pin connector on your power supply.
Wrap the long end of the bare wire around the switch and repeat this process with the other wire. Place the switch in the OFF position.
Power off the computer and remove the power supply connector.
Hold the 20- or 24-pin power adapter plug in one hand. Find the green wire (the ATX motherboard signals the command to start the power supply via "PS_ON #", which is indicated by the green wire). It is pin number 16 on a 24 pin connector and pin number 14 on a 20 pin connector. Find the black wire (GND) on the 20/24 pin connector. It is usually found next to green.

Note: there is one green wire in each row, it doesn't matter which one you use, they both serve the same function.
Insert one end of the prepared wire from the switch into contact with the green wire. Insert the other wire pin to the black wire.
Connect the power supply to the mains, and then turn the switch to the "ON" position. The power supply will turn on and you can now use it to power devices or for testing purposes.
To make sure the power supply is working properly, you can measure the output voltage with a multimeter. The drawing above shows the output voltage of each pin (+12 V, +3.3 V, +5 V, COM). Pin 13 can be either + 3.3V supply or can be used as a power supply sensor to measure cable loss.
In this simple way, you can easily, and most importantly, safely turn on your power supply without a computer.