During the operation of the OS, users notice the rapid growth of the Windows folder. The increase in size is due to the fact that the internal winsxs folder begins to weigh a lot. Let's figure out what this winsxs folder is in Windows 7, 10, 8 and whether it can be deleted or cleaned up.
Winsxs - what is this folder and can it be deleted
This folder is located along the path C: \ Windows \ winsxs and stores files of OS components, as well as backup copies and updates to these files. Even if these components are not installed in the operating system, they are stored in the winsxs folder, taking up HDD space.
Note: Under these circumstances, the letter of the local drive is C. Your letter may be different, be careful.
In fact, OS components are in other places, and the contents of the winsxs folder are links to those components. When Windows updates are installed, they and their old copies are deposited in the winsxs folder. Over time, updates become more and more and, accordingly, the winsxs folder takes up a lot of space in Windows.
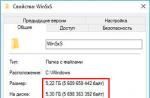
The winsxs folder can be up to several gigabytes in size. Although this free space does not mean anything for modern hard drives, it will not be superfluous. To find out how much winsxs weighs, just right-click on it, then select "properties", on the "general" tab, see the number of megabytes. This method will not give information about the actual size of the folder, but it will help to judge the amount of free space. Remember this number, it will be needed in the future for comparison. 
Important! It should be noted right away that it makes no sense to manually delete the winsxs folder in Windows in the traditional way, since you can remove the components that are vital for the operation of the system.
Cleaning programs will not work, there are standard OS tools that will help you clean the winsxs folder in Windows. Let's take a closer look at the methods.
Removing old updates through the Disk Cleanup utility
This method works in Windows 7 and later, which will reduce the size of the winsxs folder. Run Disk Cleanup in one of the following ways:

In the new window, click the clear system files button (shown in the screenshot). If prompted by UAC, click yes. 
To clean the winsxs folder in Windows, make sure that the checkbox next to the "Clean up Windows updates" sub-item is checked, as this section is responsible for deleting files in the winsxs folder. Check other items as you wish. In this window, you can also estimate the approximate amount of free disk space. Finally, click OK and wait for the end of the process, you may need to restart your PC. 
Note: the update cleanup function is built into windows 8, 10. For the seven, Microsoft released an update for this option to appear. If you do not find the update cleanup point, then download and install the KB2852386 update package. The methods below do not work on Windows 7.
Cleaning with Task Scheduler
With the release of Windows 8, there was a function that allows you to clean the winsxs folder automatically. The OS has created an automatic StartComponentCleanup task that runs in the background to remove old versions of files after 30 days. This period is given to exclude incompatibility of new updates. You can manually start this task by following the steps below.
To start the task scheduler, in the "run" window (called by the Win + R buttons), write the taskschd.msc command, then click OK. 
On the left side of the window, expand the Task Scheduler Library section, then the Microsoft and Windows subsections, find the Servicing section and click it. Select StartComponentCleanup, on the right side of the window, click "Run" to start cleaning the winsxs folder. You need to wait about an hour. 
Note: you can accomplish this task through the command line. You must then use the command:
schtasks.exe / Run / TN "\ Microsoft \ Windows \ Servicing \ StartComponentCleanup"
Cleaning up via the command line
Dism.exe is a cmd application that allows you to perform various manipulations with Windows components, which will help you clean up the winsxs folder. Windows 10, 8.1 introduced a new AnalyzeComponentStore parameter to help determine how much space the winsxs pack actually takes up. Bring up a command line with administrator rights, enter the following command and click Enter:
Dism.exe / Online / Cleanup-Image / AnalyzeComponentStore
As a result of the calculations, you will know if cleaning is recommended. To see the amount of memory that can be freed, take a look at the items marked in the screenshot. The sum of these two items shows the amount of hard disk space used. 
After analysis, you can start cleaning the winsxs folder. The StartComponentCleanup parameter in cmd produces similar results as in Task Scheduler. However, the removal of components occurs immediately, without waiting. In cmd with admin rights, enter this construction, then click Enter:
Dism.exe / online / Cleanup-Image / StartComponentCleanup
Using the ResetBase parameter you remove all obsolete versions of each component. The command looks like this:
Dism.exe / online / Cleanup-Image / StartComponentCleanup / ResetBase
The SPSuperseded setting helps reduce the space that the service pack takes up. Use a command like this:
Dism.exe / online / Cleanup-Image / SPSuperseded
Wait for the completion of these commands. Next, estimate the amount of memory freed through the AnalyzeComponentStore parameter. 
Removing Windows Components
Windows 8, 10 allow you to enable, disable Windows components. These functions are located in the Programs section. 
All Windows components are stored in the winsxs folder, whether they are enabled or not, and take up space. There is a way to help remove these components from winsxs entirely, thereby freeing up space. In the future, you will be able to download the remote components as needed.
Run cmd with admin privileges. Enter the command below, then press Enter:
DISM.exe / Online / English / Get-Features / Format: Table

The command line will build a table of component names, as well as their states. Remember the name of the component to be removed and use the following command:
DISM.exe / Online / Disable-Feature / featurename: NAME / Remove
In this command, you need to replace NAME with the name of your component. In the example, we will remove DirectPlay. 
This will change the status to Disabled with Payload Removed. In these ways you can clear the winsxs folder in Windows.
That's all, now you know winsxs - what is this Windows 7, 8, 10 folder and how to clean it. It is recommended to first of all use the first three methods, although you do not need to resort to the method with the task scheduler, since it is duplicated, but everything is at your discretion. Removing the components is not recommended because it will not free up a lot of space, and the removed components may be needed in the future. You can also, to free up additional space on the HDD.
The WinSXS folder is an integral part of any operating system version 7 and higher. It is an archive that stores information for system backup recovery. The folder is replenished with files with each Windows update and can grow to quite large sizes if the OS is not reinstalled for a long time.
In theory, the WinSXS folder can be cleaned up periodically. However, deleting some files can have a negative effect on the performance of your computer. To find out what exactly can be removed, and what is better to leave, it is necessary to resort to using special software.
How to clear the Winsxs folder in Windows 7
To be able to perform actions with the WinSXS folder in Windows 7, the SP1 update package must be installed on your PC. You can check its presence on the following path: "Control Panel" - "All elements of the security system" - "System". Slightly below the OS version, the line Service Pack 1 should be indicated. If it is not there, then you will not be able to delete the folder.
Before proceeding directly to deleting the folder, you must download the KB2852386 update. Go to the "Update Center" through the "Start" menu. In the list of "Optional Updates", find the number you are looking for and install it.

There are several ways to clean the WinSXS folder in Windows 7. The first of them involves cleaning the disk through the "Properties".
Go to the "My Computer" folder and right-click on the "Local drive C" icon, select "Properties". Next to the pie chart showing the disk fullness is the "Disk Cleanup" button, which must be pressed. Unnecessary files will be deleted automatically.

You can delete unnecessary documents using the "Run" command. In the line "Open:" enter in Latin cleanmgr and press Enter. Select "Drive C" and then check the box "Clean up Windows updates". The command will be executed.

You can use a special utility to clean up the storage. WinsxsLite... It is freely available on the Internet.
Download the program and open it with administrator rights. Enter "1" then "s". The scanning process will start. It usually lasts a long time. After completing it, enter the following data:
- Phase 1 + Apply [a];
- Phase 2 + Scan [s] + Apply [a];
- here write the same as in the second line.

Clear Winsxs in Windows 8
Actions with the WinSXS folder in the "eight" can be performed using the "Disk Cleanup" function. Call the Run command and enter cleanmgr... Next, you should select the C drive. In the new window, you need to click "Clean up system files". Check the box next to "Cleanup updates" and wait until the process is complete. This method will delete the update files from the folder.
To get rid of minor files, we recommend using the DISM utility. Open command prompt as administrator. Set the command: Dism.exe / online / cleanup-image / AnalyzeComponentStore. The search will begin for files that can be “painlessly” deleted from the folder. At the end of the process, you will see the OS recommendations for cleaning up the storage. Automatic removal of unnecessary components can be started by entering the command Dism.exe / online / cleanup-image / StartComponentCleanup.

How to empty the Winsxs folder in Windows 10
Deleting data from the WinSXS folder in the tenth version of Windows should be extremely careful. It is not recommended to take any action if the folder size is much less than 10 GB. The peculiarity lies in the fact that when you delete items from a folder “lighter” than 5 GB, its volume may increase and the system will work worse.
Cleaning in Windows 10 usually happens through the command line. The algorithm of actions absolutely corresponds to that described for version 8 of the OS.
The system drive C must have a lot of free space.
This will ensure that the system of your laptop (computer) will work stably. drives are faster than HDDs.
The only catch is that the price of an SSD is rather high. In this regard, after Windows is installed and there may not be enough space on the hard disk.
Therefore, the user often stumbles upon the WinSxS folder, it is located in the directory. The size of such a folder can reach several tens of gigabytes.
In this regard, most users ask the question "Is it possible to clear the entire WinSxS folder from a computer (laptop), and also how is it possible to do this?"
You will receive information about winsxs and how to clean it up.
What is WinSxS folder?

There is a specific path to find this folder: C: \ Windows \ winsxs ... This file contains backup copies of various updates.
If they were not installed in the OS, they are still stored in the winsxs folder and take up HDD space.
When Windows is updated, outdated copies also end up in the winsxs folder. After some time, their number increases, as a result of which the folder begins to weigh more.
The volume of such a folder can reach several gigs.
Of course, for hard drives that are now, this amount of free space does not play a special role, but still it will not be superfluous.

In order to determine the weight of winsxs, you need to do the following:
But! This method will not allow the user to know the size of the folder in fact, but it will be possible to find out how much free space is available.
Another important point in how to clear the winsxs folder is that you do not need to solve this problem with the help of special ones that clear this folder.
As a result, the user will have only standard tools with which it is possible to clear the folder in Windows.
Important!!!
Windows takes up system disk space and how to clear winsxs folder in windows. The page file is pagefile.sys. In the event that the RAM is large, the size of this file can be adjusted (changed) manually.
On the menu Disk Cleanup there is a point "Cleaning in hibernation mode"... In the event that this mode is not used by you, you can proceed to cleaning.
If the laptop is constantly in sleep mode, then after cleaning the file, enter in the command line:
Powerrofg –h on && shutdown.
The user's personal folder (for example, my documents or desktop) can be moved to another location both through the property of the desired folder, and through group policies, how to clear the winsxs folder in Windows 7.
Why is the WinSxS folder constantly growing?
Many inexperienced users mistakenly believe that the WinSxS folder is a large disk space after the OS is installed.
Please note that there are files that are in fact located in completely different places.
Their volume is taken into account only due to the fact that Explorer has hard links.
Every user needs to know!
You should not enable the hidden files display mode before you are going to manually delete the entire contents of the folder.
After the hidden ones are removed, the computer will be a little slow and intermittent failures are possible.
Below are several options for cleaning winsxs on different Windows OS. They will be discussed below in more detail so that readers receive comprehensive answers to their questions.
Vista cleanup
Any changes can be reverted back to the position they were before.
If the user wants to rollback everything back to 6.0.6001 (including the initial build), Vista Service Pack 2 must be installed.
To ensure that updates cannot be returned, 2 system utilities are used:
- Vsp1cln.exe- for garbage collection after installation;
- Compcln.exe- to perform similar actions with SP
This system allows you to create on demand restore points during the installation of necessary and important or drivers.
This function can be installed both on demand and on schedule. This recovery consumes 15% of the disk space.
You can disconnect such a disk using the function Disk Cleanup... Moreover, on the tab "Additionally" keep the last restore point to save space.
Cleaning in Windows 7
Cleaning up the WinSxS folder is a complex process. You must follow the prompts on your PC. In addition to manual cleaning of WinSxS, unnecessary files can be deleted "Task Scheduler" in Windows OS.
Click on "Create task" in the Planner. After specifying the task name, click "Further".
Then select the frequency of the task launch and follow the prompts. After all the operations performed, restart your computer.

Need to empty the WinSxS folder in Windows 7? You must download and then install the KB2852386 update. You will see the required line in the utility.
For this operation, you must click "Start" and introduce "Update centre" to the search bar.
You need to choose "Search for updates" , it will be in the left menu.
There you will need to choose "Optional Updates" at the end of the scan.
In the proposed list, you need to find KB2852386, then install it and then restart your computer ().
After the above steps, be sure to type in the search engine Disk Cleanup.
Of the proposed options, mark "Backup files" and press "OK".
Cleaning in Windows 8

There is one additional method for solving our problem - using the "Disk Cleanup" utility, its plus is that no decisions from users are required.
To clean up the folder, you should take some steps:
First you need to press the key combination Win + R and then enter "Cleanmgr" ... Then select the C drive and click "OK". As a result, the free space will be evaluated, after which you must choose the option - "Cleaning up system files".
Check the box "Clean Windows updates" and click OK. It will then start the process of cleaning up Windows updates.
Another utility to clean up Windows updates is the DISM utility.
The advantage of this utility is that with its help the user can also get rid of other garbage from the WinSxS folder.
First, open a command prompt as administrator. This can be done with the keyboard shortcut Win + X.
Please select "Command line".
Dism.exe / Online / Cleanup-Image / AnalyzecomponentStore
It will inform you how much free HDD space you have at your disposal.
If necessary, you can clean up the backups and. Be sure to examine the line "Recommended cleanup of component store" — "Yes".
Run the following command to remove unnecessary files:
After that, the cleaning mode will become active.
Cleanup with a Scheduled Job

Windows will clean up the winsxs folder on a specific and accurate schedule. Do the following: Microsoft → Windows → Servicing → StartComponentCleanup .
Because the cleanup is done by the COM object handler, you will not be shown the specific command.
If there are no triggers, this may indicate that the task is running in automatic mode.
By starting the task contained in the schedulers, the user achieves the same result as from the DISM command with the / StartComponentCleanUp switches.
However, there are some differences:
- Updates installed in the last month will be ignored;
- Due to a pause that lasts for an hour, files may not be completely cleaned up.
After performing cleanup in Windows 8.1, the user can once again analyze the storage to evaluate the changes.
Cleaning in Windows 10

Use a command prompt with administrative rights, it will help clean up the WinSxS folder. To start this process, you need to type:
Dism.exe / Online / Cleanup-Image / StartComponentCleanup

At this point, the function is complete and the folder is considered to be cleaned up.
In order for you to be able to determine how much the folder has become smaller in size, you need to analyze the component store, for this you need to do the following:
Dism.exe / Online / Cleanup-Image / AnalyzeComponentStore
If you really need it, it is possible to reduce the file size even more, because its parameter has an additional ResetBase key, which will help to delete everything old and unnecessary.
To do this, enter:
Dism.exe / Online / Cleanup-Image / StartComponentCleanup / ResetBase
Automatic deletion
In order not to increase the size without your knowledge, you need to configure the function of self-cleaning of data and documents that you do not need.
To configure this feature, you need to use the operating system's task scheduler.
You can find this program using the menu "Start"... After starting the program, check the section "Creating a simple task", which is located on the right side of the window.
Then you should generate the StartComponentCleanUp task. To do this, you need to go to the branch Microsoft → Windows → Servicing ... After that click OK and restart (laptop).
Dism.exe
Serving system Dism.exe means the system is a command-line program, which is also an assistant in configuring and removing the components of Windows and. The Clean up image option is most commonly used by advanced users
You need to set the StartComponentCleanUp parameter in the Dism.exe program... Please note that previous versions of such components will be quickly erased.
There will be no time limit here.
From a command prompt with administrative rights, enter
Dism.exe / online / Cleanup-Image / StartComponentCleanup
We hope that the above information in this article will help you clean up the winsxs folder on your computer yourself, clean up the free space on your computer and yours will work properly.
Follow the tips above!
| Operating system | WinSXS Cleanup Run Command |
|---|---|
| Windows Vista Windows Server 2008 Service Pack 1 | VSP1CLN.EXE |
| Windows Vista Windows Server 2008 Service Pack 2 | Compcln.exe |
| Windows 7 Windows Server 2008 R2 Service Pack 1 | DISM / online / Cleanup-Image / SpSuperseded |
| Windows 8 Windows10 | Dism.exe / Online / Cleanup-Image / StartComponentCleanup |
The problem of free space on the hard disk of the computer, and what is this folder winsxs- the questions are topical and topical, and this is despite the fact that the volume of today's hard drives is already measured in terabytes. Gradually and imperceptibly, day by day, the hard drive is filled with many different files, until it turns out to be crammed to capacity.
Comparing Windows folder sizes
Chaotic searches for the most expensive files and directories often lead the user to the winsxs folder, which is located in the main directory of the Windows 7 operating system. When I measured the size of this winsxs folder on my hard drive, it turned out that it takes about six gigabytes! Of course, the first step is to remove winsxs along with its content in order to simply and effectively get rid of such a "load". But this just should not be done, since such a step can lead to very sad and unpredictable consequences. How, and with the help of what methods, you can reduce the size of the winsxs folder, I will tell you in the material below.

This winsxs folder is located in the Windows operating system share, usually at C: \ Windows \ winsxs, and it is designed to store previously installed Windows system components.
- In fact, this is a special kind of storage that contains all the necessary information about the system, from the system keys to the necessary installation files.
- Thanks to the winsxs folder, it is always possible to rollback to the previous version of the system files, which was relevant before the update.
- Every time during the next update of the operating system, old versions of files and data about changes are written to this directory so that the user can always return to the previous version if something goes wrong.
- Accordingly, the more updates are installed and the longer the operating system has been used, the larger the size of the folder in question.
I also note that the actual size of the winsxs directory can be smaller than the explorer and file managers show us, due to the use of the so-called. "Hard links". The real size of this directory can be viewed by typing in the command line with administrator rights (relevant for Windows 8 and higher):
Dism.exe / Online / Cleanup-Image / AnalyzeComponentStore
I think we figured out what winsxs is and what its purpose is, now let's talk about shrinking the folder and clearing the contents.
What happens if you uninstall winsxs?
If you uninstall winsxs, Windows will simply stop working, and you will most likely have to rearrange it or try to recover previously deleted files. And even if the OS starts up, it still won't work fully. Therefore, you need to try to avoid such a development of events by using other, more effective methods.
Reducing the size of the winsxs folder
There are several options for reducing the size of the winsxs folder, I will focus on the most common and effective ones.
Cleaning up winsxs using the Disk Cleanup utility

To use the capabilities of this utility, you need to click on "My Computer", and in the window that opens, hovering over the system drive "C", press the right mouse button by selecting "Properties". In the window that appears, click on "Disk Cleanup", and in the next window, click on "Clean up system files", and then confirm the start of the procedure. The system will analyze the removal of unnecessary system files, and then delete them. After uninstalling, you will need to restart your computer.

Another option for clearing the winsxs folder is to use the utility cleanmgr.exe... Run the command line as administrator, and there type cleanmgr, select the system drive and click "Ok". You can also run this utility through "Start" - "Run", or use any popular file manager, in the line of which you need to type cleanmgr. In the menu that appears, you will need to select "Clean up system files", confirm the operation, and then restart your computer.
How it looks visually can be seen in this video:
Such procedures are quite simple, and can free up several gigabytes of previously occupied space in the winsxs directory for the user. Note that old versions of files will be deleted, except for the penultimate ones.

We use dism.exe
This program is designed to work with file images, unpack and run them. In this case, you just need to type the following on the command line:
Dism.exe / Online / Cleanup-Image / StartComponentCleanup
and wait for the program to perform the necessary operations. After completing them, restart your computer.
Conclusion
After I found out that this winsxs folder is necessary, and its contents are valuable, no more thoughts about deleting winsxs arise. The presented methods allow you to easily and conveniently reduce the size of your winsxs folder, freeing up to several gigabytes of free space on your hard drive. It is important to remember that the size of the folder in question grows over time, so it is necessary to systematically reduce its size using the tools provided in this article.
At the same time, it is also important to observe regular "hygiene of the hard drive", to prevent chaotic filling, to regularly clean and delete unnecessary and unused files, thereby increasing the amount of free space for your primary tasks. Good luck.
In contact with
Many are faced with the problem of lack of free hard disk space. Especially often the disk on which the operating system itself is installed becomes clogged. This is due to the fact that there are a lot of folders on it, which the system itself fills with the information it needs. This problem is also relevant for Windows 7. You can clean up system folders from unnecessary garbage either manually or using special programs.
Windows 7 system folders: the need to clean up and the possible consequences
Each of the system folders has its own purpose and stores information of a certain kind. Before clearing the disk, carefully read what function this or that folder is responsible for, otherwise you may lose important data or severely harm the operating system, which will lead to its breakdown:
Video: what files can be deleted on the system drive
What not to do when cleaning up system folders
Please read the specifics of the above folders carefully. Before clearing one of them, consider if its contents will be useful to you in the future. Some folders, like Windows or System32, shouldn't be touched at all. And don't try to clean up folders by simply deleting their contents. This will lead to the fact that the remnants of them will remain in the computer's memory, which in the future will begin to litter and overload the system. There are only a few folders that you can clean up manually:
Do not under any circumstances delete the folders themselves, this will lead to critical errors in the operation of the system, you only need to erase their contents. Also, before clearing system folders, make sure you can free up memory by other methods, for example, by uninstalling third-party applications and games.
Methods for cleaning up Windows 7 system folders
If you nevertheless decide to clear your hard drive of accumulated third-party files, then the easiest way is to use the built-in Windows functions. There are two initial options - standard and advanced cleaning.
Standard cleaning
Using the standard cleanup method, you will get rid of the following files and folders:
To perform a standard hard disk cleanup, follow these steps:
 Opening the properties of the system disk
 Go to the "General" section
 Select the files you want to delete
 Click the "Clear" button in the "System Restore and Shadow Copy" section
Extended cleaning
Using the advanced cleaning option, you will delete the following folders and files:
To perform Advanced Disk Cleanup, follow these steps:
 Run "Command Line" as administrator
 We register the cleanmgr command
 Select the disk on which to perform cleaning
 Selecting the files to be deleted
Video: how to clean a disk using Windows
Disk cleanup using third-party programs
Before proceeding with manual cleaning of each folder separately, you should use special third-party programs created to automatically search for and clean the disk from unnecessary files:
 Download the CCleaner app
 Go to the "Cleaning" section
 Selecting the sections to clear
 Press the button "Analysis"
 Before deleting files, you can view their details
Video: Deleting System Files Using CCleaner
Features of cleaning individual system folders
If the previous cleaning methods did not solve your problem or you need to clean one of the folders selectively, then find it in the sections below and follow the instructions.
But many folders are hidden by default so that the user doesn't accidentally damage them. To display hidden folders in the general list, do the following:
 Opening the explorer
 Expand the "Service" menu
 Go to the section "Folder options"
 Go to the "View" section
 Changing the parameters of hidden folders
Winsxs
Cleaning the Winsxs folder on Windows 7 is done through a standard disk cleanup. This method has already been described above. Before starting the cleanup, you are presented with a list of files that you can delete. Check the section "Files of the backup copy of the update package" in it.
 We mark the "Files of the backup copy of the update package"
Video: how to empty the Winsxs folder in Windows 7
System Volume Information
To clear the System Volume Information folder, you must first access it:
 Open the properties of the System Volume Information folder
 Go to the "Security" tab
 Press the button "Change"
 Click the "Add" button
 We register the username
 We give full access to the folder
 Go to computer properties
 Go to the "System Protection" section
 Press the button "Configure"
We successively press the buttons "Apply", OK.
DriversStore
To remove outdated drivers from the DriversStore, follow these steps:
 Opening the command line
 We register the command pnputil.exe –e
 We register and execute the command
Installer
The Installer folder may contain files necessary for the system or programs, but there is a special third-party application PatchCleaner that will automatically determine what can be removed from the content:
 PatchCleaner searches for obsolete update files and allows you to move them to another media or completely remove them
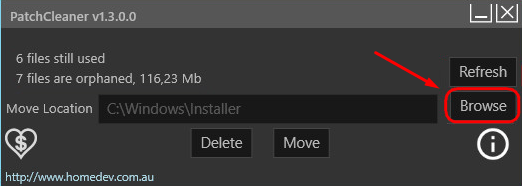 Click the Browse button
 Specify the path to the Installer folder
 Press the Delete button
 We confirm the action by clicking on the Yes button
Pagefile.sys
If you are sure that the computer can handle the required tasks without the Pagefile.sys paging file, you can remove it by following these steps:
 Go to the section "Additional system parameters"
 Press the button "Options"
 Click the "Change" button in the "Advanced" tab
 Setting the required parameters
 Restart your computer
Folders with history, cache and browser cookies
Browser files can take up a lot of disk space. The easiest and safest way to remove them is through the settings of the browser itself:  We mark the files. which need to be removed from the browser history
 We set the parameter "For all time" and clear the history
Disk cleanup problems
If, after you have deleted any files from the system folder, errors appear or the computer starts to slow down, there is only one thing to do - perform a system restore. This could happen if the disk was not cleaned correctly or the necessary files were deleted. System recovery is only possible if the computer has restore points:
 We start the computer in safe mode
 Open the "System Restore" application
 Press the button "Next"
 Choosing a restore point
Video: Windows 7 Recovery
What to do if there is no "Clean up system files" button
If, when trying to free up disk space through the standard cleaning method, you encounter the absence of the "Clean up system files" button, this means that you have disabled UAC (User Account Control), and the program starts immediately with the ability to clean up system files. That is, pressing the "Clear system files" button gives you administrator rights and, along with them, the ability to edit and clear system folders. But if UAC is disabled, then you have access to changing system files immediately and you do not need to press any additional buttons.
 If the button "Clean up system files" is missing, User Account Control is disabled
If you want to clean up disk space or are sure that a part of the virus has survived in the system files, then the operating system itself has a standard and extended disk cleanup function for this case. You can also use third-party programs or clear each folder separately. But do not delete everything, otherwise it will lead to a breakdown of the computer, and the only way out is to roll back the system to the last restore point.