In the process of working in Photoshop, you constantly need to move objects along. For these purposes, it is used tool Move. In this article, you'll learn everything you can do with Move and what other useful features it has.
There are two possible scenarios in this action:
1. Just move the fragment. In this case, the tool will work as a command Cut out, that is, after moving, a void will remain in this place.
Example
Let's say you want to select a word in an image (which is part of the image) and move it somewhere else:

Let me remind you that to create such a selection, as a rule, use .
2. Move the contents of the selected area, automatically creating a copy of it. To do this, you need to hold down the Alt key on the keyboard while moving.
Example
The same case when you need to move the text, but the task is to automatically create a copy of it:

When moving the contents of a layer or selection, make sure that the correct layer is selected in the layers palette. If this is the content of the selected area, then first select the layer that contains this fragment.
If you have selected an empty layer, or the selected selection does not include a single pixel, then Photoshop will show you .
If you need a fragment that was created by overlaying two or more layers, then first these ones to get one layer, to which you will apply the movement of the selected area fragment.
3. Move objects from one tab to another
In Photoshop, there are many ways to add an image to an image. One such way is to use the Move tool.
To do this, you need to place tabs with pictures () on the workspace so that you can see them all. Then take the tool, hold down the contents of one tab with the left mouse button and, without releasing the mouse button, move to another tab.
Example

4. Align objects to the center and edges
The options panel contains commands that allow you to automatically align objects with respect to the entire image or its individual fragment.

On the options bar, most of the functionality is taken away by the alignment buttons. But besides them there are other settings.
Autoselect
Checking this box will change how you select an object to move. If in the normal mode (without a checkmark) you first need to select a layer on the palette, and then move it, then with the activated mode Autoselect, Photoshop will move the layer you hover over in the image itself.
This is useful when the image has many layers with small details that have to be constantly moved. Moving the hand to the layers palette and back, and still need to find the thumbnail of the desired layer, takes a lot of time. This mode will significantly speed up the performance. The main thing is to clearly understand what objects are on separate layers and clearly aim with the mouse pointer to their pixels.
Here I would also add another similar tool option for selecting layers to move - right click on the image brings up the layers menu. That is, this menu shows the names of all layers that have their pixels at this point, and the top one in the list will be the one whose pixels are above the rest.

Show controls
If you check this option, then all objects that you select for moving will be displayed immediately with a frame with markers. With its help, you can immediately change the size of objects, their angle of inclination and call .
Noticed an error in the text - select it and press Ctrl + Enter . Thank you!
The layer in Photoshop is a key element in building an image. Today we will talk in detail about what layers are, why they are needed, and what you can do with them, as well as get acquainted with the move tool and auxiliary elements.
Introduction
We are quite sure that for many of you, after reading this tutorial, Photoshop will open up from a different, more professional side. Today you will find out what underlies what makes it possible to build such diverse images of varying complexity in this editor, as well as how even inexperienced users can create their own masterpieces at the initial stage without fear of spoiling anything.
Of course, you already understood that most of this material we will talk about layers and operations on them, but we hasten to reassure those who think that this is not enough for one lesson. There will be a lot of information, since in parallel we will learn how to create geometric shapes using the selection tools and copy image fragments to layers, as well as get acquainted with the color palette, the move tool and many other interesting things.
Layers are probably the main component on which in Adobe Photoshop based on image manipulation. To understand what it is, imagine a stack of absolutely transparent sheets, each of which contains some kind of image. If you look at them from above, then visually all the images will merge into a single picture, since through the transparent areas of the upper sheets, you can see the contents of the lower ones.
Same thing with layers. Each layer in Photoshop, it is a virtual transparent sheet on which any graphic object can be placed. You can create as many layers as you need, and most importantly, they will all form the final image in an overlay manner. Thus, with the help of layers, an image can be created in fragments, which can be worked on separately. This approach provides users with very wide opportunities for creating and editing graphic documents.
To manage layers and work with them in the editor, use the panel, which is located at the bottom of the right column by default. Here you can see all the layers that make up the document, as well as enable, disable the display of layers and arrange them. If for some reason the panel is closed for you, then open it by selecting the option in the main menu Window, and then item .
First, let's create new document using menu commands File - Create or using the keyboard shortcut "Ctrl + N". When you open or create a new image in the editor, it consists of one layer. You can verify this by looking at the "Layers" palette, where immediately after the creation of the document there will be one single layer with the name "Background".
The background in Photoshop is the bottommost opaque layer, the order, blend mode, and opacity of which cannot be changed. So pho new layer is, as it were, a substrate of the image, on the editing of which a number of restrictions are imposed.
Any image can have only one background. At the same time, all images that you, for example, shot with a camera or scanned, will have one single background layer when opened in Photoshop. Try opening any photo in the editor and see for yourself.
Now let's create a new layer. To do this, the program has several options. As always, this can be done using the main menu. Select option , then item New and then the command Layer.

Second and more convenient way, is the use of the button Create a new layer, which is located at the bottom of the Layers panel and has a leaf icon with a curled corner.
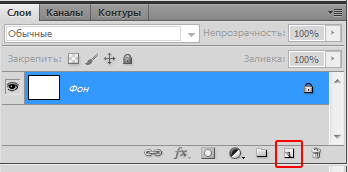
You can also use the button to call the main menu of the "Layers" panel, which is located in the upper right corner of the palette and contains the command .

Finally, you can use the keyboard shortcut "Shift + Ctrl + N".
It is worth noting that when creating a layer in the first and last two ways, an additional window will appear in front of you, in which you can set an arbitrary name for the layer and select a number of parameters. However, all this can be done later, and we will not dwell on these parameters in detail for now. The main thing here is to press the OK button.

Immediately after performing the soybean operation, a new layer will appear in the "Layers" palette, which will automatically be named "Layer 1".

At the same time, you will not notice any visual changes on the sheet with the image itself. It will remain just as clean and white because our new layer is completely transparent. That is why the thumbnail of "Layer 1" in the "Layers" palette is painted over with a checkerboard pattern.
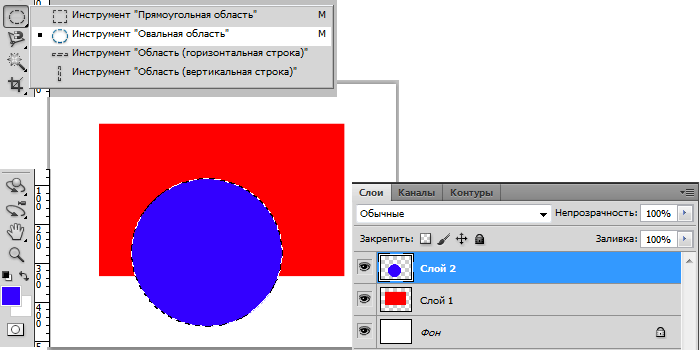
Now let's create a simple geometric object on our new layer. Select the tool "Rectangular area" (M) on the panel on the left and select an arbitrary area on the sheet with it.

As we remember, our layer is transparent, so in order to get a visually visible figure, let's paint over the selected area with some color, and at the same time get acquainted with one of the ways to choose a working color in Photoshop.
Before filling, we need to make sure that any option other than white is set as the main color (otherwise we will not see anything on a white background). To do this, look at the second icon from the bottom on the toolbar, which is made in the form of two intersecting squares. The top one is the current foreground (working) color, and the bottom one is the current background color. Thus, in our case, the top square should be colored in a different color than the bottom square. If this is not the case or you just want to change the main color, then click on the upper square and in the window that opens Color palette (Main color) choose any suitable color (in our example, red is selected). If necessary, you can also change the background color by clicking on the bottom square, but in our case we will not do this.

After you figured out the fill color, in the main menu, select items Editing, and then Fill or immediately use the key combination "Shift + F5".

After filling, we need to remove the selection. The best way to do this is to use the Ctrl+D keys. We strongly recommend that you remember this combination, because while working in Photoshop, this action has to be performed very often.
As a result, we should get a colored rectangle on the sheet. This will also change the Layers panel. Note that a rectangle has appeared in the "Layer 1" thumbnail, which indicates that this layer is no longer empty and contains the shape we have drawn.

Now let's create another layer according to the already familiar algorithm, but instead of a rectangle, draw an oval on it and paint it with a different color. Click on the leaf icon to create a new layer. Change the tool "Rectangular area" to "Oval area" (right mouse button), as well as the fill color (in our case, we chose blue). Next, select an oval or round area (while holding the "Shift" key) and fill it.
In general, you can create as many additional layers as you need. True, their number may limit the amount of software installed on the computer. random access memory. If there is not enough RAM, then with a large number of layers, the PC will start to "slow down" a lot, and the application will crash.
Basic operations with layers
Moving layers
Now you can see that in our image, the blue circle is placed above the red rectangle, and both shapes are placed on a white background. Now let's look at the list of layers: at the top is "Layer 2" with a blue circle, in the middle is "Layer 1" with a red square, and the bottom layer is "Background". Let's try changing this sequence. Move the mouse cursor over "Layer 2", and then, holding down the left mouse button, move it down to the border between the "Layer 1" and "Background" layers. When you release the button, you will see that "Layer 1" and "Layer 2" will switch places.

Let's pay attention to the image - there have also been changes in it. Due to the fact that "Layer 1" is now the top one, the drawing on top is now a red square, and not a blue circle, as it was before. Thus, it is clear that the layers higher in the list are superimposed on the lower ones. Be sure to take this into account when forming the image.
Changing the transparency of layers
In the current layer layout, we can see that the area of the blue circle that is overlapped by the red square is completely invisible. But Photoshop has a wonderful feature that allows you to change this state of affairs by changing the opacity of the layers. Let's see how it works.
The layer opacity control tool is located in the Layers panel and is located in the upper right part of it. By default, the opacity value is 100%, which means that all images on the layer are completely opaque and will completely cover the bottom areas. Switch to "Layer 1", click on the arrow next to the opacity value and change it to 50% using the slider. Also, the value can be set manually directly from the keyboard.
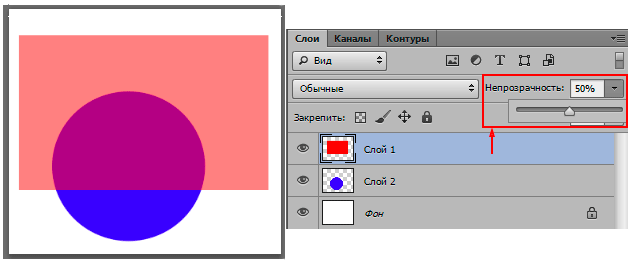
Now, after changing the transparency of the layer, the part of the circle that is overlapped by the rectangle is visible. It looks like we put a red piece of glass on the blue circle. Controlling the opacity of layers is a very important and useful feature with which Photoshop creates a huge number of effects.
Surely many have noticed that under the parameter Opacity a parameter is placed, with similar controls, but only under the name fill. In fact, these two tools are very similar in their purpose, and are responsible for changing the transparency of the layer, but with a slight difference. Application fills has no effect on the effects applied to the layer (layer styles). True, we will talk about them in another material, but for now, at this stage, these two parameters will be completely identical in their effect for you.
If there are no problems with changing the transparency of ordinary layers, then, as mentioned above, such a trick will not work with the background layer due to a number of restrictions imposed on it. Well, what if it is necessary? For example, the background layer may be some photo with which you would like to perform all the same actions as with a normal layer.
In order to convert the background layer to normal, double-click on it with the left mouse button in the "Layers" palette. A window will open in front of you, as in the case of creating a new layer, where you just need to click the OK button. You can also create a layer from the background using the context menu. Right click on the "Background" layer and choose command Background from background.
Enabling, disabling and deleting layers
Of course, while working in Photoshop, you have to not only create layers all the time, but also delete them. To delete an unnecessary layer, just select it and click on the button with the trash can icon, which is located at the bottom of the Layers panel, or simply drag the layer line there. It's even easier to delete a layer by pressing the "Del" key.
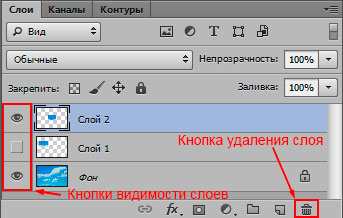
Also, you can not delete, but turn off unnecessary or temporarily unused layers. To do this, each layer on the left has a button with the image of an eye, which indicates the visibility of the layer. If there is an icon with an eye, then the layer is visible; if it is not there, then the layer is disabled. Layers are enabled/disabled by a simple mouse click on this button.
Renaming and grouping layers
As you have already noticed, each created layer is assigned a typical name "Layer" with a serial number. It is not uncommon for the total number of layers in a document to number in the tens. In such a situation, even despite the thumbnails, it becomes difficult to remember exactly what each of the layers contains, which in turn leads to confusion during work. But this can be avoided if you immediately give meaningful names to the layers.

To rename a layer, hover over its name and double-click on it. Then, in the active field, type in a new name and press "Enter".
In continuation of the conversation about the organization of layers, one cannot fail to say that they can be combined into thematic groups (folders). Believe me, this greatly facilitates navigation in large projects and allows you to perform certain actions immediately with a whole group of layers.
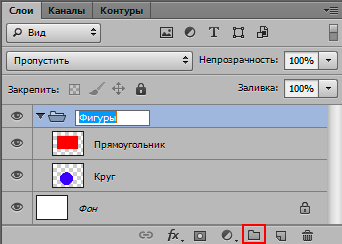
To create a group at the bottom of the Layers panel, there is a special button with a folder icon. After clicking on it, a folder is created in the list of layers, which is automatically named "Group" with the current serial number. As in the case of layers, to improve the information content, it can be renamed in exactly the same way.
Immediately after creation, the group folder is empty and you must manually move all the necessary layers into it. This is done by simply dragging the layer into the folder with the mouse. You can also select several layers at once (using the "Ctrl" or "Shift" keys) and move them all to the required group in one operation.
In our example, we created a group called "Shapes" and placed two layers there - "Rectangle" and "Circle". Visually, we can see this by the fact that the thumbnails of the layers in the same group are slightly shifted to the right, while the thumbnail of the background layer is located directly at the left edge of the list. By the way, there is a triangle next to the folder, by clicking on which you can collapse or expand the group, thereby optimizing the workspace in the Layers panel.
If you need to display some layer and groups, then drag it with the mouse to the area above the folder. If you need to completely disband the group, then this can be done using the context menu and the command Ungroup layers.
Move tool. Copying images and their fragments to layers.
Before we continue talking about layers, let's take a short digression and get acquainted with a new tool that you will have to use very often. While working in Photoshop, it often becomes necessary to move various graphic objects within a composition in order to find the most appropriate location for them. For this purpose, the program has special tool with a telling name "Moving"(shortcut "V"), located at the very top of the toolbar.

This tool works very simply: move the cursor over the desired object, hold down the left mouse button and, without releasing it, move the cursor along with the object to the desired point in the document. Release the paddle key to complete the action. In this case, both an independent graphic fragment and any selected area can act as an object.
In addition to the usual movement of selected fragments around the sheet, this tool can be used for other useful purposes, for example, copying objects from one file to another.
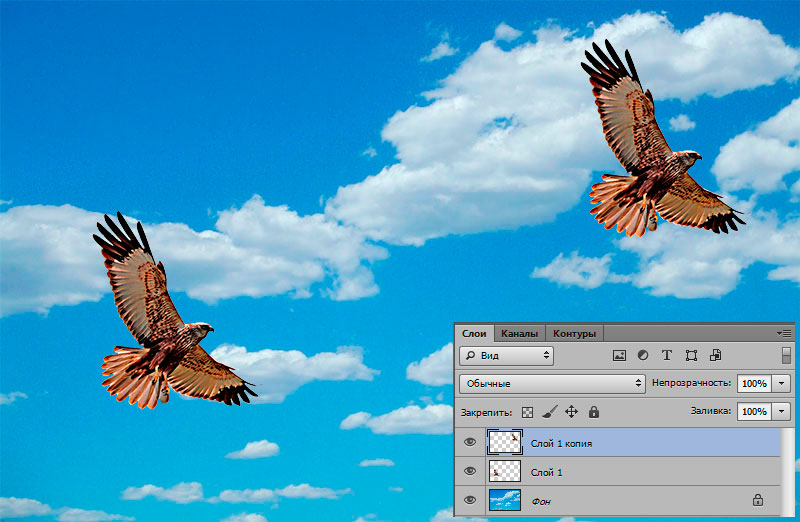
In order to visually demonstrate how this works, we downloaded two files with a sky and a bird on a transparent background (PNG format) from the Internet, and then both opened them in Photoshop in two windows vertically located next to each other.

Now let's activate the tool. "Moving", move the mouse cursor over the bird, hold down the left key, and, without releasing it, drag the cursor over the image of the sky. After you release the button, the image of a bird will appear against the sky. At the same time, note that in a document with a sky image, after copying a new object there, a new layer will automatically be created. Thanks to this, you can freely move the bird to any point. background image with the same tool "Moving".
In order to copy an object in the standard single-window mode, when the active file occupies the entire workspace, you need to open two images, capture the desired object in one of them, as we did above, and move the cursor up to the tab with the name of the required file.

When the cursor is on the tab, Photoshop will automatically switch to the specified file. To complete the operation, move the cursor to the desired point in the opened image and release the left mouse button.
You can also use the clipboard to copy objects to separate layers. Wherein this way can be considered the most versatile, convenient and widespread. To place any graphic fragment or the entire image on the clipboard, you need to select it in any way known to you, and then select the command Copy from menu option Editing or just use the keyboard shortcut "Ctrl + C". To place an object on a new layer from the clipboard, use the command Editing - Paste or the Ctrl+V keys.
In our example, to copy the bird to the sky background, do the following. Choosing a tool "Rectangular area" and we allocate them. It is clear that the object must completely fall into the selected area. Next, press the keys "Ctrl + C", then go to the file with the image of the sky and use the keyboard shortcut "Ctrl + V". Right after that, the selected graphic object will be placed in the document on a new layer and automatically centered on the canvas.
It is noteworthy that to paste a fragment from the clipboard, in addition to the classic command Insert you can use other options located in the option from the menu Editing.

- Insert instead of (Shift +ctrl +v)- copies the object to the same relative area of the image from which it was copied. For example, if the fragment was in the upper left corner of the source image, then it will be placed in the upper left corner of the target document.
- Paste in (Alt +Shift +ctrl +v)- allows you to insert an object into a user-selected area of the image.
- Insert outside- allows you to copy an object from the clipboard outside the user-selected area of the image.
Sometimes when working with an image, it becomes necessary to place some part of it on a separate layer.

In order to carry out this operation, it is necessary to select the desired section of the images, right-click on the selected area and select the command in the context menu that opens. Copy to new layer. Immediately after that, a new layer with the selected object will be created in the document, but it will also remain in the original image. That is, in fact, a duplicate of the selected fragment will be created on its own layer, with which you can work without fear of spoiling the main image.
If there is no need to leave the selected fragment on the original image, then you can select the command Cut to new layer. Then the selected object will be removed from the original layer and moved to a separate layer.
Sometimes during work you may need to create an exact copy of an already existing layer, for example, to place several identical objects in an image. To quickly create a duplicate layer, select the tool "Moving", move the cursor over the image contained on the layer, and then, holding down the "Alt" key and the left mouse button, drag it a little to the side. In this case, the name of the newly formed layer will contain the word "copy".

You can also create a copy of a layer using the Layers panel. To do this, drag the layer line to the blank sheet icon or call the context menu by right-clicking on the layer line and select the command Duplicate Layer. By the way, the layer's context menu contains a number of other useful commands that you often have to deal with. So we advise you not to forget about this tool if you want to learn how to work in the program most efficiently.
Selection of layers. Rulers, guides, and grid
It's time to go back to our example where we copied the bird into the sky. Let's try to create a duplicate of the bird layer in any way described above, and then place the resulting copy and original in different corners of the image using the tool we already know "Moving".
When you work with several layers, you need to be careful and constantly make sure that you currently have the active layer that you are going to work with. Otherwise, you run the risk of accidentally starting editing an unplanned fragment of the image, and it is quite likely that you will spoil the work already done.
Thus, in order to move a certain object to the desired point, we need to make sure that the layer on which it is placed is active at that moment. In our example, we have only three layers, and therefore they can be selected directly in the Layers panel. But in other situations, when the image consists of many layers, sometimes finding and choosing the right layer from an impressive list is not so easy. In this case, it is much more convenient to select a layer by clicking on the image itself while holding down the "Ctrl" key.
You can also activate a special tool that allows you to select layers by clicking on the image without pressing the "Ctrl" button. It is enabled/disabled on the property panel of the Move tool (located immediately below the main menu).
So, we randomly placed our birds in different parts of the background, without really thinking about their location. But in some cases, you may need to position elements at exactly certain points in the image.
For precise positioning of objects, Photoshop has a number of useful tools. First of all, these are rulers that can be placed on the left and on top of the working area of the document. They are disabled by default. They are enabled/disabled in the main menu option. View using the command Rulers or by pressing Ctrl+R. Ruler units can be pixels, inches, centimeters, millimeters, points, picas, and percentages. The easiest way to select them is to use context menu, invoked by right-clicking on the ruler bar.

The second important tool for precise positioning is guide lines. To place them in the figure, you can also use the menu View by selecting the command there New guide, but there is a more interesting way. To place a guide on the canvas, just move the mouse cursor over the ruler and, holding the left button of the manipulator, drag it onto the image.
In the future, you can edit the position of the guides. To do this, move the mouse cursor with the tool turned on. "Moving" to the line (the cursor should change and take the form of multidirectional arrows), hold down the left button and drag the guide in the desired direction. If you drag the guide back onto the ruler, it will be removed.
For practice, let's imagine that we need to place our birds 2 centimeters from the edges of the corners in which they are located. Turn on the rulers and increase the scale of the image so that their scale becomes large enough. We “pull out” two guides from the top and side rulers and position them 2 cm from the edges of the image, guided by the scale of the rulers.

Now we are left with the tool "Moving" move the birds so that their plumage does not go beyond the guides. It should be noted that for more precise positioning of objects, you can use not only the mouse, but also the arrow keys on the keyboard.
In Photoshop, there is another way to accurately place objects relative to guides, which is called - binding. It works like this: you bring the object close to the guides, after which it automatically “sticks” to the auxiliary elements, as it were. To enable/disable this function, you need to open the menu View, and check/uncheck commands Binding(keyboard shortcuts "Shift + Ctrl + ;") or Snap to.

In the first case, automatic snapping is enabled for all possible elements, and in the second case, you can select specific elements, such as guides, grid lines, layers, nesting fragments, and document borders.
In conclusion, I would like to note one more useful auxiliary element for positioning image fragments, which is called Grid. To turn on the grid, go to the menu View, then select Show and then the option grid or use the "Ctrl + '" keys. Using the grid is useful in cases where you need to accurately place many different graphic objects on the canvas, since it is very long and inconvenient to pull out guides on each of them. For example, enabling a grid can be very useful when designing a website that contains many rectangular block elements.

As with guides, you can also enable object snapping to the grid. True, constantly working in this mode is not always convenient, since all independent fragments of the image will begin to “stick” to the grid, which is not always necessary and can greatly interfere. So after placing all the necessary elements on the grid, it is more expedient to turn off the binding to it, and the grid itself.
To turn off any specific auxiliary elements, be it a grid or guides, use the checkboxes on the necessary items in the menu View - Show.

If at some point in your work you want to disable / enable all auxiliary elements at once, you can do this by clicking on the item Auxiliary elements or use the keyboard shortcut "Ctrl + H".
Conclusion
With a certain degree of confidence, we can say that today we have considered one of the most important topics that underlie the work in all of Photoshop. As you probably already guessed, we are talking about layers and the principles of building images using them. Understanding this issue is really very important and critical for the successful development of this editor.
The beauty of working with layers is that objects placed on separate layers of their own can be edited and moved independently of each other. This allows users to both create images from individual fragments, and work with individual fragments of the image, without fear of spoiling the entire composition as a whole. This principle of creating graphic documents creates almost ideal creative conditions for both professionals and beginners.
Good afternoon, dear visitors of my blog. I'm glad you visited my blog. And today there will be another lesson in Photoshop. Finally, we will begin to study. This is oh so important. Let's start with what we can't do without. The move tool in Photoshop will help us move any objects, thereby facilitating various tasks for us.
Why do we need this tool?
- To drag objects
- To move selections in a given image or to another image in general
In general, what am I listing everything for you here? Let me show you how it works.
When the desired area is surrounded by a dotted line, then stand on the tool "Move", then move the mouse over the selected area and hold down the left mouse button. And now, without releasing your finger from the mouse button, start moving it around and you will see that the selected fragment is also moving. This way you can move it anywhere.

If you want to transfer this selected area to another image, then for starters. Now go back to your document with the selected area, or select another area. It turns out? Excellent. And now a deep breath ... again we hold down our selection with the left mouse button and bring it to the tab of the new document, but do not release the mouse.

When our new document is revealed to us, you can go down on it and release the button or move it to the right place. That's all. As you can see, nothing complicated.

In addition, we need movement when we work with layers, i.e. when we have one picture superimposed on another. And then we can move each picture separately.
For example, the picture shows a frog sitting on a leaf of a water lily. In fact, there are two images here - a separate frog and a separate water lily. It turns out that the layer with the frog is superimposed on the layer with the water lily. In general, we will talk about layers in more detail in the following lessons, so don’t go into too much, but try to catch the essence.

So, as you can see, this green princess is sitting on the bottom jug. But she says: “I don’t want to sit on the bottom, I want to go up!”. Yes, no problem Kvakushechka. Then I take the move tool again, and holding the left mouse button on the frog, I drag it to the top sheet. Just like that, our princess simply jumped from one leaf to another and now she is waiting for the prince there.

Well, how? Is the essence of the movement tool clear? I'm sure yes. But don't worry if you have any questions, because this lesson is just an introduction to this tool. You will still fill your hand in the following lessons, since we will use the movement all the time. Well, in general, if you have any questions or additions, then ask. Do not be shy.
In general, I would like to recommend you excellent video course on learning adobe photoshop. The course is simply excellent, everything is from scratch and is told in an understandable language. I always try to find something new and useful, and after watching this course, I even learned some new tricks that I did not know about before, and which made my work easier. In general, if you really want to learn Photoshop from scratch with video tutorials, then you simply won’t find the best. Highly recommend.
Well, that's all I have for today. I hope my drag and drop lesson was useful to you and you understood something for yourself. Do not forget to subscribe to my blog update and then you will be the first to know about the latest news and more. In general, I really look forward to seeing you in my next articles, but for today I say goodbye to you! Bye Bye!
Sincerely, Dmitry Kostin.
You can create different layers on one image, and then work with each layer separately in Photoshop.
Layers can be moved. To do this, choose a tool moving (the top one on the toolbar). Hotkey for this tool V. With this tool selected, select the layer you want to move and move it.
Open in Adobe program Photoshop CS5 any image and write text on it. The text will be placed on a new layer, and you will be able to moving place where you need.
You can also move using the cursor arrows on the computer keyboard. If you just press the arrows, the layer will move one pixel with each press, and if you hold down the key Shift- the layer immediately moves ten pixels.
On the tool options bar moving You will see an option Autoselect. If this option is enabled, then when you click on the image, the layer will automatically become active. which contains the part of the image that was clicked on.
Also in the options panel there is an option Show controls . If you make it active, then when you click on the image around the fragment of the active layer, a frame will appear, moving the borders of which, you can change the size of the fragment. If you move the mouse inside the border, you will move the image, and if you move the mouse outside the border, you will rotate the image. To resize a fragment without violating its proportions, you need to move the frame around the corner. with key pressed Shift .
 You can drag layers from picture to picture, thus creating collages. To do this, place the pictures side by side on the workspace. tool drag and drop
capture one image, and drag to another.
You can drag layers from picture to picture, thus creating collages. To do this, place the pictures side by side on the workspace. tool drag and drop
capture one image, and drag to another.
In addition, layers can be moved in the palette relative to each other. In this case, their mutual arrangement changes, and they will overlap each other in a different way.
Please note: the background is also the background of the image, it cannot be moved or resized. On the layers palette opposite this layer you will see a padlock icon. To be able to change this layer, you need to delete the locked layer. Any layer can be made the background using the menu Layers - New - Convert to Background .
What other types of image fixation are there besides the option of creating a background? In the palette above the list of layers you will see the inscription Pin, and to the right of the inscription are various icons.
The first icon blocks the image by transparent pixels. If you make a layer locked by this setting, any changes to it will only occur where the pixels are opaque.
Open the image in Photoshop transparent background. Or do this: first open an image with a white background, convert it to gif format, and open the converted GIF image. Then choose a tool Magic wand , and select white. Then click Delete. The background will become transparent.
Lock the layer on transparent pixels. And try to brush over the image. The brush will only paint where the pixels are opaque.
The next type of blocking is to preserve the color of the pixels. In this mode, you cannot use the drawing and color tools, but you can move the image. and resize it.
Move Lock allows us to change the color of the pixels, but does not allow us to move the layer or resize it.
Full block completely blocks the layer, and nothing can be done on it.
 Layers can be connected - select several layers, and click on the image of the chain at the bottom of the layers palette. After linking the layers, if you move them, they will move all at once. A chain icon will appear next to the name of each layer. Clicking the icon again will unlink.
You can also move several layers at the same time by simply selecting the ones you need and moving them with the tool moving on the image.
Layers can be placed in groups. Groups are like a folder for layers. Select several layers, then click on the icon in the upper right corner of the palette, and select A new group from layers
. The layers will move into the group, and you can work with them as a single entity. You can expand and close a group by clicking on the triangle to the left of the group name. You can create an empty group using the icon at the bottom of the layers palette, and then drag the desired layers into it. You can also put layers in a group by selecting them and pressing hotkeys ctrl+g. And you can delete a group and pull layers out of it by pressing hot keys Shift+Ctrl+G
.
You can get more detailed information in the sections "All courses" and "Utility", which can be accessed through the top menu of the site. In these sections, the articles are grouped by subject into blocks containing the most detailed (as far as possible) information on various topics.
You can also subscribe to the blog, and learn about all the new articles.
It does not take a lot of time. Just click on the link below:
This chapter of the Photoshop Tutorial is about various methods layout of image elements: clipboard (commands Cut(Cut out), soru(Copy), paste(Paste) and Paste Into(Paste in)), dragging, cloning and using samples. In addition, it talks about methods for accurately positioning and aligning image elements, as well as smoothing the seams between them.
Moving in Photoshop
Here and in the section on dragging and copying, we are talking about moving points in an image. (For information on how to move only the selection box, see Chapter 5, "Moving the Selection Box".)
Moving the contents of a selection in Photoshop
- Optional. To precisely position the selection, select the menu item View > Show > Grid(View > Show > Grid), or press the keyboard shortcut Ctrl+Alt+", or drag the guide line(s) of any of the rulers. Also enable options View > Snap To > Guides(View > Attach To > Guide Lines) and Snap Then > Grid(Attach to > Grid).
- If the selection has a background, select its color. The area that opens when you move the selection will be automatically filled with the background color. If the selected area is located on a layer, then the opened area will become transparent.
- Activate the tool move V ctrl while working with most other tools.
- Position the cursor over the selected area (the cursor will change to scissors), then drag it. The selection frame will be moved along with the contents of the selected area (Fig. 6.1-6.3).
Rice. 6.1. Move a selection on a layer

Rice. 6.2. Opened transparent area

Rice. 6.3. Moving the selected area on the background with filling the opened area with the background color
![]() When you deselect an area, its points will return back to their original layer, to their new location, regardless of which layer is currently active.
When you deselect an area, its points will return back to their original layer, to their new location, regardless of which layer is currently active.
![]() Press any of the arrow keys to move the selection box 1 pixel in the corresponding direction.
Press any of the arrow keys to move the selection box 1 pixel in the corresponding direction.
Moving and copying a selection
- Activate the tool move(Move), or by pressing the key V. Also, this tool can be activated by simply pressing the key ctrl while working with most other tools.
Pressing a key alt, drag the selection you want to copy (release the mouse button first, and then the key). All copied pixels will remain selected (Fig. 6.4, 6.5).