In previous articles, we looked at installing Windows 7 and Windows 8.1, and in this article, we will consider a clean installation of Windows 10 with all the nuances. You can download a comparison of Windows 10 versions at the end of the article or right now in the "Links" section.
1. Is it worth installing Windows 10
Windows 10 has incorporated the best of previous versions of Windows 7 and Windows 8.1. She's pretty pretty, comfortable and fast. But it was not without its drawbacks. The most significant of them are errors that arise in the operation of the system, programs, games and the operating system itself deletes applications that it considers unlicensed, even some free ones.
Nevertheless, if you have a fairly modern computer or laptop, then over time, most likely you will still have to upgrade to Windows 10, since older versions of operating systems are gradually losing support from both the developers of the system itself and the software developers.
Should you rush to update the system for owners of PCs that are rather mediocre by today's standards? Probably not ... Since you will have more problems than the benefits of updating - selection of drivers, glitches in the system and programs, etc. And in performance, you are unlikely to win.
But for owners of licensed versions of Windows 7 and 8.1, it is important not to miss the moment and make a free upgrade to Windows 10, which is available until July 29, 2016. After this date, you will not be able to get the update for free.
If you love games and your video card supports DirectX 12, which is only available in Windows 10, then you will have to switch to it anyway, as this is intended to give an additional performance boost. Although games on DirectX 12 are unlikely to appear until mid-2016, or even closer to its end.
But if you have a modern computer or laptop with not very successful Windows 8.1 and you want to plunge into the world of a more modern operating system, then why not? Back up Windows and go to new technologies! As a last resort, you can easily and quickly restore your previous system.
2. How to download Windows 10
Using the "Media Creation Tool" utility, you can not only download the original Windows 10 image, but also create a bootable disk or USB flash drive. You can download the utility at the end of the article in the "Links" section.
The utility allows you to download the version of Windows 10 you need with the latest updates. It works on Windows 7, 8, 8.1, 10 of any bitness. It will not work to run the program on Windows XP and Vista.
After running the utility and accepting the license agreement, you will be asked what you want to do.

The "Update this computer now" item is intended to update the Windows 7 or Windows 8.1 operating system you already have installed. But it's always best to do a clean install from a disk or stick. To do this, select the "Create installation media for another computer" item.

To download the image from which you can install both Windows 10 Home and Windows 10 Professional, just leave Windows 10.

If your computer or laptop was installed licensed "Windows 10 Home for one language" and you just want to reinstall it without losing the license, then choose this option.
In the "Architecture" field, select the bitness of the operating system.

General recommendations are as follows. If you have 3 GB of RAM or less, then go for the 32-bit version. If the RAM is 4 GB or more, then it is 64-bit. If you select the "Both" option, a universal image will be downloaded from which you can install both 32-bit and 64-bit versions of Windows. But the size of the image will be more than 5 GB, so you will need a dual-layer DVD or a USB flash drive of at least 8 GB to burn it.
The next window prompts you to select the media for Windows 10.

If you will be installing Windows from a USB flash drive, you can leave the "USB flash drive", this option will be the simplest and most reliable. Insert a USB flash drive with at least 4 GB and click "Next". At the end of the image download, a bootable USB flash drive will be created automatically.
Please note that all files on the flash drive will be destroyed, so copy them to a safe place (for example, on the "D" drive) in advance.
If you select "ISO-file", then it will be downloaded to the folder you specified and from it you can make a bootable disk or USB flash drive at any time. Installing Windows from a bootable disk is easier and more reliable than from a USB flash drive. Therefore, if you have a DVD drive and it works well, this option is preferable.

At the end of the download, you will be prompted to burn the image to DVD. If you plan to install Windows from a DVD, then insert a blank disc and click on the appropriate link.

Thus, using the "Media Creation Tool" utility, you will download the required version of Windows 10 and prepare a disk or flash drive from which you can install the system.
3. Create bootable media
To install Windows 10 from the downloaded image of the operating system, you need to make a bootable disk or USB flash drive.
3.1. Create a Windows 10 installation disc
The easiest way to create a Windows 10 installation disc is using the Astroburn program, which you can download at the end of the article in the Links section.
Run the program, go to the "Image" tab and click on the icon next to the "Path to the image file" field.


Be sure to tick the "Check" box and click the "Start recording" button.

As a result, you will receive the Windows 10 installation DVD.
3.2. Creating a bootable USB flash drive Windows 10
You can make a bootable USB flash drive for Windows 10 using one of the best programs "Rufus", which you can download at the end of the article in the "Links" section.
Connect a USB flash drive of at least 4 GB to your computer.
Launch Rufus and click on the DVD drive icon.

Select the Windows 10 image and click Open.

Now it is enough to press the "Start" button and the creation of a bootable USB drive will begin.

If you have valuable files on your flash drive, copy them in advance to a safe place.
As a result, you will receive a bootable USB flash drive from which you can install Windows 10.
When installing Windows from a USB flash drive, there are various problems that can often be solved using the settings in the Rufus program. There is a more detailed description of the Rufus program on our website.
4. Booting from an installation disk or flash drive
To begin installing Windows 10, insert a bootable disc or USB flash drive and turn on or restart your computer.
It is better to insert the USB flash drive into the rear USB connector on the motherboard without using a USB extension cable.
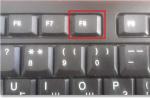
Immediately after turning on the computer, press and hold the Boot Menu key. It is usually listed in the prompts on the computer's startup screen. On different computers and laptops this can be a key from "F8" to "F12".

After the “Boot Menu” appears, use the “down” and “up” arrows to navigate to the DVD drive or USB flash drive and press “Enter”.

If your computer does not even try to boot from a disk or flash drive, then read our article on setting up BIOS. If the computer sees a USB flash drive and tries to boot from it, but freezes or gives an error message, then read about the Rufus program settings and make a bootable USB flash drive in a different mode.
5. Beginning of installation and choice of bitness
Immediately after booting from the installation disk or USB flash drive, you should see a prompt to press any key to start installing Windows.

This must be done within a few seconds, otherwise the installation will not start and the computer will need to be restarted. I usually press Space.
During the Windows installation process, the computer will restart several times, but you no longer need to press a key on the keyboard, otherwise the installation will start over.
If you downloaded an image that allows you to install both 32-bit and 64-bit versions of Windows 10, a screen with a choice of bitness will appear.

Select the required version using the down and up arrows and press Enter.
Wait for the blue Windows Setup window to appear.
6. Setting language parameters
At this stage, you are asked to select languages.

In the next window, click the "Install" button under the "Windows" logo.

7. Entering the key and choosing the version of Windows 10

If Windows 10 is being installed on this computer or laptop for the first time and you have an unused key or a key from Windows 7, 8 or 10 used on this PC, then enter it and click the "Next" button.
If Windows 10 has already been installed on this computer or laptop (for example, by updating Windows 7 or 8.1) or you do not have a license key, then do not enter anything and click on the link "I do not have a product key".
Windows 10 does not have a binding of the license key to the bitness of the operating system, as it was in previous versions of Windows. You can, for example, upgrade from 32-bit Windows 7 or 8.1 to 32-bit Windows 10 and then do a clean install of 64-bit Windows 10 and the license will be preserved. But Windows 7 or 8.1 Home cannot be upgraded to Windows 10 Pro.
In the next window, you need to select the version of the operating system - "Windows 10 Professional" or "Windows 10 Home".

If you do not know why you need the "Professional" version, then choose "Home", as it contains fewer unnecessary components and will work faster. You can download a comparative table of "Professional", "Home" and other versions of Windows 10 at the end of the article in the "Links" section.
In the next window, put a checkmark "I accept the terms of the license" and click "Next".

8. Types of Windows 10 installation
We are offered two types of Windows 10 installation.

"Update" - selecting this type of installation will display a message about the impossibility of updating when booting from the media (disk or flash drive).

You can upgrade from Windows 7 or 8.1 to Windows 10 with or without preserving files and installed programs by running the installer from under Windows. We will not consider this option now.
Custom - Installs clean Windows 10 on a new or existing hard drive partition. We will cover this type of installation in this article.

9. Disk setup
After selecting the installation type, the disk setup window will appear. If you already had some version of Windows installed, then the disk will have partitions with the old system.

Delete all partitions except the largest one, which contains your personal files (drive "D").

Take care in advance of the safety of your files that were on the desktop and in the user's folders such as "My Documents", as they will be deleted along with the old system.
Then select "Unallocated Space ..." for installation and click "Next".

If the disk of your computer or laptop is clean and there are no partitions on it, then create a partition for the system with a volume of about 100 GB (102 400 MB) using the "Create" button.
It is better not to divide the SSD drive into several partitions, but completely give it under the "C" drive for installing Windows, programs and games. Then you will get unrivaled computer speed!
If your disk's partition table is in MBR format, then a 500 MB service partition will automatically be created before the partition for installing Windows 10.

If your disk's partition table is in GPT format, then before the partition for installing Windows 10, 3 service partitions of 450, 100 and 16 MB will be created.

If the disk on which you are installing Windows has a volume of 3 TB or more, then it must be in the GPT partition, otherwise the system will not use its entire volume. Read more about installing Windows on large drives.
Below there will be still "Unoccupied space ...". Create on it one more section for user files for all the remaining space, select it and click the "Format" button.

Select partition 2 or 4 to install Windows, which has a capacity slightly less than the 100 GB we specified, and click "Next".

It is quite easy to create and delete partitions, but if in doubt, refer to our article on installing Windows 8.1, which describes in great detail how to configure your hard drive. If Windows 10 won't install to the disk and reports an error, then try converting the disk to GPT or MBR.
10. Copying files
At this stage, the files from the installation disk or flash drive are copied to the hard disk of the computer and then the installation will already occur from the hard disk.

Sometimes this process can stop at 0% or in any other place for a while, and then quickly complete. Be patient and don't touch the computer. If after 30 minutes of waiting nothing happens, then most likely the computer is frozen or the installation disc is hard to read. You will have to start all over again and if you freeze again, perhaps replace the installation disc.
After copying the files, the computer will reboot several times and the installation process will continue, which requires user interaction. In the process of reboots, each time you may be prompted to press any key, but you don't need to press anything, otherwise the installation will start over.

If you did not click anything, but the installation still starts from the very beginning, then remove the installation disc or USB flash drive, restart the computer and the installation will continue from the hard drive.
11. Setting parameters
At this stage, you can configure some of the Windows 10 settings, mainly related to user tracking.

If you don't want to bother, then click the "Use standard parameters" button, nothing bad will happen. To view and change the settings, click on the link "Settings".

It is advisable to disable all options for connecting to unknown Wi-Fi networks and sending error reports, this will increase security.

It is better to leave the protection of the browser and speed up its work. But it is better to prohibit other users from using your computer to download system files, so as not to load the disk and the Internet.

The computer will then restart and the installation will continue.
12. Logging in or creating an account
The next window prompts you to enter your Microsoft account login and password.

If you do not have such an account, then it is suggested to use the link "Create it!". This account is tied to the Microsoft server and is needed primarily to synchronize system settings between multiple computers.
Personally, I don't like to tie my account to the Internet, as sometimes this causes various problems and slows down the computer. To create a local account, as in previous versions of Windows, click on the "Skip this step" link.

Now just enter your name, preferably in English, and click "Next".

It is better not to enter the password at this stage, and if necessary, set it later in Windows, after the computer has been completely set up.
13. Completing the installation and logging on to Windows
At the last stage, the installation program finishes setting up the system and displays various messages on a background that changes brightness.

This may take 5 to 30 minutes. Please be patient and do not touch the computer.
When you first log on to the desktop, you may be prompted to allow access to the computer from the local network.

If you still have another computer or laptop and you want to exchange files between them, then allow access. If you do not have other computers, then it is better to deny access, this will increase security.
14. Activation and follow-up
If during the installation process you entered the correct license key or Windows 10 has already been activated on your PC once, the system is activated automatically the first time you access the Internet.
In order to check the activation status, enter or change the product key, click on the Windows icon in the lower left corner and go to the "Settings - Update and Security - Activation" section.

There is also a "Go to Store" button to buy a license and legalize Windows 10 on your computer.
If you do not activate Windows 10, a reminder will appear on the desktop about the need for activation, you will not be able to change the color settings, and the wallpaper on the desktop can only be set using the "Photos" application.
Now you need to install the drivers, all the necessary programs, set up antivirus protection and make a backup copy of the system.
Below you can download all the necessary files to download and install Windows 10 that I mentioned in this article.
ironfriends.ru
How to install Windows 10 on a new computer or laptop from a disc: step-by-step instructions
Most laptops come with a recovery sector on which the system is already wired. It is very rare to find models where the FreeDOS version is attached. If there is a recovery sector, then the operating system is already installed in 99% of cases. And you don't have to puzzle over how to install Windows 10 on your computer. Nevertheless, a certain percentage of people have already paid a large sum for a licensed distribution kit and want to save a little (if at all possible after the Crimean events).
It is not accepted to send a DVD disc today. Instead, the distribution kit is uploaded on the store's website in the form of an image. You just need to burn the project on the local computer. Honestly, it's hard to come up with a reason why you can't do all the procedures from a USB drive, but if you really want to ...
Image
Someone will buy a ready-made image from the Microsoft store, but we decided to create it using the Media Creation Tool. A new computer is always a problem, but not a virtual one. Why burn an operating system disc when you can create an image? Today drives are unpopular because they consume a lot of energy, run slowly, and take up a lot of space. Usually, the installer is loaded onto a USB flash drive, but today we agreed to talk only about blanks. So let's get started!
The image is created by the utility. You just need to indicate that we want to create media and select a folder for storage. In the future, this file can be used to burn any disc. The utility will gradually pull up the distribution kit from the official site.

This process is slow. It takes from forty minutes or more, so let's see for now how to burn the project. The same application, at the end of its activity, will offer to burn the disc right there and then.

But if this simple option does not suit something, or the image is already available (downloaded from the store), then there are other ways of development of events. Before exiting, Media Creation Tool will delete unnecessary data.
How to burn the installation disc
Rather than downloading Ultra ISO, we'd recommend checking out the Windows USB / DVD Download Tool. If only because this tool is specifically designed for the purpose voiced above. After downloading the auxiliary application, you also need to install it. Do not pay attention to the inscription that the software is for the seventh version. Eyewitnesses say that this is a miracle, and under ten.

The process will not be long, no choice is given, and the process ends with a message that the installation of the product is complete.

In the meantime, our image with the operating system is just finishing creating, therefore, soon it will be possible to test the mechanism in action. The appearance of the application is somewhat extravagant in a contrasting theme. Apparently, the developers wanted to create something beautiful, but this is what happened.

Burn image
We are sure that readers will easily cope with the interface of the utility. In the second step, you will be asked to choose between a flash drive and a DVD drive so that the application can create bootable media. Therefore, you can go directly to the installation process.
Installing on a new computer
Do not forget that you need to punch through the settings in the BIOS, let's set the DVD as the first boot device. Without this, the system will not start.

We see that the image is combined (multiboot disk). This was set in the Media Creation Tool. You need to install the version that meets the system requirements. First of all the processor:
- x86 - 32 bits.
- x64 - 64 bits.
Let's start! The traditional Windows logo will appear, followed by the language settings screen, which we, with the permission of our readers, will skip.

After a couple of screens, the meaning of which is obvious, you will be prompted to enter the key. Installing Windows 10 is possible without it. Just click "I don't have a key." This will be correct, because it will be possible to get a little familiar with the system before purchasing it. There is nothing worse than installing Windows 10 on a laptop and realizing that there is not enough RAM, or the hard drive is slowing down. According to our observations, this system works faster than 7 and better draws three-dimensional games. And no configuration is required at all.

We see that there are some other options besides the bit depth. Regular users should be interested in the first three. The keys for them are sold in stores, those that remain from the seventh versions do not fit. Therefore, the installed package will not be able to be activated as if we were upgrading to the top ten. This is not possible after July 29, 2016. But the installer did not accept keys from sevens before.
The next few screens are of no theoretical value, so go straight to the installer. There will be two options:
In our case, we need the second and only it.

Partitioning a hard drive
Windows 10 is installed on an NTFS partition with a size of 40 GB or more. You should not take less, and this is not enough. Ideally, you should leave 100 GB. Gradually, the place will be eaten away for various purposes. A blank hard drive looks like this.

You just need to create a new main section in this place. Please note that the system will take 500 MB for itself. Everything will happen completely automatically after pressing the create button. You just need to specify the size. This is how it looks after all the operations.

You need to install Windows in the main section. Click further. Further step-by-step instructions do not make sense, usually the disc has a bootloader that does not interfere with the installation, even if the media is in the drive. You can rest for the next 40 minutes. Although on some machines the process takes much less time. The installed instance of the system will need to be activated through the system menu, but Windows will remind you of this, so you should not worry about your own future in this regard.
If the installation process started over
With Microsoft Windows it happens that if the media remains in place, then when the installer completes all the operations and goes to reboot, control does not pass to it. Therefore, the installation process starts over by entering the key. In this case:
- Turn off your computer.
- Remove the installation media.
- Turn on your computer.
In principle, the disc can be removed at any time. If the system unit is no longer powered by voltage, then this is done using a long steel wire (the hole is located next to the tray open button).
feetch.com
Clean install of Windows 10
- Who needs it and why
- Where to get a system for a clean install
- How to install clean Windows on a new clean hard drive
- Clean install on a system upgraded from an old version
- Clean install by second system
How to install Windows 10 on a laptop, netbook, stationary personal computer correctly and at the same time for free?
It is not uncommon for users to have such a question. And there are many reasons for this. The desire to replace the old operating system with the most modern one, the desire to try new features, to make a choice before switching to a new OS, to buy a new hard drive or to purchase a device without an operating system installed.
I must say that with the release of the latest version from Microsoft, the installation of the operating system has become much easier and does not require much knowledge. However, despite the convenience, ease of updating from old versions to a new one, a clean installation due to the absence of conflicts with old software is a more correct solution, although it requires some preparation.
The very first thing you need to do is find a system that will be installed. There are not so many options.
- Buy a boxed version of the operating system and, as a result, get a bootable flash drive for a clean installation, update and system recovery.

- Download Windows 10 from the official website in ISO image format.
- Burn the image directly to USB.
In the first option, in addition to the software, a carrier is provided as a gift, only an OS on a Physical USB is on sale. The second option is faster and does not require waiting for the delivery of the box with the program. To do this, from the Microsoft website, it is possible to download the purchased OS or a trial version for 90 days.
By the way, the tenth version of Windows for trial is provided only in the version. How to install trial windows on a new clean hard drive
and how to install such a version, see the official website. Going to the official Windows 10 page, we see a proposal to update the system or download a media creation tool.
Download the proposed Installation Media Creation Tool, run it with administrator rights and again see the offer to update or create a drive. After selecting creation, a page for selecting the parameters of the downloaded system (language, version, bit depth) will appear. Next, select USB or ISO (to install Windows 10 from disk), depending on what the installation will be from. After that, the installed image will start loading.

Installing Windows 10 on a laptop and on a PC is not very different. To install on a new HDD, you will need to boot your computer from bootable media. This is done either from the Boot Menu, or the media is assigned as the default drive in the device BIOS. Boot Menu is called differently on different PCs.

For example, on an HP laptop, the F9 button is used for this, on an Asus - F8, and so on. BIOS settings also appear after pressing a button, usually DEL. There we need a BOOT section where we set the installed bootable media as the first device to boot.
After choosing a device, the installation of Windows 10 will start from scratch and a proposal will appear in choosing a localization, it depends on this choice in which language the installation will be made, and what the installed system will have. Click install and agree to the license. Choosing a setup for advanced users. Then you will need to select the partition where the system will be installed. If the disk is new, then the partition will be one and without formatting. Previously used disks usually have several partitions of different sizes. In this case, you need to delete all partitions, then re-create a new partition for installation.
In both cases, after selecting a partition, the installer will warn you that you need to create several more partitions for the system. The first of which contains the recovery environment, the second is the EFI system partition, the third is the MSR that the system reserves for service operations. Only the next one will the installation be done.
Partition size should not be less than 16 gigabytes for 32-bit edition and 20 gigabytes for 64-bit. We agree and wait for completion, until which the installer will reboot the system several times.
Another frequently asked question: how to properly install Windows 10 over the updated Windows 10. This option is convenient after updating the OS from the old version to a dozen. Due to the fact that the newly installed Windows does not have "garbage" from previously installed systems. Thanks to the developers, free installation of windows 10 from older versions of the product does not require special skills and work with external devices, which is convenient, for example, when installing Windows 10 on a tablet.
To do this, you need to find the "Recovery" item in the "Update and Security" section. There we need the item "Return the computer to its original state."
After clicking the "start" button, you will have to make a choice to either save user data or completely erase the system disk. In the first option, all personal data is saved, and in the second, a complete cleaning of the previously installed system is performed. Next, the installer will show the actions that it will perform and, after agreeing to restart the computer, will proceed with the installation.
Unlike other options, where after installation is followed by setup plus activation, this method at the end provides the user with how to install Windows 10 on a computer either clean or already configured previously and activated system.
What to do if windows 10 needs to be installed on the second system? To do this, pre-allocate at least 20 gigabytes of space on the hard disk, boot the computer, select the previously created USB or DVD media for loading. After agreeing to the license, an update or custom installation will be offered, which is clean. Next, there will be a choice of a section for installation, there we select the recently created section.
After installation, a mandatory reboot will follow, after which the system will start from the hard drive and provide a choice between the two installed OS. The timeout and location of the OS during the selection can be easily changed in the system settings, the item "Startup and Recovery" in the "System" section.
This installation is also clean, but it is not installed at the beginning of the hard drive, which can slow down overall performance. But on the other hand, it facilitates the transition for some users to the new OS interface, makes it possible to first familiarize themselves, and then make a choice.
How to install clean Windows 10 each user must choose from the level of their knowledge in the computer, as well as the needs for which this action was required. And also at least roughly know how to roll back the performed manipulations
secretwindows.ru
How to install Windows 10 - step-by-step guide for novice PC users
›Home› Educational program ›Software› How to install Windows 10 - step-by-step instructions for novice PC usersThis article will guide you through installing the Windows 10 operating system from a USB stick or DVD. It is preferable and more convenient today to use a USB-drive, therefore, it will be given preference hereinafter.

There is no difference in which media the installation will be made from. The only difference is in the process of creating these media. A bootable USB drive for installing Windows 10 can be easily created directly from a specialized utility program, and to create a bootable DVD, you must first save an ISO image of the disc to your computer, which you then need to transfer to a DVD.
Obviously, everything is much easier with a flash drive, so let's go ...
Step # 1. Preparing to install Windows 10
Before starting the installation process, you need to prepare a USB flash drive with a volume of 4 GB or more. Such a flash drive costs only a few hundred rubles, so it is unlikely to be difficult to acquire.
If you already have such a flash drive, then you must take into account that all the information that is recorded on it will be deleted during the creation of a bootable USB bootloader.
In addition to the USB flash drive, to install Win10, you will need to know which version and what bit of Windows is installed on your computer at the moment.
Please note that owners of licensed Windows 7 and Windows 8.1 can upgrade their operating systems to Windows 10 for free. Others need to buy a license key.
To find out the version and bitness of your operating system, you need to go to: Start - Control Panel - System and Security - System and in the window that opens you will see all the necessary information:

Step # 2. Create a bootable USB drive
First of all, you need to create a bootable USB-drive or DVD drive, it will contain the OS installation files.
For holders of an operating system license, the most correct would be to use the utility from the Microsoft website, which can be downloaded here: get the MediaCreationTool.
Note! On the specified page, you need to select the link (or button): "Download the tool now", which is near the end of the page, and NOT "update now", located at the top of the page.
After downloading the utility, run it and select the "Create installation media for another computer" command:

Next, specify the language and what version the OS will be. If the name of the previous system had the word "Pro", then it will be updated to Windows 10 Pro, otherwise Windows 10 Home will be activated. By default, you will be prompted to install the data recommended for the computer you are using. To change them, you need to uncheck the box next to the corresponding entry:


Step # 3. Install Windows 10 from DVD or USB
Before installing, copy all the valuable information from the hard disk partition where the operating system you are installing will be located. This is usually the C: drive.
To make the device boot from a DVD or an installation USB drive, change the boot priority in BIOS. How to do this, see here.
If everything went well, then after the device reboots, "Press any key to boot from CD or DVD" will appear on the black monitor. This is a request to press any of the keys. What should be done.
The installation program window will appear. Specify the parameters specified in it (language, etc.). Click "Next" to continue.

Then a window will follow, in which you will need to agree to the terms of the Windows 10 license. You will need to check the box under the license text and press the "Next" button again.
Select the type of OS installation in the window that appears. There are two options:

Update. It looks like a regular update. Then the parameters and programs of the old system will be saved. Not recommended.
Custom installation. It is with the help of it that a clean installation is performed. You should see a window asking you to specify the disk partition where the system should be installed. Better not to touch the recovery partitions, system or reserved.
Select the section corresponding to C :, as a rule, you can determine it by its size. Click "Format" (if you are doing a complete reinstallation on the disk on which the system was previously) and "Next". The following figure shows the installation on a virtual disk, your picture will be different, but fundamentally they are no different.

If you want to be able to roll back to the previous version, then omit the formatting. It will be saved in a folder called Windows.old.
If you want to have the old OS on the C: drive, and Windows 10 as the second system, then for installation, specify a different partition that you can create by clicking the "Create" link all in the same window.
Having defined the section for Windows 10, click "Next", the installation process will begin.

The files of the installed OS will be copied to your device, and upon completion of this, a reboot will occur. When prompted to press any key, do not do this. Windows 10 will boot itself from the hard drive. If you changed the boot priority in the BIOS, return everything before that to its previous state.
Now you have to be patient and wait. The computer will restart several more times. The fact that he can freeze with a black screen in relation to this situation is not scary. Don't worry and don't get involved.
After a very long time, you will be prompted to connect to a wireless network or enter a product key. How to proceed in this case depends on a number of circumstances.
If the Ten was purchased by you, then you should enter the key indicated on the box. You can also find it out by looking at the confirmation email.
If you received Windows 10 as a free update, and you have already done it, then click Skip. If the update has not been completed, then in order to activate the installation, you need to perform it, following the instructions of Microsoft.
If you downloaded the distribution kit directly from the Microsoft website after November 12, you can enter the key from Windows 7 (8.1).
If the above options are not your case, you can click "Skip" without entering the key, but then the system will not activate. Activation can be performed later.
Step # 4. Configuring Windows 10 Settings

Here you can enter some settings yourself - click "Configure", or you can click on the "Use standard parameters" button. Here, as you are better off, all this can be reconfigured later, but it is more convenient, of course, to do it right away.
After choosing your settings, you will be asked to sign in to your Microsoft account:


Here you can enter the code, or you can skip this step for now (recommended) by clicking "I can't do this now."
The final stage consists of installing and configuring standard applications, the OS is getting ready to launch. On the monitor during this process for about 40 minutes you can read "It will not take long" and many other inscriptions on the screen, which changes color.
And finally, you will be pleased with the appeared Windows 10 desktop.

Congratulations, it's done!
In conclusion, I would like to draw your attention to the fact that in some nuances the installation process for Windows 10 may differ, since the company may make changes to new versions, but fundamentally it is unlikely that anything will change.
The process of cleanly installing Windows 10 on a computer from a bootable DVD consists of several steps. Let's take a look at each of them and step by step install Windows 10 on a new computer. The process itself can be roughly divided into two 2 stages:
- Preparing to install Windows 10;
- Direct installation of Windows from bootable media (DVD or USB stick).
Preparing to install Windows 10
Windows 10 system requirements
The first step is to check our computer for compliance with the system requirements of Windows 10, as well as hardware compatibility. To do this, I recommend visiting the official website of the manufacturer of computer components and checking for drivers for the Windows 10 operating system. In order not to waste time, you can also download them for subsequent installation.
So, the minimum system requirements for Windows 10 are as follows:
- Processor: at least 1 GHz;
- RAM: 2 GB for 32-bit or 64-bit systems;
- Hard disk space: 16 GB (for 32-bit systems) or 20 GB (for 64-bit systems);
- Video adapter: DirectX version 9 or later with WDDM 1.0 driver;
- Display: 800x600.
Windows 10 operating system image
To install Windows 10 on a computer, you need an operating system image (iso file, for example WINDOWS-10_RUS_64BIT.iso). Where can I get the Windows 10 image? Find it on the internet, of course. There are many options to choose from - you can buy and download from the official Microsoft website, you can also search for images on other sites (torrent trackers, for example). We assume that we have the iso file and it is official. Next, we burn the image onto a blank DVD disc.
Preparing your computer for installation
Before starting the installation, you also need to prepare the computer, namely, configure the computer BIOS. This is done so that the first thing to do is to boot the PC from the DVD disc.
To do this, after turning on the computer, press the F2 or DEL key, open the BIOS window, in which you need to find the BOOT item, where we set the device boot priorities. In our case, in the Boot Device Priority tab, we make the first CD-DVD ROM.
Next, we move to the Exit item and, upon request on the screen, press Y (YES) to save the changes made. This completes all the preparatory steps, you can start installing Windows 10 from the bootable DVD we created! 
Windows 10 installation process from a bootable DVD
So, insert the Windows 10 boot disk into the DVD drive;
On the monitor appears the inscription "Press any key to boot CD or DVD", which means Press any key to boot from CD or DVD, press "Enter"; 
The Windows 10 installation process begins, a download window appears; 
- The installed language is Russian (Russia),
- Time and Currency Format - Russian (Russia),
- Input method (keyboard layout) - Russian. Click the "Next" button;

A window appears on the screen with a large "Install" button, press it and the installation process begins; 
In the window for entering the product key, click the "Skip" button (this process can be performed after the installation is complete); 
Next, a window opens with the terms of licensing, where you need to accept the terms of the Windows 10 license and click the "Next" button; 
The next step in installing Windows 10 is deciding on the type of installation:
Update: install Windows while keeping files, settings and applications;
Custom: Windows installation only (advanced users). Since we are installing Windows 10 on a new computer (or on an empty hard drive), we select the "Custom" option; 
Then the question is asked - Where do you want to install Windows? To this question, I propose to create 100 GB for the Windows 10 system, and use the remaining space as a user partition (photo, video). Thus, by dividing the hard disk into 2 partitions, you can use the second disk partition to create archives and snapshots of Windows 10. And if during the operation of the computer, something does not go so easily, you can restore or reinstall Windows. Therefore, we create a 100 GB partition, select it and press the "Next" button; 
Begins copying Windows 10 files to your computer - Preparing files for installation, Installing components, Installing updates, and Completing installation. I would like to note that at this time the computer may reboot several times; 
Upon completion of the installation, the parameter settings window will open, where it is proposed to change the settings or agree to use the standard ones. Press the button "Use standard parameters"; 
Then the system analyzes the data and starts preparing the system for the first launch; 
Since the computer is not connected to the Internet, you must create an account for the computer, and enter the password and password hint. Enter the data and click the "Next" button; 
When preparation to launch is complete, Windows 10 Desktop will open. 
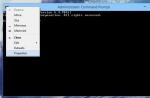
Congratulations, the installation of the Windows 10 operating system is complete! Also read how to launch Command Prompt in Windows 10 in different ways. Write comments, ask questions and do not forget to like the material if you liked it.
Technical level: Basic
Summary
In this article, I'll show you how you can prepare to install or reinstall Windows 10 on your tablet or computer using the official images of this OS provided by Microsoft.
By doing this, you agree to the following terms of use. When installing Windows 10, you will also need to accept the license agreement, otherwise you will have to abort the installation and remove the OS from your device.
Summary:
1) What is needed to complete these steps.
2) Create bootable Windows 10 image media using the Media Creation Tool.
3) Create bootable Windows 10 image media using official images from Microsoft.
Note: Before performing these operations on your device, you should contact the technical support of its manufacturer. It may be using special images for your device, and you will not be able to install the system correctly using the "clean" images from Microsoft. Check the possibility and legality of using this manual.
Note 2: Enterprise / Education editions are not mentioned in this article, however, most of the steps for installing these types of Windows 10 are the same as described in this article.
Details
What is needed to complete these steps.
- Internet connection (you will need to download 4 to 7 GB of data).
- Disk space on your computer / tablet to store downloaded files.
- An 8 GB flash drive or disk (in some cases, 4 GB will suffice). You can also use SD cards (for example, it will be much more convenient for a tablet).
- For tablets without a full-fledged USB port - a USB-OTG adapter.
- Operating system Windows 7 or later (Windows 10 recommended).
Make sure you have it all.
Create bootable Windows 10 image media using the Media Creation Tool.
This method is the easiest one and will work for most Windows users.
1) Download the Media Creation Tool and run it.
You can download the program from the official Microsoft website by clicking on the button Download the tool now on this page . You can also use the direct link.
Run the downloaded file. A window like this will open:
2) Read and accept the license agreement.
Review the license agreement. If you agree with it, which is necessary for the further operation of the program, click Accept.
3) Select "Create bootable media for another PC".
After some time (usually up to 1 minute), the program window will be updated and will look like this:
Click on the button Create bootable media for another PC... Then click Further.
4) Select the options you want for the Windows 10 you are about to install.
After the previous operations, a window will open where you will be asked to select the options for the Windows you are installing. Initially, as you can see in the following screenshot, they are inactive.
In order to select the required parameters manually, uncheck the box circled in the screenshot. It will be signed as Use the recommended settings for this computer.
Select the options you want. Select the Windows language from the first drop-down list. In the second - the editorial office. In the third - bit depth, 32-bit or 64-bit.
Learn more about languages.
The language you choose will be the default Windows language. The selected language also affects the region and format of time, currency, etc. in Windows, as well as the available editions of Windows 10. In the standard editions of Windows 10 - Home or Professional (Pro) - you can change the language. However, I recommend initially choosing the one you need.
More about editions.
The editions available depend on the language you selected. There are 4 of them. If you are going to reinstall Windows on your current computer / tablet, you can leave this parameter unchanged - the program automatically selects what you need. Otherwise, you need to select the exact edition for which you purchased the license.
1) Windows 10. This edition is available for all languages. It includes Windows 10 Home and Pro. When installing Windows from such an image, you will be prompted to select the desired OS type.
2) Windows 10 Home for one language (Home Single Language). This edition is also available for all languages.
3) Windows 10 N. This edition is available for a limited number of languages. There is no Russian or Ukrainian among them. It differs in a different set of built-in programs.
4) Windows 10 KN. This edition is only available for Korean.
More about bit depth.
The bit depth of the system directly depends on the processor architecture. It comes in two flavors - 32-bit and 64-bit. Moreover, a 32-bit system can be installed on 64-bit processors, but a 64-bit system cannot be installed on 32-bit processors.
If you are going to reinstall Windows on your current computer / tablet, I recommend leaving this setting unchanged. Otherwise, make sure that the processor of the device you need supports one or another bit. In addition, the manufacturer of this PC must provide drivers for this bit depth.
Moreover, keep in mind that a 32-bit system will only work with 4 GB or less of RAM, even if you have 6 GB or more installed, and a 64-bit system should only be installed if you have more than 4 GB of RAM.
You can also select the "Both" option. In this case, when installing the OS, you can choose the bit depth you need.
After selecting the required parameters, click Further:
If you changed any parameters, you will receive a warning that a different license may be required to activate the Windows that you install using this image.
Click on OK.
5) Select to create a bootable media based on a flash drive.
You will see a window asking where to write the system image. The program can simply download and save an ISO file on your computer for later use, or it can immediately write an image of the system to a flash drive. If you need to use a disc, I recommend using the instructions from part 2 of this article (creating bootable media using official images from the Microsoft website). In this part of the article, we will select a flash drive.
Depending on the options you selected earlier, you will need flash drives of different sizes. The required capacity is displayed directly under the first item - "USB flash drives".
Select the 1st item - USB flash drive and press Further.
6) Insert the flash drive and select it in the program.
You will see a window with a list of all flash drives connected to the computer / tablet. If you plug in a new flash drive, you will need to press the button Refresh disc list for the program to detect it.
Insert the flash drive to which you will burn the image, update the list of drives and select the appropriate device. Please note that this flash drive will be formatted. Then press Further.
7) Wait for the image to load.
After selecting a flash drive, the program will start downloading the image. During this time, you can freely use your computer.
8) After downloading, the image verification process will begin.
9) After that, the program will start writing the image to the flash drive.
10) The bootable flash drive is ready!
You can close the program.
Create boot Windows 10 image media using official images from Microsoft.
Let's assume:
- The Media Creation Tool does not work correctly for you;
- You wanted to download the OS image yourself;
- You wanted to burn the image to disk;
- You want to burn an image of one of the Windows Insider Program assemblies to disk or flash drive.
Then this instruction will help you.
Note that this method works on all the most popular operating systems, including Windows 7, Windows 8 and Windows 10.
1) Download the desired image from the Microsoft website.
1.1) You need an image of the official, stable version of Windows 10.
Click on the following link: https://www.microsoft.com/ru-ru/software-download/windows10ISO/... The opened site should look like this:
It is possible that the browser redirects you to the site https://www.microsoft.com/ru-ru/software-download/windows10... In this case, use in order to still enter the image download site.
Scroll down the page. You will see the following:
Here you are asked to select the edition of Windows 10. You can read more about editions in paragraph 4 of part 1 of this article. Open the drop-down list and select one of the 4 editions. Then press the button Confirm.
After a few seconds, the following drop-down list will appear. It asks you to select the Windows language. Scroll through the list and select Russian if you need Russian, Ukrainian if you need Ukrainian or any other language. Then press the button again. Confirm.
After that, you will see two buttons that contain download links. The first button is a link to download a 32-bit image, the second is to download a 64-bit image. Read more about bit depth in paragraph 4 of part 1 of this article.
1.2) You need an image of one of the preliminary OS assemblies.
Go to the following site: https://www.microsoft.com/en-us/software-download/windowsinsiderpreviewadvanced
If it says that you are not a Insider, although you are, try changing your Microsoft account name to something in Latin rather than Cyrillic.
The process of configuring the parameters and obtaining the corresponding link is similar to the process described in clause 1.1 of this part of this article. True, the Insider Program website is in English, but you can use a translator.
The only thing that will change is the available editions of Windows 10. Different assemblies, corporate editions, etc. will be available. However, most will need the Windows 10 Insider Preview edition, which contains Windows 10 Pro Insider Preview and Windows 10 Home Insider Preview ... These editions are activated by licenses from Windows 10 Professional and Windows 10 Home, respectively.
Also, not all languages available for the stable version of Windows 10 may be available!
2) Download Windows USB / DVD Tool.
This program from Microsoft is designed to burn ISO images to flash drives or discs. You can download it from this page owned by Microsoft. Go to it and press the purple button Download on the right side of the site.
3) Install Windows USB / DVD Tool.
To do this, run the downloaded file.
Click on Install("Install").
Click on Finish("To complete").
Now the program is installed, its shortcut is on the desktop. It can also be found in the Start menu.
ATTENTION! During installation, the program may ask you to install a system component - .NET Framework 2.0. The installation will most likely happen automatically, you just need to confirm the download and installation of this component.
4) Run the program and select the ISO file you downloaded earlier.
In the window that opens, click the gray button Browse(1). File Explorer will open. Find and open the ISO file you downloaded earlier. Let it appear in line (2). Then press the green button Next (3).
5) Select the medium to which you will burn the image.
Click on the blue button USB device(1) if you will write the image to a flash drive, on the blue button DVD(2) if you will burn the image to disc or gray button Start over(3) if in the previous step you chose the wrong image and want to return to the beginning of the burning process.
6) Insert the desired flash drive / disk to which you want to burn the image.
Select the required device in the drop-down list (1). If you have just inserted a disc / flash drive, click on the blue button (2) to refresh the list of available devices. Then press the green button Begin copying("Start recording", 3). If you confused something in the previous steps, the gray button Start over(4) to return to the beginning of the process at your service.
7) Agree with the formatting of the flash drive if you write the image to it.
The flash drive needs to be formatted before the write process. If it contains information that is important to you, copy it to your computer or to another flash drive before the image recording process.
Press the button to format Erase USB Device... After that, another window will pop up, "Do you really want to do this?". Click on Yes("Yes").
Even not advanced Windows users have probably heard that there are several ways to reinstall a given operating system: using a DVD and a USB drive. These two options are now the most common among users. However, there is another one that allows you to perform a "clean" installation of Windows or upgrade it to a newer version using a hard disk partition. It can help in cases where there is neither a USB drive nor a DVD to which you can write an image of the operating system. If you are curious to know, how to install Windows 10 from a hard drive partition, we recommend that you read this manual. Perhaps it will be useful to you in the future.
Make sure you have:
- ISO file with Windows 10 operating system.
- EasyBCD and UltraISO programs.
- At least 5 GB of free space on the system partition.
Installing Windows 10 from a hard drive
- Install EasyBCD and UltraISO programs on your computer.
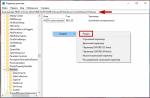
- Start the Disk Management console. To do this, press the Win + R key combination, enter the diskmgmt.msc command and press the Enter key or the "OK" button.
- Select the system partition by right-clicking on it and select "Shrink Volume" from the drop-down menu.

- In the field opposite the item "Compressible space (MB)" enter 6000, and then click on the "Compress" button. After that, a new space should appear in the Disk Management window.

- Click on the new space with the right mouse button and select "Create simple volume" from the context menu.

- In the wizard window, click the "Next" button three times.

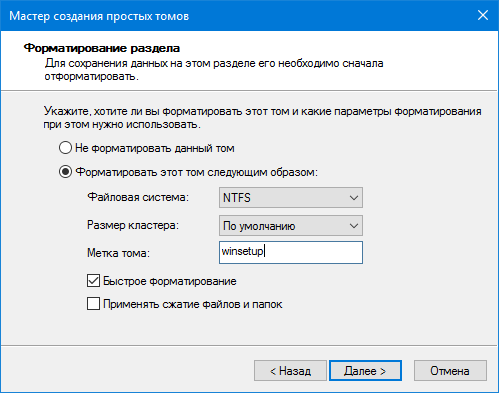
- At the stage "Formatting the partition" in the field opposite "Volume label" enter a name winsetup
, and then click on the "Next" and "Finish" buttons.
- After that, open "Explorer", go to "Computer" and make sure that a new section has appeared in it with the name that you specified and the volume of 5.86 GB.
- Mount the Windows 10 ISO file, open a new partition and copy the files from the mounted image into it. If you have Windows 8, 8.1 or 10 installed on your computer, you just need to double-click on the ISO file to mount it. If you have Windows 7 installed on your PC, you need to use the UltraISO program in order to open the system image and copy the files from it to a new volume.
- Start the EasyBCD program.
- In the program window, select the "Add Record" section.
- Click on the "WinPE" tab.
- Next to "Type", select "WIM Image (Ramdisk)".
- Next to "Name", enter winsetup
.

- Specify the path to the "boot.wim" file. To do this, open the "Explorer" window by clicking on the icon with binoculars and a folder opposite the "Path" field, expand the winsetup volume, go to the "Sources" directory and select "boot.wim" in it.

- Return to the "EasyBCD" window and click on the "Add" button.

- Go to "Edit Boot Menu" and click on the "Save" button.

- Click on "Tools" and "Restart Computer".

- On the OS selection screen, click on winsetup to launch Windows 10 Installer.
Interestingly, in this way you can install not only Windows 10, but also Windows 7, 8 and 8.1. If you want to install any of these operating systems, you just need to delete the Windows 10 files, copy the files of your preferred system and specify the path to "boot.wim".
Installing each new release of Windows is easier than the previous one and requires less user effort. With the release of Windows 10, this task has become easier than ever: now, in order to install an operating system on a computer, you do not need any special knowledge and ingenious applications. You don't even need a Windows distribution kit - the installer "learned" to download it itself. She herself creates installation media - a DVD or a USB flash drive. The user only has to respond to requests and follow instructions that are understandable even for those who do it for the first time.
Today we'll show you how to do a clean install of Windows 10 on any laptop and desktop PC. A clean install is an OS installation on media that does not have an operating system (for example, on a new computer or formatted hard drive). Or where it is, but it must be completely overwritten without saving the installed software, accounts and settings. By the way, don't worry about the license: if you install a system instead of a legally activated one, you can save it. And we will not hide from you what needs to be done for this.
What do you need
- Bootable media for recording the Windows 10 distribution kit. It can be a USB flash drive with 3 GB or more, a DVD drive, a portable or internal hard drive. Since the vast majority of users prefer to install Windows from a USB flash drive, consider this method as the main one.
- or a set of files.
- Utility for transferring system files to installation media. If you are going to install Windows 10 on a PC with UEFI (enhanced "BIOS"), you can do without it - you just need to copy the files and folders of the distribution to a USB flash drive. By the way, in Windows 8 and 10 the ISO image can be opened in Explorer as a regular folder, but in earlier systems this will require a special application, for example, any archiving program.
- The computer on which you will prepare the bootable USB flash drive.
Cooking a USB flash drive
If you do not have a pre-prepared distribution kit of "tens", it is easier and more convenient to instruct it to download the Microsoft Media Creation Tools utility and use it to burn it to a USB flash drive or DVD.

The utility does not require installation on a PC, it is enough to run it with administrator rights.
After launching Media Creation Tools:
- In the "License Terms" window, click "Accept".

- To the question "What do you want to do?" we answer: "Create media for another computer."

- In the "Selecting options" section, define the system language, edition ("home for one PC" or "Windows 10") and architecture (bit) - 64 or 32. If the selection options are grayed out, the "Use recommended settings" checkbox should be unchecked.

- Next, select the drive: USB - to create a bootable flash drive, or an ISO file - to upload an image that you will burn to DVD in the future.

- After selecting the USB device, click "Next" and wait 30-50 minutes while the program downloads the distribution kit and creates the installation media. At this time, the computer is available for use.

- You will be informed that it is time to proceed with the installation by the message: "The USB flash drive is ready."

If you downloaded the distribution in advance or do not have stable Internet access, use other tools to create Windows 10 installation media. For example:
- Rufus. Works without installation. To write an operating system to a USB flash drive, it is enough to specify the location of the distribution kit, as well as determine the partition scheme and the type of system interface: MBR for computers with BIOS (old), GPT for computers with UEFI (new, released after 2013) or MBR for computers with UEFI ( if your UEFI PC has MBR-formatted disks).

- ... This utility is as simple as Rufus. In the "Add to USB disk" section, it is enough to mark the item "Windows Vista / 7/8/10, etc.", specify the path to the Vinodovs 10 image and click the "Go" button.

- Windows 7 USB / DVD Download Tool. This proprietary Microsoft utility is capable of transferring all versions of Windows, starting with the "seven", to USB-flash drives and DVD-drives, in just 4 steps.

Besides these, there are tons of other free utilities for creating installation media. You can use any - the result will be the same.
We start the installation
Installation launch options
Windows 10 installation can be started in two ways:
- From under a running system. It can be used if you plan to reinstall it or install the top ten from scratch to another partition of the disk.
- When booting from the installation media (via BIOS). A universal option that is suitable for installing the system on a new computer, and for reinstalling an old copy of Windows.
If you choose the first option, open the boot disk or USB flash drive in Explorer and run the Setup.exe file.

If you choose the latter, boot your computer from the installation media.
How to boot a PC or laptop from a USB flash drive
The BIOS Setup utility has a different interface on different computers. To enter it, you must press a certain key immediately after turning on the machine and the manufacturer's splash screen appears on the screen. Which one is usually indicated at the bottom of the splash screen. Most often these are Delete, F2 and Escape, sometimes F1, F3, F10, F12, or a combination of several keys.
Once the utility is open, navigate to the Boot section. In the BIOS Setup Utility version shown in the screenshot, this is a separate tab in the top menu.

In other versions, it does not exist as such, and the necessary settings are collected in the "Advanced Bios Features" section. In order not to confuse anything at the most crucial moment, study in advance the BIOS interface of your computer and figure out what and where is.
In the "Boot" section, you will see a list of devices from which the machine can boot. The first place is usually the hard drive. You need to make sure that the computer first checks the boot files not on it, but on the USB flash drive. To do this, using the arrow keys, as well as F5, F6, plus and minus (the tip is located in the right half of the BIOS window), lift the USB device to the top of the list. Press F10 to save the setting and exit the utility.
In graphical versions of UEFI, you do not need to change the order of devices, just click on the USB device. After that, the PC will restart and start booting from the selected media.

The main part of the installation
Most of the Windows 10 installation process takes place without the active participation of the user. You will have to work only at the beginning and a little at the end.
So, the first thing you have to do is choose the operating system language, time formats, currency formats and the main keyboard layout. If you downloaded the Russian-language version of Windows, the default language will be Russian.

After defining the language settings, click the "Install" button.

Accept the license terms. To go to the next task now and in the future, click the "Next" button.

The next step is to define the type of installation - upgrade or custom (in previous versions it was called clean). We, accordingly, need the second type.

Let's move on to choosing a place where the new Windows will "settle". If the hard disk is not partitioned or you want to change their aspect ratio, select the required area of the disk and click "Create".

In the "Size" field, specify the number of megabytes that you allocate for the system partition. 64-bit Windows 10 requires at least 32 GB. Click Apply. If necessary, create other partitions in the same way, and then format them.
Attention! If you want to install the system while maintaining the license, do not format the disk, but carry out the installation in the same partition where the previous activated copy of Windows is located. The second important factor in maintaining activation is that the new system must be the same version as the old one. If you install Windows 10 Ultimate instead of Home, you can't do without losing your license!

After finishing work with the disc, you can relax - for the next 40-60 minutes the process will go on without your participation. If you want, just watch him.
It will take about 1/4 of the time to copy the files.

The computer will then reboot and continue with the installation. Most of the time, the Windows logo will hang on the screen and the "wheel" will rotate. You can understand at what stage the process is by the messages at the bottom of the screen.

It's time to get back to active action, because the end of the installation is nearing. When you see an offer to increase the speed of work, click the "Use standard parameters" button. You can change them later if you wish.


After the upgrade, you will need to create the first user account. By default, it will be assigned administrative rights. Everything is simple here - enter a username and enter a password, if necessary.


Finally - the long-awaited desktop. Everything is ready, the installation of Windows 10 is complete. We hope it did not bore you too much, because now you have to set up the network, design the desktop, install applications and other pleasant chores to "settle down" the new OS.

If during the installation Windows did not require you to enter a license key, check if the activation is in place. Open the context menu of the "Start" button and go to the system settings.

Activation information is located at the bottom of the Basic Computer Information window. In our example, it was not executed, since "ten" was installed in the virtual machine from scratch.

If you succeeded in reinstalling the license, you can delete the C: \ Windows.old folder, which contains the files of the previous copy of the system. They are no longer needed - the activation information has been successfully migrated to the new one.
How to install a system from a hard drive
There are situations when neither flash drives nor DVDs are at hand. In short, nothing but the hard drive of the same computer on which you need to install Windows 10.
To install "tens" from the hard drive, you must meet 3 conditions:
- Have a distribution kit. More convenient - in the form of a set of files and folders. If you only have an ISO image, you will have to unpack it, for example, using an archiving application (WinRAR, 7-zip and analogs) or Windows Explorer (only in the "eight" and "ten").
- Have an additional partition on a hard disk with a capacity of 3 GB or more. Desirable free.
- The computer must boot from the same disk. If not, you will need a Live CD / Live USB (portable operating system) media such as BartPE, Alkid Live CD, etc. You can easily find their images on the net.
The hard disk, or rather, its additional partition, will serve as the carrier of the installation files. You will need an operating system to copy the distribution and create its bootloader.
Installation procedure
- Boot your computer from a hard drive or portable OS media.
- Copy the files and folders of the Windows 10 distribution to the root of the additional partition (not the one into which the system will be installed).

- Rename the boot file (bootmgr), for example, "Win10". The length of his name must not exceed 5 characters.

Now you have to create a bootloader for the distribution using the BootICE utility. You can use other boot management tools instead, but we chose BootICE because we find it the simplest and most convenient tool.
- Run the utility (it does not require installation). In the "Physical disk" section, select the hard drive of your computer from the "Destination disc" list. Click the Process MBR button.

- Check Grub4DOS and click Install / Config.

- In the "Rename GRLDR" section, write down the new name of the Windows 10 boot file (as you remember, we named it "Win10") and click "Save to disk". Click OK on the message that the bootloader was successfully created and close the utility.

It remains to restart the computer. The next time you start, the Windows 10 setup program will take control, and then it will be the same as when installing the system from a USB flash drive.