Today we will figure out how to install any modern version of Windows (including Windows 7 or Windows 10) on a hard drive with a GPT partition table on a legacy computer with a BIOS that does not support a modern one. The need to perform this trick arose when trying to install Windows Server 2008 R2 x64 on an HP DL380 G8 server (HP DL servers do not support EFI yet) with local disks, the total capacity of which in RAID 5 exceeds 4 TB. With a standard Windows installation on a disk with MBR partitioning, only 2 TB is available in the system. Windows cannot mark up or access the remaining 2 TB of disk space. The only way to take advantage of all the available disk space is to convert the disk layout to GPT.
This article describes how to configure Windows to boot from a GPT partitioned hard drive on a computer with a classic BIOS (which does not have UEFI) or Legacy BIOS mode. Windows operating system cannot boot from GPT disks on old BIOS systems. To work around this limitation, we will use the method of transferring the BCD of the Windows bootloader to a separate small USB flash drive (or HDD) with an MBR partition table. This flash drive will only be used to start the Windows boot loader, which must then transfer control to the main Windows image located on the GPT disk. The instructions are universal and should work both in Windows 7 and Windows 10 and any other supported 32 and 64 editions of Windows.
Benefits of GPT over MBR
What are the advantages of using GUID Partition Table (GPT)- a new format for placing partition tables on a hard disk. The GPT partition table overcomes some of the limitations of the classic MBR partition table. Let's list the main points:
- Supports hard drives larger than 2.2 TB(the maximum available disk size for GPT is 9.4 ZetaBytes (9.4 × 1021 bytes))
- Supports up to 128 partitions on disk (MBR has only 4 partitions)
- High reliability achieved by duplicating the partition table in multiple locations on the disk and checking the partition table using a cyclic redundant parity check (CRC). Thus, the structure of the disk partition will not be lost if the first sectors of the disk are damaged.
- No need to use logical partitions error prone
Booting Windows from GPT disk
According to the official Microsoft documentation http://msdn.microsoft.com/en-us/windows/hardware/gg463525.aspx, all its OS, starting with Windows Server 2003 SP1, support volumes with GPT markup as data disks, however, boot only 64-bit versions of Windows installed on motherboards with support for the new UEFI (Unified Extensible Firmware Interface) specification can handle GPT volumes. Thus, it will not be possible to install or boot Windows from a GPT disk on older computers with a classic BIOS.
Advice... There are several workarounds allowing you to boot Windows 10/7 x64 on BIOS systems from a GPT disk. To do this, you need to use a boot disk containing an emulator of the UEFI development environment - DUET (Developer's UEFI Environment) that mimics EFI. In this configuration, the computer BIOS starts booting with SYSLINUX installed, which loads the UEFI emulator (DUET). DUET, in turn, calls the standard Windows boot loader - bootx64.efi. It is also possible to transfer the disc to hybridMBR mode (hybrid mbr) using the Linux utility gdisk. However, in both cases, the procedure is rather complicated and requires a good knowledge of Linux OS from the user.
Once again, we note an important fact that should be learned forever: booting Windows x64 from a GPT disk is possible only on a system with UEFI.
Thus, if your computer runs on BIOS, and you need its disk to contain a GPT partition table, the easiest way is to add another hard disk (regular or SSD) with MBR markup to the system, install Windows on it, and then boot into the system. from him.
We will try to modify this technique a little. To do this, we need a USB flash drive or a small SD card (at least 64 MB) with MBR markup, on which we will place the Windows boot manager - bootmgr. This bootable USB stick will provide the initial system boot and transfer control to the main system bootloader located on the GPT volume.
Important... The system must support booting from a USB flash drive or SD card at the BIOS level.
Thus, we will be able to boot any (both 32 and 64 bit versions of Windows !!! ) from a GPT disk on a non-EFI BIOS system.
Installing Windows to a GPT disk on a BIOS computer
Let's say we have a BIOS (non-UEFI) computer that uses a new GPT partition table on its hard drive. When trying to install Windows on a gpt disk such a computer, the Windows installer will give an error:
Windows cannot be installed to this disk the selected disk is of the GPT Partition Style
In the Russian version, the error is:
Advice... You can convert a disk from MBR to GPT with the loss of all data by pressing Shift + F10 on the Windows setup screen. And by executing the following commands on the command line:
Diskpart
select disk 0 (if the system has one hard disk)
clean (clean the contents of the disk)
convert gpt (convert partition table to GPT)
Installing Windows 10 / 8.1 / 7 directly to a GPT disk in such a situation is possible only in UEFI mode through emulation of this environment using DUET. But in this mode, it is possible to install only 64-bit versions of Windows, and the procedure itself, as we said above, is rather complicated.
In this case, it is much easier to install Windows on an MBR disk in normal mode, and then convert it to GPT using the utility gptgen.
Gptgen - convert disk partition table from MBR to GPT without deleting partitions
Windows Console “Disk Management” allows you to convert a disk from MBR to GPT only “blank” unpartitioned disks. The console will not allow converting partitions on a disk on which the OS is already installed.
For online hard disk conversion from MBR to GPT, you can use a small utility that allows you to convert the partition table format on the fly without having to delete all partitions (without losing data).
Important... Before performing the conversion, it is highly recommended copy all critical data to external media... And although, I have not yet encountered the incorrect operation of the utility gptgen, which would lead to a complete collapse of the file system, I recommend that all users still save their important data before converting the partition table, so that later there will be no complaints about the author of the article 🙂.
Download the gptgen utility, and unpack it to an arbitrary directory (for example, c: \ tools \ gptgen-1.1).

So, the conversion of the partition table to GPT was successful!
Transferring the Windows bootloader to a USB flash drive
We reboot the computer and make sure that the BIOS cannot boot from the hard disk with the GPT table. It should be so! We connect a small USB flash drive or SD card to the system. We boot from the installation CD / USB disk with Windows (both the installation disk with Windows 10 and Win 7, as in our case, will do) and on the installation screen, click Shift + F10 by opening the command line console:
- Run the command: diskpart
- Let's list the disks in the system: list disk. In this case, the system has two disks: Disk 0 - a 40 GB hard disk (* in the Gpt column indicates that this disk contains a GPT partition table) and Disk 1 - a 1 GB USB flash drive.

- Let's figure out the partitions on the disks and the letters that are assigned to them. Let's select a hard disk: select disk 0 and display a list of partitions on it: list volume
 Based on the size of the partitions, it can be understood that the system is installed on partition 2 (Volume 2), which is assigned the letter D: (this letter may not correspond to the letter of the system drive, which is displayed in Windows itself)
 - Let's create the necessary partitions on the flash drive:
select disk 1 (select a flash drive)
clean (cleaning the contents of the disk)
create partition primary size = 1000 (create a primary partition on the USB flash drive, in this case 1 GB in size)
format (we format it in the FAT32 file system. Do not use the NTFS file system for a USB flash drive, since it will not work from such a partition)
select partition 1 (select the first partition on the flash drive)
active (mark the section as active)
list volume (we will display the list of partitions again. In this example, you can see that the partition we created has an index of 3)
select volume 3 (select it)
assign letter = G (assign it a free drive letter, for example G)
list volume (make sure the letter G is assigned to the partition on the flash drive)
exit (Exit diskpart utility) - Let's copy the boot environment files from the system disk to the USB flash drive: bcdboot d: \ Windows / l en-us / s g:
- Let's write the boot code to the USB flash drive to load bootmgr (Windows Boot Manager): bootsect / nt60 G: / mbr / force
- Reboot
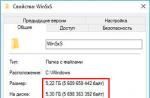
Go to BIOS and set the maximum boot priority for your USB (SD) drive. Save your changes. If you did everything correctly, the system should boot correctly. You can make sure that your Windows is on a GPT disk in Disk Manager ( diskmgmt.msc) by opening the properties of the system drive. The Volumes tab indicates that the type of the partition table is GPT (Partition style - GUID Partition Table)

This method of transferring the bootloader to a separate USB flash drive will allow you to take full advantage of the GPT partition table and use the entire hard disk capacity (over 2.2 TB) on systems with BIOS (without UEFI environment). A similar trick can be done with the following (even 32 bit versions) Windows:
- Windows 10 / Windows Server 2016
- Windows 8, Windows 8.1
- Windows Server 2012/2012 R2
- Windows 7
- Windows Server 2008/2008 R2
- Windows Vista
- Windows Server 2003 SP1 / 2003 (64-bit)
- Windows XP x64
Disclaimer... The article is offered as is. All of these operations have been tested on a virtual machine - not tested on real machines. If someone tests a similar configuration and system operation on physical hardware and writes about the results, I will be very happy. According to the available information, some old computers with BIOS do not in principle allow working with GPT disks; such disks are simply not detected.
You also need to understand that every time you turn on / reboot the system, your USB flash drive with the MBR table and the bootloader on it must be connected to the computer, otherwise Windows will simply not boot.
About the operating system Windows 10 installation requires order 15 GB free hard disk space - a little, if it's normal HDD
-disk and too small if it is a solid state drive SSD
... As the latter become more popular, shortly after the release Windows 8.1 Microsoft has introduced a new technology that offers an alternative method of installing a system in which most of the files from the installation image remain in a compressed form.
The new technology was named Windows Image Boot or abbreviated WIMBoot... Except for a slight, almost imperceptible decrease in performance, for the applied WIMBoot the user does not change anything, but there is an order of magnitude more free space after installing the system using WIMBoot. By the way, this technology can be used when installing Windows 10, but, as in the case of the eighth and tenth versions of the system, certain restrictions apply.
Firstly, the use of WIMBoot during the installation process is possible only on computers and laptops with modern BIOS, that is UEFI, secondly, the installation of the system using WIMBoot is performed in a non-standard way using the command line and a pre-boot environment, which can cause difficulties for users who are not well versed in such matters. But does this mean that saving space by compressing system files on PC is not possible with a regular BIOS? Of course not. Because with the same success for these purposes, another, more advanced compression technology called Compact OS .
Compact OS which is an improved technology WIMBoot is also good in that it can be used both on MBR -discs with normal BIOS and on disks GPT with UEFI with slight differences in markup. In this article, we will be looking at installing Windows 10 using Compact OS on SSD-disk with markings MBR and classic BIOS.
So, we have a bootable USB drive at our disposal. (disk) with recorded ISO -image Windows 10 and laptop with hard drive size 16 GB... Boot from the installation media and when the installation wizard window appears on the screen, press Shift + 10
Open a command prompt and run the following commands in it:
diskpart list disk select disk 0 clеan crеate partitiom primary format fs = NTFS quick activе assign letter W
diskpart list disk s el ect disk 0 cl еan cr еat еpartitiom prim аry format fs = NTFS qui сk activ e assign letter W |

- The first command launches the disk utility.
- The second displays a list of all available physical media (we have one with index 0).
- The third sets focus on him.
- The fourth clears it.

- With the fifth command, we create a main partition on the selected disk.
- The sixth is to format it into the file system NTFS.
- Seventh make it active.
- Since the operating system will be launched from it.
- Team assign letter assign a letter to the drive. It can be arbitrary, let it be W .
We continue working with the command line, one by one executing the following commands:
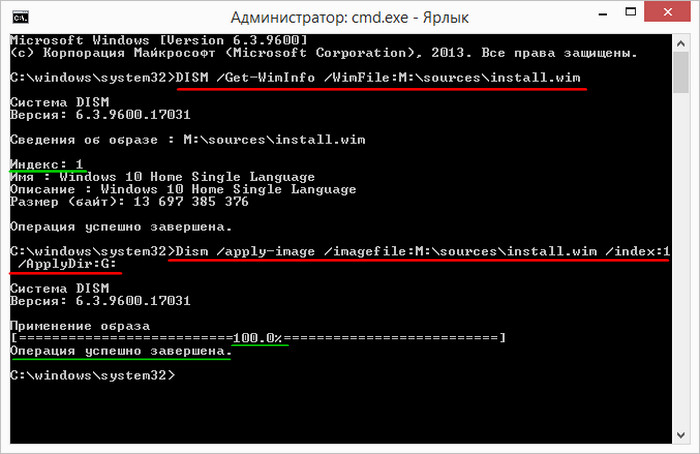
list volume exit dism / Get-WimInfo /WimFile:D:\sources\install.wim
list volume exit dism / Get - WimInfo / WimFile: D: \ sources \ install. wim |
- The ninth command lists all sections,
- The tenth exits the utility Diskpart .
Then all the fun begins. Note that in the command dism used letter D- this letter denotes the bootable media on which the image file is located install.wim (it could also be install.esd) ... The command itself allows us to determine the release index of the system in the image. We have it Windows 10 corporate with index 1 ... Move on.
dism / apply-image /imagefile:D:\sources\install.wim / index: 1 / applydir: W: / compact bcdboot W: \ Windows
dism / apply - image / imagefile: D: \ sources \ install. wim / index: 1 / applydir: W: / compact bcdboot W: \ Windows |

- With the twelfth command, we expand the contents of the image install.wim to the main disk W (future system) with compression parameter compact.
- And on the thirteenth, we create a bootloader for our operating system on it.
Ready.
This completes the command line and boots the computer in the usual way from the disk. The final stage of the Windows 10 installation will begin, during which you will be asked to specify the region, language and other settings, in a word, everything is the same as during a normal system installation.

It's easy to make sure the installation was done using Compact OS: if you open the properties of the Windows folder, you will see that the space it occupies on disk is significantly less than the actual size, whereas on a system installed in the usual way, these two indicators should be approximately the same.


And the last moment.
After installation, it does not hurt to check if the recovery environment is active on the system. To do this, in the command line run as administrator, run the command reagentc / info and make sure the state of the recovery environment is relevant Enabled .
If the environment turns out to be disabled, activate it by running the command reagentc / Enabled .

Note: installation Windows 10 using Compact OS on laptops with UEFI practically no different, except for a few additional commands when partitioning the disk. You can download an example of such markup from the link yadi.sk/i/amYOjGmY36tuom .
Hello admin! How to install Windows 10 on a portable GPT USB hard drive that will boot on a laptop in UEFI mode?
I have a brand new laptop with UEFI BIOS and Windows 8.1 installed. There is also a portable USB hard drive and I want to install Windows 10 on it.
Note: I need Windows 10 installed on an external USB drive to have an independent bootloader and if I disconnect the USB portable hard drive from the laptop, it would just boot Windows 8.1. But if I connected an external USB drive to my or someone else's laptop, then Windows 10 would boot on it like a portable operating system. Is it possible?
Hello friends! It is very simple to do this, we will use the AOMEI Partition Assistant Standard Edition program and the command line, who find it difficult to work in the command line, at the end of the article we will show you how to use the WinNTSetup utility.
For example, let's take a new laptop with Windows 8.1 and UEFI BIOS installed, also take a 1TB USB portable hard drive and install Windows 10 on it.
On an external USB drive, Windows 10 will have a separate independent bootloader, and to boot Win 10, we just need to select a portable USB hard drive from the laptop boot menu, and by default Windows 8.1 will boot on the laptop. Installed on a USB portable hard drive, Windows 10 can be used as a portable system, it will run on almost any laptop with the UEFI enabled.
Laptop disk management
Disk 0 is the hard drive of a laptop with Windows 8.1 installed, GPT style.
Disk 1 is a 1TB USB portable hard drive, MBR style (will need to be converted to GPT)
The USB portable hard drive has a 29.30 GB partition, so we will install Windows 10 on it.
If you do not have such a section, then you can create, we have already done this with you in previous articles and we have one on this topic, please read. A 29.30 GB partition is enough for me to install Windows 10, but you can create a partition of any size.
After creating the partition on which we will install Windows 10, convert the USB portable hard drive from MBR to GPT, for this we will use the AOMEI Partition Assistant Standard Edition program, the conversion will take place without deleting the files on the USB portable hard drive.
In the main window of the program, select with the left mouse portable USB-hard drive and press the button"Convert to GPT"

"OK"

Apply

"Go"

"Yes"

Conversion process.

USB external drive conversion completed successfully.
"OK"

Now you need to delete the partition on which we will install Windows 10, in my case the drive (G :)
Select the section with the left mouse, on which we will install Windows 10 and click on the button"Deleting a section".

Quickly delete a section.
"OK"

Apply

"Go"

"Yes"

The partition deletion operation completed successfully.
"OK"

The section has been removed and unallocated space has formed in its place.

Run the command line as administrator and create two sections on the unallocated space:
1. Encrypted (EFI) system partition 100 MB (we will place the Windows 10 boot files on this partition).
2. Service section MSR 128 MB required in markup EFI.
Enter the commands:
diskpart
lis dis (display a list of disks).
sel dis 1 (choose a portable USB hard drive).
create par efi size = 100 (create encrypted (EFI) system partition 100 MB).
format fs = fat32 (format it to FAT32 file system).
creat par msr size = 128 (create a 128 MB MSR partition)

We return to the main window of the AOMEI Partition Assistant and click on the "Restart" button

Select the remaining unallocated space with the mouse and click on the "Create section" button

"OK"

Apply

"Go"

"Yes"

"Yes"

Partition creation from unallocated space completed successfully.
"OK"

The created section is assigned the letter (G :).


Download the ISO image from the Microsoft website.

Click on the image by double-clicking the left mouse and The ISO image is attached as a virtual drive.
Virtual drive letter (M :).

V Windows 10 ISO image we need a folder"Sources ", And in it the install.wim file with Windows 10.

DISM / Get-WimInfo /WimFile:M:\sources\install.wim(with this command, we determine the number of Windows images in the install.wim file - the install.wim file can contain multiple Windows images, and each image has its own index. In our case, the image is one - Windows 10 Single Language 64bit and its index is 1)
Dism / apply-image /imagefile:M:\sources\install.wim / index: 1 / ApplyDir: G:(with this command we expand Windows 10 Single Language 64bit From File install.wim to the (G :) section.
M: \ sources \ install.wim is the location of the install.wim file.
index: 1 is the index of the Windows 10 Single Language image.
G: - the letter of the partition to which Win 10 is deployed.
The operation completed successfully.
Now it remains to create boot files for Windows 10 (drive G :) on an encrypted (EFI) system partition of 100 MB

Run the command line as administrator and enter the commands:
diskpart
lis vol (displaying a list of disks).
sel vol 11 (choose encrypted (EFI) system partition 100 MB)
assign letter V (assign it a drive letter (V :)
exit (exit from diskpart)
bcdboot G: \ Windows / s V: (this command means - create a bootloader for Windows located on volume (G :), and place the boot files on volume (V :))
Upload files created successfully!

Important note: We create a bootloader on a live systeminstalled on gpt (UEFI mode), sothe command looks like this:
bcdboot G: \ Windows / s V:
but if we created a bootloader on a system installed on MBR (Legacy mode) then the command would be like this:
bcdboot G: \ Windows / s V: / f uefi
If you work in the WinNTsetup program, then everything is the same for it, both in uefi and in Legacy.
We reboot the laptop and enter its boot menu.
We select a portable USB hard drive for loading.

The devices are being installed.

The final phase of the Windows 10 installation begins.

If you do not have a license key, click "Do it later"

We accept the license agreement.

You can connect to the Internet now, or you can "Skip this step"

You can click the "Use standard parameters" button, or you can configure them manually according to this article: .

Coming up with a name for the local account.

Boot Windows 10 from a USB portable hard drive.

Operating system installed on (C :) USB portable hard drive and has its own separate bootloader located in the first hidden one(EFI) system partition 100 MB.


Conclusion
Friends, almost everything that we did in the article using the command line can be done with a very simple utility.
Download and run WinNTSetup
In the main window of the program, we need to specify the Windows 10 files, or rather the install.wim file located in the M: \ sources folder. We press Select.

Find the file M: \ sources \ install.wim in the explorer and click Open.

Select the disk on which the bootloader will be installed.

In the explorer window that opens, select the 100 MB encrypted (EFI) system partition we created on the USB portable hard drive (drive letter Z :), as you can see, the explorer also contains an encrypted (EFI) system partition 256 MB of the laptop hard disk, you cannot select it if we want to have a separate bootloader for Win 10.

Select the drive on which Windows 10 will be installed.

Select the drive (G :) and click on the Select folder button.

Installation

Select UEFI bootloader and click OK

The unpacking of the Windows 10 image begins.

Ready! OK.

We choose a portable USB hard drive for loading, and then you already know what to do.
Articles on this topic:
When installing a new Windows 10 operating system, users may encounter an installation refusal accompanied by a message that the selected disk has a GPT partition style.
How, then, to convert MBR disk to GPT and vice versa when installing Windows 10?
Which disk partition style should you choose for Windows 10?
If during the installation of Windows 10, the selected disk gives an error that concerns the correct choice of the style of the device partitions, you should first of all decide on the current version of the volumes for your PC. There are two ways to determine:
- If you have a new computer with UEFI interface, then when entering BIOS settings, you can use the mouse, not just the keyboard. The graphical interface is colored, not blue with white letters. In this case, you need to correctly install Windows 10 on a GPT disk.
- If you have an old computer and you have changed components for a long time, the BIOS has a standard blue interface, you will need to convert the GPT style to MBR, and only after that it will be possible to install Windows 10 on the hard drive.
Installing Windows 10 to a GPT UEFI Disk
Performing a Windows 10 installation to a GPT disk is a complex process. To implement it, you need to adhere to two recommendations, namely:
To fulfill the first condition, you need to make changes to the BIOS UEFI settings. To do this, restart the PC and continuously press "F2" or "Del" (there may be other keys, depending on the motherboard model). Next, we carry out the following recommendations:
- Go to the BIOS Features or BIOS Setup section. We expose the boot from UEFI, not from CSM.

- In SATA mode, instead of IDE, we specify the AHCI environment. Typically this setting is found under the Peripherals section.

- We save the changes and restart the computer.
After you have saved all the changes, the computer will be ready to install Windows 10 and format the partitions. By performing this process from disk, the chances of an error occurring are low. If you use a storage device for this purpose, it is worth re-recording the image so that it supports the UEFI interface.
IMPORTANT! You can create a USB flash drive with an image in UEFI only for 64-bit versions of operating systems.
You can create such a USB flash drive using the command line with Administrator rights. To do this, we perform the following actions. We press "Win + R" and enter "cmd".

- diskpart
- list disk
- select disk

Select the USB flash drive to which the image of the dozen will be recorded. We prescribe the following commands in turn:
- select disk N
- clean
- create partition primary
- format fs = fat32 quick
- active
- assign
- list volume

After completing these steps, you need to mount the ISO-image in the system by clicking on the file and selecting the "Connect" item. Next, we select the contents of the virtual disk and send it to the USB flash drive.

Now we install Windows 10 from a USB flash drive or from a disk.
How to Convert GPT to MBR for Windows 10 Installation
If installing Windows 10 and formatting partitions fails due to GPT style mismatch, you need to convert the non-UEFI disk to MBR.
At the stage of selecting partitions when installing the operating system, you should perform the following steps:
- Press "Shift + F10". A command prompt will open. Enter "diskpart" and then "list disk" to display a list of connected drives.
- Next, enter select disk N, where N is the number of the disk that needs to be converted.
- To clean up the hard disk completely, enter "clean". If you want to delete only partitions, use the commands "detail disk", then "select volume" and "delete volume".
- To convert, enter "convert mbr".
- To finish, enter "exite".


If you converted partitions at the stage of configuring disks, you need to click the "Update" button. Further installation on the MBR will start as usual and the error will not repeat.
What settings you need to make before you start installing Windows 10 will depend on which BIOS version your motherboard uses and what type of hard drive is installed in your computer.
Based on this data, you can create the correct installation media and intelligently change the BIOS or UEFI BIOS settings.
How to find out the type of hard drive
Hard drives are generally divided into two types:
- MBR is a disk that has a 2 GB bar. If this memory size is exceeded, then all the extra megabytes will remain unused in the reserve, it will be impossible to distribute them between disk partitions. But the advantages of this type include support for both 64-bit and 32-bit systems. Therefore, if you have a single-core processor that only supports a 32-bit OS, you can only use the MBR;
- the GPT disk does not have such a small limit in the amount of memory, but at the same time, only a 64-bit system can be installed on it, and not all processors support this bit depth. Installing the system to a GPT partitioned disk can only be done with a newer BIOS version - UEFI. If the board installed in your device does not support the required version, then this markup will not work for you.
To find out in what mode your disk is currently working, you need to go through the following steps:
How to change the type of hard drive
You can independently change the type of hard disk from MBR to GPT, or vice versa, using the built-in Windows tools, provided that it is possible to delete the main partition of the disk - the system partition on which the operating system itself is installed. You can erase it only in two cases: if the disk to be converted is connected separately and is not involved in the operation of the system, that is, it is installed on another hard disk, or the process of installing a new system is in progress, and the old one can be removed. If the disk is connected separately, then the first method will suit you - through disk management, and if you want to perform this process during OS installation, then use the second option - using the command line.
Through disk management
By executing commands
This option can be used not during the installation of the system, but nevertheless it is better suited for this particular case:
Determining the motherboard type: UEFI or BIOS
Information about the mode in which your board is operating, UEFI or BIOS, can be found on the Internet, focusing on its model and other data known about the board. If this is not possible, then turn off the computer, turn it on and during boot press the Delete key on your keyboard to enter the boot menu. If the interface of the menu that opens contains pictures, icons or effects, then in your case a newer BIOS version is used - UEFI.
This is what UEFI looks like
Otherwise, we can conclude that the BIOS is used.
This is what the BIOS looks like
The only difference between BIOS and UEFI that you will encounter when installing a new operating system is the names of the installation media in the boot list. In order for the computer to start turning on from the installation flash drive or disk you created, and not from the hard disk, as it does by default, you must manually change the boot order via BIOS or UEFI. In the BIOS, the usual name of the carrier should be in the first place, without any prefixes and additions, and in UEFI, in the first place, you need to put the carrier, the name of which begins with UEFI. Everything, no more differences are expected until the end of the installation.
Putting the installation media first
Preparing installation media
To create a media you will need:
- an image of a system that suits you, which you need to choose based on the bitness of the processor (32 or 64-bit), the type of hard disk (GTP or MBR) and the most suitable version of the system for you (home, extended, etc.);
- blank disk or flash drive, at least 4 GB in size;
- a third-party program Rufus, with which the media will be formatted and configured.
Download and open the Rufus application and, having the data obtained above in the article, select one of the configuration packages: for BIOS and MBR disk, for UEFI and MBR disk, or for UEFI and GPT disk. Change the file system to NTFS for the MBR disk and FAT32 for the GPR disk. Do not forget to specify the path to the file with the system image, and then click the "Start" button and wait for the process to end.
Setting the correct parameters for media creation
Installation process
So, if you have prepared the installation media, figured out what type of disk you have and what BIOS version you have, then you can start installing the system:
Video: installing the system on a GTP disk
Installation problems
If you have problems installing the system, namely, a notification appears that it cannot be installed on the selected hard disk, then the reason may be as follows:
- the system capacity is incorrectly selected. Remember that 32-bit OS is not suitable for GTP disks, and 64-bit OS is not suitable for single-core processors;
- An error was made during the creation of the installation media, it is faulty, or the system image used to create the media contains errors;
- the system is being installed for the wrong type of disc, convert it to the correct format. How to do this is described in the paragraph "How to change the type of hard disk" located above in the same article;
- an error was made in the download list, that is, the installation media was not selected in UEFI mode;
- installation is performed in IDE mode, it must be changed to ACHI. This is done in the BIOS or UEFI, in the SATA config section.
Installing MBR or GTP on a disk in UEFI or BIOS mode is not much different, the main thing is to correctly create the installation media and configure the boot order list. The rest of the steps are no different from the standard system installation.