The most frightening thing about Linux is the dreaded "bootloader" phrase. The main reason for this is that most new Linux users have only been using the Windows operating system, which lacks a full bootloader or has minimal user interaction. In the Windows world, they never thought about a boot loader. For them, the process of loading the operating system was completely transparent. The most they did was use the Windows Recovery Console to troubleshoot issues. Therefore, they need to become familiar with one of the most important parts of computer software - the small program that loads the operating system.
The purpose of this article is to provide you with a basic introduction to the GRUB boot loader. If you've read my other Linux articles, then you are very familiar with Linux partitioning and conventions, as well as the command line. It is logical to take the next step to further deepen this knowledge. Understanding how GRUB works and what the boot menu entries mean will help you understand how the operating system works, how to fix errors that occur, how to repair or modify the GRUB boot menu to suit your needs, and how to install multiple operating systems with different operating environments.
On previously installed systems, we relied on the installer to do all the hard work. In fact, the daunting GRUB setup is a completely uncomplicated and completely reversible procedure. Mastering the GRUB boot loader is a very important step in improving your user experience with Linux.
But, first, an important preface. This article contains explanatory information and examples to help you learn GRUB. Of course, all this is on the Internet. However, new Linux users will probably spend hours searching for the information they need (especially if their PC - personal computer won't boot) a little frustrated. The purpose of this guide is to provide simple and quick solutions to common problems encountered in multiboot and Linux operating systems installations.
- Introduction
- GRUB configuration
- Installing GRUB
- Typical problems
- Links
Everything is a file
In order to successfully master the secrets of GRUB, you must understand one of the fundamental principles of * NIX-based operating systems. Everything is a file. Even hard drives and partitions are treated as files. This is not magic. If you remember this, then the risky task of modifying hard disk partitions will seem to you no different from manipulating files in the file manager (or command line).
Now that we know this, we can move on to an in-depth look at the technical details.
Introduction
GNU GRUB is a boot loader (i.e. a boot loader or primary loader) capable of loading a variety of free and proprietary operating systems. GRUB will work well with Linux, DOS, Windows, or BSD. GRUB stands for GR and U nified B ootloader.
GRUB is dynamically configurable. This means that the user can make changes to the GRUB settings at boot time. For example, modify existing boot entries, add new user entries, select different operating system kernels, or modify the initrd. GRUB also supports Logical Block Address mode. This means that if your computer is equipped with a sufficiently modern BIOS, more than 8GB (first 1024 cylinders) of hard disk space may be available. Accordingly, all this space will be automatically available to GRUB.
GRUB can be run or installed from any device (floppy disk, hard disk, CD-ROM drive, USB disk, network drive) and can load operating systems from a variety of sources, including network drives. He can also unpack the operating system image before loading it.
You can get more information, much more than this article, from the official GNU GRUB Manual 0.97.
What is LILO?
You've probably heard of another Linux bootloader called LILO (derived from the initial letters LI nux LO ader, which stands for Linux bootloader). While LILO is a good choice for many Linux users, I think GRUB is the best choice for several reasons:
- LILO only supports 16 different boot configurations, while GRUB supports unlimited configurations.
- LILO cannot boot over LAN, but GRUB can.
- LILO must be overwritten every time its configuration file is changed, and GRUB does not need this.
- LILO does not have an interactive command interface.
To summarize the above, GRUB looks like a winner. So let me show you what this little one can do.
How does GRUB work?
When the computer boots up, the BIOS transfers control to the first bootable device, which can be a hard disk, floppy disk, CD-ROM, or other device recognized by the BIOS. For simplicity, we will assume this is a hard drive.
The first sector of the hard drive is called the Master Boot Record (MBR). This sector is only 512 bytes long. It contains a small piece of code (446 bytes) called the main bootloader and a partition table (64 bytes). The partition table contains a description of the primary and secondary partitions on a hard disk.
By default, the MBR code is viewed on the active partition, and if it is found, then its boot sector is loaded into memory and control is transferred to it.
GRUB replaces the default MBR code with native code.
In this case, the work of GRUB consists of several stages.
Stage 1: placement in the MBR. Due to the small size of the MBR, only a link to go to Stage 2 is posted, which contains all the required data.
Stage 2: Navigate to the configuration file, which contains all the user interface components and settings necessary for GRUB to work. Stage 2 can be anywhere on the disk. If, as a result of Stage 2, no configuration table is found, GRUB will abort the boot process and present the user with the option to manually select a boot configuration from the command line.
There is also Stage 1.5, which is used if the boot information cannot be placed directly after the MBR.
The Stage structure allows GRUB to have a fairly large volume (~ 20-30K). Therefore, GRUB is quite complex and highly configurable compared to most boot loaders, which are more compact and easier to fit within the Partition Table limits.
GRUB terminology
This section is intended to help you get comfortable with GRUB without touching it. The next section covers actual files and manual GRUB configuration.
GRUB has its own conventions, which are slightly different from the common conventions used in Linux.
Here's an example of a typical GRUB start:
(hd0,1)
- Required parentheses, which must enclose all devices listed on the GRUB menu.
- hd stands for hard drive. A floppy disk is designated as fd, a CD-ROM as cd, etc.
- The first number (integer, for advanced users) is a reference to the physical hard drive number. The first drive is numbered starting at zero. As an example, hd2 is a link to a third physical hard drive.
- Second number, a link to the partition number of the selected hard disk. Section numbering also starts from zero. In this case, 1 corresponds to the second section.
It follows that GRUB (menu) does not distinguish between IDE and SCSI drives or primary and logical partitions. The task of determining which hard disk or partition should be loaded is determined by the BIOS and in Stage 1.
As you can see, the legend is very simple.
Primary partitions are designated from 0 to 3 (hd?, 0), (hd?, 1), (hd?, 2), (hd?, 3). The logical partitions in the secondary partition are numbered starting at 4. Their numbering does not depend on the current number of primary partitions on the hard disk. For example, (hd1,7).
This input alone is not sufficient to load the operating system.
GRUB also needs to know which operating system image to load. These parameters and special flags (keys) are assigned to each boot device. For example, a special flag for Windows Safe Mode.
Shown here is an example of a GRUB menu that boots only Ubuntu.
Shown here is an example GRUB menu for a triple boot machine (SUSE 10.2, Ubuntu 6.10, and Windows XP). This is a real menu.lst on one of my existing machines.
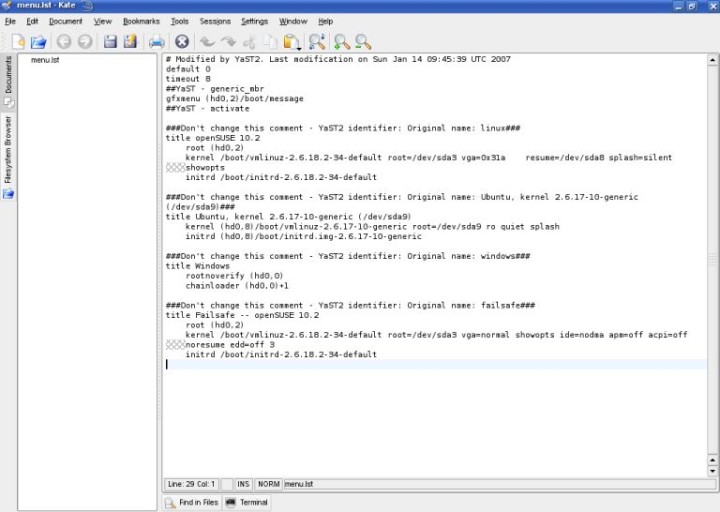
Try to understand what this data means. Only uncommented lines are counted. Comments are denoted with the special # character. Lines starting with several consecutive gray x (previous line indicator) are continuation of the previous line. In other words, the text is simply wrapped to improve the visual perception of long lines on the screen, taking into account the size of the text editor window and the screen resolution.
Default 0 timeout 8
The first line (default 0) means that the first operating system from the list will be loaded. In our case, this is SUSE 10.2. The second line (timeout 8) tells how much time (in seconds) the user has to select a system to boot before the default system boots. Simple, isn't it?
Gfxmenu (hd0,2) / boot / message
GRUB menus can be graphical. Everything you need to display a nifty custom view with a colored background and some additional elements is located on the first physical disk, the third partition (hd0,2). This is the primary section, as you may have noticed.
Title openSUSE 10.2 root (hd0,2) kernel / boot / vmlinuz -... initrd /boot/initrd.img -...
This is the first operating system on the menu.
- title (title) - elementary, means the same as its meaning. This line is intended to help the user read the menu in more accessible terminology.
- root (hd0,2) tells GRUB where its configuration files are located. In this example, they can be found at (hd0,2) / boot / grub.
- kernel / boot / vmlinuz -... loading the kernel module of the current operating system. Several similar images may be available. The fact that there is no reference to the boot device before / boot / vmlinuz means that the image is located on the same hard disk partition as GRUB itself. This circumstance often determines your choice of the default operating system.
- initrd /boot/initrd.img -... is a temporary system file that is created by the system in preparation for booting. Preparation includes adapting a generic kernel module for a specific hardware, before loading it.
Additional keys are used after specifying the kernel. They determine the current location of the root directory (root), the graphics mode used, and the location of the swap partition. This article will not cover advanced GRUB configurations in detail.
Title Ubuntu, kernel ... (/ dev / sda9) kernel (hd0,8) / boot / vmlinuz -... initrd (hd0,8) /boot/initrd.img -...
- In this case, title is the display name, with some additional technical details.
- kernel (hd0,8) / boot / vmlinuz -... placement of the 9th partition on the first hard disk (hd0,8). The root flag (/ dev / sda9) means that the root partition also contains a kernel module, that is, they are located on the same hard disk partition. Usually, this is done for reasons of practicality and simplicity. You can change this location during operating system installation.
- initrd (hd0,8) /boot/initrd.img -... nothing new here.
Notes on Kernel Module and Root Partitions: On older computers whose BIOS does not support access to more than 1024 cylinders, you had to install the boot partition containing the kernel module and root partition in different locations. However, users with computers younger than the Y2K problem (Y2K problem) need not worry.
Another thing you should look out for is the Ubuntu verbose download. Ubuntu is loaded with the OpenSUSE bootloader. This property is called Multi-boot Compliance. OpenSUSE recognizes Ubuntu and can properly invoke its modules (including special keys) and mount partitions. However, most operating systems are only partially compatible with this feature (Multi-boot Compliance).
Later I will show you how you can log into Ubuntu differently with the same results.
Title Windows rootnoverify (hd0.0) chainloader (hd0.0) +1
- rootnoverify (hd0,0) means that openSUSE cannot detect the Windows operating system because it does not have the Multi-boot Compliance property. For this reason, the operating system is called without any additional information about its kernel. GRUB assumes that the required kernel image will reside on the specified partition and mounts the operating system bootloader. As you can see, Windows was installed on the first partition of the first hard drive. This is the most convenient location for the system.
- The chainloader (hd0,0) +1 command is specifically intended for use with operating systems that cannot be directly loaded. Not surprisingly, Windows operating systems cannot be loaded directly. They are loaded using the chainloading method. As the name suggests, GRUB transfers control of the boot sequence to another boot loader located on the device specified in the GRUB menu. It can be a Windows operating system or any other, such as Linux.
Let's go back to Ubuntu. Do you remember I said that we can boot Ubuntu in a different way? Indeed, we can simply use chainloaded, just like we did for Windows.
Title Ubuntu root (hd0.8) chainloader (hd0.8) +1
This will work just as well.
The next item on the menu allows you to boot SUSE in failsafe mode (a kind of safe mode). This paragraph does not contain very valuable and useful information, so we will skip it without prejudice to our knowledge.
Let me give you a few examples.
The following is a valid example, which is recorded in Ubuntu menu.lst (commented out of course).
Title Windows 95/98 / NT / 2000 root (hd0,0) makeactive chainloader +1 title Linux root (hd0,1) kernel / vmlinuz root = / dev / hda3 ro
Now you can easily understand the GRUB language. We started with title. root is a specific partition on which we expect to find the Windows kernel and mount it (rootnoverify this job will be left to the Windows bootloader). makeactive is a command that makes active the root partition on the drive indicated on the previous line of GRUB root device. This means that the chainloader command is executed without specifying the target system partition (since this partition is the same as the active one).
The second menu item is even simpler. We named it Linux, defined its partition, and loaded its kernel. This case is very interesting. Since the kernel image and the root partition (root or /) are on different partitions. This case is very similar to the case of older computers or computers with a single boot partition.
And finally, absolutely crazy things:
You understand that everything is simple! When you fill your hand, all doubts will disappear.
For more information, you need to refer to the GNU GRUB Manual 0.97.
GRUB configuration
Most of the time, you won't have the desire or need to configure GRUB. When you install operating systems, GRUB will be installed automatically and the appropriate lines will be added to the configuration file, especially if the correct operating system installation sequence is chosen (authoritative, i.e. Windows-like operating systems, first, flexible operating systems, i.e. Linux and its family - after).
However, you need to know where and what to do if something goes wrong.
Installing GRUB
GRUB can be installed on a variety of devices. Most people will be interested in the process of installing GRUB onto a hard drive. However, studying its other settings doesn't hurt at all. You can of course move on.
We haven't installed GRUB before, so we need to know the location of the required files.
If GRUB is installed, then its menu is inside the root partition:
/boot/grub/menu.lst
Always, always back up this file before making any changes!
Also, GRUB files can be located inside your operating system image (usually CD):
/ usr / lib / grub / i386-pc
Nevertheless, here is a short version of it, for those who are not happy with the reading of another article.
You can display any information about your PC environment (personal computer) using a terminal or a text editor. To open files in a text editor, you must specify the text editor, file name and path to it on the command line. To open system files, you must have superuser rights (su or sudo for system files).
$ sudo vi / etc / fstab OR $ sudo gedit / etc / fstab
Or, you can simply display the contents of the files directly to the terminal using the cat command.
$ (sudo) cat / etc / fstab
Several useful commands that can be helpful if you are dealing with booting, hard drives, and partitions.
Displays the partition table:
$ fdisk -l
Displays a list of mounted partitions:
$ cat / etc / fstab
Now we know what is needed and where to find it in order to install GRUB.
GRUB on a floppy disk
In order to install GRUB on a floppy disk, we must copy the files (Stage 1 and Stage 2) from the operating system image directory to the first and second sectors of the floppy disk. To do this, we will use a command that copies information sector by sector.
Below is a list of commands that need to be executed (taken from the manual):
$ cd / usr / lib / grub / i386-pc $ dd if = stage1 of = / dev / fd0 bs = 512 count = 1 $ dd if = stage2 of = / dev / fd0 bs = 512 seek = 1
A little clarification: if indicates an input file, of indicates an output file, / dev / fd0 refers to the first mounted floppy drive, bs is the given block size (in bytes), count is an instruction indicating the number of blocks to be copied, and seek indicates how many blocks will be skipped before writing. Unsurprisingly, this sequence of write commands is chosen. First, we wrote stage1 to the first sector and copied stage2 to the second (skipped the first sector and then wrote).
Now that you have understood the full power of the command line, as a homework, I suggest you figure out the features of other commands yourself. Learn more about the dd command on Wikipedia.
It's all about installing GRUB on a floppy disk. Since we copied the stages from the operating system image, we have all the necessary information to configure. Of course, you can always make changes manually. However, more on that in the next section.
Installing GRUB by default
The default setting means placing GRUB Stage 1 in the first sector of the hard disk (Master Boot Record - MBR or Partition Table). This means you can boot without a second device like a floppy disk, which has become rare these days. It also means that if you install an authoritative operating system later (like Windows) or restore the master boot record for some reason (run fdisk / MBR from the DOS command line), you will uninstall GRUB and make all systems unbootable. menu.lst.
To install GRUB to MBR, you need to boot from external media (floppy disk, live CD Linux). Once booted, as soon as the GRUB prompt (grub>) is available, run the following commands:
Find your GRUB root device:
Grub> find / boot / grub / stage1
GRUB will search for all available Stage 1 and display them on the screen. If you have more than one operating system image (e.g. SUSE, Kubuntu, Mandriva), you will have several Stage 1 available.
Let's say your computer has the following operating systems installed on different partitions on your hard disk.
- SUSE on (hd0,1)
- Kubuntu on (hd0,2)
- Mandriva on (hd0,4)
These systems have their own GRUB, so any of them can be used as a GRUB device (since they each have their own GRUB files).
If you want to use SUSE GRUB, you need to make the first hard disk partition (hd0,1) the GRUB root device:
Grub> root (hd0,1)
If you want to use Mandriva "s GRUB, you need to do the following:
Grub> root (hd0,4)
If you know the location of the GRUB root partition and the required files, you can do without the find command.
If you have defined a root partition, you need to write the information to the MBR (Master Boot Record):
Grub> setup (hd0)
Finally, exit the GRUB console:
Grub> quit
Here is the entire sequence of commands you need to execute:
Grub> find / boot / grub / stage1 (optional) grub> root (hdX, Y) grub> setup (hd0) grub> quit
You can install GRUB on a different physical disk or partition. In this case, you will need to chainload, that is, you need to transfer control from GRUB to another bootloader, which will boot the system instead.
It's all. Simple and fast!
Installing GRUB with grub-install
This method is considered less secure (according to the manual), as it performs automatic disk conversion. You can calm down, for complete beginners who need detailed help with installation, this is probably the most preferred method.
You only need to call one command with one argument - specify the location where the bootloader should be installed. This command can be written in several ways, which are equivalent:
$ grub-install / dev / hda $ grub-install / dev / hd0 $ grub-install "(hd0)" $ grub-install hd0
After you've installed GRUB, your operating system will boot. After the operating system boots up, you can experiment with GRUB again. Manually change settings, such as add and remove configuration data, change chainloaders, hide and show partitions.
Manually configuring GRUB (after installation)
You can reconfigure or reinstall GRUB at any time.
Backup!
First, it is highly recommended that you back up your existing menu before making any changes to the GRUB config file. You can even copy to another machine or print the menu and store it in the safe.
$ cp /boot/grub/menu.lst /boot/grub/menu.lst_backup
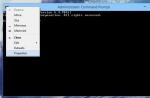
To access GRUB, run the following command in a Linux terminal:
$ sudo grub
After a while, the GRUB prompt will be shown on the screen. You can tell if there is a prompt by looking at it: grub>.

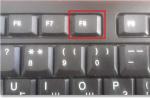
You can also access the GRUB command line at boot time. When the GRUB menu loads, press the C key on your keyboard.
Adding a new operating system to the GRUB menu
Suppose you have a pre-installed Sabayon operating system (Sabayon Linux formerly known as RR4 and RR64 is a Linux kernel distribution that is a fork of the Gentoo distribution). During the installation process, you skip installing GRUB. This means that the configuration files of the previously installed GRUB have not changed and do not contain information about Sabayon. And Sabayon won't be able to load.
Note: The sections of the GRUB menu are called rooms (perhaps this is a feature of this instance?).
Thus, we need to add Sabayon to the GRUB config file.
If you know where Sabayon was installed, then you need to add its details to menu.lst.
Title Sabayon root (hdX, Y) chainloader +1
However, this can be done while the computer boots up without editing the menu. When the installed GRUB starts to boot, press the C button to bring up a command prompt. And then:
Grub> root (hdX, Y) grub> chainloader +1
Optionally, you can use the find command to find out the required data.
This is all the magic of GRUB. As you can see, it is very, very simple. But for people who have never heard of GRUB and only seen a long list of strange commands, it can seem daunting.
Now that we know the basics of bootstrapping and GRUB, it's time to get some more information and tackle the most common problems that can arise.
Typical problems
How do I restore GRUB after uninstallation?
This often happens if you are installing Windows after Linux. Windows believes that it is the only operating system in the world and does not try to interpret the existing information in the MBR. She just overwrites it. For people with a dual boot system and a little Linux knowledge, this is a disaster. Fortunately, this is very easy to fix.
The easy way
The hard way
- Boot from floppy disk or CD (any Linux live CD should work)
- Enter GRUB command line mode.
Everything is the same as before!
Windows is not installed on the first hard drive (Swap)
GRUB cannot load the Microsoft operating system directly. Sometimes even sequential boot may not work, especially if Windows is not installed on the first hard drive. Again, you must remember to install Windows first, on the first hard drive and on the first partition (rule 3R - the first three). That being said, even if you installed Windows on a separate drive, you can fix the problem by swapping.
You need to do a virtual swap between hard drives. Thus:
Grub> map (hd0) (hd1) grub> map (hd1) (hd0)
After adding these two lines, you must boot Windows (or DOS).
Several Windows operating systems are installed on one first hard drive (Hide / Show)
Again, problems with Windows can arise if there are several instances located on the same hard disk, especially if they are installed on primary partitions. Previously, when you used the chainloader command, you were giving control to the Windows boot loader. Which operating system loader should be given control now?
The problem is easily solved by hiding and showing the sections. If GRUB hides a partition, it will be invisible to Windows to avoid ambiguity. Conversely, if you make the partition visible, Windows will detect it and be able to boot from it.
The example here, taken from the manual, demonstrates this point.
Suppose we have Windows installed on the first and second partitions of the hard drive. You want to boot the first instance of Windows. Then you need to run the following sequence of commands which will do all the work required.
Grub> unhide (hd0,0) grub> hide (hd0,1) grub> rootnoverify (hd0,0) grub> chainloader +1 grub> makeactive
You have resized the partition; GRUB doesn't work
This is an interesting case. It can happen after using hard disk software (managing hard disk partitions, recovering partitions from partition images, etc.) that modifies the Partition Table. This usually happens when you make such changes from Windows. Linux will not be informed of these changes because Windows is oblivious to anything other than Microsoft's products on this machine. Hence GRUB will not work.
Most likely, the file system is damaged and needs to be restored to solve this problem.
Boot from the live CD and run the following commands (assuming you know where the Linux partitions are located).
Check the filesystem:
$ fsck.ext2 / dev / hdXY
Replace X and Y with the hard drive letter and partition number you want to check (hda2, hdb3, etc.).
Change the filesystem type to ext2 / 3 filesystem.
$ tune2fs -j / dev / hdXY
Now mount the root filesystem at / mnt / sysimage and run grub:
$ mount -t ext2 / dev / hdXY / mnt / sysimage OR $ mount -t ext2 / dev / hdXY / mnt / sysimage $ cd / mnt / sysimage / sbin $ grub
You are back in a familiar environment again.
For more information on Linux commands such as fsck.ext2, tune2fs and others, refer to the Manual pages on Linux Reviews.
In conclusion, a few tricky questions answered in Ubuntu
A bootloader is used to initialize the kernel and start the Linux operating system. This is a program that runs after the BIOS has completed a hardware check, prepares the hardware for operation, sets the desired kernel parameters, and allows you to select an operating system. The main task of the bootloader is to give the user the choice of the operating system to boot.
Previously, several boot loaders were used to boot Linux, these are isolinux, lilo, grub. But now the most commonly used is Grub or its full name GRand Unified Bootloader. This article will walk you through installing the Grub bootloader via the terminal. We will also talk about how to install grub on a UEFI computer, also manually.
As I said, the main task of the bootloader is to provide the choice of the operating system before booting. Don't assume that Windows doesn't use a bootloader, it also exists and works, just like Grub does.
The bootloader can be installed in various disk partition tables. Currently, the most used are GPT and MBR. The installation of the Grub bootloader is slightly different for each of these tables, given their specifics. You can read more about the differences in a separate article. I will immediately say that GPT is a newer and more functional partition table, MBR is already obsolete, but still often used.
There are few options in MBR, Grub writes to the MBR area on disk. The size of the MBR sector occupies the first 512 bytes and this is quite enough to install the bootloader there.
GPT provides more advanced capabilities. First, for compatibility, GPT emulates the MBR sector, and we can install GRUB there, but this option is very unreliable and not recommended. Secondly, it is now possible to install Grub on a disk partition. We simply create a 1MB partition on the disk and write there what was previously written to the MBR, this makes the bootloader installation more reliable and safe from failures.
UEFI provides a very different way to install the bootloader. Here it does not need to be written anywhere, the bootloader is a normal EFI application that is placed on the EFI partition and already there it fully successfully works along with other applications.
The grub-install command will be used to install Grub, in all cases. Let's take a quick look at its syntax and parameters. Syntax:
$ grub-install options disk
There are a lot of parameters here, but we will only need a few:
- --compress- compress bootloader files;
- --install-modules = modules- install only these modules;
- --modules- write these modules to MBR;
- --boot-directory- use a different directory for the Grub files;
- --bootloader-id- the name of the bootloader in the EFI menu;
- --core-compress- compress the image loaded into the MBR;
- --efi-directory- use the EFI system partition;
- --force- install despite errors;
- --recheck- remove the existing device map, helps if errors occur;
- --removable- installing grub on a USB stick (EFI only);
The base was taken apart. Now let's move on to the installation. Further I will assume that all actions are performed from the system for which you need to install the bootloader or from the chroot environment of this system.
Installing Grub Bootloader in MBR for BIOS
Let's start with the most simple and familiar. This instruction on how to install the Grub bootloader is suitable for any distribution, since the commands are almost the same everywhere. There is no need to install any additional packages or create partitions here. Installing Grub on your hard drive is done with the command:
sudo grub-install / dev / sda
sudo grub2-install / dev / sda
The grub utilities in different distributions may or may not include two. Here / dev / sda is your hard drive. Now we generate a configuration file to automatically detect the installed operating systems:
sudo grub-mkconfig -o /boot/grub/grub.cfg
Ready. There is the same remark about the deuce. If you want to install Grub on a USB flash drive in MBR, then there is no problem either, just mount the USB flash drive and run the following command:
sudo grub-install --root-directory = / mnt / USB / / dev / sdb
Here / mnt / USB is the folder where your flash drive was installed, and / seb / sdb is the flash drive itself. There is only one problem here, the configuration file will have to be done manually.
Installing Grub Bootloader in GPT for BIOS
First, we can leave nothing and install Grub as described in the previous method. But then it will be installed in the MBR compatibility area, which is not reliable. Therefore, it is recommended to install grub as described below on a separate partition.
The partition we need can be created in the installer of any distribution, if you are installing in the graphical interface or using gparted. We need a 1 Megabyte partition without a filesystem and labeled grub_bios:

Ready. If you do not have access to the graphical interface at hand, you can create such a section through the terminal. The fdisk utility does not support gpt, so we will use gfdisk. First run the utility:
sudo gdisk / dev / sda

To create a new partition press n and select the partition number:

We agree with the initial sector, the first free one will be used:

We select the final sector of the partition. Maximum will be used by default. We need a 1 MB partition. The size of one GPT sector is 512 bytes, so we need a 2048-sector partition. So the final sector will be 24,000-something.

The HEX Code is the code that tells the system to use this section for Grub, it needs to be installed ef02:

Done, it remains to press w to write the changes to disk:

sudo grub-install / dev / sda
It remains to create the grub config file:
sudo grub2-mkconfig -o /boot/grub2/grub.cfg
Now let's move on to the hardest part, how to install grub efi.
Installing GRUB UEFI GPT
Installing Grub UEFI is somewhat similar to installing in GPT, here we will also have a separate partition, only this time not for the bootloader, but the EFI partition. If you already have Windows installed, then most likely it already exists. This partition is usually 100 MB in size, has a fat32 file system and an ESP flag. This is how it will look:

If there is no such partition, we can create it using gparted. To do this, create a section with the following parameters:

Size 100 Megabytes, partition name ESP, file system fat32... Then apply the changes and set the flag for the section ESP:

You can do the same in Gdisk, only this time you need to install the HEX Code of the section. ef00... After the partition has been created, we connect it to our file system:
sudo mkdir / boot / efi
$ sudo mount / dev / sda2 / boot / efi
sudo apt install grub-efi efibootmgr
grub-install / dev / sda
Installing Grub efi on an MBR looks exactly the same, only there are a few limitations. The ESP should only be created at the beginning of the disk. In EFI mode, you can also install GRUB on a USB stick, and it's not very difficult. The command is used for this.
Today I would like to show you a way to restore GRUB 2 after installing or reinstalling Windows on a Linux computer.
If you use a dual boot from Windows and Linux on your computer, then you probably already know that during the installation of the OS, in order to make less fuss, it is better to install first and then only Debian or whatever you want to install there. This is due to the fact that Windows does not see other operating systems besides its own and over the bootloader GRUB writes its own bootloader to the MBR. Accordingly, if you install Linux first and then Windows, then in the end you will not be able to boot Linux, since it simply will not be in the boot list. But what if you still need to reinstall Windows or just install it on your Linux computer? Do not reinstall Linux for the sake of this? No. It's just that after everything you've done, you'll need to rebuild the GRUB bootloader.
For demonstration, I will give my case with virtual machines, but this method is no different from restoring GRUB on real hardware.
I had Ubuntu 14.04 and Windows 7 installed on one virtual hard disk. And so I wanted to try the developer version of Windows 10. I decided to install it over the seven. As expected, after all the manipulations, Windows 10 started working, and Ubuntu did not start. Since I needed Ubuntu for work, I decided to restore the overwritten GRUB.
Recovering GRUB 2
First you need to boot from LiveDVD. When the system boots up, open a terminal (Ctr + Alt + T) and look at the partition structure using the command:
Sudo fdisk -l

As you can see from the command output, my disk is divided into 6 partitions: two NTFS for Windows, Extended (extended) and three marked as Linux for Ubuntu. To install GRUB you need to mount the Ubuntu root partition - my sda5:
Sudo mount / dev / sda5 / mnt
And to write GRUB to the boot record, you need to run the command in the terminal:
Sudo grub-install --root-directory = / mnt / dev / sda
After that, you can restart your computer:
Sudo reboot
GRUB has been restored. But there was one moment. Now Windows 10 was installed on the virtual machine, but in the bootloader menu it was still displayed as a seven, which is why an error popped up when trying to start it. To fix this, it was enough to simply boot into Ubuntu (not LiveDVD) and update the bootloader via the terminal.
More than a dozen new non-Windows users meet the phrase "bootloader" with a fair amount of doubt and skepticism these days. And there is an absolutely logical reason for this: the majority of newcomers, before switching to using other, less common operating systems on the market, used the same Windows in their daily life. In it, this loader is implemented as primitive and transparent as possible. And although this to some extent adds convenience for an ordinary user, at the same time, it also cuts down the functionality of the already most popular and universal OS. Therefore, all those who decided to pay attention to other products of the IT industry should certainly familiarize themselves with the universal GRUB bootloader, which in the future will significantly help in working with several operating systems installed on one computer.
Universal tool for non-universal systems
First of all, let's start with the GNU GRUB naming convention. This abbreviation from English translates as "the main unified bootloader". Its creator is the GNU Project, a non-profit organization that has become famous in the IT field for its free software. GRUB itself, by its very nature, is a menu for choosing the boot of the OS necessary for the user from a whole list of supported systems:
- Linux.
- FreeBSD.
- Solaris.
In this case, GRUB will be able to work even with Windows. However, for launching such systems that are not directly supported by this bootloader, there are special nuances that we will study a little later in all details and details.
Technology development path
The ever-growing popularity of GRUB has been a fundamental reason for steadily developing and improving the bootloader in the future. The very first version of the boot loader, named GRUB Legacy, still does a great job of handling the tasks of a unified boot loader for UNIX-like systems. The wide support of serious companies (like RedHat and Novell) and server distributions ensured it a long life in general.
However, even this circumstance did not in any way affect the further improvement of the boot loader, thanks to which users received the latest version of GRUB 2 at this time. Being rewritten from a clean line, GRUB 2 hardly has anything in common with the outdated GRUB Legacy, except for the name itself ... Today, being the default Ubuntu operating system since version 9.10, GRUB revision 2, thanks to its more advanced and powerful structure, completely stopped any further development of the already well-proven Legacy in the past.

However, a beginner should understand from the outset that GRUB 2 is a more complex boot loader than the previous version. Therefore, in order to save users from possible difficulties and problems, then all the smallest details will be presented simply and in detail, understanding of which will allow you to take full advantage of all the innovations of the latest version, and there are quite a few of them:
- Scripting support (for loops, conditions, variables and functions).
- The graphical interface adds the ability to flexibly change the appearance of the bootloader to suit the individual user's taste (GRUB 2 can be easily changed from a black and white table to a stylish multicolored window).
- Possibility of dynamic loading of modules. This will allow expanding the functionality not at the assembly stage, but directly at runtime.
- Compatible with different architectures.
- Added support for booting Mac OS.
- Added stable work with such file systems as: FAT16, FAT32, NTFS, any version ext, XFS and ISO
- Cross-platform installation type will allow you to install GRUB2 from a different architecture
- Introducing a safe mode in case of problem situations.
- Fixed bugs from old GRUB Legacy that initially could not be fixed due to requirements
Have you all heard of LILO?
Of course, not only GRUB is limited to the choice of users among OS loaders. A similar analogue is LILO - the Linux boot loader (LInux LOader), which still does not completely lose its relevance. However, in favor of GRUB, several distinctive features should be taken into account. So far, the direct competitor definitely cannot boast:
- LILO only supports 16 boot configurations, while GRUB has support for an unlimited number of boot configurations.
- GRUB can boot over a local network, which is not the case with LILO.
- Finally, LILO does not have the same command-line interactive interface that users of the latest version of GRUB have long been accustomed to.

The only common feature of both loaders is the need to compile all the changes made to the menu every time. The autosave feature has long been absent from the proprietary Linux bootloader. GRUB 2 also lacks such a handy feature. But even taking into account this nuance, inconvenient for everyday use, LILO loses to its competitor on several points, thanks to which it is becoming more and more widespread among users' home computers.
Installing GRUB: all the nuances and details of the process
Make sure you have either Ubuntu installed or a bootable CD (LiveCD) from the beginning. After starting the system, you need to call the terminal with the Ctrl + Alt + F2 keyboard shortcut, and then write the following commands in it:
Sudo add-apt-repository ppa: cjwatson / grub,
Sudo add-get update && sudo add-get install grub2,
Sudo update-grub2.
And even if you do not have Ubuntu installed, but have a LiveCD, the procedure remains the same with only one tiny difference. Having booted from this, select the "Try Ubuntu" option - this way you start the system without any changes on your computer. After that, continue to install the GRUB boot loader in the same way from the terminal invocation step.
You can check the installed version of the bootloader with the command grub-install -v, as well as directly when you boot Ubuntu.
GRUB startup algorithm
As GRUB Install completes, the boot loader first changes the MBR code to its own. MBR is a sector containing the Master Boot Record (from the English.Containing in itself:
- main bootloader code (446 bytes);
- partition table with descriptions of both primary and secondary hard disk partitions (64 bytes).

Due to the small size of the MBR sector, launching GRUB fits into two conditional stages:
- The MBR contains a link to the configuration file (which can be located on any hard disk, at the discretion of the user himself). It is on it that the entire boot stage, starting at the second stage, will be determined.
- Their configuration file takes into account all the settings and data required for GRUB to work. If the configuration file was not found at the second stage, the boot process will be terminated and the user will have to manually select the boot configuration from the command line.
This boot structure allows GRUB to be "more broadly configurable and flexible than many other analogues, in which this process is simplified to maximum compactness.
Most commonly used console commands
A considerable scope of working possibilities in the console mode of the latest version of GNU GRUB, customization and configuration possibilities will also not leave indifferent users. In order to get into it, just press the "C" key while the boot menu is displayed, after which it remains only to correctly enter the commands you need:
| Commands | Description | Example of console input |
| ls | A universal command for working with lists of hard drives and partitions. Can be used to display the contents of a folder. | ls / boot / grub |
| Its use will give complete information about absolutely any section. This will indicate the type of file system on it, its label, UUID, as well as the date of the last changes. | ||
| cat | Displays information about the content of a specific file. | cat / path / filename |
| linux | An analogue of the GRUB kernel command from the good old version of Legacy, which allows you to boot the specified Linux kernel. | linux kernel_file option1 = value option2 option3 |
| chainloader | Transfer of load control to another bootloader along the chain. The loader will be searched exclusively in the section that is specified as root (of course, with the indication of a specific executable file). | chainloader / path / filename |
| root | When using the command without any parameters, the user will receive information about the root partition, as well as the type of file system on it. | root |
| Less commonly (due to the likelihood of incorrect operation) it is used to transfer root to another partition. | *, * - disk number and partition number on it, respectively |
|
| set | Most often, due to its stability and performance, it is used to remap the root partition on a disk. | set root = (hd *, *) *, * - disk number and partition number on it, respectively |
| search | The command to search for a UUID section, a label, or by a specific file. The following keys are used to set search parameters:
The command is useful if the numbering of disks and partitions "flies", because of which the set root command will either lead to nowhere, or to the wrong partition of the wrong disk. | search -u uuid_required_key search -l section label search -f / path / filename |
| lsfonts | Displays a list of currently loaded fonts. | lsfonts |
| help | Used to display the entire list of available | help |
| Or to output commands starting with a certain combination of characters. | help s - displays help for all commands starting with s. help set - Displays help about the set command. |
|
| terminal_output.console | Switch to black-and-white display color gamut. | terminal_output.console |
| background_image | Change the background image in real time. It only helps in the selection of such a design option for fonts so that they are distinguishable against a given background. Please note: the command does not change the appearance settings - the image remains in the background only in the current session until the next shutdown. | background_image / path / filename |
| boot | Load your computer. | boot |
| reboot | To restart a computer. | reboot |
| Turn off computer. | halt |
Post-installation GRUB: setup and useful software
The main configuration file in GRUB2, unlike the previous version of Legacy, is not /boot/grub/menu.lst, and already /boot/grub/grub.cfg. However, it is pointless to edit it directly - it will be generated with each saved change in the settings file / etc / default / grub and in the script directory /etc/grub.d.
V / etc / default / grub customization is mainly limited to changing the default boot item and / or menu display time:
- The parameter is responsible for the first item of changes. GRUB_DEFAULT, the value of which denotes the item number in the boot menu. When choosing any other item, the user must know its order from the general list (for this, you need to view the contents /boot/grub/grub.cfg and find the required entry on the account). At the same time, do not forget the numbering rules: the first item is assigned the value 0, the second - 1, the third - 2, and so on.
- The parameter is responsible for the delay in displaying the boot menu. GRUB_TIMEOUT, whose assigned value in quotation marks indicates the number of seconds that this splash screen will appear. There is one tricky feature in editing this parameter: by setting the value to "-1", the splash screen will hang exactly until the user selects an item.
A set of scripts in /etc/grub.d find all installed systems and kernels on the computer, forming a boot menu in grub.cfg. For the search for kernels and other operating systems, respectively, two main ones are responsible: 10_linux and 30_os-prober. The 40_custom file allows you to change GRUB by adding your own boot points, which is useful for working with special types of system startup (note that for any changes it must end with an empty line, otherwise the last boot point of all the proposed ones will not be displayed corny).

However, an even easier way to edit GRUB on an Ubuntu system is with the Grub-Customizer utility. Due to its simplicity and intuitive interface, it is the best option for configuring the bootloader, most suitable for inexperienced beginners. To install, start the terminal (Ctrl + Alt + T), then enter the following commands in it one by one:
Sudo add-apt-repository ppa: danielrichter2007 / grub-customizer,
Sudo add-get update,
Sudo add-get install grub-customizer.
And although the translation of the Grub-Customizer program leaves much to be desired for the best execution, it is very easy to understand it:
- List configuration- when the system boots. Here the order of its items is changed.
- basic settings- selection of the system to be loaded by default, as well as defining the waiting time.
- Appearance - editing the appearance of the boot menu.
In addition to all the variety of settings, the user should certainly pay attention to the well-proven software for working with GRUB, the configuration and diagnostics of which will become much more comfortable:
- Super Grub Disk- a simple and convenient tool for quick bootloader recovery. At the same time, he knows how to work not only with GRUB and LILO, but even with Windows itself. Runs from CD, flash drive or floppy disk.
- Gparted- editor of sections of disk partitions, launched directly from CD. With its help, you can carry out such operations with partitions and file systems on them, such as: create, delete, resize, check, move and copy.
- SystemRescueCD is a Linux distribution specially designed for disaster recovery.
- TestDisk- a utility that allows you to diagnose and recover both individual partitions and entire boot disks.
How does the bootloader handle Windows?
Directly, unfortunately, GRUB in no way can boot Windows x86 (64-bit is no exception), which is why you have to create an appropriate chain launch mechanism. To do this, in the configuration file grub.cfg it is necessary to add several lines of certain commands:
Title Windows,
Rootnoverify (hd *, *),
Chainloader +1,
An example and a detailed description of the latter was just given in the table of console commands. Now the same practical case has come when it will come in handy at work. However, before it there are a couple of lines that are no less important for loading Windows:
- rootnoverify (hd *, *)- the same analogue set root... It informs GRUB of the location of the partition where the next part of the boot code is located, but does not mount it (for the obvious reason that this cannot be done for GRUB). Note again that part (hd *, *) is the disk number and partition number, respectively, on which Windows is installed.
- makeactive- the command gives the specified root partition the boot status.
Now the same team chainloader +1, which transfers all further boot control directly to the Windows bootloader.
Finally, the final boot command implements the boot start, after which you can safely work in the selected operating system.

It also happens that not one, but two or even more versions of Windows are installed on the hard disk. And then carry out a stable launch without additional hide / show commands ( hide / unhide) sections are simply unrealistic. The bottom line is that if the hiding of a drive partition is specified in the GRUB configuration file, then Windows simply won't be able to read it. And if the section is visible, then it will be possible to boot from it accordingly.
If you have several operating systems, first determine which instance you want to load, then check its exact location - you need to know on which hard disk partition it is installed. For example, there are two different versions of Windows located respectively on the first and second partitions of one drive, and the user needs to load the second one. To do this, the following changes must be made in the menu.lst file:
Title Windows,
Unhide (hd0,1),
Rootnoverify (hd0,1),
Chainloader +1,
Compared to the previous code sample, the following commands have been added hide and unhide, thanks to which the user will be able to load the desired operating system from the specified partition of the hard disk.
Reinstalling GRUB for Critical Issues
Even in the event of a technical problem, restoring GRUB is a snap. First, load the installation LiveCD, open the terminal with the keyboard shortcut CTRL+ALT+T.
After that, we enter the commands one by one:
- sudo grub-install / dev / sda - install GRUB directly to the MBR (sda is the boot disk);
- sudo update-grub - Search for other boot records on your hard drive (eg Windows).
Now all that remains is to restart the computer and make sure that the reinstalled bootloader is fully operational.
Reboot loop protection question
The need for such a protection system integrated into the GRUB bootloader arises when the size of the logs located in the / var / log directory, due to uncontrolled recording of information in them, grow to unacceptable volumes. In a normally operating system, special services are provided that archive and clean up these logs in automatic mode. Thus, in most cases, the user absolutely does not need to spend time controlling their volume.
However, these same services are started only after the operating system is loaded. Prior to that, the size of the log files was absolutely not monitored by anything, which is why in the event of an unforeseen system crash and further reboots, the logs will only grow in volume. And this uncontrolled growth of them will continue exactly as long as reboots last due to a system failure. Subsequently, all this can lead to the complete filling of the partition on which the / var / log directory is located, which is fraught with the system freezing tightly and the impossibility of starting even the recovery mode.

It is from this catastrophic situation that the GRUB integrated protection system against cyclic reboots saves the output of the "frozen" GRUB menu, waiting for explicit user intervention. The protection itself is guided by the value of the recordfail variable written in the /boot/grub/grub.cfg script. During each download, it is installed as recordfail = 1, and at the final loading stage it is reset to recordfail = 0... And if just such a reset did not happen, then automatic boot is completely prevented and the very same GRUB protection is activated.
To do this, in / etc / defaul / grub we find the variable GRUB_RECORDFAIL_TIMEOUT and assign it a value for the number of seconds during which the GRUB menu will wait for user intervention in the absence of resetting recordfail from 1 to 0. Then we save the changes with the command sudo update-grub, thereby disabling protection against looped reboots.
Who can benefit from this? Only for stations and servers that do not have a keyboard for input-output of information. Without it, in the event of such problems, system boot is generally impossible. Boot loops are not that common and occur mostly due to either power or software issues.
Uninstalling GRUB and Going Back to Windows: Fast, Easy, and Painless
If the question arises "How to remove GRUB and leave the bootloader of another operating system?", Then first of all the user will need its installation disk / flash drive. Let's analyze everything with a specific simple example: a user removes Linux from his computer, leaving only Windows in the end, but at the same time he cannot load it due to an error Grub error... To completely solve the problem, you need to restore the Windows x86 / 64 bit bootloader:
- We boot from the installation drive, having previously set it to the first priority when booting into the BIOS
- After booting from the installation media, select the system recovery partition.
- From the list of tools that appears, select the command line, in which we will write down the following commands one by one:
- BOOTREC.EXE / FixBoot.
- BOOTREC.EXE / FixMbr.
Since GRUB can be removed in a few steps, after all successful operations, we restart the computer and work without any problems already in the Windows system.
As a rule, additional GRUB configuration is not required; all necessary files are installed on the computer independently during the Linux OS installation. There is no need to reinstall the boot loader if, for example, the user needs to configure, since in this case he only needs to edit the contents of / boot / grub / menu.lst.
How to make the correct installation and configuration - in the article below
Installing GRUB is advisable if it does not physically exist on the device, in other words, it can be erased after installing another system (most often Windows). Sometimes it also happens that copies of the bootloader do not function properly or GRUB, at the request of the PC owner, is replaced by another typical bootloader. Whatever the reason, the installation of GRUB, in any case, should be done exclusively from a "live" system (Knoppix, for example). The fact is that without a functioning bootloader, launching a Linux distribution on a PC, which is located on a hard disk, simply will not work. In this article, we will look at ways to install and configure the GRUB bootloader.

What is the boot sector?
If the PC owner is confident in his abilities and knowledge, it will be enough for him to read only the section in which the process of installing the GRUB boot loader is described step by step, but those users who first encounter such a problem should first learn about the features of BIOS and MS DOS.
The hard disk is divided into several sectors, in the first of which the main recording of the disk is carried out (users are used to referring to it as MBR). This requires only 512 bytes, in which a small program is "hidden". The next sector is occupied by a disk partition table, which, as usual, consists of four main partitions, 64 bytes in size, and a digital signature (only 2 bytes).
Features of the boot sector
The boot sector can be called the backbone of the basics, as it is in the MBR and in all other partitions. As practice shows, it is enclosed in all 16 sectors into which any hard disk is divided. Despite the fact that in most modern file systems, the data that the bootloader includes is not located in the first sector: the XFS system, for example, needs all the usable disk sectors. Therefore, in the case when the bootloader data is erased, the file system is completely destroyed.
Turning on the device
At the moment of starting the computer, the BIOS itself starts to start first. At this point, the data stored in the MBR of the first disk is read. After a few seconds, the contents "go" to the main memory, where they are checked for the presence of 55 AA hexadecimal codes in the last bytes. Such verification consists in the need to identify the media for their subsequent loading. A small program stored in the MBR is needed if the presented codes match. The first program "hooks" the next one, located in the boot sector of the active partition, in order to subsequently activate it, and, as a result, start the Windows OS.
If there is more than one hard disk, the user can configure in the BIOS the order according to which specific hard disks will be started at the time of system boot. Thanks to this feature, new PCs have the ability to boot the system both from an external drive and from a USB drive. Naturally, by changing the boot order in the BIOS, the user can boot the system via CDs and DVDs.

To avoid having to deal with bootloaders in the future and think about how GRUB should be configured, the user should know how to install two operating systems from different manufacturers so that they do not conflict with each other. As practice shows, it is most reasonable to install the bootloader of the Linux system initially, in order to subsequently be able to choose regarding the system to start.
However, if the device has one of the latest OS versions from Microsoft (later 9x / ME), then in the system loader you can make it “worry” about GRUB on its own. A huge advantage of this feature is that there is no need to once again deal with the peculiarities of the MBR. True, not every modern user will be able to independently perform such a manipulation, since this process is quite complicated. You have to do everything manually.

Among other ways, you can configure the normal operation of the two systems by resorting to an additional installation of GRUB. The loader must be located directly in the boot sector of the main partition and subsequently marked as active. This method also eliminates the need to use MBR, however it can only work with primary partitions and file systems that do not affect the partition's boot sector.
Why is it important to create a copy of the MBR?
After the decision is made to make a GRUB install, the user needs to back up the MBR. The fact is that incorrectly made changes will "help put" both Windows and Linux. In this case, you will inevitably need a Knoppix system or a Windows installation DVD to help you edit the boot sector. It will be possible to correct your actions several times faster if there is a backup copy of the MBR. To do this, execute the commands below:
root # dd if = / dev / sda of = / boot / bootsektor.scsi bs = 1 count = 446
Boot sector recovery can only be performed using the command:
root # dd if = / boot / bootsektor.scsi of = / dev / sda bs = 1 count = 446
However, it should be noted that with these commands the user will only be able to change 446 bytes of the MBR.
Installation in the MBR of a hard disk
GRUB install can be performed as soon as the corresponding configuration file is created (set using the /boot/grub/menu.lst command). Files such as stage1, stage2 and * _stagel_5 must be present in the grub directory. If they are absent, the files contained in GRUB should be written to this section.
Further manipulation consists of starting the GRUB bootloader and executing the setup command. The values hdl, 12 should be replaced with the device name of the GRUB partition of the disk containing / boot. Be careful, as the / boot partition may not be in the system folder, but in a different folder. Hd0 is responsible for the storage area of the boot sector of the main hard disk.
During installation, SUSE is supplemented by the /etc/grub.conf file, which contains commands related to GRUB install itself. If something went wrong, the PC user can restart the installation at any time during the procedure. The grub command can help with this.< /etc/grub.conf.
Boot Loader Installation Methods
Installing GRUB can be done not only on the MBR. Optionally, the bootloader can be located in any boot sector of absolutely any hard disk. Despite the fact that there are situations when such a decision turns out to be unjustified, in the cases listed below, installing GRUB in a different partition greatly simplifies the user's task.
You can resort to GRUB install if the bootloader is launched using a similar Windows device. Also, the solution will be advisable if several variants of Linux OS are installed on the computer and the user is not going to change the previously installed GRUB to another boot loader.
It is preferable to select the Linux system partition to optimize the process. In other words, if the operating system is located in / dev / sda7, to install correctly, the user must use the commands below. The main difference between installing GRUB on an MBR or system partition is the need to specify the selected partition in setup instead of hd0.
root # grub grub> root (hd1,12)grub> setup (hd0,6) (Install in boot sector / dev / sda7) grub> quit
Before executing GRUB install, you should take into account one peculiarity of some file systems, since sometimes the boot sectors of a partition cannot be used by the boot loader or other typical application. In particular, one of these systems is XFS - installed in its boot sector GRUB, will simply destroy the entire file system.
Installation to USB stick
Thanks to modern technology, anyone can boot the operating system via a USB drive. If GRUB install will be performed directly from an external storage medium, and not using Windows or Linux, the user should verify that the motherboard recognizes the drive correctly.
Before you get started, you should format the USB flash drive in one of two well-known ways. With the first method, it will clean up as a superfloppy, the other as a hard disk. The choice of the cleaning option should be based on the features of the BIOS.
The next step should be to activate support for USB storage, for which there is a separate parameter in the BIOS. When the USB drive is recognized as a separate boot disk, the BIOS will change the list according to which GRUB writes data from the media one by one. The first drive will be a USB stick, the rest of the hard drives will be accessible via hdl and hd2. If necessary, you can modify /boot/grub/devices.map before GRUB install.
If done correctly, installing GRUB from external media will be more than successful. GRUB recognizes the flash drive as hdn + 1, where n is the number corresponding to the last internal hard drive. Subsequent installation of GRUB into the MBR using an external storage device requires the following command:
root # grub grub> root (hd1,12)grub> setup (hd2) (install to the MBR of a flash drive) grub> quit
A further reboot of the PC should help GRUB appear in the MBR and start all existing systems that are contained in menu.lst. In case of errors, you should enter interactive mode through the bootloader menu by pressing the C button. Activating the command consisting of the word cat and pressing the tab key helps the user to find out about the names that the bootloader has assigned to all hard drives. Using the Esc key, you can go back to the menu, and the E key will help you change the commands previously written for loading and re-execute them.
If the Linux operating system is stored on a flash drive or external hard drive that can only be connected to a computer via a USB port, the user should be aware of several important issues. The fact is that GRUB install may not be carried out the first time, most likely, you will have to change the BIOS settings and drive designations several times. It will be better if all the properties stored in the menu.lst file are only manually configured.
In addition, all important USB modules should be kept in the Initrd file. When working with Ubuntu, in the / etc / fstab section and the kernel line located in menu.lst, you need to specify not the device names themselves, since after a system reboot they can be changed, but the UUID numbers. The user can independently specify the directory in menu.lst by means of uuid, into which the kernel and the Initrd file will subsequently be placed.
Conclusion
Despite the seeming complexity, anyone can do GRUB install. Assisting with newfangled motherboards allows for easy and hassle-free operation of any operating system, including Linux, which can be installed directly on the USB drive itself. It is not easy to configure all the parameters correctly and create all the conditions for the uninterrupted existence of two different systems, except for free time and knowledge, the user must have considerable experience that those who are just starting to get acquainted with the Linux environment do not have.