The Excel program from the Microsoft Office package is perhaps the most popular office application. It is used everywhere for storing data, working with tables, importing and exporting information for other purposes. Microsoft Excel has a lot of functions for storing and protecting information that are useful to activate if several people are working on a file at the same time. Among the security features in Excel is the ability to set password protection on a separate sheet, restricting various actions with the data on it. In this article, we will consider how to set sheet protection in Excel, as well as how to remove it, including without knowing the password.
Table of contents:How to set sheet protection and password in Excel
To protect the information on a sheet in Microsoft Excel from unwanted changes, it is enough to set a password for the sheet. This can be done with built-in functions:

How to remove the protection password from a sheet in Excel
If you receive an Excel file that has a password set on its worksheet, and you know the password, it's easy to remove it. To do this:

After that, protection from the sheet in Excel will be removed, and it will be possible to perform all actions available to the program with the sheet of this file.
How to remove the protection password from a sheet in Excel without knowing the password
There are several ways to remove protection from an Excel sheet without knowing the password. Let's look at two options below:
- Using an archiver. This method is more complicated, but it allows you to remove the password from the sheet on a computer that is not connected to the Internet.
- Using Google Sheets. An easier option to unprotect a sheet, but requires an internet connection.
Important: On the network you can find all kinds of programs that promise to remove protection from a sheet in Excel without a password. We do not recommend installing such applications on your computer. It is highly likely that they may be infected with viruses.
Using an archiver
Consider a way to remove protection from a sheet in Excel without knowing the password. To do this, you will need any archiver installed on your computer - WinRar, WinZip or another. Perform the following steps in sequence:
- Set Windows Explorer to display the file name extension in the folder where the sheet-protected Excel file is located. To do this, in the explorer at the top, switch to the “View” tab and check the box in the option;

- Next, you need to switch to the mode of renaming the Excel file (right-click on it and select the “Rename” option). As you can see, it is possible to change not only the file name, but also the extension. Change the extension “.xlsx” to “.zip”;

- When changing the name, a warning window will appear that this may negatively affect the file. Click "Yes" to confirm your desire to change the file;

- Next, you need to open the resulting “.zip” file using any archiver;
- Inside the archive, you can see several files and folders. Go to the "xl" folder;

- Next, go to the “worksheets” folder;

- Here, in the “.xml” format, all sheets of this Excel document are displayed. Sheets are assigned a serial number, depending on their sequence in the document itself. Select the “sheepN” file depending on the sheet you want to unprotect. Click on it and move the file to any folder in Windows Explorer;

- After that, in Explorer, right-click on the file and select the option “Open with” - “Notepad” to switch to its editing mode;

- Notepad will open the text of the file, as well as its technical information. Here you need to edit the code, removing mentions of the password from it. Press the combination “Ctrl + F” on the keyboard to open the document search and enter the phrase “sheetProtection” into it;

- One occurrence of the given phrase in the document will be found. This expression is enclosed together with other variables in a single block, which is opened by the symbol “<” и закрывается символом “>". Select this block and delete it from the file;

- Next, you need to save the changes in the notepad file;

- After that, copy the modified “sheepN.xml” file back into the archive to the folder where it was taken from. If an informational message appears confirming the replacement of the file - confirm;

- Close the archive and change the file extension back from “.zip” to “.xlsx”.

After that, you can simply open the file using Excel, and the password protection will be removed from the sheet, that is, it will be possible to perform all actions with information from the document.
You have worked long and hard on the file, created complex formulas and entered a lot of data. Of course, it is better to password-protect such a file! And now six months pass, you need to make changes to the file, but the password is safely forgotten? How now to remove the protection of the Excel sheet or, as they say, reset the password?
How to quickly unprotect an Excel sheet if you forgot your password? Essentially hack the book.
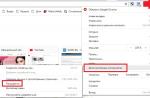
There are several ways, but except for one, they are all quite cumbersome. Create () double-click "This book" as in the picture
Copy the macro to the window on the right
Sub Password_Cracker() Dim t! Dim i As Integer, j As Integer, k As Integer Dim l As Integer, m As Integer, n As Long Dim i1 As Integer, i2 As Integer, i3 As Integer Dim i4 As Integer, i5 As Integer, i6 As Integer Dim kennwort As String t = Timer On Error GoTo err_ For i = 65 To 66: For j = 65 To 66: For k = 65 To 66 For l = 65 To 66: For m = 65 To 66: For i1 = 65 To 66 For i2 = 65 To 66: For i3 = 65 To 66: For i4 = 65 To 66 For i5 = 65 To 66: For i6 = 65 To 66 kennwort = Chr(i) & Chr(j) & Chr(k) & Chr (l) & Chr(m) & Chr(i1) & Chr(i2) & Chr(i3) & Chr(i4) & Chr(i5) & Chr(i6) For n = 32 To 126 ActiveSheet.Unprotect kennwort & Chr (n) MsgBox "Done in " & Format(Timer - t, "0.0 sec") Exit Sub nxt_: Next: Next: Next: Next: Next: Next Next: Next: Next: Next: Next: Next Exit Sub err_: Resume nxt_ end sub
Sometimes there are times when we work on important documents and don't want anyone to see them. Or, at least, we prohibit editing the content without our knowledge. But, as practice shows, if such files are not opened for a long time, the owner himself may forget the access code. In this article, we will look at how to remove protection from a sheet in the Excel editor without knowing the password.
It's not about hacking someone else's documents. We will work with what is on our computer.
When you open a protected document, you will see the following.
The toolbar will be inactive. File modification and almost all functions are not available. Try clicking somewhere and typing something on the keyboard.
The selected cell will be inactive and editing will not be possible. In this case, the following error will appear.
In order to unlock a document in Excel, you need to perform the following steps.
- Click on the "File" menu item.
- In the window that appears, click on the "Unprotect" link.
- Immediately after that, you will be asked to enter a password. If you do not know him, then you will not be able to remove the protection.
A similar window can also be called through another menu. To do this, you need to follow a few simple steps.
- Go to the "Review" tab and click on the "Unprotect Sheet" button.
- The result will be exactly the same.
In this case, the book is readable, but you can't change anything. It is worth noting that sometimes, if the maximum file protection is not set, Excel allows you to copy the contents of the cells.
Try selecting something and hitting the keyboard shortcut Ctrl + C . The active range will immediately be highlighted with a dotted frame. This means that the ability to copy is not disabled.
Open a new document and press Ctrl + V . The data will be transferred perfectly and for this you do not need to hack anything.
How to remove protection in Excel 2003
The steps described above are suitable for new versions of Excel. In the old way, the principle of operation is slightly different. When you open the file, many features will also be unavailable.
In order to remove the blocking, you need to perform the following steps.
- Click on the "Service" menu item.
- Then select "Protect".
- After that - "Remove sheet protection".
- Right after that, you will be asked to enter the security key.
How to remove the password
Whether you're trying to hack someone else's document or open your own old file, you'll have to do the same thing anyway. For the program there is no difference and it does not understand who the owner is. You end up trying to bypass the protection.
In fact, everything is very simple. To do this, follow these steps.
- Most likely, your operating system does not display file extensions. To enable them, follow a few simple steps:
- Open File Explorer.
- Click the "View" tab.
- Place a check mark next to the relevant item.
- Then change the extension of your file from XLSX to ZIP.
- To do this, click on the file and press the F2 key. After you change the end of the document and press the Enter button, you will see the following window. Click on the "Yes" button.
- Your file now has a new icon because Windows thinks it's an archive.
- Open this file (but do not unpack!). Go to the "xl" folder.
- Then to "worksheets".
- A list of files for each sheet will appear in this folder. Click on it with the mouse and drag it to the explorer.
- Then right click on this file. Select "Edit" from the menu that appears.
- As a result, the following window will appear.
- Press the keyboard shortcut Ctrl + F . Enter the word "sheetProtection" there. Then click on the "Find Next" button.
- If the file is saved in Excel 2013 or 2016 editor, you will see the following.
- In the 2007 program, this tag is much shorter, and the type of encryption is simpler.
- Remove everything contained in the sheetProtection tag. In the case of an example, you need to remove this piece.
- Then save the document by pressing the hot keys Ctrl + S . We transfer this file back (from the explorer to the archiver).
By default, Sheet Protection locks all cells so that none of them are editable. To enable some cell changes while leaving other cells locked, you can unlock all cells. You can lock only certain cells and ranges before you protect the sheet and optionally allow certain users to change only in certain ranges of the protected sheet.
Lock only certain cells and ranges of cells in a protected worksheet
Follow the steps below.
The password is optional. If you don't set a password, anyone can unprotect the sheet and change protected items.
Choose a password that is easy to remember because if you forget your password, you will no longer be able to access protected sheet items.
If the sheet is protected, do the following:
Select the entire sheet by clicking the button Select all.

On the tab home click the dialog box call button cell font format. You can also press CTRL+SHIFT+F or CTRL+1.

In the dialog box Cell Format tab Protection uncheck the blocked box and click the button OK.

When you protect a sheet, all cells will be unlocked. Now you can select specific cells to protect.
Select only the cells on the sheet that you want to block.
Open the popup again Cell Format(Ctrl + Shift + F).
This time on the tab Protection check the Protected cell box, and then click the button OK.
On the tab Peer review press the button Protect Sheet.

From the list, select the items that you want users to edit.
|
Chart Sheet Elements
In the field, enter the password for the sheet, click the button OK
Unlock cell ranges on a protected worksheet for editing by users
To grant specific users permission to change ranges on a protected worksheet, the computer must be running Microsoft Windows XP or later, and the computer must be in a domain. Instead of using permissions that require a domain, you can also set a password for a range.
To add a new editable range, click the button Create.
To modify an existing editable range, select the field, then click the button Change.
To remove an editable range, select the field Protected sheet ranges unlocked by password, then click the button Delete.
Making changes to graphics, including maps, embedded charts, shapes, text boxes, and controls that were not unlocked before the sheet was protected. For example, if a worksheet has a button that runs a macro, you can click it to run the macro, but you can't delete it.
Making any changes (such as formatting) to an embedded chart. The chart will still update when its source data changes.
Add or change notes.
Select the sheets you want to protect.
On the tab Peer review in Group Changes press the button.

This command is available only if the sheet is not protected.
Perform one of the following actions:
In field Name enter the name of the range to be unlocked.
In field Contains cells enter an equal sign ( = ) followed by a link to the range to be unlocked.
You can also click the button Collapse Dialog, select a range on the sheet, and then click the button again Collapse Dialog to return to the dialog box.
To control access with a password in the field Range password enter the password to access the range.
When using access permissions, it is not necessary to set a password. Using a password allows you to view the credentials of all authorized users who change the range.
To set access permissions, select Permissions and press the button Add.
In field Enter object names to select (examples) enter the names of the users that you want to be allowed to change ranges.
To see how usernames should be entered, click examples. To check if the names are correct, click the button Check names.
Click the button OK.
To specify the type of permissions for the selected user, in the field Permissions check or uncheck allow or ban, and then click the button Apply.
Click the button OK twice.
If necessary, enter the specified password.
In the dialog box Allow changing ranges press the button Protect Sheet.
Listed Allow all users of this sheet select the items that users should modify.
Learn more about sheet items
|
Chart Sheet Elements
In field Password to disable sheet protection enter the password, press the button OK, and then re-enter the password to confirm.
The password is optional. If it is not set, any user can unprotect the sheet and change the protected items.
Make sure you choose a password that you can remember. If you have lost your password, you will not be able to access protected items on the sheet.
If a cell belongs to more than one range, it will be editable by users who have permission to edit any of those ranges.
If a user tries to edit multiple cells at the same time and is allowed to make changes but not all of those cells, the user will be prompted to edit cells one at a time.
additional information
You can always ask the Excel Tech Community a question, ask for help in the Answers community, or suggest a new feature or improvement on the Excel User Voice website.
Note: This page is translated automatically, so it may contain inaccuracies and grammatical errors. It is important to us that this article is useful to you. Was the information helpful? For convenience also (in English).
Situations where users, when creating documents in the form of spreadsheets, protect them with a password, are quite common. This may be necessary so that no changes are made to the formulas or they are simply not visible. Many are starting to think about how to remove the password from an Excel file or remove protection. The following are some of the simplest methods that allow you to perform such operations in just a couple of minutes.
How to remove protection from an Excel file, knowing the password?
Let's start with a common situation where a sheet or group of sheets is protected, but the user knows the password to be able to change the content.
The protection removal algorithm is as follows. First, you should use the main panel, in which the section of the review is selected, followed by the transition to the unprotect line. To confirm the action, you will be prompted to enter a valid password, after which the sheet or file will become editable.
With this, everything is simple. But how, then, to remove the password from the file, the user who needs to make changes to the file does not know or does not remember the desired combination? Here you can use several methods.
How to remove the password from an Excel file using the program?
The password removal method looks quite simple. To do this, in an open document, you need to use the file menu, where a line of information about it is selected.

After that, the button for setting protection on the book is pressed, and then the password encryption item is used. In the window that appears, the previously set combination will be shown. How to remove password from excel file? Yes, just remove all characters from the password string and save the document again. When you reopen the workbook, you will no longer be asked to enter a password.
Using Change File Format
There is another equally effective way to solve the question of how to remove the password from an Excel file. It is about changing the format of the original document.
First, the opened file must be saved directly in the program, choosing XML as the format. The new document is then opened in regular Notepad using the right-click menu and the command "Open with ...", and already there you should find the password tag (usually it looks like Password), then delete the contents and just click on save the document (for quick save, you can use the shortcut Ctrl + S).
But if there are a large number of sheets, this method may not work, so you should initially re-save the document in XLSX format, then open it with any 7-Zip) and extract the contents to any convenient place.

Next, you need to find the Worksheets folder in the unpacked directories, which will contain all the sheet files in XML format (Sheet1, Sheet2, etc.). After that, for each such object, the editing operation in the text application should be repeated. Only first, a search for the sheetProtection tag is set, and then everything that is between the combinations "
Third Party Programs
Finally, the question of how to remove the password from an Excel file can be solved using special script programs like Password Remover.

After installation, the application integrates its own commands into office applications (not only in Excel, but in all others). To remove the password, at the first start with the built-in VBA script, you must first agree with the execution of the macro, then open the file, and use the Straxx command in the main editor panel. Here you need to understand that the application is not a cracker and does not work on the principle of random selection of the desired combination. It disables the protection of the file from the inside, so using it is simple and safe. Feedback from users who have used such a script in practice indicates that the entire process of removing protection takes about two minutes.