Hello! We continue the topic of routers. To be more precise, today I will tell you how and why they reset the settings to standard values. Our portal will most likely contain instructions for routers from different manufacturers. And I chose to reset the settings on the Asus router.
If you have any questions while reading, or want to add something, be sure to write in the comments!
Why is this needed?
The option "Reset to factory settings" is on all routers, regardless of the brand and model. What is this function for? Here are three main points when it can come in handy:
- When you set up the Wi-Fi router, you changed your login and password to access the administrative panel. It was necessary to change some parameters, but it turned out that the authorization data was safely forgotten, and the leaflet with the records was lost. That's when the reset to the default settings will be relevant. But there is one point - be prepared to configure the router again.
- If you saved incorrect parameters while working in the web interface, RESET will also help here. After restoring the factory settings, you can set up the device again.
- In some cases, resetting helps to remove some problems with the router.
Well, the most important thing. How to restore factory settings? There are two options that work for all routers:
- Press the RESET button on the device itself;
- Use the web interface (of course, if you remember your login / password).
Now you can move on to the main question - how to reset the Wi-Fi settings of the Asus router?
Immediately I suggest watching a video on the topic:
Hardware way
The easiest option is to press the button on the back of the device. On the Asus RT N16 model, factory reset is done by pressing and holding the RESET button on the back of the device for 5-7 minutes.

The method is suitable for most models of routers from this company. On some older devices, the reset button is named RESTORE.

There may be such an option - the button is not signed. Look for the one that is recessed into the panel. Usually, to press RESET, you need to use a paper clip or a needle.
What if the button performs two functions - reset and WPS (designed for simplified connection to a Wi-Fi network)? In this case, hold for at least 10 seconds.

Programmatic way
A more complicated option, but you need to know it. How to perform a factory reset through the "admin panel", I will tell you using the example of Asus RT N12:
- We open any browser and in the address bar (not in the search one!) We fill the IP of the router. Ours is 192.168.1.1. In the authorization menu, write the login / password. If you did not change them to your own, then this is the word admin in both fields.
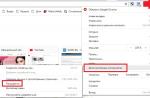
- In the "Advanced Settings" section, look for the line "Administration". Select the Manage Settings tab at the top.
- In the window that opens, find "Factory settings" and press the button opposite "Restore".

- Now you need to confirm your intentions. In the confirmation window, click "OK".
The router will reboot. The process takes a couple of minutes. Then you can re-enter the administrative panel and configure the router.
If the web interface is in English, you can reset the settings on the Asus router like this. We are looking for the “Administration” item, the “Restore / Save / Upload Setting” tab and click on “Restore”.
Resetting the settings on Asus RT N10, N14, N18U, AC1200 routers and other models is also done - either with a button or through the control panel.

We are waiting for questions and comments. Be sure to write if something did not work out or if you need help setting up the router after restoring factory settings. Bye everyone!
To set up an ASUS router, you need to connect. After, in the browser, follow the link - 192.168.1.1 . If you have not set up your device before, you will see Quick Setup Wizard. If you need a username and password, then in both fields by default we type admin(should be checked with providers). The ASUS Control Panel will be displayed.
basic settings
The panel consists of general and additional settings. Available opportunity view the network map, enable guest internet, traffic control, and parental control. In the additional section, Wi-Fi is regulated and configured firewall.
To check if you are connected, you can go to the tab " Quick Network Setup". Then select " Check connection" and " Go". In the window that appears, enter your username and password. Press " Further". Then in the section Setting up a router»Fill in the specified name (SSID) and network key (to connect to the network). 
Press " Apply". Will begin . After that, a network with the name you specified will appear in the Wi-Fi list. We connect to the device using the given access key and return to this section. In the window with connection information, click " Further».
In most cases, the Internet should already be working, but if your provider does not support the technology AutoIP, then tune WiFi follows on its own. In this case, after checking the connection, the section " Internet settings». 
Next on the proposed list choose the connection technology used by your ISP. Then in the window that appears, enter login and password that were provided by the provider in the contract. All information should be clarified with him if any problems arise. It may be necessary to further enter any other parameters that must also be taken into account (service name, IP address, etc.). After that, you need to do all the same steps that were described above.
WiFi settings
On the main tab, there is always an option to additionally tune Your WiFi. For example, in the section " Internet" can change type of WAN connection, that is, if the provider has changed the connection technology, you can switch it. In chapter " Network map» it is possible change key to connect Wi-Fi, as well as the username (be sure to press " Apply"). can be customized guest network(not recommended if you need to control internet traffic) and impose parental control, if required save child from an unwanted resource.
You can also change access key to the control panel of your router. To do this, go to Administration", Further - " System". Enter a new password and click " Apply' for it to take effect. The rest of the sections mainly contain additional settings for wireless and local Wi-Fi, which you can configure as you wish. 
How to reset the router
If you forgot the password for wireless Wi-Fi, and the other devices were not connected, try to go to control Panel by cable and view it there. But if this is not possible, it is recommended reset router to the default settings.
To do this, there is a special button on the back of the router. Press and hold it about 15 seconds until the WPS indicator starts flashing. The access key will dropped, you must follow all the steps described in the article above. To avoid such situations, when connecting on a computer, you should always check the box " Connect automatically". Then the entrance to Wi-Fi will be done using autocomplete.
Reset settings on the Asus router is obtained independently and is performed in almost the same way as on other routers. But in Asus devices, you need to know some subtleties in order to avoid new problems. The article reviews and instructs how to reset ASUS routers, and also describes possible problems and their solutions.
Attention! Resetting to factory settings will delete all data about the previous configuration of the router. Therefore, it is recommended to save the existing settings for reset and recovery. .
Resetting settings on Asus routers is more convenient to do through the web interface created by the manufacturer to manage the device. The modem connects both via Wi-Fi network and LAN. What needs to be done step by step:
After the reset, you should start changing the router settings.
Hardware reset to factory settings (Reset)
 If you lose your login/password or if you don't have access to the web interface for any reason, there is a chance to reset the parameters directly. To do this, you need to turn the back of the case. The Reset or Restore button - ASUS has a special icon - when pressed once, is responsible for turning Wi-Fi on / off. When pressed, it will reset the modem to factory settings. In some Asus models, the Reset and WPS buttons are separate. To reset to factory settings, you must:
- Connect Asus to power, without it the device is not able to reset the configuration.
- Press and hold Reset for 10-20 seconds until the WPS indicator on the front panel blinks. For clamping, it is better to use a non-sharp object and press the button carefully. If the button fails, it will no longer be possible to reset the configurations.
Asus will reboot, reset the password and login to the web interface and restore the factory settings. This modem will need half a minute or a minute. After you managed to reset the settings, proceed to change the router configuration and set up an Internet connection.
Possible problems
Sometimes, during the reset process, various problems arise that confuse the user:
Unable to open web interface page
If the user entered the IP address into the browser, and the page was not available, you can solve this problem like this.
ASUS RT-N12 is a very popular device, which is classified as a budget option. It contains all the necessary characteristics for the successful operation of a typical home, public or work network. The device is a portable Wi-Fi hotspot that has an information transfer rate of up to 150 megabits per second (possible Internet speed). The operating frequency of this device is 2.4 GHz. According to the standard, it has 4 network (regular cable) ports, these are standard features for the ASUS RT router, which are needed for direct connection to a desktop computer.
Overview of all bulbs and sockets
The front part contains 7 indicators that will make it clear the state of the device at this moment.
Number 1 we have labeled the most important LED indicator. This is the power indicator. The indicator can have several configurations:
- The light is not on. This means that there is no power, or the device is simply turned off.
- The light flashes with a large amplitude. This means that the router is just starting up.
- The light flashes with a small amplitude, quickly. This means that automation is taking place.
- The light is on without flickering. This means that the system is loaded and can be used.
Number 2 we have marked an indicator that determines the status of the ASUS RT N12 D1 Wi-Fi router at the moment. It has three configurations:
1. The light is off. No power or wireless mode may be disabled.
2. The light is flashing. This means that information is being transmitted.
3. The light is just on. The device is ready to transfer data, but no packet exchange is taking place at the moment.
Number 3 we have marked an indicator that determines the connection of the router to the Internet. There are only two configurations:
1. Off - no internet. This may be due to non-payment, due to communication problems, due to disconnection from the Internet in equipment installations.
2. On - everything should work properly.
Numbers 4-7 indicators of the status of local ports are indicated. Each has three configurations:
1. Off - Cord is disconnected.
2. The light is flashing - information is being exchanged.
3. The light is just on - this is a sign that the port is occupied by the cable connecting the PC to the network.
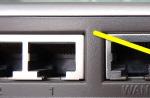
Connectors and switches are located on the rear panel. It has no indicators.

1. WPS button (starting from the right side), which is used to quickly enter the network.
2. WAN port, it is designed to connect the Internet cable to the router.
3. Four network ports, which are needed to directly connect the PC to the router through cables.
4. Micro connector for power cord.
5. Key on and off.
6. Reset key. It is inside the hole, hold it down for seven seconds to reset to factory settings. The default password and login are set at the factory settings.
How to install a router
Installing a router is not tricky and does not take much time. Connecting and setting up takes more. First, you should check the availability of all components, so that the installation goes correctly:
The router itself.
· Power Supply.
· Internet cable, which must be provided by the company or provider.
· For the first installation, you must use a local (direct) Internet connection so that there is no interference.

Once you have found everything you need, you can proceed to a fairly simple installation. First you need to figure out how to connect the Internet to the router using an Internet cable. We designated the connector for this cable with the number 2. After that, you need to connect using a network LAN cable. It remains only to connect the router to the power supply by inserting one end of the power cord into the mains with a voltage of 220 watts, and the other side into the connector number 4. Then press the power button. We act in that order.
Installing, as you can see, is not difficult. After these steps, the router should start to start. This completes the installation of the router, further debugging is done using a specific page built into the router.
Setting up ASUS RT-N12
To configure the router, you need any browser. As the site address, write "192.168.0.1" or "192.168.1.1" - without quotes.
Attention! The PC or laptop must be connected to the router, and not to the Internet cable.
After going to the page, a window with data entry fields will appear.
 Here you need to register the username (user name) and password (password). When the router is just purchased, then by default the login and password are the same there - “admin”. After full debugging, it is recommended to change both username and password to eliminate the possibility of hacking.
There are times when the router has already been operated before, then the name and password are sometimes different from the standard ones. In order to fix the ASUS RT N12 device, the firmware is returned to its original state. To do this, you need to hold down the key, which was indicated above as number 6. You need to clamp it with some thin object, the easiest way is with a paper clip. Hold the key for 7 sec. After that, all changed router settings will go to the initial state.
If these manipulations do not help, the router does not return to the standard settings, then the configuration should be performed by a specialist whose range of work includes the ASUS RT N12 firmware. You can cope with this task yourself, but the firmware of the router is not a standard situation for the average user. Reflashing the router is an order of magnitude more difficult.
Internet connection with full setup
In order to connect the Internet to the router, on the site that opens, you need to go to the router settings. Then - "additional settings". We select the “WAN” item we need (this is the Internet connection setting).

In the main settings, you need to set the following data:
· Type of WAN connection - select here PPPoE (the most popular) or for Beeline L2TP (you need to check with your provider).
· Enable WAN - our choice is "yes".
· Enable NAT - our choice is yes.
· Enable UPnP - our choice is yes.
In the next window, called setting the WAN IP address, opposite the line we need “Obtain a WAN IP address automatically”, we must mark the answer - “yes”.
Configuring DNS WAN, similar to the points that went earlier, opposite "Connect to the DNS server automatically" you need to put the option - "yes".
In the username field, as you might guess, you need to enter your number or login, which is provided by the Internet provider to log into the Internet.
Password is identical.
Some fields are allowed to be skipped. In the VPN server, enter the one provided by your Internet provider. If the ASUS RT N12 router is configured for beeline, then this is “tp.internet.beeline.ru”, nothing needs to be marked for Rostelecom.
After all this procedure, click on the "Apply" button. This completes the setup of the Internet itself on the router.
Connecting to the Internet with Quick Setup
ASUS RT N12 Quick Setup can greatly reduce the time it takes to fully configure your router. On the main page of the router, press the "Go" or "Go" button.
The router then automatically detects your connection type. Although he himself will determine the necessary parameters, the login and password for the Internet will still need to be registered manually in the WiFi settings.
Wireless Setting
Setting up ASUS RT N12 in wi-fi mode can be quite simple thanks to the “quick setup”. The final step in quick setup is debugging the wireless network settings. Here you can set the SSID and network key or password.
They also perform manual adjustments. Here we go to the "Wireless Network" window, we need to set only a few parameters. Among them:
· "SSID" is the name to detect your ASUS RT N12 Wi-Fi router. Write in Latin letters (English).
· Field "Authentication method" - here we definitely select WPA2-Personal, it will help to secure your Internet from unwanted users.
· "WPA Preshared Key" - the key or password from your Wi-Fi. Enter when connected to Wi-Fi. Write the key no shorter than eight characters.
Now you can save your settings. Now the configuration of the ASUS RT N12 WiFi router is absolutely complete. You can connect all the devices that are in the apartment, and use Wi-Fi even on a washing machine.
small addition
How to perform port forwarding? Let's talk about how to open ports on the ASUS RT N12 C1 router, here the setup is quick. Since this is just an addition, the instructions will be very concise. We act according to this scheme:
192.168.1.1 (address)-> LAN tab-> DHCP server window-> Enable manual assignment field - “Yes”-> MAC address (here you need to select the desired computer, which will be assigned a static address)-> Select and apply (after selecting the desired PC).
If this does not help, then check your antivirus and firewall.
Related videos
Fast internet to you!

Connecting to a PC or laptop
Most people put a router in the apartment, and only then I start thinking how to set it up over the air -. Which is not particularly correct. For convenience, it's easier to set up the router by connecting it to the computer directly, and after setting it up, put it where it will be more convenient for you.
To connect, first turn on the router to the network, then insert the wire from the provider into a separate socket, the color of which is different from all the others (white, blue or other color, under this socket there should be an inscription in the form of an “e” sign with a rim). Take the wire that comes with the kit - a patch cord, and connect it to one of the 4 "LAN" sockets, connect the other end of this wire to the network card. It must be inserted where the wire from the provider was connected. This completes the connection of the RT N12 D1 to the computer.
Reset router settings RT N12 D1
Before starting to configure the router, I advise with. Maybe you didn’t get a new router, or after checking at the factory, they forgot to return the settings to the standard state. To reset the settings, you need to press the Reset button, for this you need an object with which you can reach the button, for example, a match or a straightened paper clip. After pressing the button, hold it in this position for 10-12 seconds, or wait until all the lights on the front panel light up at the same time. And then wait until the router completely restarts.
Input setup on RT N12 D1
After the router connects, you need to. Login is performed as standard, as on all Asus routers. To get started, run . After that, write in the address bar 192.168.1.1, login - admin, password - admin, and press Enter.
After signing in, you will see the quick settings page. For a better understanding of the process, it is better to do everything yourself. By clicking on the button that looks like a "house" and is located in the upper right corner, you will go to the main page. For some firmwares, just click the "Next" button.

Setting up the Internet on Asus RT N12 D1
First, set up your Internet connection. To do this, find the contract with your provider, which specifies the settings and type of connection. If for some reason you cannot see these settings in the contract, contact your provider's technical support and ask them for these settings. After that, go to the "Internet" menu, located on the right side.

IP address, dynamic. Setting for Rostelecom, Volya, TDK-Ural, Kyivstar
This type of connection is the simplest. To configure, it is enough: in the Type-WAN-connection field, select "Automatic IP". After that, be sure to put "Yes" in the "enable WAN" and "enable NAT" fields, you can also enable "UPnP" - so that there are no problems when working with file hosting.
Some providers have a binding to a specific MAC address, in which case it is worth specifying it. This address most likely belongs to the computer that was previously connected to the Internet. If you are setting up on the same computer, just click on the "Clone MAC" button, after which you should click on the "Accept" button.

Setting up a PPPoE connection for Rostelecom, TTK and Dom.ru
To get started, select the WAN connection type - "PPPoE", also enable WAN, NAT and UPnP by putting dots in the "Yes" field. Most importantly, in the account settings, in the "Username" field, indicate your login, which you looked at in your contract or learned from the support service. And in the "Password" field - in the same way we enter the desired value assigned to the login, provided by the agreement.
Similar to the Dynamic IP settings, some providers bind to the "MAC" address. When setting up on a computer that was previously connected to the Internet, simply use the "Copy MAC" button. If you are using another device, enter this address manually. After entering all the settings, click the "Apply" button.

Setting up RT N12 D1 with L2TP connection type and Beeline provider
To carry out the settings, if your provider is Beeline, you need to select the L2TP connection type. Then enable WAN, NAT and UPnP. The username, in this situation, is the contract number, this is the same number to which you pay for the Internet. Password - identical to the password from the personal account. In the "VPN connection" item, specify - tp.internet.beeline.ru. At the end, it remains to click "Apply".

IPTV, Asus RT N12 D1 setup
IPTV settings in this router are incomplete due to the new firmware. You can select the port on which the signal will be received. If your ISP requires you to specify a "VLAN ID", I will disappoint you, because this router does not have one, and therefore it is not suitable for you.
In order to select a port, go to the "Local Network" item. At this point, in the "IPTV-STB port selection" field, you will need to select the port to which you will later connect the iptv set-top box. At the end, click the "Apply" button.

Setting up Wi-Fi Asus RT N12 D1
To configure Wi-Fi on this router model, you need to go to the "Wireless Network" tab. In this tab, select "General" and enter some data there. SSDI - the name of your network, you can enter any name in Latin. "Authentication Method" - selects only WPA2-Personal, "WPA Preshared Key" is, specify whichever you like, but not less than 8 characters and click "Accept".
At the end of entering any settings, restart your router. The button for this is located at the very top of the interface. The whole reboot procedure will last about 2-3 minutes. After that, the Asus RT N12 D1 setup is completely finished.

That's all. I created a small manual for setting up asus rt n12. Setting it up is not as difficult as it seems, you just need to set aside a few minutes of your personal time. And then, after all the actions taken, you can fully use the purchased router. I hope this information will help you in setting up asus rtn12.