Each user sooner or later faces the need to install an operating system. There is a myth that it is difficult to do it yourself, although in reality it is not. All that is needed is to have basic PC user skills and follow the simple instructions that will be discussed below.
Before installation
There are a number of things to take care of before starting the installation.
To do this correctly, first of all, pay attention to the following:
- select the desired version of the operating system;
- decide on its capacity;
- prepare the hard drive for installation;
- take care of the drivers.
- x86 (32bit);
- x64 (64bit).
If you are reading this article, there will be no problem choosing the OS version - it will be Windows 7. But what about its bitness? How do you know which one is right for your PC?
You may encounter two kinds of systems:
What are their differences? 32-bit support up to 4 GB of RAM, and 64 - from 4 GB or more. The performance of a 64-bit system is higher, so if the technical characteristics of your PC allow it, you should choose it. Determining the amount of computer RAM is very simple - just right-click on the "Computer" icon on the desktop and the necessary technical data will be displayed in the window that appears.
Important! It should be noted that after choosing one or another bit depth, in the future, the installed programs must be optimized specifically for it.

Now you need to think about where exactly the new operating system will be installed. Most often, drive C is selected for this. At the same time, you need to remember that all data on the drive (including the desktop!) Will be permanently deleted. All important files should be transferred to another drive or copied to a flash drive.
Another important item is drivers. Most often, they come bundled with equipment on special disks, but if not, download them from the Internet in advance. You can find the necessary drivers on the official websites of manufacturers of video, network cards and other PC components. Why should this be taken care of in advance? Because after installation, without a driver for a network card, it will not be possible to do this.
Video: Installing Windows 7
Disc creation
To start the installation process, you need a disk with Windows 7. If you have it, you can safely proceed to the next step. If it doesn't exist, you'll have to create it first. You will need an image of the operating system, as well as a program for recording. It is best to give preference to "pure" MSDN builds that have not been heavily modified. Recording from an image is no different from working with a regular disc. This can be done, for example, with the UltraISO program.
For this you need:

Installing Windows 7 from a disk via BIOS
Let's move on to the main process. It begins with working with the BIOS - the basic input / output system. It is the installation through the BIOS that scares novice users so much, but there is nothing difficult to handle with it. For our task, you need to perform only a few basic manipulations.
BIOS setup
First you need to get into the BIOS:
- insert the disk into the drive and reboot the PC;
- at system startup, hold down the Delete key (may differ for different systems);
- when the BIOS shell appears, find the "Boot" tab and select Boot Device Priority;

- here you need to move the drive to the first place so that the download starts from it;
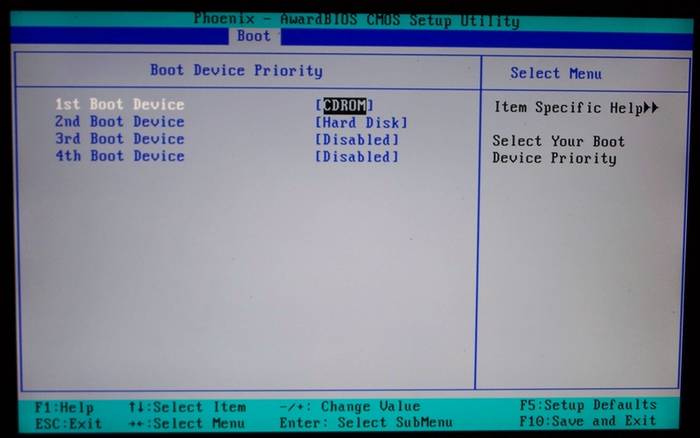
- press "Enter" and then F10 to save the changes and exit.
- when the window appears "Press any key to boot from CD or DVD" press any key;

- a window with an inscription will appear and the extraction of the necessary files will begin;
- then select the language, time format and keyboard layout, then click "Install";

- accept the terms of the license agreement by checking the appropriate box and click "Next";
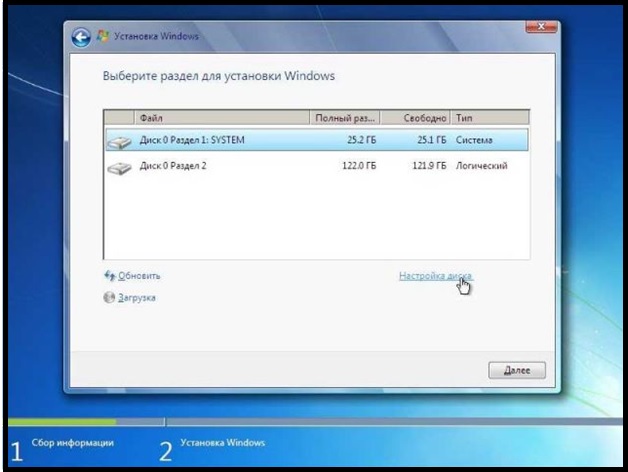
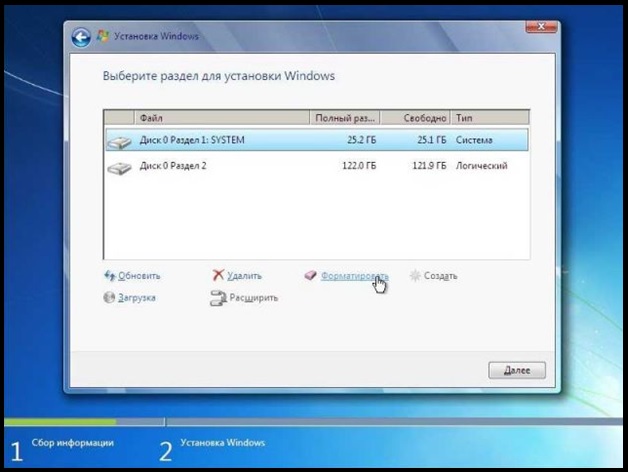
- in the new window, select "Full installation";

- specify the partition where the new operating system will be installed;
- if the hard disk is not partitioned, create new partitions by clicking on the "Create" option at the bottom of the window and specifying their desired volume;

- after a warning about deleting data in the selected partition and formatting, click "Next".
The process itself
After restarting, the system will launch the inserted disc and the actual installation process will begin:
Note! If you want to install windows 7 from a formatting disk, then take care in advance of the safety of data that may be lost during this procedure.
The installation will begin, usually taking between 15 minutes and half an hour. Upon completion, the system will prompt you to enter a username and password (optional), as well as set a hint phrase to restore them. Next, you will be prompted to enter the serial number, which is usually found in the box with a copy of the OS. If it is missing or the build does it automatically, skip this step.
There are a few more small steps ahead:
- specify the "recommended" security settings;
- your time zone;
- network type.
This completes the installation and the system is almost ready for use, it remains only to configure it.
Video: Installation and setup
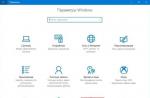
System Setup
The first step is to activate the operating system (if this did not happen automatically during the installation process). Do not forget about this, because after 30 days, annoying reminders will begin to appear, announcing the expiration of the registration period.
How to check if Windows is activated:

Drivers and programs
The next critical step is to install the drivers. Their absence may result in incorrect display of graphics, incorrect operation of the computer and inability to connect to the Internet. How to determine which drivers the system needs?

Often Windows 7 installs a driver for the video adapter so it won't be listed as unrecognized. Despite this, a driver for the video card is still needed, because without it it will not work at full capacity (which can be seen from the not entirely correct display of icons on the desktop). We install it from the manufacturer's disk or downloaded in advance from the official site.
Important! Do not forget to install the driver for the network adapter, because without it access to the network will be impossible.

It is worth noting that all such programs are quite effective and able to secure your system. For maximum efficiency, it is worth changing the antivirus used from time to time. After installing it, don't forget to activate and update to get the latest database versions that can protect against newly discovered threats.
Now you can start installing the browser. Its choice also depends entirely on the personal preferences of the user. When the new search engine is installed, the first step is to update Flash Player, because without it it will be impossible to watch videos or listen to music on many resources. You can do it in seconds on the official website. 
Using a freshly installed browser, start filling the system with new programs that no system can do without:
- office applications (Microsoft Office, OpenOffice);
- archivers (WinRAR, 7-Zip);
- programs for listening to music and watching videos;
- useful utilities (CCleaner);
- communication applications (Skype, Mumble);
- other software you need.
Installing any operating system is a matter that requires a thorough and careful approach. Despite this, you should not be afraid of him. Just follow the simple instructions, and very soon your PC will be boasting a new OS.
Ready to install windows? Install correctly - this is from the disk through the BIOS. To do this, it is necessary to ensure that the boot is performed using a CD-ROM or DVD-ROM. If you need to make loading With USB flash item must be selected USB HDD.
To do this, we need to reboot the computer, get into the BIOS settings (Setup) - a program that provides the initial boot of the computer. When the computer boots, a window will appear, at the bottom there is an entry Press xxx to enter SETUP, in fact, there it will be written how to get into Bios. There are not many options - it can be a button: Del, Esc, F1, F2, F3, F10, Ctrl + Alt + Esc (simultaneously)
Also, to select the boot option from HDD, USB, DVD, you can use boot menu, keys to enter:
Monoblocks and laptops
Samsung - Esc
Dell-F12
HP - key F9 or Esc, and then - F9
Toshiba-F12
motherboards
If you have Did not work out go into the BIOS, try to do everything again, if YES - we see the next window.
from DVD-ROM - burn a disc from windows to minimum speed, to another disk (new), select other distribution.If in BIOS, UEFIno possibility select, add boot from disk or usb flash, you need turn off secure boot or in the operating system run installation from disk.

One of the reasons why the boot from the usb flash drive does not work (black screen) is that it is turned on UEFI, the flash drive is formatted in NTFS. Legacy BIOS supports booting from NTFS partition, UEFI - FAT32
Windows XPnot installed on hard driveSATA III (3)
It is worth being wary of distributions with Windows auto-installation, an answer file, the operating system can be installed on the wrong partition and delete data!
And so we are in the AMI Bios settings, to change the settings, click the " -> " button on the Boot tab

Use the "down" button to select CD-ROM Drive, use the "+" button to move it to the first place in the list. With this, we have ensured that the download is made from CD\DVD-ROM. Do not rush to rejoice :), you must save these settings! You can do this by pressing F10 (Save and Exit), or by clicking " -> " go to Exit - Exit Saving Changes (Exit Save Changes).

If you have AWARD (Phoenix) BIOS, select Advanced bios Features:

Second Boot Device - HDD-0

After changing the boot option, press Esc and save the settings in the Save & Exit Setup item.

Save & Exit - Boot Override
gigabyte uefi dualbios in Russian

Select Bios functions - Device boot priority - Boot option - F10
When the computer boots up, press any key.
Tags: install, reinstall windows via bios
Choose Russian language


Click install

At this stage, you will have to choose x86 architecture or x64 bit, x64 bit is worth choosing if you have more than 4 GB of RAM.

Click I accept the license terms

Choose Full installation for further format drive C

Click on section C Disk setup


We remove the daw Automatically activate Windows 7 when connected to the Internet

I hope the article how to install helped.
Do you want to reinstall windows? It is very important to reinstall the OS correctly. The process can be divided into three stages: The first stage is the actions taken before installation, The second is the installation of the operating system, The third stage is the configuration.
You cannot reinstall the system via the Internet, you can reinstall Windows using a DVD rom or usb flash.
Before reinstalling Windows, you must right choose a distribution kit that can be bought in a store or downloaded from the Internet. The disk image can be burned with the UltraISO program. I recommend using clean builds that do not have pre-installed drivers, themes, no tweaks (registry settings changes). To improve performance and security, the latest service pack and critical updates should be pre-installed. This operating system will last longer!
Next, we take out the network cable (if any) from the network card so that the "evil spirits" do not climb out of the network. We check the distribution kit and all sections of the hard disk (hard drive) for viruses with updated databases. Check all sections so that the virus does not get into it from partitions other than C after installing the operating system.
Copy all NECESSARY files from the system drive C (root, folders My Documents, Desktop, Documents and Settings, C:\Users) to D, E, since partition C must be formatted when installing the OS (complete loss of information). In the future, do not store documents, movies, games (do not install) on the system drive, as these files will not affect performance for the better.
We rewrite the network settings (IP address, gateway, workgroup, etc.), if there is a home or another one. Make sure you know beforehand how to set up internet connection after system reset. Go to your ISP's website and look at the instructions.
If you do not have a system disk with DRIVERS or saved on the hard drive, a program will come in handy that will help you correctly save existing drivers, as well as find them on the Internet and update them in the future.
If you have done all these steps, proceed to the Windows installation process. how to do it right you can read
After installing Windows, install the antivirus, drivers for all devices, service packs, critical updates if they were not preinstalled in the distribution. As well as all the necessary programs, configure the OS as convenient (folder view, theme, desktop shortcuts, etc.), update anti-virus software via the Internet, optimize the OS.
So that once again you do not have to install Windows from scratch, and the reason for this may be: a virus attack, slow system operation, caught the "Blue Screen of Death" and the like, for you there is the right decision- a special program!
I hope this article helped you reinstall Windows!
Tags: install, reinstall via bios
how to reinstall (remove) preinstalled windows 8?
After buying a new Acer v3 laptop, I ran into a problem - it had windows 8, this operating system is unusual for many like me, so it was decided to reinstall it on windows 7.
It was not possible to immediately reinstall windows 7 in the usual way, because when the computer was booted there was no message how to enter the BIOS and it was impossible to choose to boot from DVD-ROM.
It turned out to enter bios using the F2 button, you can look at the rest of the keys to enter and configure the BIOS. By default, the UEFI interface was used, in this case it is impossible to choose to boot from a dvd rom or flash drive, so to reinstall windows, you need to Boot - boot mode instead of UEFI select Legacy Bios.

tab Exit - Exit Saving Changes(Exit Save Changes), restart the laptop.
Go to bios Boot priority order select boot from dvd rom or flash, press F10.


asus laptop, standing Free DOS aptio setup utility

If you download an ISO image with a Windows distribution and even burn it correctly to a DVD disc or create a bootable USB flash drive using the same UltraISO, it is practically not difficult for anyone. Then with the second stages, directly installing the operating system from a disk or flash drive on a PC, many have difficulties.
There are three ways I know how to start installing Windows.
1) the simplest and most unreliable is to open an image through a virtual drive with Windows already running and start the installation, but there are many factors that can interfere and give an error at some stage of such an installation.
2) Insert the flash drive we created into a USB connector or a DVD with Windows into your drive, no matter which version, either windows 7 or windows 10, or even win95. This works for everyone. Then, when you turn on the PC, call the BOOT menu, this is a list with media from which you need to boot, select the media we need and press ENTER. You can read more about how here.
3) It differs from method 2 only in that we specify what we want to boot from not through the boot menu, but in the BIOS of our device.
In this article, we will talk in detail about how to install Windows from a flash drive through BIOS or boot Windows 7 from a BIOS flash drive.
Booting Windows 7 from a BIOS flash drive
Installing Windows from a USB flash drive through the BIOS begins with calling the BIOS menu or it's also called Setup, this is most often done with the Delete button immediately after turning on the laptop or computer, press continuously until you see a blue screen with some text, but it happens that you need to press another button, it's F2 or F10 or Esc. You can try all the options until you see the desired result, or you can read a text like "Press DEL to run Setup" in the welcome window of the mother firmware, it tells us that in order to get into the BIOS, you need to press DEL.
And so, after we got into the BIOS SETUP UTILITY, we look for the Boot tab and use the arrows to go there. We need the line Boot device Priority

Here the logic is simple, the higher the device in the list, the higher the priority in the download queue. That is, the top one in the list is loaded first, and so on in turn until the system boots.

And so, using the arrows, select the first drive in the list and press ENTER, we see a list of all possible devices from which the computer can boot.

If we want to choose to load the BIOS via a USB flash drive, then we select the USB interface, this is Removable Dev or something with the inclusion of the text "USB" or if the USB flash drive is already inserted, then the name of the flash drive manufacturer will be written. If you need to select a DVD drive, then usually this line begins with the words CDROM: or DVDROM: or it can also be written by the manufacturer of the DVD drive.
If you make a choice, then press ENTER and in the same way select the second device in turn, the second in the list should be your hard drive on which Windows will be installed. If the BIOS does not see the USB flash drive, then try inserting the USB flash drive into another USB connector and do everything again.
In order for all changes to be saved in BIOS Setup, you need to go to the Exit tab before leaving and select the Exit & Save Changes line and press ENTER.

After that, we can install Windows BIOS via a USB flash drive or DVD drive. bios with a blue screen is no longer available for everyone. In 2017, more and more often you can see the new generation BIOS, it is more graphically thought out, there are pictures of the icon for an understandable association, if you are not strong in English so as not to be mistaken. But essentially all the settings are the same.
Attention!- after our changes in the BIOS, now the computer will always boot first from the USB flash drive, then from the hard drive, so it is important when installing Windows after the first stage of installation, when the laptop or PC reboots, YOU MUST HAVE TO PULL THE FLASH DRIVE FROM the USB connector, or pull out the disk from DVD-roma. Otherwise, the first stage of the installation will be repeated indefinitely.
Now we know how to set up the BIOS to install windows from a USB flash drive. And having a bootable USB flash drive with the image of WINDOWS 7 or 10, we can easily install or reinstall the OS on any device.
Attention! In some assemblies, the default settings for the Chrome browser are already set, the start page leads to the go.mail.ru search engine. Everyone has the ability to change the search engine to any other.
Now you can independently install Windows 7 recorded on a USB flash drive. Just follow the step by step instructions. From the installation procedure professional work with a computer begins. It is assumed that the installation will be carried out with flash drive. A flash drive or hard drive to install a bootable image of Windows 7 must be at least 8Gb in size.
Steps to install Windows 7 from a flash drive
Download the latest version of the operating system Windows 7 Ultimate
At the moment, Windows 7 maximum x64 is one of the successful developments of Microsoft, along with the almost retired XP, and the growing popularity of Windows 10. It is stable and ready to fulfill user requests of any complexity. At the moment, Windows 7 holds the first place in terms of the number of downloads and users.
To create a flash drive with the image of Windows Seven, we recommend using the official utility from the corporation that releases and maintains the Windows OS.
Benefits of Windows 7 USB DVD Utility
1. Simple and intuitive program interface
2. Created specifically for creating bootable images of the Windows Seven operating system
3. A completely free utility with a size of only 2.6 Mb.
How to create a bootable flash drive with the Windows 7 USB DVD utility:
Download the utility from the official site at the link above. Install Windows 7 USB DVD on your computer by following the installation wizard. And run the utility about Microsoft. In the launched main window of the program, you need to select the iso image, we see two buttons for creating bootable Windows 7.
- The first button is "Browse" to browse and select an iso image of Windows 7 x64.
- The second and last button is "Next" to go to the next menu.
And so we select the downloaded system image and press the button at number two (Next) 
In the next window, you need to select the type of media for the image and there are already three buttons:
- "start over" to go (return) to the previous menu, to select the image of the Windows Seven installation image.
- USB device to proceed to the selection of a flash drive or portable hard drive where the image will be installed.
- DVD to proceed to the selection of a blank DVD disc where the system image will be installed.
We are interested in button number two USB device click and go to the next step. 
Insert your portable hard drive or flash drive into the USB port on your computer. All information from the USB drive will be permanently deleted while Windows is booting to the USB flash drive!
Select the drive defined by the system and click on the button Begin Copying to start copying Windows files to the flash drive. 
In the next window, the Windows 7 USB program asks for permission to format a USB flash drive or portable hard drive. We agree and click "Erase USB Device" to delete all information from the USB flash drive. After formatting the flash drive, the installation of the bootable Windows Seven OS will automatically begin. After the successful completion of copying Windows files, the program will remind you of this in the next window with the inscription Bootable USB device created successfully
Close the program with the "Close" button in the upper right corner. Bootable flash drive with Windows 7 is ready.
Changing BIOS settings to choose to boot from a flash drive
In order for the system to boot from a USB flash drive, you need to set the priority startup option from an external drive in the BIOS. To do this, when restarting the PC, at the moment when lines with information about the technical characteristics of the computer begin to appear on the black background of the screen, repeatedly press the Delete and F2 keys. There are other options for triggering the keys, for example, on different laptops, you need to press the Win + F12, F10 buttons. The result of pressing the correct key will be the appearance of the window. 
After that, in the menu that appears, you need to look for the “Boot” option, which changes the boot priority of the operating system. The word can serve as a guide. Boot. The boot device is selected using the Up/Down arrows on the keyboard. The flash drive with the name of the flash drive on which you installed Windows Seven is placed in the first position, and by pressing the F10 key you need to exit the BIOS by answering “OK” (“YES”) to the question about saving all the changes “save configuration and exit?”  This completes the work with the BIOS, and if everything was done correctly, and the USB flash drive with the operating system being installed is inserted into the USB drive, then the following window will appear after the PC is restarted.
Installing Windows 7 from a flash drive with BIOS boot

Here you need to press an arbitrary key, which will start the installation process.
In the next dialog box, select the system language, By clicking the "Next" button, select "Install" in the next window


Then you should check the box next to the line about accepting the terms of the agreement, and click on the "Next" button. In the next interface window - make a choice - "full installation".


Then you need to select the partition in which you want to install the system. With a mouse click, the desired partition is selected, and then the “Settings” link, clicking on which will open a window with disk partitioning tools, where you should click the “Format” link. This action will result in a warning.

After confirming the selection by pressing the "OK" button, the process of formatting the logical partition will start, after which the return to the last window will occur. Clicking on the "Next" button initiates the process of unpacking the installation files, followed by their installation.The progress of the installation can be observed by filling the green bar at the bottom of the window, as well as by the emerging green daws near each line at the top of the window. Upon completion of installation, a message will appear about the reboot, which can be done immediately by pressing the appropriate button or waiting for an automatic reboot after 15 seconds.

IMPORTANT POINT!
When you restart the PC, you must enter the BIOS again, and change the initial boot from the USB flash drive to "Hard Disc". And save the changes, otherwise the installation will start from the beginning.

At the end of the installation, the system will ask:
Entering a username and PC (you can think of anything)

Account password generation

Operating system activation

Security mode selection

Date/Time Settings

Select a network connection option. The last window will only appear if there is an active network connection.

After that, the user profile is created, and the desktop is loaded

Activating Windows 7 using an activator
If you do not have a windows 7 activation key, download the activator (password from the archive: 1111)
How to install windows OS? Perhaps, any PC user can easily answer this question. And no wonder, because installing windows has already become a common thing! However, not all users understand the essence of the actions they perform! How to install Windows through the BIOS system is the topic of this article.
What is BIOS
Any installation of Windows OS implies, first of all, setting up the BIOS system. So what is it?
BIOS - basic information input-output system is a set of microprograms that provide the operating system, for example, windows, with API access to hardware.
Although "combining" computer modules is the main function of the BIOS, it is not the only one! The very first IBM computers did not have a full-fledged operating system, but this did not prevent them from calculating and displaying information on the monitor through the BIOS. The fact is that a BASIC language interpreter is built into it. Through some kind of basic input / output system, you can even play media files and access the Internet through the simplest browsers.
At a technical level, the BIOS looks like a microchip located on the motherboard.

Information in a computer is stored and transmitted through electrical impulses - bits. However, when the computer is turned off, the entire system is de-energized. Everything but the bios! The BIOS, like the heart of a person, does not stop working for a minute, because the settings of the basic input / output system, stored in bits, provide access to the central processor to the rest of the PC modules. The computer uses a 3 volt battery to power the BIOS.

This is a battery, not a battery, and batteries tend to sit down! If the battery is completely discharged, all settings stored in the BIOS disappear, and the central processor loses access to all other modules, while the power supply and computer fans continue to work. After replacing the battery, the BIOS will recollect all information about the computer and start up with default settings.
BIOS setup
What happens when you start your computer? When current is applied to the central processor, one of the BIOS functions is activated - the POST operation, through which the system itself is tested and the parameters are configured. During the operation, the logo of the manufacturer of the motherboard is displayed on the screen. The POST operation itself is performed in a matter of seconds. After self-checking, the basic input / output system starts the operating system loader - a program that searches for a valid boot sector (Master Boot Record - MBR) on active partitions of disk spaces transfers control of the computer to it. In other words, the BIOS looks for the Windows executable on the active partition of the hard drive and starts Windows. During the installation process, Windows creates a separate partition on the hard drive equal to 100 MB and places the MBR file there. Such a partition is usually hidden from the user and marked as "system reserved".

Changes to active partition settings may result in a "BOOTMGR is missing" error when loading windows.

By default, it starts from the hard drive. In order to install or install a USB flash drive, you will need to change the boot order in the BIOS settings.
Fortunately, the BIOS system provides a visual interface that greatly simplifies the task. It is called by pressing just one key during the POST operation. Usually, it's F2 or Delete. In either case, the desired key is indicated on the POST screen.
The visual user interface of the BIOS system is diverse and depends on the manufacturer. There are both Russian and English speakers. Since it is not difficult to understand the settings of the Russian-language interface, this article will describe the settings for the English version.

Having opened the BIOS menu, the first thing that catches your eye is the number of different tabs, but don't be scared! Through its interface, you can disable or enable individual PC modules, set the clock, delve into the system settings. In order to install windows, it is enough to change the boot order, which is located in the "boot" tab.
Expanding the tab we are interested in, you will see a couple more three. We need - Boot Devise Priority.

Moving on to the next step, you should already have a windows distribution from which Windows will be installed!
So, opening the “Boot Device Priority” tab, you will see the current boot order.

- If you set the first parameter to boot from the hard disk (via the SATA bus), then windows will start faster, since the system will not check for distributions on other media.
- If you set boot from disk using CDROM as the first parameter, then the system will check for the presence of the windows distribution kit on the disk (even if the disk itself is not in the drive), and only then proceed to boot the OS installed on the hard disk.
- If you set USB-HDD as the first parameter in the boot order settings, then Windows will boot from the installation flash drive.
After saving the settings and restarting the PC, the windows installation will begin. I hope it's not necessary to explain how to install Windows! On the site you will find a lot of articles on this topic for different versions of the OS.
After installing Windows, I advise you to install the boot from the hard drive through the BIOS first to speed up the boot of the OS.