Want to know how you can "swap faces" with a friend, relative or favorite celebrity? The magic of photomontage will help you with this! How it works? Search engines on request, for sure, will offer to use Photoshop, but this program will not work for a non-professional. The best option is a simple one, like the "Home Photo Studio". In this article, you will learn how to insert another face into a photo without having any experience in photomontage.
Step #1. Getting Started
To get started, we suggest and install it on your PC. Follow the instructions of the Installation Wizard - the program will be ready to work in just a minute. Run the utility. In the start window, select the option "Open photo" and find the photo file you want to edit.
You can start working immediately after the program is installed
Step #2. Photomontage
The next stage is the most responsible. In the main menu, click on the tab "Registration" and find it in the list. In the window that appears, create a new layer. To do this, click Add Layer > Photo and upload the photo you want to overlay.

With the help of photo montage, you can easily superimpose one photo on another
When choosing a picture, it is worth remembering that both photos should have approximately the same resolution and quality. Moreover, the faces should be taken from the most similar angle possible.
Select the layer with the added image in the list and click "Crop Photo". A new window will automatically appear. Use an arbitrary crop shape. Carefully outline the face along the contour, trying to avoid unnecessary objects, such as accessories. If it turns out uneven, use the option "Reset Selection" and try again. Close the dotted line by double-clicking the mouse. Increase the scale "Blurring the Boundaries", dragging the slider to the right, and press "Apply".

Zoom in on the image to make the result as accurate and accurate as possible.
Now let's find out how to insert another face in the photo so that the difference is not noticeable. To do this, you need to transform the cropped layer. Resize the new image by dragging the selection around the corners. The "new" face must match the size of the face in the original image. If necessary, rotate the layer by moving the slider on the scale "Angle of rotation". Blend mode "Normal" will be set by default, but you can choose a different one if you wish. Ready! Click the "Apply" button.

Adjust the layer blend so that the "new" face looks as natural as possible.
Step #3. Levels and color correction
It's still too noticeable that the face was taken from another shot. Let's do some simple color correction. To do this, in the tab "Image" open "Levels". It is very easy to understand how to use this function. On the scale "Levels at the entrance" 3 sliders - white (light shades), gray (midtones) and black (dark shades). With their help, you can comprehensively adjust the brightness of the photo. Adjust the sliders to darken (right) or lighten (left) the image. Then, save it by clicking OK.

By adjusting the levels, you can make the picture with the "new" face more solid
Step number 4. Working with details
Now you know how to insert another face into a photo as naturally as possible, but your possibilities are not limited to this. If individual areas of the image need to be processed, use the tools in the panel on the left. Select "Blur Brush" to make the transition from the original image even smoother. Adjust the tool parameters - the smaller the processing object, the smaller the size and transparency of the brush.
You can also darken or lighten certain areas of the photo in the same way, add sharpness, contrast or saturation to them. Just select the appropriate brush from the toolbar and process the desired part of the image.

Use the Dodge and Dodge brushes to give the image more dimension.
Step number 5. Save and share with friends
Let's evaluate the final result.

Photomontage will help you try on the role of your favorite movie character

You can adjust the image quality before saving
Ready! Now you know that pasting a face into another photo in Photoshop is not the only solution. This instruction is universal, use it in practice the way you want. Find out and discover new features of the program! "Home Photo Studio" will become your faithful assistant in any situation when you need to process a picture with high quality.
4 votesGood day, dear readers of my blog. I was very surprised recently. It turns out that just one skill in working with Photoshop can make good money. The option that we are going to talk about today is in serious demand. If you manage to complete the project well and get noticed, then there will be no end to the customers.
Many girls take 500 rubles for half an hour of such work. Today we are exploring Photoshop - how to insert a face into another photo. In this tutorial, you will find all the steps that the pros take. Unfortunately, on YouTube, authors often miss some of them. The result is not very good.

But, let's not procrastinate. We have a lot of work to do, though not difficult. By the way, at the end you can find a training video and reduce reading time. Well, let's get started, shall we?
Spectacular collage in 15 minutes
So, I'm going to put the face of Aishwarya Rai, a charming Indian actress, on top of Emilia Clarke's Daenerys Targarian. It has long been interesting what would happen if an Indian woman got one of the main roles in the Game of Thrones.
By the way, there are online services and mobile applications for such operations, but you will never be able to work in them as efficiently and realistically as if you were using Photoshop.

To begin with, through the menu "File" - "Open" I need to extract both pictures into the working window.

Now, using a simple Selection tool, I capture the face in the image. All I need is eyebrows, nose, eyes and lips. The oval of the face and all the rest will belong to the source. Then the result will be better.

Now I take the Move Tool and drag the selection I just made into the first tab.

I set the opacity of the new face to about 60%. This is necessary in order to see the bottom layer and mix smoothly.


Remove the visibility of the previous two layers. Just click on the "eyes" icons.

Now remove the hard borders around the edges of the image.

At some points, when using a brush, someone else's eyebrow, part of the eye, or something else unnecessary may appear. In this case, change the tool to Healing Brush or Stamp. They will correct the picture.

Now we need to work on the face. Merge all layers using the keyboard shortcut Ctrl+Shift+Alt+E.

Click in the "Camera RAW" filters section.

Using the tool on top, select the area of the face. Move to the bottom of the panel on the left to check the box next to "Effect" - "Inside". Otherwise, all changes will be applied to the outside of the photo.

Twitch the sliders to achieve a better and more natural effect. Try. It may not work right away. Over time, you will feel more subtle changes and what settings to apply. Unfortunately, there is no single scheme, since all photos are different and there can be a million collage combinations.

Well, we have reached the final stage. Work with the whole photo. This will help polish it and set up a single composition. Go to the "Editing" section. I prefer to use Curves to correct, and then work on the color tone as well.
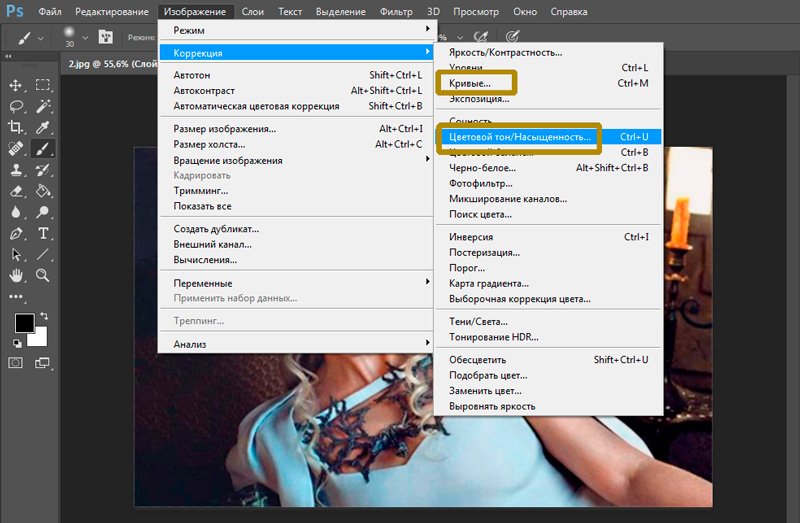
Curves I put to align the light and shadows.


And finally, I create a single composition with the help of color balance. All in the same edit menu.

This is the result that worked for me.

By the way, you can use another interesting effect. Apply a mask to the topmost layer. We already did this today. Then take a black soft brush and leave only the top and bottom layers visible.

You can erase part of the face you just drew. In this photo, I left only the eyes of Aishwarya Rai, and returned the lips from Emilia Clarke.

You can open one eye or divide your face into two parts.

In general, have fun at your own discretion. It will be funny.
Video instruction
Well, now, as promised, a training lesson in which all the same actions that are described in the article are performed. If something is not clear, you can refer to the text and vice versa.
Of course, in order to achieve the ideal result, I would advise you to master additional information about all correction tools. Information about them and not only can be obtained from the course of Zinaida Lukyanova " Photoshop from scratch in video format ».

By the way, if you are interested not only in entertainment, and you are thinking, I can offer an interesting one, as well as a subscription to my blog's newsletter. Here I talk about design, websites, and everything you may need for a stable and good income.
Until we meet again and good luck in your endeavors.
The program, created by PHOTOULITSA specialists, allows you to make face photomontage online for free. You just need to choose one of the templates, special effects or tools available in the program set and apply it to edit your photo. You can also apply all sorts of frames and other effects to any photo that can significantly improve the quality of the picture.
It should be noted that online face photo montage is absolutely free and without the need to study any popular graphic products. Absolutely any action performed through such an online editing program on the network makes the photomontage process free and accessible to many users. The quality of the resulting photograph, it must be mentioned, is also at the highest level.
Benefits of online photo editor
Free photomontage, carried out online through our website, is not only of high quality, but also very fast. All you need to do to start editing is just three simple steps:
- Select the necessary special effects from the online editing service;
- Upload a photo necessary for editing from a computer or other source;
- Choose the most optimal effect online and save the photo;
After the edited photo is ready, the online editing program allows you to do almost anything with it - send it to your own gallery, save it to your computer, and also add it to friends. Thanks to a huge variety of modern functionality, as well as ease of use, the free online photo editor from PHOTOULITSA is very convenient to use and allows you to quickly and efficiently edit photos.
The variety of effects available on the portal allows you to create almost anything with a photo. The main thing is to know what exactly you want to get in the end. After that, it will be possible to admire the photos obtained through the use of the service for no reason and with great pleasure. This is a very fast and practical way to get photos, which does not require the presence of various kinds of programs and special skills.
The photography industry is rapidly developing, so it is not strange that everyone wants to get high-quality photos. Their processing has become especially popular thanks to social networks. Previously, you had to use special software, which is not always easy to understand due to navigation, so there is nothing strange in the fact that many people want to insert a face into a photo online for free. To do this, you can use our service, which provides a variety of options for processing images. Believe me, not many resources allow you to do a lot of manipulations with photos.
We also have a wide selection on our website.
Work principles
Before inserting a face online for free into any image, you need to consider a few points during pre-processing:- the photo format must be of high quality;
- you can take a picture not on expensive equipment, but if you use a phone, you need to make sure that the face is clearly visible;
- before inserting a face into a template online for free, you need to decide on the color scheme, design.
To make a photo montage online for free, inserting a face into a picture is quite simple:
- go to our service;
- select the appropriate section;
- choose the necessary photomasks;
- Upload a photo;
- save the image on your computer.
Do you want to attach? Do it on best-photoshop.
Advantages
Photomontage is one of the ways to insert a face into a picture online without registration and for free. Now everyone can feel like a star on the covers of magazines, visualize dreams of a vacation on the coast of an exotic island, imagine at least for a moment what it is like to be the hero of a famous film.When working, you need to adjust the color gamut, brightness and contrast of the image. The work is quite complicated and takes more than one hour, but if you insert a face into a photo online for free, you can avoid this process, as the service offers different filters for pre-processing.
If we talk about the advantages of using such resources, then there are several of them:
- available without registration;
- various photomasks;
- simple interface;
- clear navigation;
- a full-fledged photo editor is available on one resource.
Internet services involve the use of a variety of devices, including phones and tablets, because there are no system requirements. Now even those who have never done anything like this before can make a beautiful photo in just a few minutes. In addition, such a picture will be a great gift for family and friends. It does not need to be used only on social networks, but can be printed and hung on the wall.
Choose a photo montage and get beautiful images without much effort.
Have you ever wanted to transform into the image of a famous hero, present yourself in a comic or unusual way, change photos of your friends? Often, Adobe Photoshop is used to replace faces, but the program is difficult to understand, requires installation on a computer and productive hardware.
Today we will talk about unusual sites that will allow you to replace a face in a photo with any other in real time. Most resources use the face recognition function, this allows you to accurately fit a new image into a photo. After processing, the photo is subjected to automatic correction, due to which the output is the most realistic installation.
Method 1: Photofunia
The convenient and functional Photofunia editor allows you to change a face in a photo in just a few steps and a few seconds of time. The user only needs to upload the main photo and the picture from which the new face will be taken, all other operations are carried out automatically.
Try to choose photos that are as similar as possible (by size, face rotation, color), otherwise the manipulations with the movement of the face will be very noticeable.

The site replaces faces qualitatively, especially if they are similar in composition, brightness, contrast, and other parameters. To create an unusual and funny photo montage, the service is 100% suitable.
Method 2: Makeovr
The English-language Makeovr resource allows you to copy a face from one image and paste it onto another photo. Unlike the previous resource, you will have to select the area that will be embedded, select the size of the face and its location in the final photo yourself.
The disadvantages of the services include the lack of the Russian language, but all functions are intuitive.

Montage in the Makeovr editor turns out to be less realistic than in Photofunia, described in the first method. The lack of automatic correction and tools for adjusting brightness and contrast had a negative effect.
Method 3: Faceinhole
On the site, you can work with ready-made templates, where you just need to insert the desired face. In addition, users have the option to create their own template. The procedure for replacing a face on this resource is much more complicated than in the methods described above, however, many settings are available that allow you to match the new face to the old photo as accurately as possible.
The disadvantage of the service is the lack of the Russian language and numerous advertisements, it does not interfere with work, but significantly slows down the loading of the resource.
The site constantly freezes, so it is advisable to be patient. The English interface is understandable for Russian-speaking users due to the convenient illustration of each button.
The considered resources allow you to move a face from one photo to another in a matter of minutes. The Photofunia service turned out to be the most convenient - here the user only needs to upload the necessary pictures, the site will do the rest on its own.