- Select your language and country.
- Connect to a Wi-Fi network.
- Select "Setup as" new iPhone» in the iPhone Settings menu.
- Create an Apple ID. It is needed to access App Store(applications, games, music, movies, TV series are downloaded from there), communication via iMessage and FaceTime and synchronization - in general, without an Apple ID you will not be able to use any Apple services. Also, without an account, you will not be able to block and find your smartphone in case of loss or theft.
How to set up an iPhone 6s if you previously had an Apple device
If you have already used an iPhone, then use a backup copy to transfer all data to new smartphone. There are two types of backup. Photos, accounts, documents and system settings are saved to the iCloud cloud daily. And on the computer with iTunes it is stored full copy your iPhone.
Setting up the iPhone 6s in this case begins with the same steps as in the previous section.
- After unpacking, insert the SIM card into your smartphone and turn it on.
- Select your language and country.
- Turn on location services (you don’t have to turn it on, but then the Maps app won’t be able to determine your location).
- Connect to a Wi-Fi network.
- Select "Recover from" iCloud copies" or "Recover from iTunes copy."
- If you choose to restore from iCloud, you will need to enter your Apple ID and password, and then choose which copy to restore from. If you chose to restore from iTunes, then connect the device to the computer on which the copy is stored. After that, click on the smartphone icon in the top menu, and in the “ Backups» Click on “Restore from copy”. Do not disconnect your phone from your computer until all data has been transferred.
Just recently, official sales of the iPhone 6 and its older brother iPhone 6 Plus with iOS 8 on board started in Russia. New items can raise a lot of questions, so we have prepared a brief instructions for using iPhone 6 / iPhone 6 Plus and iOS 8.
What's included with iPhone 6 and iPhone 6 Plus:
Headphones Apple EarPods
with microphone and remote control for listening to music and watching videos, as well as making calls.
Lightning cable. Used to sync data between your computer and phone, or to charge using a power adapter.
USB power adapter. Use it together with a Lightning cable to charge your device from the mains.
SIM card removal tool. Use this paperclip to remove the SIM card tray.
Basic elements of iPhone 6/iPhone 6 Plus
Icons on the desktop can be located completely differently, the picture above is just an example. It all depends on your settings and installed applications.
Installing a SIM card in iPhone 6 / iPhone 6 Plus
The process is very simple, although not familiar. iPhone 6/iPhone 6 Plus includes special tool to open the SIM card tray (in the picture above), which, however, can be replaced with a paper clip. Using this tool, open the SIM tray, insert the NanoSim card from your mobile operator and carefully insert it back. A special latch built into the tray mechanism will not allow you to make a mistake, the main thing is not to mix up the side, but even this, thanks to the special design of the tray, is not easy to do.
The most important iPhone 6 buttons
Lock/Power Button
When you are not using your phone, you should turn off the screen by pressing the lock button. This will put your iPhone into sleep mode, which will help save valuable battery power and avoid accidental taps on the screen. While in Lock mode, you will continue to receive calls, FaceTime video calls, SMS messages, and app notifications. You can also listen to music and adjust the volume.
On iPhone 6 and 6 Plus, this button is located on the right side. iPhone enters Lock mode automatically if you don't use it for about a minute. You can change the Auto-Lock time in Settings > General > Auto-Lock.
If your iPhone is turned off, to turn it on, hold down the power button until the Apple logo appears on the screen.
If your iPhone is in sleep mode, press the Lock button or Home button, and then slide the screen from left to right to unlock the phone.
If you wish, you can set a password that will be requested every time you unlock your device. Open "Settings", go to the "Touch ID & Password" section. Create a secure combination or set up Touch ID to unlock using the built-in fingerprint sensor.
Home button
No matter what app you have open, the Home button will take you back to the home screen, where all your app icons are conveniently located.
Find out which applications are currently running by double clicking on it. With a long press you will call a personal voice assistant Siri, who will answer your question or complete an order in the blink of an eye.
Volume buttons
With these buttons you can adjust the volume in music, movies, third party applications and games. By default, when music or video is not running, these buttons are used to adjust the ringer volume, notifications, and other sound effects.
Ring/Silent switch
To enable silent mode, switch this lever to the position with a red indicator. In that iPhone mode replaces ringer and notification sounds with vibration. It is worth noting that some applications (for example, alarm clock or “Music”) will in any case continue to play sound through the built-in speaker.
You can also mute calls and notifications using Do Not Disturb mode. To do this, pull the screen up from the bottom. Control Center will open. Click the crescent moon icon to turn this mode on or off.
Basic iPhone 6/iPhone 6 Plus Control Gestures Used on iPhone touch screen with the support multi-touch gestures. The main gestures that will be useful to you when working with your phone are pressing, scrolling (scrolling), “swipe” (swiping with your finger) and “pinch” (narrowing, squeezing).
Launching applications
To launch an application, simply tap its icon on the Home screen. There can be several screens; you can switch between them by swiping your finger right or left.
Put everything on the shelves!
Hold any application icon until it starts to move. While apps are shaking in fear that they could be deleted at any second, you can change the order of the icons. Layer one on top of the other to create a folder.
Making calls
To launch the “Phone” application, feel free to click on the green icon with the handset icon. It can often be found in the bottom left corner of the home screen dock. The application consists of several tabs. If you need to dial the phone manually, select the Keys tab and start dialing the number. In most cases, you will, of course, use the Recent and Contacts tabs.
Apple ID
To download apps, music, movies and books from the store iTunes Store you need to create an Apple ID account. It will identify you in the Apple ecosystem and allow you to use all the company's services. Ours may be useful.
Reachability
If you can't reach the top, tap the Home button twice. The entire contents of the screen will smoothly move down so that you can get to the desired element.
Notifications
All notifications, including those you missed, go to the Notification Center. To open the control center, pull the screen from top to bottom. Also here you will find the “Today” tab with current events in the calendar and available application widgets.
In this short guide, we tried to briefly talk about all the main features. To unlock the full potential of your device, we recommend reading the prepared Apple(unfortunately, it is currently only available on English language). If after reading this manual If you still have some exciting question, don’t hesitate to ask us in the comments, we will try to help.
Hi all! Let's talk about what any person faces after purchasing Apple mobile equipment. The article was prepared for novice users of the Apple company’s products, and experienced people will only smile after reading this note - after all, everything has been clear to them for a long time and they will say why bother wasting time and describing this simple and intuitive process.
However, as I can judge from my own experience, some people do not know what to do after turning on the iPhone for the first time. And many are also willing to pay money to have everything done right for them and to “boot the iPhone as correctly as possible.” This instruction is for them. By the way, it’s completely free! :)
As an example, I'll consider iPhone 5s activation, on others Apple devices everything happens the same way.
Actually, let's start!
We press the power button - the screen with a welcome message lights up. It can be in any language, so when you see hieroglyphs, don’t be alarmed.
Swipe your finger across the screen and a language and country selection menu will appear.


Now we need access to the Internet, there are three ways, any one will do. If the SIM card is connected to the Internet, select use cellular communication.

Another option is Wi-Fi networks, we connect to them.

If the previous methods do not work, you can always set up your iPhone with using iTunes, first, install iTunes (how to do this -), and then connect the phone to the computer using a cable.

Anyway, you need to install a SIM card, otherwise we will see such an inscription.

We wait a few seconds...

Congratulations, we are with you activated iPhone, there are a few parameters left to configure.
Location Services (). Since many functions and programs are related to map services and navigation, I recommend enabling this item.

Setting up iPhone. On this screen we see three positions:
- Set up like new
If this is your first Apple device, feel free to click the first option.

Next stage: Apple setup ID is Account in the system (you can find out more about it), and you must create it, but this can be done later. About all the subtleties Apple registration ID, written in detail. And in these instructions for turning on the iPhone for the first time, I skip this point.

We accept the license agreement - we have no choice :)

And, since in this article we are looking at activating the iPhone 5s, and let me remind you, it is equipped with a fingerprint sensor, they ask you to configure it as well.

And the last point (finally!). We are asked if we want to send diagnostic data to Apple company, I choose to send - why not help improve products and services? :)

And that's all first turning on iPhone ended and it's ready to go!

Hooray! Now you can fully use the device!
Well, the instructions for activating the iPhone 5S turned out to be quite long. But the author of the article has nothing to do with it - it’s all Apple’s fault, it was they who delayed this procedure so much :) However, there is nothing complicated about it. A little attention and everything will work out!
P.S. However, if any difficulties arise, as always, I welcome questions in the comments - I will be happy to help with advice and suggest a solution!
P.S. And if there are no difficulties, then why not like it? Feel free to click on the buttons below the article - the author will be very grateful. Thank you!
Articles and Lifehacks
Owners of a brand new, fashionable smartphone, immediately after purchasing it, are primarily interested in how to activate the iPhone 6. After all, only after this will they be able to use the desired acquisition: make the first call, the first photo, and whatever else.
First activation steps
The initial steps are as simple as possible and involve the usual steps.- You need to remove the gadget from the packaging and install a SIM card on it.
- Then the user will see a welcome message on the screen, which must be swiped across. This must be done in the direction from left to right. This manipulation will help unlock the phone, after which you can select the desired language system.
- The next step is to select the country in which the iPhone user is currently located. Then you need to find Wi-Fi network or other Internet access. This step is extremely important, since without it it is impossible to activate the device.
- What’s noteworthy is that if suddenly a window appears on the gadget’s screen to activate the device, then this correctly indicates that the phone is being re-sold and that someone has already used it.
Basic steps to activate a smartphone

If at this stage there are no problems, then you can set up a modern gadget as a new device. To do this, you need to select the settings tab, which is designated “like a new iPhone.”
- To carry out the following steps, you need to generate your own Apple ID. This is a kind of account that is used not only when activating the device, but also for general services from Apple.
- It is optimal to enter into this window the e-mail that the person regularly uses. You also need to create a password. It is optimal to choose an alphanumeric combination that contains at least 8 characters.
- Then the user must agree and accept all the services that the resource offers. In addition, their operation will not require additional financial costs from the owner of the device.
- The next step will require you to create an access password. It is he who will be shown every time you turn on the gadget.
- It will also be required during the process of unlocking the iPhone if the user creates such a setting at a certain frequency.
- It’s worth noting that you can refuse to use Apple services with a clear conscience. The gadget is still activated. However, their use can greatly help the owner to use the device conveniently and comfortably.
- If the user does not need all these subtleties, then he can start working directly with the device.
When you turn on any of the Apple tablets and smartphones for the first time, you need activate. Beginners and iPad users are unaware that the activation procedure is quite simple - they are willing to pay sellers to take the right steps.
The initial setup service for Apple equipment is one of the most expensive; in different salons, consultants charge from 500 to 1,000 rubles for activation. This article will tell you how to properly set up your iPhone the first time you turn it on. on one's own, and will relieve the user of the need to enrich communication stores.
Before you start initial setup Apple device, you need to take the following measures:
- Recharge your device. It is necessary that the gadget's battery is filled at least 30%.
- Insert the SIM card into the tray using a special needle. Without a SIM, it was possible to activate gadgets with a pre-installed iOS operating system below version 7 - by completing emergency call to number 112. New operating system iOS 10 does not provide this feature.
- Connect your smartphone to Wi-Fi distribution or to the mobile Internet. If 3G (or LTE) appears next to the network signal indicator and the operator's name, you will be able to do without Wi-Fi. If you have an EDGE signal (letter E), you will have to connect to the router.
- Download and install the latest version of iTunes on your PC. You can find the program here - http://itunes.apple.com/. If the user does not have access to a Wi-Fi network and does not have an “unlimited” SIM card, he can perform the initial setup via a PC/laptop with iTunes installed and wired Internet.
After completing all of the above steps, you can proceed directly to activating your iPhone.
How to set up iPhone for the first time?
You need to activate your Apple gadget as follows:
Step 1. Turn on the device by holding the “Power” button for 2-3 seconds. The Apple logo will first appear on the screen, followed by a greeting in different languages (“Hello,” “Hello,” and so on).
There is no need to be afraid of hieroglyphs at this stage - if the greeting is in Chinese, this does not mean at all that the iPhone is fake.
Step 2. Swipe your finger from left to right along the bottom of the display and on the next screen select Russian from the list of available languages.

Step 4. Select available network Wi-Fi and connect to it.
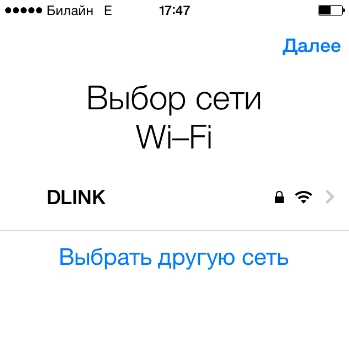
If the network you would like to use for activation is not in the list, add it - click the “Select another network” button and enter the SSID.
If you wish to use for initial setup Mobile Internet, click on the button “ Use cellular connection", located just below the list of networks.
Step 5. Enable/disable location services. Many of iPhone applications are associated with geolocation - if you refuse it, you will not be able to use, for example, a navigator. On the other hand, geolocation consumes a lot of energy - therefore, it is still recommended to turn it off during activation (“ Disable»).

Whatever decision you make at this stage, it will not be fatal. Location services can be activated or deactivated at any time.
Step 6. The iPhone will prompt you to create an Apple ID or sign in with an existing account.

Click on the button " Skip this step" and then confirm your decision by clicking " Skip».

Step 7. Accept Apple's terms of use - click " I accept" You can familiarize yourself with them in advance, but this will not bring you much benefit - there is nothing remarkable or interesting in the text.

Step 8. If you are the owner of an iPhone 5S or a newer model, the device will prompt you to configure Touch ID- fingerprint sensor. At this stage you have 2 options: " Tune" And " Set up later».
It is clear that by choosing the first option, you agree to configure immediately, and if you prefer the second one, you postpone the procedure. It is recommended that you set up Touch ID the first time you activate it. This does not take much time and effort - the user only needs to touch the button with his index finger or thumb several times. Home" You can be sure that the procedure has been completed correctly if the message “ Successfully» (« Success»).

Image: everythingicafe.com
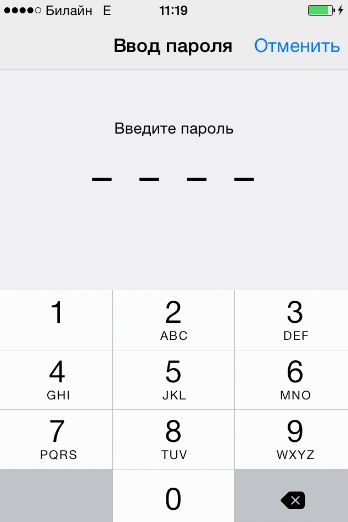
Step 9. Create a numeric password. This code will allow you to unlock your device if for some reason Touch ID is unable to recognize your fingerprint. Enter 4 numbers that you will definitely remember, twice.

You can leave creating a security code “for later” - to do this, click on the “ Don't add a password».
Step 10. The final step is to choose whether you want error data to be sent to Apple. The manufacturer recommends choosing the option " Send automatically“- according to representatives of the Apple company, reverse information allows you to create more advanced products.

Information that goes to Apple includes geodata. This essentially means that the manufacturer will know where and when you were.
This completes the initial iPhone setup process. The welcome message “ Welcome!».

Click " Get started"and start exploring your new device!
Common problems when activating an iPhone and how to solve them
Most often, problems arise when activating an iPhone because of the SIM card. If the user sees the message “ Activation Error", he needs to make sure that the SIM card is working.
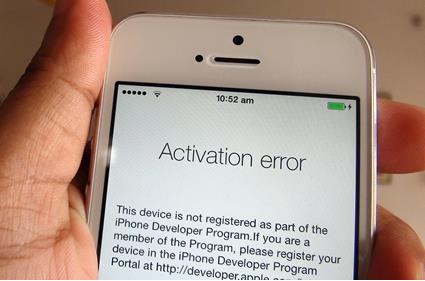
Image: infoidevice.fr
To do this, just move the card to another phone and see if the network is detected.
If the SIM is OK, you should try to fix the error as follows: by pressing the " Home"Call the bottom menu and click on " Start Over" This will not take you to the first settings page - try activating it again. You may have to do this procedure 6-7 times in order to get rid of the “ Activation Error».
During the initial setup, you may encounter another error - “ Could Not Activate iPhone."

Image: ipadappsbuzz.com
The reason for this error is high load on the Apple server. It is best to wait 2 - 3 minutes and try to activate again. If this doesn’t work, you should change the way your gadget connects to the Internet - for example, use 3G instead of Wi-Fi. You can also write a complaint to Apple support, but you will have to wait several days for a response from the company’s specialists.
Finally, the third common problem is that beginners are unable to set up Touch ID - the sensor simply does not respond to finger touches. The solution to this problem lies on the surface - it is necessary to remove the factory film from the front edge of the device. The desire to protect the new iPhone from scratches is commendable, but for this you need to use a special film, and not the one that comes in the kit.
How to set up your iPhone like new?
The need to set up a used iPhone like New occurs when the device begins to freeze and slow down. The gadget's memory becomes clogged - this leads to slow and unstable operation of the device. Helps you quickly get rid of “garbage” in your memory full reset iPhone. There is no need to worry that all user data will be deleted as a result of the reset - after all, you can first “pack” valuable information into a backup copy.
Correctly configure your Apple device like new you need this:
Step 1. Check if Apple offers you to update the operating system of your gadget. To do this, follow the path " Settings» — « Basic» — « Software Update" If you see what's underneath iOS version written " Latest software installed", carry out further actions.

If there are updates available, install latest version iOS
On a jailbroken iPhone, you can only update the operating system through iTunes.
Step 3. Disable iMessage and the " Find iPhone" The messenger is deactivated in the " Messages" V " Settings" To turn off " Find iPhone"you need to go to the section " iCloud».

Step 4. Start cleaning your device. Follow the path " Settings» — « Basic» — « Reset" In the last subsection you will find the item “ Erase content and settings" - that's what you need.

Click on this item and enter your security password.
Then confirm that you want to erase the iPhone - click on the appropriate button.

Next, wait for the gadget cleaning procedure to complete. If at the end of the procedure a welcome message appears on the screen, it means you did everything correctly. Set up your iPhone according to the instructions given in this article, and then. Through such manipulations, you can significantly increase the performance of the gadget without losing any important information.
Conclusion
During initial setup iPhone more Opening an Apple ID account takes all the time. Another difficult step used to be registration in Game Center - but this application is no longer available in iOS 10. You can complete all other stages of iPhone activation in 5 minutes - they are simple and do not require the user to have programming skills. For this reason, paying the money that consultants ask for the initial setup of an Apple gadget is completely unreasonable.