You can transfer contacts to another mail account using a computer.
You can back up contacts stored on your phone or SIM card. If you lose or change your phone, they can easily be restored to a new device.
Export contacts
How to enable or disable automatic backup
The first time you sign in to your Google Account on your phone, you'll be prompted to turn on data backup. To change the current settings, do the following:
How to restore contacts from backups
- Open the Settings app.
- Click Google.
- In the "Services" section, select Restoring contacts.
- If you have multiple Google Accounts, click From account and select the one you want.
- Click on the phone you want to copy contacts from.
- If you don't want to copy contacts from your SIM card or phone storage, turn off the settings SIM card or Device storage.
- Click Reestablish and wait for the message "Contacts restored".
- Only those contacts that were not there before will be restored on the phone. Restored contacts are also synced to your current Google account and other devices.
Advice. To restore contacts from other applications, such as Outlook or WhatsApp, install them again.
Good day!
Here is such an allegory as never close to life. Usually, any problems and breakdowns with the phone (as well as with the PC) arise suddenly, and most of them cannot be foreseen. Accidentally knocked or dropped the device - and that's it, write wasted ...
In this short note, I will give some tips on how to easily and quickly back up all the basic data on your smartphone: contacts, photos and video files. In general, once spending 10-15 minutes on this. time - you will protect yourself from many losses in the future.
Copy of contacts
Option 1
- open phone settings, section: "Settings / Accounts / Google";
- if you do not have your own Google account, you will need to go through a simple registration procedure;
- then move the slider opposite "Contacts" to the right (i.e. on) and wait until the notification appears "Last Sync...".

Contacts are synced
Actually, everything! Now all your contacts will periodically be saved in auto-mode. If the phone is lost (or replaced) - then by logging into your account on the new device, the contacts will automatically be loaded into the device's memory.
Option 2
To launch it, you first need to open the address book, click on the "three dots" and select the item in the settings "Import Export". See the screenshot below for an example.

Import/Export contacts. Android 9.0

Save contacts to SD card
Actually, you will only have to check whether the file has been saved to the SD card "00001.vcf"(this is the default name). Of course, it is better not to carry the SD card with this file in the phone, but to put it in a safe place (otherwise, if the phone disappears, the backup will also disappear).

Contact file saved
Important: to restore contacts - you will need to do the reverse operation. Those. connect an SD card with a file (with contacts) to a smartphone, go to the contact log and activate the function import…
Option 1
The simplest option is to periodically copy everything on your own to a computer or a spare SD card (which is at home and does not “travel” with the device).
But I don't really like this option, because. over time, it all gets boring, forgotten, and as evil - at the right time there will not be a fresh backup.
Option 2 (auto mode) 👌
It is much more convenient to set up auto-copying of all photos and videos to a cloud drive once (I like Yandex-disk). What are the advantages:
- files are uploaded to it automatically;
- files on a cloud drive can be viewed from any device that has access to the Internet;
- it is quite reliable;
- if you lose your phone - access to the disk (and hence to the photo) is restored in a couple of minutes.
Using Yandex Disk is very simple: after installing the application on your smartphone, open its settings and enable auto-upload of photos and videos (you can also specify in this section when to download - only via Wi-Fi or via Wi-Fi + mobile Internet) .

Viewing the same photos on Yandex disk, even on the phone, is done quite well: they can be sorted by date, albums, etc.

Sort photos by creation date
As for installed applications, as a rule, they will all be automatically reinstalled on another smartphone after logging into your Google account.
Backups are often irreplaceable. There is nothing worse than losing all the valuable information on your phone or computer and then finding out that you never backed up your valuable smartphone data, photo albums or documents.
Advanced users are advised to always make a backup before installing root rights or new ROM firmware. The reason is simple: some actions require a factory reset and therefore erase your data, so it's better to move it to another location so that you can restore it later.
So, here are some ways to backup Android.
Google backup
As you probably know, Google is always ready to help protect all your apps and data, and you can take advantage of this by following a few simple steps:
- Go to settings.
- Open the " Reset and backup».
- Next, find the option to back up the type of data you want (including Wi-Fi passwords, settings, app data).
Keep in mind that this will all be linked to your Google account and you can choose the option to automatically restore your data when you reinstall the app.
Backing up app data with a Google account is one of the easiest ways.How to back up everything with software tools: MobiKin Assistant
You never know when you might accidentally delete something of value. Therefore, backing up your data is absolutely essential, and we are sure that many of you have gone through this difficult path. This is not only the case when you have lost your phone - installing updates can sometimes also lead to the loss of your data.
An easy way to ensure your data is backed up is to use the MobiKin Assistant app for Android, which exports everything including contacts, text messages, apps, photos, music, videos and more in their original format and quality.
 The interface of MobiKin is user friendly.
 If you just want to get the desired result, this application will achieve it without any problems. All you have to do is download MobiKin Assistant from trusted sources.
After downloading and installing the above software on your device, just follow the instructions, and soon your data will be securely stored, and, plus, some internal memory of your device will be freed up.
Are you an iPhone user? MobiKin also has an assistant for iOS devices. If you need to backup your iPhone or iPad, try MobiKin Assistant for iOS.
Manual backup using PC
If you don't feel like trusting a third-party software to do the job, there's always a do-it-yourself method.
- Connect your phone to your computer with a USB cable.
- Open a Windows Explorer window and navigate to your device.
- Here you will see a number of folders including photos, videos, music and documents.
- Go to each folder and copy/paste the stuff you want to keep to your computer for safekeeping.
This is a pretty handy thing even if you have other backup solutions because there is no such thing as too many backups. If you want to access your backups in the future, you will need to ask your PC for help.
 Super easy way to backup your phone.
 App backup (for rooted phones)
If your phone is already rooted, then there is no better backup solution than Titanium Backup. This app allows you to back up absolutely everything on your phone. A full backup can be restored at any time, and you can set up scheduled backups so you have a regular "snapshot" of your Android phone's contents.
 Titanium Backup is in many ways the gold standard for Android backups.
 You can back up without even closing the applications you are currently using. They can be saved as quick zip files. Titanium also makes it as easy as possible to transfer files between your SD card and your phone.
How to Backup Everything on Android with Titanium Backup
- Download the Titanium Backup app on your rooted Android device;
- run the application and grant it superuser privileges;
- after that, you will be asked to read the disclaimers, etc.
An important point: the option "Debugging via USB" must be enabled on your phone.
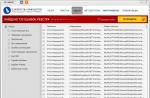
In Titanium you will see three tabs. The first one is a tab. "Review" with information about your device, the second - " Backup / restore where all the fun stuff happens, and the third one is for scheduling regular backups:
- go to tab " Backup and restore»;
- after that, you will see a list of the contents of your phone, along with icons that indicate whether copies have been made;
- triangular warning icons mean you don't have a backup, smiley icons speak for themselves.
 The "Overview" section provides information about your device, and the most interesting item is "Backup and Restore".
 - If you want to back up system data or apps, tap the small document with a checkmark at the top. This will take you to a list of batch actions;
- then click on the icon "Run" next to the action you want to take;
- if you wish to back up your applications, click on the icon "Run" next to " Backup of all user applications»;
- do you plan to back up your system data? Then click on the icon "Run" Near " Backing up all system data».
 Batch actions give you the ability to back up apps, data, and more.
 When you complete all the above steps, Titanium will start the backup process. This may take some time.
When completed, the backup will be labeled with the date it was made and saved. You can also create an update.zip file to flash via Recovery if you like, or you can restore via the Titanium app itself.
- To reestablish data from a backup with Titanium, again go to batch action section screen and scroll down.
- After that in the settings "Recovery" you will see the options for the actions you performed earlier: in this case it is "Recovery all applications with data" and "Restore all system data."
 Restoring applications and system data is equally easy.
 Now you should click on the "Run" icon next to the actions you want to use. After that, you will have the option to restore all backups or only some of their sections. Make your choice and tap the green checkmark in the top right corner.
How to Transfer Android Backups
As you can see, depending on the backup methods and type, transferring files to Android can be done in different ways. As a general rule, if you have used Titanium Backup or Helium, you should simply reinstall the app and copy the backup folder to your smartphone if it is no longer there.
Always transfer backups to your computer or other device outside of your smartphone. This way you can get your files back later without any nasty surprises.
Manufacturer Solutions
Some manufacturers offer file transfer services in a very simple way. This applies, for example, to Samsung, Motorola or Sony.
The advantage is that almost the entire backup process takes place automatically, and the disadvantage is that data transfer is only possible to a device of the same brand. Check your device model to see if this option is available to you.
Which backup method do you prefer and why? Tell us about it in the comments.
Modern smartphones store a huge amount of necessary and important information, and each user sets up the phone individually for himself. And now, switching to a new device, the owner of Android is faced with a situation where the operating system needs to be configured again. The ideal way out here is deep or partial backup. But not everyone knows how to make a full backup of Android quickly and safely using a tablet or phone without losing important data.
How to backup individual apps on Android
 It is not always necessary to copy the entire system, and the process is quite painstaking. If you need to save only specific programs, we recommend using this method. And here the Helium app is the ideal option.
This tool can be freely downloaded from . It works on two "bases": either the provision and all frauds are carried out only on a smartphone, or access to a PC if you do not have the "Superuser" mode.
The application allows you to save copies to and in cloud storages, namely Drobox, Google Drive and Box, which is very convenient.
She can:
- Make a backup of the history of incoming and outgoing calls;
- Backup applications and their settings;
- Backup SMS and contacts.
The paid premium version has more advanced functionality, but if you only need to save, for example, games, the free one will be enough.
The application works perfectly on the latest versions of the operating system, mainly on Android 7.0, 7.1 and 8.0. And now let's consider what actions we will perform in it:
- Download and install the app on your phone. If there are no root rights, repeat this procedure on the computer. Versions are available for both Windows and Mac. Drivers are also required for the PC. You can find them on the official website of the manufacturer of the connected smartphone.
- Now let's proceed directly to the backup operation itself. To do this, open the application on the device. If necessary, we connect via wire to the computer. We are offered several options: a full backup of the phone or only specific applications. Please note that you can copy the entire program with data, or just the data.
- After all the checkboxes are checked, click "Backup". Choose where to save. If to the Cloud, then we indicate the address, if to the computer, we open the service with the IP address and transfer it to the browser search bar. We allow copying. Ready. Copies have been successfully created.
 But here things are already a little more complicated, since we need a complete saved copy of Android. Of course, it will take up more space, and several different ways are provided for its creation.
Backup via system option (No Root)

The easiest and most comfortable option, suitable for beginners and just users who did not want to waste their time. We open "Settings", go to point "System" – "Backup", in the location choose Google drive. Made. The following information will be stored:
- Standard settings (language, time and date);
- Wi-Fi hotspots and passwords, if enabled;
- Screen settings (wallpaper, themes, brightness);
- Applications (in most cases, just a list, but not internal settings and achievements in games);
- Content located in Google Calendar;
- Materials stored in Gmail, individual mail settings.
Root rights are not required, their presence does not affect the quality of the backup.
Unfortunately, failures in the backup process are possible, which is why many users complain about the insufficient amount of information saved. And on some devices, such a system function refuses to work at all, this may affect phones with an operating system below Android 6.0.
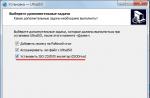
Backup Android with FlashTool (No Root)

This is a more serious and difficult procedure that allows you to back up the entire firmware. There will be many stages We do not recommend this option to users who are not confident in their abilities and technical knowledge! But if you are a connoisseur of Android "with experience", then you can safely proceed.
To begin with, we prepare all the necessary materials so that during the backup process we do not have to be distracted by them.
- Download directly the program itself from the official website of the developer ( flashtool.net);
- We find original firmware made specifically for your smartphone;
- If the computer does not have MTK drivers, download them.
- We get access to the PC, since without it backup is not possible here, we check the performance of the USB cable and the health of the connectors.
- Next, we extract two files from the firmware, namely the name of the number with permission txt and weg_l.bin. We move these materials to a separate, empty folder.
- We also place the folder where the software is stored there.
- We launch the previously downloaded FlashTool program on behalf of the administrator this is a prerequisite.
- A page opens where you need to specify the path to scatter.txt using the built-in conventional conductor.
- A new screen should appear where the memory blocks are located. With them, you need to make a backup. For this go to the "Memory Test" tab. We put a tick in front of the first five items.
- Turn off the phone, click on the computer Start.
- Now we connect the smartphone using USB.
- Information is read and displayed on the screen. As soon as the process is completed, the device is disconnected from the personal computer.
- We open "Notebook" and transfer the received data there. Please note that empty sectors do not need to be copied. Save and close notepad.
- Again we return to the main page of FlashTool, remove the checkmark in front of the first item.
- Opening the section "Readback" - "Add". A new line appears, on which we double-click.
- Specify where exactly to save the backup and come up with a name.
- A small menu appears asking you to specify the settings for each sector. Yes, yes, a separate memory block needs a separate setting. Change only the "Length" column, to which we add block data from the saved notebook.
- click "OK" and press the top button Read back.
- And the last final action: we reconnect the phone and observe the copying process. At the end, a green icon should appear, indicating that the operation is complete. Made! Now we repeat similar actions with the remaining sectors.
After the backup is completed, the files can be moved to any cloud storage, because if some big trouble happens to your computer or hard drive - the saved information will be lost, don't risk it!
So we made a backup on Android through FlashTool using a computer, now we are trying the following method.
Backup via Titanium Backup (Root)

Pretty light and comfortable option using special program Titanium Backup. You can download it without any problems on Google Play and install it in the standard way.
Now we launch the application and give it access to root rights. Yes, superuser mode is required here, and this, in principle, is the main disadvantage of this utility. Click on the checkmark image in the upper right corner, we get to the page "Batch Actions" and choose what data we want to save. Click opposite what you want "Start".

Another decent option that works on all devices, but from experience I will say that it is much easier than the FlashTool method. To do this, we need a recovery mode. Of course, the most popular and most functional is TWRP, which allows you to install custom firmware, various kernels, but for backup is quite suitable and stock. Begin:
- Make sure your smartphone is over 60% charged.
- We turn off the phone, after about 30 seconds we hold down the power button and the volume rocker down or up, on different models in different ways.
- Next, an image of an Android robot with an exclamation mark may appear. If this happened - hold down the same key combination, but do not hold. Did you go straight to recovery? Then we skip this point.
- Now we get into the recovery menu itself, only here the touch input no longer works. We will switch with the keys: the volume rocker, respectively, is a command "up", volume down rocker – "way down", on/off button - "OK".
- We go down to the point backup/restore» , click backup. The copying procedure starts and takes up to 10 minutes on average. During this period of time, we do not press anything, do not turn on the smartphone, we just wait.
- When the operation ends, we reboot the smartphone. That's all, it's ready, the backup of the firmware on Android is done.

IMEI, as we know, is a unique smartphone identification number. And quite often there are situations when this number needs to be saved, that is, backed up. For this we will use special program Root Explorer. Root rights are also required for its operation.
We open the application, through it we go to the root of the device, where the required efs folder. We carry out a long press, after which an additional mini-menu appears, where we select "Create archive"(archive resolution is up to you).
I do backup messengers
Messengers for a modern user are just a necessary thing that helps to communicate with friends and, for example, send a photo of the work done to the boss. Consider the example of WhatsApp. It stores a huge amount of necessary information: important messages, images, phone numbers. And the ideal way not to lose such materials is to make a backup. How to do it on whatsapp?
Backup built-in option
All popular messengers have their own backup function that allows you to save the necessary materials directly from the application itself. WhatsApp is no exception.
Begin:
- We find the application, open the menu;
- Click "Settings", now go to the tab "Chats" and click "Backup copy".
- Choose save to Google Drive and set the frequency of saves.
- If you have several Google accounts, select the desired one in the window that appears. Not signed up or logged into your account yet? Then we click "Add account".
- And in the last column, select the network under which copying will take place. Do not forget that the use of mobile Internet may result in additional charges for the consumed megabytes. Therefore, we recommend assigning a Wi-Fi network. "Applications" Immediately after starting the utility, we see a list of programs and games installed on the device. We are looking for our messenger, put a tick next to it and click on the big gray button located at the bottom - How can I restore a copy made in Restore?
To do this, go to the application, open the section there "Archive", find the necessary materials, and after the checkmark, click "Reestablish".
Is Super Backup Free? I heard you have to pay for it.
There are two versions of this tool: basic, that is, having a small but useful functionality, and extended premium. In the first option, no fee is required, but for the second one you will have to pay. Both versions are freely available on Google Play.
As you can see, on Android, it’s quite easy to make a backup, you can save firmware, instant messengers, applications, and always have the necessary information at hand. The most important thing is attentiveness and strict adherence to instructions. Good luck!
An incorrectly installed system update, a broken smartphone, erroneous user actions are far from all the reasons why the phone book may be lost. To prevent this from happening, it is important to back up this data regularly. About how to do backup contacts android, will tell
What is contacts backup
A contacts backup is the storage of phone numbers in safe places for quick recovery in case of possible loss. It is recommended to back up regularly, especially if new data is constantly added. This is necessary so that in an unforeseen situation you do not encounter the fact that important information is irretrievably lost.
How to backup contacts on android
There are several ways to back up data:
- through Google;
- export to phone memory or SD card;
- use special applications.
Each of these methods has its own advantages and disadvantages.
Synchronization via Google
Synchronization via Google is the easiest and most convenient way to create a backup. With a network connection, the user will be able to restore all his data anywhere and at any time. At the same time, if there is no Internet access, this procedure will not work.
There are several ways to move contacts to your Google account. Firstly, each new phone number can be placed in the cloud storage. When creating, the system prompts you to specify where it needs to be placed - on the SIM, in the gadget's memory or in your Google account. If you choose the third option, it will automatically be placed in the cloud, from where it is convenient to restore it.

To synchronize the numbers already stored in the device's memory, open "Contacts", go to the menu, select "Import / Export".


After these steps, here, in the menu, click "Accounts", select the one you need and perform synchronization.


Now you can check the activity in your Google profile via PC. All synced numbers will appear in the Google Contacts section.

You should be aware that when synchronizing with Google, only the numbers stored in the memory of mobile equipment are transferred. Those placed on the SIM card will not be moved, therefore, if they also need to be copied to your profile, you will first need to send them to the phone book in your mobile gadget.
Export contacts to phone memory or SD card
If you choose this solution, all numbers are saved to the internal or external storage as a .vcf file. This document can then be left in memory or moved anywhere, for example, to a PC or to Google, Yandex, Dropbox or any other cloud storage for easy access via the Internet.
To perform the transfer, you need to open the appropriate section. go to the menu and select "Import/Export". First, the mobile device is indicated (from where the data will be extracted), and then the drive on which the information will be saved. The next step is to select the exported numbers.


A notification about the creation of a new file with the .vcf extension will appear on the screen. After a few seconds, the operation will be completed.
Dedicated Backup Applications
Another way to make a Backup contact list on your Android device is to use third-party applications.
One of the most common and at the same time does not require RTH rights is MCBackup. It is available for download on Google Play. After installation, you will need to provide the utility with access to the phone book, and then, after starting, click "Backup". The program will create a document with the .vcf extension. After that, click "Send" and choose what to do with the file - you can send it via instant messengers to yourself or to your email inbox, from where it will be available to the user at any time.


Another well-known Android contact backup utility is G Cloud. Its possibilities are wider. After installing the application, you will need to register by entering your email. Further, the user will be able to make backups of phone numbers, call log, messages, images and videos, music, data. To store information, the user has access to 1 GB of space in the cloud storage, but if necessary, it can be expanded for a fee.


Backup smart contacts. Convenient and functional, as well as an easy-to-use utility for creating backups. Once launched, it automatically scans the phone, finds contacts and offers to back them up. After making copies, you can email them to yourself as a .vcf file.


How to restore contacts from a backup
To restore information from your Google account after reinstalling the system or other actions that caused the loss of contacts, you will need to log in to your profile on your phone and synchronize personal data. In the settings you need to find "Accounts", then "Add an account", select "Google" and enter your registration data. Then click on the created account and perform synchronization.


The numbers in the phone book are not displayed immediately, but after a while, so do not be surprised to find that they are missing immediately after the operation.
To recover data from a file with the .vcf extension, you need to download the document to the internal memory of the gadget or to external media, and then open the phone book, then the menu, go to "Import / Export" and sequentially select external or internal memory first, and then mobile device as a contact receiver. After these steps, the gadget scans the memory for documents with the .vcf extension and copies the data from them to the specified location.


Another option is to find the file in the gadget's memory, click on it, and then specify which account the numbers will be installed to.


For more information about importing a phone book from various media or a Google account, see the corresponding one.
Conclusion
Know, how to back up contacts on android necessary so as not to lose valuable information in case of device malfunction or for other reasons. You can do this using your Google account by exporting contacts to a memory card or internal storage, as well as through third-party software.