Threat to computer security when working with the Internet, incorrect operation, driver failures and software- these are just a few possible problems when refusing Windows system updates. However, those who consciously take such a step as disabling Windows updates probably know what they are doing and why. In cases where system updates are not installed due to unwanted reasons beyond the user's control, it is certainly necessary to look for troubleshooting methods. Below we will consider those for operating system Windows 8.1.
Finding the causes and ways to eliminate them for any problem in the operating system is in any case a risk. And, naturally, this applies to cases when updates are not installed on Windows 8.1. Even having found the right solution, on the way to a successful result we may accidentally make unwanted changes to system settings. Therefore, before carrying out troubleshooting operations with updates, it would not be a bad idea to worry about the possibility of a rollback Windows changes. For these purposes you can create:
Any of the above options for system rollback, or it will be creating a backup not with using AOMEI Backupper Standard, and through any other third-party backup programs for Windows, also prevents problems with system updates in the future. These, however, as well as instability in general Windows operation, may be the result of malware. Viruses, network worms and other malware can damage the integrity of system files. An antivirus cannot always cope with the recovery of infected files, therefore, if the cause of problems with Windows 8.1 updates is the activity of malware, the easiest way is to roll back the operating system - to the state of a restore point or backup copy. Ideally, to prevent problems with Windows 8.1 updates, it is advisable to add the presence in the system good antivirus with regularly updated databases.
Well, now let’s directly begin to consider the causes of problems with Windows 8.1 updates and how to fix them.
1. Enable the update service
The risk of problems with system updates is especially high when using 8.1. These are often pre-installed, at best, with the Update Center disabled, and at worst, with the Center system service stopped. In such cases, accordingly, the Update Center must be enabled and the system service must be started.
Let's check that the Center Windows updates was on. Press the keys Win+X and in the menu that appears in the lower left corner of the screen, select “Control Panel”.
In the search field in the upper right corner of the control panel window, enter the key query “Update Center” and launch it.

The update center must be turned on - that is, configured to automatically download and install, download only, or at least just search for updates. If the only problem is that the system has the “Do not check for updates” option preset, there is nothing easier than changing this. Click “Settings parameters”.

And we install the appropriate option.

If the Update Center is enabled, the search for updates cannot be carried out due to the disabled service; therefore, you need to start the latest one. Press the Win+R keys to start the “Run” service and in its window enter:
services.msc
Click “Ok” or Enter.

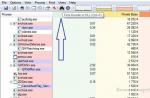
The system services section window will open. At the very bottom of the list we find a service called “Windows Update”. Double-click to open its properties window.

Using the “Run” button, we start the service.


2. Troubleshooting using the standard Update Center recovery tool
A disabled Update service, along with other potential sources of update problems, can be identified as part of the work standard means Windows Update 8.1 recovery. This tool diagnoses the system and automatically fixes problems. To launch it, go to the control panel again (keys Win+X and selecting the “Control Panel” menu item) and in the search field enter the key query “Troubleshooting”. In the search results, click the “Troubleshooting” section.

In the window that opens, in the “System and Security” section, click the link option “Troubleshoot using Windows Update.”

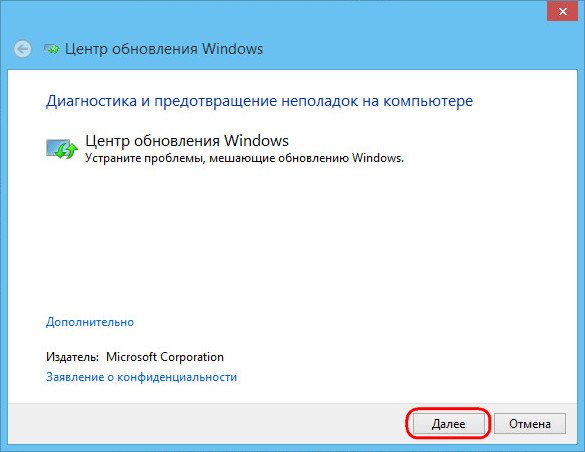
In the welcome window that launches the troubleshooting wizard, click “Next”.
Run as administrator.

After this, the automatic process of detecting problems with the Update Center will begin.

Once completed, the troubleshooting wizard will display a progress report. Detected problems, if any, will be corrected automatically. We will see which of the Update Center problems may have interfered with its full operation in the “Detected problems” column.

Now all that remains is to manually start searching for and installing updates again. You may need to restart your computer.
3. Windows Update Troubleshooter on Microsoft Site
If the standard Update recovery tool does not solve problems with Windows updates, you need to resort to another troubleshooting tool - an additional utility downloaded from the Microsoft website. The software giant for Windows 8.1 has developed something like a universal solution to problems with system updates, in particular, if errors 0x80240016 and 0x80240016 are indicated when trying to install them. When launched, the utility checks all possible causes and automatically fixes problems.

Let's launch it.


We are waiting for the problem detection process to complete.

As with the standard troubleshooter, at the end of the problem detection process, we will see a final window where the problems found and a mark about their automatic correction will be indicated.

That’s it – now we manually start searching for and installing updates. If problems arise again, repeat the search and installation of updates after restarting the computer.
4. Solving problems with updates when your computer is infected with viruses
Problems with system updates may be the result of viruses, network worms and other malicious programs. In particular, Windows Update errors such as 0x80240016, WindowsUpdate_8024401C, 0x8024401C, 0x80070490, in most cases arise precisely because of damage to the integrity of system files caused by malware. If any malware and it is after this that updates are not installed on Windows 8.1, the first step is, of course, to neutralize the source of the problem. The malware may have entered the system because the antivirus license has expired. In this case, you need to renew your license and run a global scan of your computer. A proven and reliable virus removal tool is the free one. It can be used in parallel with the antivirus installed on the system.
After neutralizing the malware, the next step is to restart the computer and determine whether important system files are damaged (or even destroyed). To diagnose and restore system files, we will use the help launched in command line standard Windows utility “sfc.exe”. The process of its work is described in detail in the article. The process of restoring the integrity of system files is also possible if Windows 8.1 does not boot after being infected by viruses. In this case it will help.
If, after restoring the integrity of system files, problems with Windows 8.1 updates do not disappear, you can try running the Windows Update troubleshooter downloaded from the Microsoft website, as indicated in paragraph 3 of this article.
5. Restart the update service and remove the update distribution
If none of the methods suggested above for solving problems with Windows 8.1 updates helped, restarting the update service and uninstalling the update distribution package may fix the situation. Update installation files downloaded with errors are not overwritten when downloaded again, and in order for the installation files to be downloaded again, their storage folder must be cleared. But first, let's stop the update service.
Press the keys Win+R and in the “Run” service field enter:
services.msc
Click “Ok” or Enter. In the window of the system services section, as in the first paragraph of the article, we find the “Windows Update” service and double-click to open its properties window. But if in the first paragraph of the article we started the service, now it is necessary, on the contrary, to stop it.

Without closing the service properties window, let's start cleaning the folder where update installation files are stored. This is the folder located along the pathC:Windows/SoftwareDistribution/Download. The easiest way to get to it is to press the Win+R keys and enter the folder path in the “Run” command field.

We delete the contents of the folder.


That’s it – we can reboot and try to start searching for and installing updates.
6. Lack of free space on the system disk
An infrequent cause of problems with Windows 8.1 updates, however, and it can occur is a cluttered C drive. To be sure to exclude this from the list of possible causes, it is necessary that at least 5 GB of free space remain on the C drive.
7. Blocking access to Microsoft web resources with an antivirus or firewall
Another one possible reason, why updates are not installed on Windows 8.1, in particular, the endlessly long and fruitless process of searching for updates is the work of an antivirus or firewall. These, with certain settings, can block access to Microsoft web resources. The easiest way to get ahead of this moment is to disable your antivirus or firewall while searching for and downloading updates.
8. Troubleshooting update issues in Windows Clean Boot mode
If all the methods discussed above for eliminating the causes of problems with Windows 8.1 updates have been tested, and none of the solutions have brought positive results, you can use something like a fallback option in the form of a clean mode Windows boot 8.1. You must perform a clean boot of the operating system, as indicated in the article.
Already in clean boot mode, you need to run the Windows Update troubleshooter downloaded from the Microsoft website and follow the same steps that were discussed in paragraph 3 of this article.
9. Also keep in mind that often the cause of Windows Update 8.1 not working correctly is damage to the system component store
You can restore a damaged component store very simply using the DISM.exe /Online /Cleanup-image /RestoreHealth, command.
If Windows 8.1 updates are not working for you and you are searching endlessly, you cannot install games and programs because Windows cannot install some components, such as Visual C++ and. etc., then this instruction is for you.
This problem appeared for me after I, you may have a different case when an error appeared, but the problem is the same, there are no updates.
Since I had it preinstalled licensed Windows 8.1, then the problems with updates caused me a slight shock, like the license, but I can’t update Windows, except for constantly searching for updates, there was no result :)
I won’t go into detail about how many days I’ve been looking for a solution, but I’ll write for you a few instructions on how to fix the update center not working in Windows 8.1.
I’ll say in advance that the first instruction most likely will not solve the problem, but it’s worth a try, since it won’t take much time and it helped some.
Windows 8.1 does not find updates - solution one
1. Go to the control panel (if you do not see the control panel interface as in the screenshot, in the right corner set the parameter: view -> category), then system and security.
2. At the very top of the “Support Center” section, click on the “Fix common computer problems” item.

3. In the tab that opens at the bottom, click the item “Troubleshoot using Windows Update.”

In the window that appears, click Advanced and then click on “Run as administrator”, in the same window click Next and wait a little while Windows tries to fix the problems.


Once the process is complete, restart your computer and try searching for updates.
Wait 15-20 minutes, if there is no result, then move on to another instruction, which is described below.
For clarity, video
Windows 8.1 does not update - instructions for solving problems with the update
This solution helped me and many others and the system began to find updates and install them without errors.

2. In the left corner, click "Settings".

3. From the drop-down list, select “Don’t check for updates” and click “ok”.

4. After you disable checking for updates, you need to temporarily stop the update service.
To do this, we go to the services.
Press the WIN+R keys or the start menu, select Run.
A window will open, enter the command comexp.msc and click ok.

In the tab that appears, select “Services (local)”.
We look for the “Windows Update” service, select it and right-click it, select stop.

After stopping, reboot the computer!
This is where the worst part is over :)
Now all we have to do is download a few updates from the official Microsoft website and install them.
The updates that we will need to install are located below, as well as links to download them.
Important! Before downloading, check what 32 operating system you have. or 64's. bit (you can see it, press start, select system, it will be written there)
For 64's. Windows
For 32. Windows
We will install updates in strict order.
Important! Before installing updates, check whether any of these three updates are installed on the system (if any is installed, you do not need to install it again).
How to find out what updates are installed.
Go to the control panel, then system and security and select “Windows Update”, at the bottom left there will be an item “ Installed updates", click it, a window will open with all the updates, in the right corner there will be a search field, enter the update numbers one by one and make sure that they are not in the system.


After making sure that these updates are not in the system, install the updates in this order: (the installation is as simple as installing regular programs, double click on update)
KB2999226
After installation, be sure to restart your computer.
After reboot we set:
KB3173424
And
KB3172614
We reboot again.
After the reboot, we follow the familiar path to the control panel, then system and security and again select the “Windows Update” item.
2. In the left corner, click "Settings"
3. From the drop-down list, select “Search for updates, but the decision to download and install is made by me,” click ok and it will search for updates.

We wait 10-15 minutes and see that Windows 8.1 immediately found updates for us and offers to install them, we select which updates to install and install them :)
Manually editing the Windows registry to remove Error 87 keys that contain errors is not recommended unless you are a PC service professional. Mistakes made when editing the registry can render your PC inoperable and cause irreparable damage to your operating system. In fact, even one comma placed in the wrong place can prevent your computer from booting!
Because of this risk, we highly recommend using a trusted registry cleaner such as WinThruster [Download] (developed by Microsoft Gold Certified Partner) to scan and repair any Error 87-related issues. Using Registry Cleaner [Download] you will be able to automate the process of finding corrupted registry entries, missing file references (such as those causing the %%error_name% error), and broken links within the registry. Before each scan, a backup copy, which allows you to undo any changes with one click and protects you from possible damage to your computer. The best part is that fixing registry errors [Download] can dramatically improve system speed and performance.
Warning: Unless you are an experienced PC user, we DO NOT recommend manually editing the Windows Registry. Using Registry Editor incorrectly can cause serious problems and require Windows reinstallation. We do not guarantee that problems resulting from incorrect use of Registry Editor can be corrected. You use Registry Editor at your own risk.
Before manually restoring Windows registry, you need to create a backup by exporting the part of the registry associated with Error 87 (for example, Windows 8.1):
- Click on the button Begin.
- Enter " command" V search bar... DON'T CLICK YET ENTER!
- While holding down the keys CTRL-Shift on your keyboard, press ENTER.
- A dialog box for access will be displayed.
- Click Yes.
- The black box opens with a blinking cursor.
- Enter " regedit" and press ENTER.
- In the Registry Editor, select the Error 87-related key (for example, Windows 8.1) that you want to back up.
- On the menu File select Export.
- On the list Save to Select the folder where you want to save the Windows 8.1 key backup.
- In field File name Enter a name for the backup file, for example "Windows 8.1 backup".
- Make sure the field Export range value selected Selected branch.
- Click Save.
- The file will be saved with extension .reg.
- You now have a backup of your Windows 8.1-related registry entry.
The following steps for manually editing the registry will not be described in this article, as they are likely to damage your system. If you would like more information about editing the registry manually, please check out the links below.
Manually editing the Windows registry to remove error Error 41 keys is not recommended unless you are a PC service professional. Mistakes made when editing the registry can render your PC inoperable and cause irreparable damage to your operating system. In fact, even one comma placed in the wrong place can prevent your computer from booting!
Because of this risk, we highly recommend using a trusted registry cleaner such as WinThruster [Download] (developed by Microsoft Gold Certified Partner) to scan and repair any Error 41-related issues. Using Registry Cleaner [Download] you can automate the process of finding corrupted registry entries, missing file references (such as those causing the %%error_name% error), and broken links within the registry. Before each scan, a backup copy is automatically created, allowing you to undo any changes with one click and protecting you from possible damage to your computer. The best part is that fixing registry errors [Download] can dramatically improve system speed and performance.
Warning: Unless you are an experienced PC user, we DO NOT recommend manually editing the Windows Registry. Using Registry Editor incorrectly may cause serious problems that may require you to reinstall Windows. We do not guarantee that problems resulting from incorrect use of Registry Editor can be corrected. You use Registry Editor at your own risk.
Before you manually repair the Windows registry, you need to create a backup by exporting the portion of the registry associated with Error 41 (for example, Windows 8.1):
- Click on the button Begin.
- Enter " command" V search bar... DON'T CLICK YET ENTER!
- While holding down the keys CTRL-Shift on your keyboard, press ENTER.
- A dialog box for access will be displayed.
- Click Yes.
- The black box opens with a blinking cursor.
- Enter " regedit" and press ENTER.
- In the Registry Editor, select the Error 41-related key (for example, Windows 8.1) that you want to back up.
- On the menu File select Export.
- On the list Save to Select the folder where you want to save the Windows 8.1 key backup.
- In field File name Enter a name for the backup file, for example "Windows 8.1 backup".
- Make sure the field Export range value selected Selected branch.
- Click Save.
- The file will be saved with extension .reg.
- You now have a backup of your Windows 8.1-related registry entry.
The following steps for manually editing the registry will not be described in this article, as they are likely to damage your system. If you would like more information about editing the registry manually, please check out the links below.
This article discusses steps that can be used to restore Windows 8.1 without deleting user data.
If computer malfunctions cannot be resolved using conventional methods, there is only one radical solution left - reinstalling the operating system. Many users are frightened by the prospect of reinstalling the system.
In Windows 8.1, the problem of reinstalling the operating system is almost solved. Of course, the operating system will not do everything for you, but many users who previously called specialists or experienced friends to reinstall the operating system will now be able to do it themselves. The fact is that in Windows 8, Windows 8.1 appeared new feature reset, which allows you to quickly, in just a few mouse clicks, restore the operating system or return it to its original state.
In the event of serious system failures that cannot be resolved using conventional methods, you can restore the operating system while preserving your personal files, Accounts and contacts. To do this, you need to reset the operating system. We will need installation disk Windows 8.1 or bootable USB flash drive with Windows 8.1
Press the key combination + I in the panel that opens Options click Change computer settings

A window will open Computer settings, select Update and recovery

In the window Update and recovery press Recovery


We wait a little

If your computer does not have active partition For Windows recovery 8.1, the system will issue a warning. You will need an installation Windows disk 8.1 or bootable USB flash drive with Windows 8.1

Insert the Windows 8.1 installation disc or bootable USB flash drive with Windows 8.1. An update wizard window will open, which lists the consequences of the update, namely:
● Your files and personalization settings will not change.
● Your computer settings will be restored to their default values.
● Windows Store apps will be retained.
● Applications you installed from drives or websites will be removed.
● List remote applications will be saved to your desktop.
If you accept the terms listed above, click the button Further


The computer will restart, after which the system recovery process will begin.
System recovery may take some time. The recovery time can range from several minutes to several tens of minutes (depending on the speed of the computer).
Recovery is complete in automatic mode. Your presence at the computer is not required. Once the recovery process is complete and rebooted, your computer is ready to use. All you have to do is install programs that were removed as a result of system recovery. All your accounts and passwords will remain intact, so use your old password to log in.