How to check whether the camera is tracking the user or not?
Hello, today we will talk about how to check whether the webcam of your laptop or computer is currently working, and the camera is now monitoring your movements, or can you calmly pick your nose?
The fact that any mobile device is now equipped with a camera is damn convenient. Have you ever thought that the camera can take pictures without your permission? After all, by its very existence it is aimed at the one who settled in front of the monitor. That is, you.
Let's move on. If the camera is built-in, then the blinking LED next to it often “gives away” the operation process. The same “eye” is located on a device mounted on a desktop PC monitor. Well... well, if so, and you suddenly noticed it. What if not, and the camera is watching you right now? She can do this without blinking...
Immediately about the unpleasant.
There are a lot of options when a hacker can turn on a camera from a distance. This is usually done using two options:
- Trojan program, and it will be assembled not only for the purpose of broadcasting the image from the camera. After all, the picture itself has no meaning. Sometimes turning on the camera and subsequent recording occurs in conjunction with another, huge number of programs that allow, among other things, to disable most Windows security features. A typical and most basic example of such a Trojan is .
- who doesn't know (aka meter), I advise you to get to know him, at least superficially. And if in the first point the hacker’s dexterity can come to naught thanks to a good anti-virus package, then there is no panacea for this - the anti-virus does not isolate the open session of the meter. And among the running services, recording screenshots from the screen or webcam may be running there. Read the article at the link.
Is the camera watching? Quick option.
Let's check...
But first, I will ask you to download a very good program called Process Explorer. It is very useful for those who are interested in the nature of certain processes that occur in Windows, allowing you to track programs running on the system. With its help, it is easy to identify viruses and other crap that successfully disguises itself as popular processes. Program Process Explorer will appear in my articles more than once, it’s high time you got it. It is in English, does not require installation, a simple executable file.
But let’s go back to “our sheep” and check who the camera is watching.
Download the Process Explorer program from the Microsoft website in a zip archive
To check the details of your device (or any device!), you will need its full name. The device manager in Windows will give it out with giblets. Computer(through Start) – right mouse Properties – device Manager.
Now find the imaging devices. Expand the item. And right click Properties. Copy the device name in the tab Device Description:
Now let's launch Process Explorer. It reminds me of Windows Task Manager. On the left in the toolbar, find the binoculars icon. Click on it and paste what you copied. Click Search


If something has already alerted you, kill the process using the two buttons above, starting with Kill . See what happens to the performance of the camera and the camera program. If nothing happens, the option is to think about the fact that someone else knows what your face looks like in front of the monitor. And consider the fact that the camera is watching you as a proven fact.
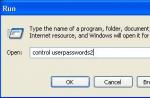
- To correctly identify your camera among other computer and laptop devices, you will need its full name in the list of equipment. No one can tell you this better than Windows Manager. Click WIN + R, dial the command

Copy the name from the tab Intelligence under the item Device Description and enter it in the open search box Process Explorer(CTRL + F). You know what to do next. Check and make sure.
How to prevent it?
I’ll tell you a secret - a well-hidden Trojan will hide the “process” so that no one will notice it. Therefore, make sure that the infection does not get into your computer. If there is no good antivirus package, your computer is open to surveillance. And it will solve most problems. Bypass antivirus protection, and sometimes even at the level Defender-but not everyone is a “hacker” from Windows 10. There are few professionals who will encroach on your camera. And without an antivirus there is absolutely nothing to do on the Internet. The problem sometimes is that hackers often have very specific titles and positions.
There is an option - turn it off. And turn it on only for the duration of the session. Is there a built-in camera? There is probably an option in the BIOS to disable the camera from there. Dance from the word camera in CMOS settings. Take advantage of this. If you use it often, the next option is suitable.
If paranoia still prevails, take opaque tape and seal it. Camera. Funny? If you only like to play tanks, then very much. But Zuckerberg and Assange do just that. Snowden confirmed back in 2013 that a separate Trojan for turning on the camera was developed against owners of iPhones and BlackBerrys. If using medical tape is for you mauvais tone– simple technical products began to appear and gain popularity in digital stores protectors or stubs like a slider:

For smartphone owners. And what: they are inexpensive, easy to install/dismantle and can be chosen to suit every taste and color, even to match the hardware configuration of a laptop/tablet/phone. At the moment, this is the only real way to protect yourself.
Read: 2,864
Almost all modern laptop models have a built-in camera (webcam). If not, users purchase it themselves. But they are not always configured or connected correctly.
And in this article you will learn how to turn on a video camera on a laptop, configure it and prepare it for further work.
How to check if the camera is working
1. In order to check the functionality of the video camera, go to the service " Webcam&Mic Test" and select " Check webcam».

2. Or run any utility, for example, Skype and see if the image is transmitted. If the video does not start and the indicator next to the camera is on, it means it is working normally, and the problem is in the program, in this case Skype.
If the indicator is off, it means the webcam is not functioning. By default, Windows does not have its own utility for managing the webcam, so you will have to enable it manually.
Installing drivers
The algorithm of actions will be the same for all models, whether you have Asus, MSI, Lenovo, Toshiba, Dell. This solution is not suitable only for MacBooks.
Before proceeding to the activation procedure, you need to see if the necessary drivers are installed.

If the software is not updated, then download them and install them manually. You can find and download the driver on the manufacturer’s website. That is, if you have a Lenovo brand computer, then go to The site of the company and in the support section, indicate your model (you can find it on the bottom of the laptop on a sticker) - a list of all available drivers will open.
If there is no exclamation mark icon, then the device may simply be disabled.
You can turn on the built-in video camera as follows:

Original program from the manufacturer
PC manufacturers can also build in their own programs to work with the camera. Where can I find it?

Sony Vaio on Windows 7 has the ArcSoft WebCam Companion utility built into it.
On HP on Windows 8, control is provided by the HP MediaSmart application.
In Windows 10, Asus suggests using "Life Frame".
It is also possible that you may have a different program, but this depends on the manufacturer and model of the laptop. In terms of functionality, they are all similar and easy to operate; it won’t be difficult for even a beginner to figure it out on their own.
Pressing special keys
Almost all models of not only laptops, but also netbooks, have special so-called “ Hotkeys» with which you can connect a video camera in a few clicks.

Hold down the FN button on your keyboard and simultaneously press the camera icon key. It is most often located on the bottom or top panel of keys.
In my case it is "FN + V".
If after these manipulations it still does not turn on, perhaps you have that rare case when the problem lies in its physical malfunction.
Enabling an external USB camera
The most common reason why a USB video camera on a laptop does not work is a problem with the cable. It may come loose, become worn, or the connector may not work. Try inserting the cable into a different input.
If everything is connected, but the video still does not turn on, then go to Device Manager and check whether the drivers are installed on the computer. The USB camera may appear as in the section image processing, so in " USB controllers».
Most often, drivers are included with the webcam on a disk - either on removable media or already embedded in the webcam, and when connected, the software is automatically installed. It can also be downloaded from the manufacturer’s website. Some developers may provide a special utility to configure it.
Problem with programs
Perhaps the webcam is functioning normally, but its use in a specific program is prohibited. Most often this problem occurs with Skype. For example, if you previously used the built-in webcam, and then started connecting a removable one, then by default Skype will use the first option.
To change default settings:
- go to “Tools”;
- then go to “Settings”;
- click on “Video Settings”;
- and from the “Select camera” drop-down list, select the desired device.

If you wish, you can also adjust the video camera there: brightness, zoom, white balance, etc.
If after selecting the image still does not appear, it means that the problem is with the webcam itself - there are no drivers or physical damage.
Online services
In order to enable the built-in webcam on a laptop with not only photography, but also the ability to record video clips, you can use free services, and one of these “ Video Recorder».

When using video calling in a browser, the browser always asks if it can be used on this site. If you click no, the camera will not work. Also, to play video, the browser requires Flash Player; if it is not there, a corresponding notification will appear asking you to download and install it.
The main advantage of online services is that you do not need to download and install additional software, thereby polluting your computer. And such services work with all laptop models including Samsung, Toshiba and MSI.
Suddenly stopped working
Quite often, it happens that one day the camera stops working. And this happens due to physical damage, wear and tear, reinstalling Windows or software failures.
In the last two cases, the problem is solved by installing/reinstalling drivers.
How to disable the webcam on a laptop
If you do not want the video call to not work, simply turn it off in the program where you are talking.
If you want to completely turn off the video camera, go to the device manager, right-click on the camera and click “ Disable».
If there is a USB camera on the computer, then remove the cable from the computer connector or press the disconnect button.
Webcams, built-in and external, differ in resolution, but all are designed to transmit video and voice using special messenger programs such as Skype or ooVoo. In this case, it does not matter whether you use a USB camera on a regular PC running Windows 7 and later versions, or a built-in webcam on a Macbook and laptops from popular manufacturers: Samsung, Lenovo, HP, Asus and the like.
Step-by-step instructions for enabling the webcam in Windows 7
The vast majority of modern webcams connect to a PC using a standard USB 2.0 (or 3.0) interface. They come with a CD containing drivers and a special program for managing video images. However, additional software is not always necessary. Most devices, thanks to PnP (Plug-and-Play) technology, are able to independently identify themselves as the operating system and operate successfully within a few seconds after the first connection. But in some cases, you may need step-by-step instructions for turning on the webcam on a laptop or personal computer running Windows 7.
The easiest and fastest way is to click on the “Start” menu, enter the word “webcam” in the search bar that appears and press “Enter”. After which the user will be presented with a list from which to select the most suitable result.
If you couldn’t find your webcam this way, you need to follow a few simple steps one by one.

You can get here in other ways, for example: “Start” → right-click on “My Computer” → Properties. In the window that appears (on the left side), one of the items will be “Device Manager”.
Depending on the type of webcam (built into a laptop or external), it can be located in different groups:
- "Image processing devices";
- "Sound, video and gaming devices."
At the same time, its name may contain the name of the manufacturer and model, or a general characteristic, for example, “USB video device.” Double-clicking the mouse will open a window that will contain information about whether the device is working normally. If there are problems, then you need to go to the “Driver” tab, insert the CD from the kit and click the “Update” button. Then in the dialog that appears, specify the path to the folder with the webcam drivers on the CD.

You can also turn on the built-in webcam on your laptop by installing the selected communication program - Skype, mail.ru agent or any other. After installation and registration in the system, you will be able to check all functions, including the built-in microphone, if there is one, and select your preferred device from the proposed list of detected ones.

Features of checking the operation of the webcam in Windows 8 (8.1)
The Microsoft Windows 8 (8.1) operating system, like the previous version, does not have utilities for checking the webcam built into a laptop or connected via USB. In the vast majority of cases, in order to turn on the webcam, you will need to launch a program that will work with it. To do this, you can use the services of third-party developers. One of the simple, convenient and free programs for working with built-in webcams in laptops and USB models for desktop computers is called “Live Webcam”. You can download it on the author's website.
How to connect the built-in webcam in a laptop
The vast majority of laptop models do not have fundamental design and software differences; they can be divided into two categories:
- running Microsoft Windows or Linux (Samsung, Dell, Lenovo, HP, Asus, Sony and so on);
- Macbook, an Apple product with the iOS operating system.
Enabling the webcam on laptops from different brands may vary. Sometimes this becomes quite a serious difficulty if you do not know all the possible ways to enable webcams on laptops and netbooks.
ASUS laptops (Asus)
Almost all Asus laptops are equipped with built-in webcams, which can be turned on by simultaneously pressing two buttons on the keyboard. These are Fn (bottom left) and the keys that display the camera icon, usually located in the topmost horizontal row.
Some Asus netbook models have a special mechanical switch that can be easily seen at the top of the screen. It has two positions (ON and OFF), with which you can turn on and off the broadcast of video images.
The disk that comes with the device contains the Life Frame utility, which was created to control the web camera. If you don’t have it, you can download it and all the necessary drivers on the company’s official website.
HP laptops (Hewlett Packard)
Possible inclusion methods:
- Press Fn + key with the camera icon.
- Automatic activation by any program, Skype or similar
- Click “Start”, then in the search bar type “QuickPlay”, then “Video”
- Using a standard program called “HP MediaSmart”.
Lenovo laptops (Lenovo)
The entire line of this brand is equipped with built-in webcams; this device is even included in the budget model for home and office B590, not to mention such multimedia-oriented laptops as the G500 or G580. Turning on the camera on a Lenovo laptop is very simple, there are three ways to do this. The first has already been described above, through the “Control Panel”, and the second is universal for almost all such devices - the Fn button + the key with the camera icon. The third one is also not very original; it involves setting all the camera parameters in Skype or a similar program.
Samsung laptops (Samsung)
The main problem that users of Samsung laptops and netbooks face is the blurred image produced by the built-in webcam. This happens if Windows 7 or 8 (8.1) drivers are installed on the device, and not “native” ones from Samsung. In this case, you need to go to the official website in the “Support” section and download the software for your model.
Laptops Toshiba (Toshiba)
In order to enable the built-in camera on any Toshiba laptop model, you will definitely need “native” drivers and a special program. Usually all this comes included on a CD, but if not, they can always be downloaded from the company’s official website.
MSI laptops (MSI)
MSI products in this regard are practically no different from Toshiba - to enable it you will need a driver package and a small program. All this can be taken on a proprietary disk from the kit.
Dell laptops (Dell)
A specific feature of Dell laptops is the lack of separate software for each of the integrated devices. You will need to download from the website or run from disk a single package for a specific model, and then select installing drivers for the built-in webcam in it.
Sony laptops
With laptops of this brand, advice at the level: “enter the control panel” or “enable the camera in the device manager” does not make sense. If you purchased a device with Windows 7 or 8 pre-installed, then everything will work initially. Otherwise, you will have to visit the Sony technical support website and download everything you need there, focusing on your model.
Acer laptops
As a rule, there are no problems with setting up and turning on the webcam on Acer laptop computers. Almost all models are equipped with an LED next to the peephole, which allows you to monitor its activity and turn off the camera if it is not needed. Control is carried out by pressing Fn + V.

Required software.
Laptops DNS (DNS)
According to data published on the website of this manufacturer, there is no need to download special drivers. The standard ones that the operating system will install on its own will suffice. You can turn the webcam on and off using the combination Fn + F11.
Mac laptops
MacBooks, like all other Apple products, are distinguished by a high level of reliability. The webcam on a Macbook rarely breaks down, but occasionally problems may arise that prevent it from working properly. This usually manifests itself in the following:
- users don't see your image;
- While loading the application, an error window pops up;
- the program freezes when you try to close it;
- the image contains stripes or multi-colored tints;
- A system message appears indicating that the device is disabled.
If we exclude the possibility of mechanical damage to the MacBook, then all other problems with the webcam can be solved quite easily. The first thing you need to do is open the task manager window and check if there are two processes running simultaneously that have the word “Camera” in their name. If so, closing one of them will eliminate the conflict in the system.
The second possible reason is an incorrect name in the registry (for example, CameraApps instead of Camera); all such processes must be renamed. If this does not help, then you need to turn off the device and remove the battery from it. Turning it on after 10-15 minutes should fix all errors and get the computer working normally.
Checking your webcam using Skype
The easiest way to check that the webcam is working correctly on a desktop computer or laptop is to launch Skype. At the top of the program window, select “Tools” and go to “Settings”. Clicking on “Video Settings” will allow you to see your image on the right side of the window. Below it there is a “Webcam Settings” button, which will allow you to set various parameters (brightness, contrast, saturation and others) to your liking.

Attention, one of two points for automatically receiving and demonstrating video must be enabled - “anyone” or “only people from my contact”
Online services for verification
There are quite a large number of resources on the Internet (for example,) that allow you to quickly check the quality of your webcam and microphone. Before you begin, you will need to enable media transfer in the pop-up window of a standard flash player. You will then be able to test the picture and sound. The same page provides detailed instructions on how to use it correctly.
How to turn on and off a USB camera on a computer
Desktop computers use USB cameras that need to be purchased separately, but installing and configuring them is even easier than on laptops. In the vast majority of cases, it is enough to connect the device to the connector and wait a few seconds until the operating system detects it and installs the necessary drivers. After which you can start using the gadget. If this method does not work, then you will need to go to the control panel, as described above, and manually install the software from the CD included.
Now there are a huge number of manufacturers on the market that offer devices with different resolutions, including high-quality HD mode. The most popular webcams are from well-known brands such as Logitech and Microsoft, due to their high quality and the absence of problems with their detection by the system. Budget options have also proven themselves quite well: Gembird, Sven and Genius. There is no single algorithm that allows you to quickly turn on the camera and start using it, but searching for drivers on the manufacturer’s official website almost always helps.
Remotely turn on the webcam
Quite often, users need to turn on their webcam on their computer remotely. This problem can be solved either using the built-in tools of Windows 7 and 8 (remote assistance), or using third-party software: Radmin, TeamViewer and similar programs. The only limitation that exists for remotely turning on a webcam is that it does not need to be physically connected to USB or use mechanical switches. Visually, this process occurs in exactly the same way as when directly present near the computer.
Dangers. How Hackers Can See You Through a Webcam
In the field of cyber crimes, a new term has increasingly begun to be used - ratting. It sounds like the English version of the word “rat”, but has a slightly different meaning, since it comes from the abbreviation RAT (Remote Administrator Tools). Such tools, designed for remote administration, are often used by hackers who take control not only of someone else’s computer, but also of gadgets connected to it: web cameras, printers and other equipment.
Typically, hacker software gets onto the victim’s computer after visiting a malicious site or through an invitation from a spam mailing. After this, the hacker gains full control over all of his victim’s equipment: he can download confidential data, turn the webcam on and off, take his own pictures and even record video using it.
There is no guaranteed way to protect against such an intrusion, but you can take a number of effective measures and follow a few simple rules:
- use the latest versions of operating systems and related software: browsers, flash player, etc.;
- install upcoming updates in a timely manner;
- use a reliable antivirus and install a good firewall;
- do not click on links found in your mailbox if the sender is unknown to you;
- do not access sites on the Internet that seem suspicious or violate the law.
How to turn off (disable) your webcam
Turning off a regular webcam is very simple - just unplug it from the USB port; for built-in models this process will be a little more complicated, but also will not require any special skills. To do this, you need to find it in the list of device manager, right-click on it and in the menu that appears, click on “Disable”. This is the simplest, fastest and most reliable method if there is no mechanical switch on the case. To reverse the process, you need to repeat this procedure by selecting the “Enable” menu item. The current status of the camera can be determined by the indicator (LED) located next to it.

Service maintenance
Repair and setup of web cameras on personal computers, laptops and netbooks can be done in our service center. It’s very easy to get to it using this route map:

Before you try to find out how to turn on the camera on your laptop, you need to make sure that it is available.
Most laptop models are equipped with built-in. But its presence is more an option than a design requirement.
If there is no built-in camera, you can always connect it via the USB connector.
If there is a need for a video call, then usually no special steps need to be taken to turn on the webcam.
Just press the video call button on Skype and during the conversation you will be able to see what the camera is transmitting in a small window at the edge of the screen.
The same goes for online services that provide
This is just how the camera works - it does not show signs of life until it is accessed by a program that can work with it.
Ways to use the camera functionality
Many laptops come with a set of programs, including programs for working with the camera.
Typically, these programs can be launched via a shortcut on the desktop, in the Start menu, or via keyboard shortcuts, a keyboard shortcut that instantly launches the program.
The sequence of actions to enable video communication on a Windows 8 or Windows 7 laptop is not fundamentally different.
Let's look at the shortcut keys and programs that serve the camera for some common brands of laptops.
To turn on the device on an ACER laptop, you must press the key combination FN+V.
The standard software package accompanying the new Aser includes the laconic Acer CrystalEye utility, designed for working with the camera. It can be found in the Start menu.

To turn on the video device on an Asus laptop, you will need to use the Fn + V command.
The package of programs and drivers for Asus laptops usually contains three programs related to the operation of the built-in camera: Virtual Camera Utility, Life Frame Utility, ECap Camera.
With their help, you can adjust the parameters of the transmitted image, record a video, and even apply simple effects.

To turn on the device on an HP laptop, hold down the Fn button and look for the button with the camera icon.
If it is not marked, then most likely the combination FN+V works. By default, your HP laptop should have HP Camera or HP MediaSmart installed.

To turn on the video device on a Lenovo laptop, in most cases you need to press Fn+ESC, but there are exceptions.
To manipulate the camera on laptops of this brand, you can use the EasyCapture program.
It is unknown whether it is included in the standard package, but you can download it from the Lenovo technical support website.

If the camera still doesn't work
If you were unable to turn on the device using the above method, you need to find out the following:
- Is the video camera detected by the system?
- Are the necessary drivers installed?
- Is the camera enabled in the current system configuration?
All three questions are answered in the Device Manager utility.

The fastest way to open this program window is:
- click the Start button;
- in the “Search programs and files” field, enter “Device Manager”;
- press Enter.
In the window that opens, look for the Image processing devices item and expand it by clicking the triangle at the beginning of the line.
Important! If the list under this item is empty, the camera has not been detected, and you need to look to see if there are any lines in this window marked with an exclamation mark on a yellow background.
If there are exclamation marks, this means that the system has detected a device for which there is no suitable driver.
Go to the “Searching and installing a driver” section.

If the list contains a line with a set of letters, numbers and words, then the camera is detected by the system and drivers are available.
If at the beginning of the line there is an icon in the form of a white circle with a black arrow pointing down, then the use of the camera is disabled.
To enable the use of the camera, right-click on the stock and select “Enable” from the context menu. The device should work.
We check again using special programs or.
Finding and installing a driver
Typically, in such cases, technology serves as an “intermediary” between the service and the camera.

In order for her to gain access to control the camera, she needs formal confirmation from the owner of the computer.
You will be prompted for confirmation when you try to use the webcam, such as joining a video chat.
At the same time, a small window appears with the name “Adob Flash Player Settings”. Click the “Allow” button and enjoy the fruits of technological progress.
How to turn on the camera on a laptop
Simple and clear instructions on the topic - how to turn on the camera on a laptop
All laptops today come with integrated webcams. This attribute allows you to use a variety of applications and video calls. Today, in order to contact a friend on the other side of the continent, it is enough to turn on Skype and activate the device.
To check the camera's operation you often have to use third-party software
Many users are perplexed when the characteristics of their laptop are equipped with such an option, but in fact it is difficult to enable it. The webcam may be deactivated, and to start using it, you need to learn how to turn it on. How to turn on the webcam on a laptop? Let's look at it in more detail.
To activate the camera on a laptop computer, it is usually enough to launch a special utility designed to work with such components.
Many experts praise the Live Webcam program, which can be found for free on the Internet. It has a very simple interface and is convenient for the average user.

An alternative option is to use an online service. Today there are a great variety of these resources, all of them make it possible to check the quality of the microphone and the camera integrated into the device as quickly as possible. After visiting such a site, it is important to allow data transfer in a new window. Only after this will it be possible to test the sound and picture. Each service offers its own instructions, which consist of a few simple steps.
Skype
The functionality can also be checked via Skype, it is convenient and simple. Select "Settings" from the "Tools" menu. Then find the Video Settings option. Clicking on this item will launch the image in the right corner of the screen. You can set equipment parameters such as contrast, brightness, white balance, hue after pressing the “Webcam Settings” button.

To check your device via Skype, you must first enable the auto receive option. You can also make a test call to one of your friends.
Configuration via Device Manager
For Windows users, it is possible to check active hardware through a special manager. It’s not difficult to get into it; just select “Device Manager” in the computer properties. If there is a camera in the list, it must be activated (select “Enable” after clicking on the camera).

If the device is missing, try installing the drivers. A laptop is usually sold with a disk on which all the drivers for the product components are recorded. Lost a disk? Download the element through the developer’s website.
If the camera is not built-in, but is connected via a USB connector, then the model and manufacturer will be marked on it. Once you know this data, you can quickly download and install the component.
Keyboard shortcuts
The “magic” Fn key is designed on laptop keyboards. It helps you increase or decrease the screen brightness, add volume, and do many other operations. Another use case is to turn the camera off and on. To activate the device, you must press Fn in combination with the button on which the camera icon is visible. Fn is usually located not far from the Ctrl key (on the left or right).
The combination for each laptop model may be different. For example, on Acer equipment the camera turns on after pressing Fn+V, and the DNS manufacturer claims to use Fn+F11.

For Lenovo, the Fn+Esc combination is usually suitable, but there are various exceptions. The manufacturer of this equipment offers users the EasyCapture utility for working with a webcam. A similar assistant in HP devices is HP MediaSmart.
Hackers are attacking!
The camera must be used with extreme caution. Recently, cybercriminals have become more active in the field of ratting, that is, illegal spying using devices connected to a laptop.
After visiting a malicious site, you voluntarily give the hacker the reins of your PC. Very often, attackers independently record videos and take pictures from the camera without your notice. They usually hunt for celebrities so that they can later post provocative materials online, but ordinary users are often unlucky.

To prevent this, it is important to be careful and follow a number of useful rules:
- do not “follow” malicious, suspicious links;
- install firewall;
- use proven versions of software;
- install updates in a timely manner;
- protect yourself with an effective antivirus.