Before updating
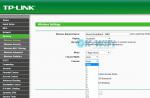
- Before updating the firmware, it is recommended to check the current version. To do this, after loading the portal, you must click the button "SET", then select the menu item "Device info". The current firmware contains in the line image description phrase "A1", or in the line RootFS version contains the value "0.2.18-r23" and higher.
Manual firmware update in “DHCP Upgrade” mode MAG250 Micro
In this mode, the set-top box must be connected to the IPTV port (bridge) of the router, because update parameters are obtained from the DHCP server
- Press the button "MENU"
- Select an item "Upgrade Tools" and press the “right” button on the remote control.
- Select an item "DHCP Upgrade" and press the “right” button on the remote control. The firmware update of the console will begin.
- At the end of the update (about 5 minutes), the set-top box should reboot itself and go to the VOKA portal.
Manual firmware update in “MC Upgrade” mode MAG250 Micro
In this mode, the set-top box must be connected through the NAT of the router (to any LAN port that is not an IPTV port)
- The set-top box is disconnected from the ~230V network
- Press the button "MENU" on the remote control of the set-top box and hold it.
- Connect power to the console. Something similar will appear in the BIOS. Release the "MENU" button.
- Select an item "Upgrade Tools" and press the button on the remote control "to the right" .
- Select an item "MC Upgrade" and press the button on the remote control "to the right" . The firmware update of the console will begin.
- At the end of the update (about 5 minutes), the set-top box should reboot itself and go to the VOKA portal. *Additionally, after manually updating the set-top box and loading the VOKA portal, we recommend changing the screen resolution to a comfortable one. To do this you need to press the button "SET" on the remote control, then select menu "System Settings" - "Video". In this menu item, use the arrows on the remote control (Left, Right) to select the required Video output mode (1080p-50) And Graphic resolution (1280x720) Next, save the configuration using the remote control "OK".
Using the MAG 250 console as an example
1.
First you need to download the required firmware version. For this:
- Go to the website soft.infomir.com.ua
- Select the desired model from the list provided, i.e. MAG250
- In the list of folders that appears, select release/
- Next select 0.2.18-r22(the name 0.2.18-r22 is valid as of 03/09/18 - with a subsequent firmware update this folder may be called differently)
- In the download list that appears, select (left-click) items Bootstrap_250 And
2.
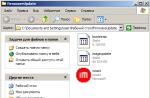
Next, you need to rename the downloaded files. To do this, right-click on the file name and select the value from the context menu Rename. The final file names should look like this: Bootstrap And imageupdate respectively.
3.
We prepare a USB drive for flashing. Let's format it in FAT32. Create a folder on the drive. The folder name must match the model of your set-top box. The name is indicated in lowercase Latin letters, without spaces - mag250
4.
Copy both firmware files to the created folder Bootstrap And imageupdate.
5.
6.
Disconnect the set-top box from the power supply, turn it on and hold down the button Menu on the remote control. After which the bootloader menu will appear on the screen.
7.
If the first item in the menu that appears is not TV System, A Upgrade Menu- select an item Upgrade Menu at the touch of a button Right. Otherwise, move on to the next step.
8.
In the menu that opens, use the button Down select item Upgrade Tools and activate it with the button Right.
9.
In the menu that opens, activate the item USB Bootstrap button Right.
If after these steps the set-top box does not boot, or the flashing process was not completed correctly, then disconnect the set-top box from the power supply, turn it on while holding the "menu" button until a blue screen appears and change the Boot Mode value from NAND to NAND2, or vice versa. And repeat the software update process.
After loading the console you will be taken to the internal portal, you need to go to Settings and further on System settings, then to advanced settings - Advanced settings(item with a picture of a screwdriver and a wrench) - and in the first field, change the language to Russian using the arrows on the remote control.
Next, restore all settings as after a normal reset.
The firmware is installed in 2 stages - flashing the intermediate version in bootloader mode and updating to the current version via the Internet.
To update the intermediate version of the firmware, you need to download the firmware and update utilities:
We unpack the archive - we see 3 files in the folder.

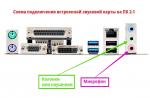
Launch mcast.exe. If there are several interfaces, you must select a wired network card. The address is usually 192.168.x.y

In the next dialog, you need to select the bootstrap and imageupdate files from the unpacked archive.

Select an item Upgrade Tools and Use the right arrow to open the update menu.

There we select the item MC Upgrade and press the right arrow.

The set-top box will show the Multicast address, which must be entered into the first IP field in the program mcast.exe

We only change Stream 1, IP address, port: 224.50.0.50:9000 from the previous picture. We do not touch the second address. And press the buttons start

In a couple of minutes, after the cursor starts moving, the set-top box will report the successful download of the first file.

You will need to wait a few minutes until the firmware itself downloads:


After this, the console will reboot itself.
The first stage of the firmware ends here.
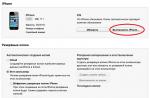
In the second stage, you need to click on the button when loading SETUP to download the final firmware.

Go to the section Settings

And select the item Update software now.

Select an item Update

And we agree to automatic firmware updates in the future.

The set-top box will automatically reboot.

And it will show a window for entering credentials for iptv, which can be obtained in your personal account.

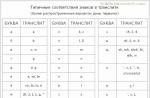
To enter a dot symbol, press the key OK You can call up the on-screen keyboard on the remote control.
The latest development of the Infomir company, which combines the maximum number of technical capabilities demanded by broadband access operators and unsurpassed ease of use for the end consumer of interactive digital television. The set-top box meets all modern requirements for multimedia devices, including support for streaming video, video on demand, playback of digital channels in high quality, as well as access to OTT services (YouTube, Picasa, online cinemas, weather forecast, etc.) and the Internet -browser.
On the Russian market, the console is sold under the brand name . The main difference is the presence of a programmable remote control.
MAG-250 Micro and MAG-245 are an excellent subscriber solution in combination with headends and Middleware from the company
In this article we will look in detail at how to update the firmware on this STB and how to restore it.
So we have a MAG 250 Micro IPTV set-top box, on which we need to update the firmware. Where to start?
1. Go to the BIOS menu, to do this you need to:
- Power off
- Press and hold down the " Menu» on the remote control
- Without releasing the button " Menu» turn on the power of STB MAG 250 Micro
As a result, we see the following picture on the screen:
2. Menu item " Upgrade Tools", enter by pressing right on the remote control
3. Select " USB Bootstrap"(a folder mag250 must be created on the USB drive, which should contain 2 files: bootstrap and imageupdate)
4. Connect the USB drive and confirm by pressing OK to begin the update process


5. Wait until the update is completed and the device reboots

If you are not familiar with this set of letters and numbers, then you might think that this is a magician numbered 250. In fact, this has nothing to do with the world of magic and wizardry. MAG-250 is a set-top box that makes it easy to launch a project over IP networks. This is also a kind of magic of modern technology, because before there were no such devices on the market. They began to gain popularity quite recently, as a relatively new product in Russia. Now you can see similar gadgets in almost every home.
There is nothing complicated in the MAG-250 firmware if you follow the instructions and do everything correctly
These set-top boxes are most often used by Internet service providers, content aggregators and other services providing IPTV, VoD and OTT based services. That is, such devices are designed to open digital TV channels, play streaming video and other similar things.
What do you need to know before installing the firmware?
First, you will need to determine the version of the installed software, since this will determine which firmware file you download in the future. Therefore, your procedure is as follows:
- Open the settings of the set-top box and find the “Firmware” item.
- Now look at the version. Now we will compare it with the data that is presented and conditionally divided below. This is done for convenience, which you will appreciate later.
So, our three conditional divisions by firmware:
- Your version is 2248.
- Your version is lower than 2248.
- And the last option is 2281.
If with version 2281 everything is extremely clear and understandable (you have the latest version of the operating system installed, and you do not need to reflash anything), then in the other two cases we will tell you in detail what you need to do.

Version 2248
- First of all, download the firmware files (there are only two) to your computer or laptop. Owners of MAG-250 set-top boxes with version 2248 can update their devices to version 2281. Therefore, the files will contain bootstrap_2281 and imageupdate documents
(http://www.lanta-net.ru/files/Bootstrap_250_2281)
(http://www.lanta-net.ru/files/imageupdate_250_2281)
- Now you will need to change the name of the downloaded documentation. Right-click on the file and select “Rename”. We remove all numbers, dashes, underscores and other attributes, leaving only the words bootstrap and imageupdate.
- Now we will need to format the flash drive in FAT format. To do this, in the “My Computer” menu, right-click on our drive and select “Format”. Here, in the tabs, find the FAT32 system type and agree on it (check mark or other marking element).
- Next, go into the flash drive itself and create a new folder, which you must name mag. Strictly this way, nothing else. There is no need to write capital letters, spaces or commas. Because this will affect the firmware process. And since we don’t want any troubles to arise, we strictly follow the instructions. Transfer the firmware files from step two to the created mag250 folder.
- So, the flash drive is ready, and you can connect it to the set-top box. We unplug it from the outlet, then turn it on again and at the same time hold down the menu key on the remote control.
- Now a whole dialog box has opened before your eyes, where you need to select the Upgrade Menu. This can be done by moving the white selection bar using the up and down navigation buttons on the remote control, then pressing the right arrow key. If you don’t have such an item in the menu, then select Upgrade Tools in the same way, and then USB Bootstrap.
- So, all that remains is to wait for the flashing process to complete, as a result of which you will receive a notification on the screen about a successful operation. Next, the device will reboot.
I couldn't flash it, what should I do?
In this case, you need to repeat the fifth and sixth points of the previous instructions again. If this does not help, then in the dialog box after the fifth point, select Boot Mode and change the indicator to NAND2. Then click on Exit & Save. This operation should help if problems arise with installing the firmware. Otherwise, it is recommended to contact a specialized center.
Firmware version lower than 2248
In fact, there is nothing wrong with this, except that you will have to follow the above instructions twice: the first time you will update the device to 2248, and the second time to a more current one. You just need to download additional files from firmware 2248. These will be Bootstrap_250_2248 from the link (http://www.lanta-net.ru/files/Bootstrap_250_2248 and imageupdate_250_2248) from the link (http://www.lanta-net.ru/files/ imageupdate_250_2248). And the process itself is the same, we repeat it again as described above. Therefore, friends, we carefully study the material to avoid trouble.

Let's sum it up
Today we learned how to flash or reflash a specialized MAG-250 console. Now you can enjoy all the delights of the new version of the operating system. Don’t forget to share your impressions and opinions with other users in the comments, dear readers!