Hi guys! Evgeny Tridchikov is in touch, and in this article I, by tradition, will briefly and without water tell you how to set up Yandex Metrics.
Here are just the basic settings, which are almost always enough to understand what is happening on the site.
I would call this the minimum metric setup requirements.
Let me emphasize that without installing Metrics, this is very bad, because you will not have comprehensive analytics on the work of advertising campaigns. Now let's go.
How to set up Yandex Metrica
Metrica counter settings: basic

- The field "Counter name" is set for yourself, it is logical to indicate the name of the site here.
- The "Site domain" field must contain the site address, i.e. second-level domain - in our example site.ru
- The Add Domain button allows you to add sites to collect information from them, ie. cross-domain binding. In this case, the sites must have one counter installed.
- The Time Zone field will sync reports according to your time zone.
- "Time-out of a visit to minutes "- sets the maximum duration of the visit.
We press the button "Create counter" and go to the settings.
Metrica setup: "counter code" tab
The "Counter Code" tab contains several check points. Let's take a closer look at them.

- "Webvisor, scrolling map, form analytics" - we must tick the box to enable the corresponding functions in Metrica.
- "Tracking the hash in the address bar of the browser" is relevant for AJAX sites, so we skip it.
- "For XML sites" - respectively, skip.
- "One line" - purely for aesthetes.
- "Prohibition of sending for indexing of site pages" - skip, no comments.
- "Informer" is the name of a block counter that can be placed anywhere on the page. We do not use (why open statistics?).
Thus, we copy the contents of the counter and press the save button.
Configuring Metrics: "Webvisor" tab
Webvisor is the most useful thing in Metric. A tool that records user visits and allows you to view them in the Metrica player. A very cool thing for analytics.

I use the entry "from browser" and "from anonymous user". See screenshot for settings. More detailed information you can find out about the recording options by clicking on the question mark icons.
Metrica setup: goals tab

Setting goals is a topic for a separate article, so I will pay special attention to this and prepare detailed post on this topic. I will only mention that at least one goal should be configured, because the essence of analytics is the study of user experience on the way to our goal. For now, let's skip.
Configuring Metrics: Filters Tab
On the Filters tab, you can set a limit on incoming traffic, as well as transform it using the Operations tool.

For example, I know that visits to my site (when I go to the site's admin panel or any other site administrator does it) come from links that contain the word admin. That is, if the URL (link) contains this word (admin), we can conclude that the site is an administrator. Why record his visits? After all, we only need new and unique users in the reports, it makes no sense to overload them with our own visits.
Therefore, I boldly set up a filter for visits whose URL contains "admin", put a checkmark "Do not take into account my visits", and also a checkbox opposite "filter robots only according to strict rules". Click the "Save" button.
Metrica setup: "notifications" tab
Here you can set the rules for receiving notifications about Metrica's work. I think there will be no questions, everything is very clear.

Likewise with the "Access" tab.
Summary
That's it, this completes the basic setup of Yandex Metrica. it step-by-step instruction suitable for all beginners. It remains to stick the counter code in front of the closing tag and start getting statistics.
If I forgot to tell you something about how to install Yandex Metrica - please do not hesitate to ask questions in the comments. Have a nice day!
When a SEO grows out of short pants, he begins to open Metrics and Analytics not only in order to ... hmm, admire the beautifully growing charts. Complex data segmentation, detailed analysis of entry points and conversions comes to the fore. In short, advanced features. If you use a statistics system specifically for serious analytics, then you hardly need to prove how important the accuracy of the initial data is.
I'll tell you about a few simple techniques for increasing the correctness of statistics.
1. Set the counter as high as possible in the code
The position of the counter is really very important. If you put it at the end of the code, the system will not count visitors who leave the site without waiting for it to fully load. This will rob you of valuable failure data and prevent you from fighting it.
In addition, the distortion can be very high. I am familiar with the case when the different places Analytics and Metrica returned the number of visitors, which differed by more than two times (by the way, if you see a similar problem in yourself, check the speed of the site).
2. We filter users who are not in the target audience
The director opens the meeting.
- How many people visited our site yesterday?
- So. Our company has 43 employees. What bastard didn't come in?
Jokes aside, and on poorly visited sites, the project team can seriously affect the statistics.
To avoid this, go to the counter settings - Filters and:
- We put the checkbox "Ignore my visits."
- Add a filter by ip of employees working on the site.
If there are many remote workers working on the site, IP filtering can be inconvenient. There is no ideal solution for such a case, as an option, you can oblige employees to enter the site only by a link with a tag like “utm_source = corporate”. Or make it so that everyone visits the link with a parameter once, add a cookie, and then track the visit of visitors with this cookie through a JavaScript event target.
We do not close the "Filters" page, it is also needed for the following items.
3. Filtering robots
We set the option "filter robots according to strict rules and behavior" (the most stringent option). After the settings take effect, the total amount of displayed traffic on the site can seriously decrease. Consider this if the site is not yours, but a client's.
For customers who do not have extensive experience in Internet marketing, it is often extremely difficult to prove that it is not the number of visitors as such that matters, but the customers that the site brings. It would seem that representatives of real business, coming to the Internet, should take care of orders / purchases first of all. This is not always the case: the magic of growing charts is addictive.
4. We accept data only from our own domains
This week, many of our users noticed the appearance of page views from domains that have nothing to do with the counter in Metrica (Popular, Webvisor) reports.
From a technical point of view, nothing is impossible in such a situation: it was spam. Yes, along with mail and search spam, such "statistics spam" also exists. We have localized the source of this spam and blocked it.
Why does Metrica accept hits from other domains? This is done for the convenience of users: very often the owners of the counters do not indicate the site address in the settings. Or, having installed the tracking code on another site, they forget to register it as a mirror. If Metrica did not take into account views from such unspecified sites by default, this would create unnecessary inconvenience.
Each user can turn on the filtering himself, which prohibits Metrika from counting views from any other sites. To do this, you need to specify the site address and all necessary mirrors in the counter settings, and then in the "Filters" section of the counter settings add the filtering rule "Leave only traffic - page URL - site and mirrors".
Unfortunately, this way you will not be able to block all refspam (invalid referrals from "left" sites). I consider banning sites that "foul" the statistics of referrals to htacess as an irrational waste of resources (the list of domains is constantly changing), if necessary, it is easier to create and save segments that cut off refspam in the Metrica itself.
5. Struggling with "internal transitions"
I think everyone saw the traffic source "internal referrals" in the reports. In reality, Metrica registers visitors who have spent a long time on the site in this way: one visit is split into several, and the true source is shown only for the first visit.
If internal transitions bother you, then most of them can be easily removed by attaching them to 1 visit. Quote from help:
The visit is ended if some time has passed between the actions of the visitor on the site. The default is 30 minutes. You can specify a different time using the visit timeout option.
For example, the timeout is 30 minutes. The visitor has entered the site and viewed several pages - the visit is valid. Then I left the browser tab open and walked away. After 35 minutes, I came back (timeout period expired) and went to another page of the site. This viewing is considered a new visit.
Thus, to get rid of internal transitions, you need to go to the counter settings (tab "General") and specify a timeout, for example, 360 minutes.
Attention: do not change the timeout just like that, "just in case." First, make sure that changing the rules for calculating the number of visits does not distort the results of regularly monitored metrics or experiments. The total number of displayed visits will decrease, the viewing depth will increase slightly, keep this in mind.
For a number of purposes, it will be quite sufficient to simply remove the internal transitions using the appropriate segment.
For example (clickable):

Of course, you can filter in other ways as well. In my opinion, this is what Metrica is good for - it provides a lot of alternative ways for quickly building any reports, and in the nuances that differ between them, you can find very valuable data. He who has a head, let him find it!
Yandex.Metrica is an excellent tool that has rich functionality and, most importantly, is constantly updated. However, not everyone knows about some of its useful features or postpones their use on the back burner.
What Metrica functionality often remains unfairly unnoticed? We have compiled the top 10 Metrica settings and tools, which it is time to remember and start using them. Go!
10th place. Labels by counters
Not everyone needs this tool. However, if you have multiple lines of business and each has more than one site or landing page, you can use tags to view consolidated reports.

9th place. One click month selection
In my work, I always try to "cheat" (cheat), use hotkeys and so on, which allows me to speed up my work. Therefore, I am always surprised when the month is selected by clicking on the first and last day of the month.
The truth surprises me even more when the choice of the month with one click is not provided by the service, fortunately, Metrica took care of us.

8th place. Filters and operations
The tool is powerful, but you need to be extremely careful with it so as not to mess things up.
Filters are used to cut off non-targeted traffic. I recommend that you immediately check the box "Ignore my visits." In this case, if you are logged in to Yandex with access to the counter and are viewing the site, your visits will not be counted.
If you are going to check the performance of targets, then this checkbox must first be unchecked.

Filters can also be used to cut off users by IP address (both by full and by mask, i.e. 192.168. *. *). You can also exclude from reports views of certain pages by link or page title.
I warn you again: be careful!
Filters have a reverse option "Leave only traffic" that matches the specified conditions. If you specify a specific IP address or page address, then only data from this address or page, respectively, will be taken into account in the reports.
Let's conclude our consideration of filters with "Filtering robots".

The setting accompanying filters is Operations.

Popular use cases:
1. Replace https with http... If your site is accessible via http and https at the same time, use this operation, otherwise your traffic in reports will split in two. Additionally, it is better to immediately redirect to the https version of the site. At the same time, it is advisable to consult with SEO specialists in advance so as not to lose positions in the search results.
2. Convert to lower case... Another option is when the same page is available at several addresses. To make it clearer, let's give an example with URL addresses and the number of views of these pages: https: //mysite.ru/newevent - 4 https://mysite.ru/NewEvent - 12 https://mysite.ru/newEvent - 7 When viewing a report on on popular pages, you will see these three lines separately, and for accurate calculations, the data must be additionally processed. If you enable the "Convert to lower case" option, the data will be represented in one line: https: //mysite.ru/newevent - 23
You can read more about filters and operations in the help.
7th place. My reports and favorites
There are never too many reports. Each business is individual, and each marketer, analyst, business owner looks at the indicators that interest him.
It is for such cases that reports are saved. How to do it:
1. Customize the report: change the groupings and add your own metrics;
2. In the upper right corner, click the "Save As" button;

3. Enter a relevant title and click "Save";

4. And so that the most important ones are not lost in a large number of reports, add them to your favorites:

All these reports can now be found here:

6th place. Notifications
The larger the organization, the more it costs each hour of downtime for its site. This is especially important for online stores.
Add notifications about the unavailability of your site to mail and in the form of SMS in order to be able to quickly respond to site failures.

5th place. Hide statistically unreliable data
In our work, we often encounter the desire of clients to keep track of everything. The desire is great, but there is one problem: the data collected can be negligible, and it will be incorrect to draw conclusions based on them.
What does Metric have to do with it? The function "Hide statistically unreliable data" speaks for itself.

How does it work?
Methods of mathematical statistics allow you to calculate how many visits are needed so that you can confidently assert (for example, with a 95% probability) that the calculated conversion value differs slightly from the true value (for example, by no more than 5%).
and increase the timeout
Today we will talk about Yandex Metrica settings. And this will be the final point in a series of articles about this wonderful tool.
Where can I find Yandex Metrica settings?
If this is not the first article from our series that you are reading, then you should not have any problems with finding settings. But, just in case, here they are:

What items are available to us? There are 8 of them:
- basic;
- counter code;
- webvisor;
- goals (after the name of the item, the number of goals is indicated);
- filters;
- access (the number of accounts that are given access to the counter is also indicated here).
I will not go into detail about each tab - I will only note the main points that you should pay attention to when connecting Yandex Metrica.
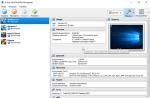
The main

Here you can find the unique meter number and its name (you can use the one you like best).
Immediately you need to indicate the address of the site on which the counter is installed, add additional addresses (this may be necessary if your site has several addresses - for example, with www and without). In addition, you can use one counter for several sites - but to be honest, I can hardly imagine what such a function is for.
The site currency will help in determining the cost of achieving goals.
But the most useful point here, perhaps, is the visit timeout in minutes. I recommend setting it to the maximum value - 360 minutes.
Why is this needed? So that the visits of one visitor who, for some reason, turned off the page with your site, switched to another tab, or simply walked away from the computer (in general, took a pause in studying the site, but did not close it at the same time) did not turn into several different visits ...
Counter code

Here you can enable , (Please note that these features are not enabled by default! Do not check the box in front of this item - they will not work).
Thanks to the tick in front of the "Asynchronous code" item, Yandex Metrica will not affect the loading speed of your site.
If you want the counter to be displayed on the pages of your site - put a tick in front of the "Informer" item, and using the item "Prohibit sending for indexing site pages" you can hide from the search pages. But do you need it?
In general, the best option for setting the counter is in the image above. Everything else needs to be included depending on the specifics of your work and your site.
Webvisor

If you have an online store and it is important for you to see what exactly the visitor adds to his cart and how he acts after that - choose the options "From the browser" or "Separate request". Then in the web browser you will see an exact copy of the computer screen of the visitor to your site. But keep in mind that this is an additional load on your site!
If the content of the page is the same for all users (as, for example, in our blog), then select the "Disabled" option.
Why do I need the item "Loading pages into the player on your behalf", I honestly cannot understand. To see how users would behave if they were in your place? There are no even assumptions. So there is only one option - anonymous user.
Goals

Allows you to add and edit goals on your site. The options range from visiting specific pages to complex, compound goals involving multiple events.
If your goal is to keep users' attention, pay attention to the "Number of views" option. It will help you quickly find those visitors who have visited a certain number of pages on the site (for example, more than 10).
If you have an online store, then your option is to set a goal to visit the thank you page for your purchase. Thus, the goal will be achieved only by those visitors who saw this page, and therefore made a purchase.
However, setting goals is no longer a task for beginners, so I will not go into details.
Filters

This is not the section that beginners should climb - otherwise, you can break such firewood that only deleting all the settings will help.
So just check the box “Do not take into account my visits” - and after that try to enter the site only from the browser in which your Yandex Metrica account is active.
The option "Filter robots by strict rules only" is selected by default - and leave it. This item refers to search robots that index content. This choice allows you to cut off only "proven" robots and not lose a single real visitor.
Notifications

A very useful item for those who have problems with site accessibility. Allows you to receive notifications about problems with its availability - and, as you can see in the illustration above, you can even customize convenient time receiving SMS. However, it is not clear to me why choose the option "Only on weekdays" - apparently, it is intended for those who want to take a break from all problems during off-hours, including from troubles with a fallen site.
Loading data

These are also opportunities for advanced users. Although they are very useful features that allow you to see how your specific customers behave (yes, even Ivan Ivanovich, even Ivan Nikiforovich), as well as understand exactly what actions led to the conversion performed offline.
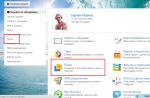
Access

Everything is simple here. If you want to give access to statistics to everyone - put the switch to "On". If you want someone specific to get access, add their username (mail must be on Yandex). You can define its powers - only view or edit.
So the cycle of articles about Yandex Metric has come to an end. If you have any questions, ask them in the comments, and I will definitely answer them.
I would be grateful if you write about what topics for my next articles are of interest to you. And I will try to fulfill your requests!
I think that each site has one or more statistics services. Our site is no exception, and they are also present on it. After the traffic on the site increased, in parallel with it, the percentage of refusals also increased.
For a long time I observed the following picture:
Agree, the spectacle is so-so. At first, I did not attach much importance to this. But after a while the picture repeated itself, and I began to figure out what was the matter. Using the Webvisor function, I analyzed the activity on my site and noticed a strange thing:

Almost a hundred simultaneous visits from different IP addresses, with zero site browsing time. Here you can immediately guess that these are clearly not people, but bots that spoil the overall picture of statistics. And the task was to filter out such traffic as much as possible.
What have I done?
1. First, I went to and in the "Filters" section set the following parameters:

1.1 Checked the box " Ignore my visits».
1.2 Chose a filter with parameters:
Filter type- Leave only traffic;
Field- page URL;
Condition- site and additional addresses.
1.3 I switched the filtering of robots to "Filter robots by strict rules and behavior."
1.4 Saved all settings.
2. Updated the counter code on the site.
One day later I saw a different picture:

That is, thanks to the standard counter settings, I was able to filter out unwanted traffic (excluding bots) and reduced the bounce rate from 92.1 to 25.4. And a day later, the bounce rate hovered around 10.