A program for writing scores, like any other software, must be well written, functional and practical, as well as provide users with a convenient and understandable user interface. The narrow specialization of the task and the complexity of composing musical scores is often reflected in the price tag of commercial products. However, do not worry, there are enough free programs on the Internet that can fulfill your needs.
The main task of this class of programs is to create compositions from notes and their subsequent presentation in a printed version. Of course, hand-writing musical notation using pen and paper can be more fun and carry a subtle flavor of creativity that a program can never replace.
However, you may be faced with more mundane tasks that are much easier to solve with automation tools. For example, duplicating repeating parts of compositions, inserting notes in the right places, dragging notes from one part to another, which, when manually compiled, can be solved up to composing a composition or a separate page of a musical notation from scratch.
Nevertheless, this class of programs is just one of those options where you should not chase automation, sacrificing freedom of action. First of all, the music composing software shouldn't interfere with your recording. The main purpose of such an application should be to maintain and provide additional tools for quick operations.
Therefore, if you installed the program and found that your possibilities are somehow limited or you are required to change the way you are used to writing, then it is better to find another program, even if it has fewer tools.
Remember, any composition writing is primarily a creative process. Just imagine you are composing a composition. In front of you is a pen and music paper. How do you think it would be appropriate to remove "extra" notes or multiple duplications due to the fact that the program cannot transfer the volta bracket to the next line or page?
There are many free music notation programs. Some may seem better, some worse. A matter of taste. Nevertheless, when choosing, you need to take into account that each of these programs has its own individual interface, to analyze the features and functions of which you may need at least half an hour.
Note: Basically, the parsing time is more due not so much to the complexity of the programs, but to different approaches to the organization of the menu, the location of buttons and other controls.
This review presents well-known and powerful cross-platform programs for writing scores.
Review of free software for writing music
MuseScore is an excellent music score editor
Lilypond
| An excellent program based on textual representation. Beautiful musical notation at the exit. Has various third-party graphical shells for ease of compilation. | ||
| The creation of musical notations based on a special text language can cause some difficulties. |
A free sheet music editor that allows you to create scores of any complexity. The resulting score can be saved in one of the popular formats or even in sound file due to the presence of a built-in synthesizer operating on SF2 technology.
Attention! The description below is for previous version 1.3.3, which may differ slightly from the current one.
A computer is a universal thing! It can be used for work, entertainment, and even creativity. We were convinced of this more than once by examining various programs on the pages of our site.
Our today's article is another "hello" to the musicians :). Moreover, this time, it is professional, since the application that we will consider allows you to create musical scores of any complexity on a PC!
But not only will you be able to create and print notes of typographic quality, but in addition you will also get a rather powerful synthesizer that will allow you to hear the composition you just recorded with the notes and even save the recording in one of the popular sound formats! So, we will talk about a cross-platform free visual editor of scores - MuseScore.
Comparison with paid analogue
MuseScore has a user-friendly interface and rich functionality, which can be compared with the capabilities of famous paid music editors, such as, for example, Finale 2012:
A small disadvantage is the ability to work only with SF2-instruments (it would not hurt to support VST and VSTi), since it is not possible to find high-quality "soundfonts" for all instruments. And the built-in sound library, although it sounds better than simple MIDI, is still far from ideal.
However, not everything is so bad :). MuseScore has a small size (in comparison with giants such as Sibelius or Finale), but at the same time it allows you to add almost all imaginable signs and marks to the score. And support for export and import of the MusicXML format makes it easy to open and edit sheet music created in any popular editor!
The last thing I would like to note is the most simple and convenient interface. There is nothing superfluous in MuseScore, and all the tools for managing the created composition are located as well as possible, which allows you to add the necessary elements of notation in just two clicks!
Installation and first acquaintance with the program
Installing MuseScore is very simple. You just need to download the archive with the program and run the installer. In the installation wizard window that opens, we agree with all the points and click "Next" until the program is installed. Upon completion of the installation, the program's working window will load:
![]()
Here is the simple interface I promised :). The main part of the window is occupied by the stave with notes familiar to all musicians, the rest of the workspace elements are grouped around it.
On the right is the MuseScore Connect frame, which gives us access to the program's community, which has some sheet music. In principle, this section is practically useless for work, so it can be closed by clicking the cross in the upper right corner.
There is a preview panel under the music sheet. It depicts miniatures of our entire project, with the help of which we can quickly move to the desired position of our score.
On the left is a panel containing drop-down lists with a variety of additional musical signs and symbols. They are all grouped by type, which allows you to quickly find the one you need.
At the top there are two toolbars (one for entering notes, and the second with the usual project management buttons and a mini-playback panel) and a menu bar. That's all:). Let's consider the techniques of working with the program in practice, creating a melody of the popular Soviet song "The Last Train".
Creating a new score in MuseScore
In order to start a new project, we just need to click the "Create a new score" button or select the corresponding item in the "File" menu:

In the window that opens, we can enter information about the name of the composition, its authors, etc. In principle, you can skip this step, and enter all the data into a ready-made score using the "Text" section in the "Insert" menu. After filling in all the fields, press the "Forward" button and proceed to the next preparatory stage:

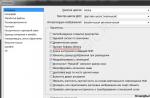
At this stage, we will need to decide on the set of tools that will be used in the composition. By default, the names of all instruments are given in English, but if you wish, you can change them to Russian in the program settings (menu “Edit” - “Parameters” - line “List of instruments”).
To begin with, I advise you to leave only the piano (or any other solo instrument) in the list, and add the rest of the instruments after creating the main melody. The next step is to choose the key of the piece:

If you have the notes of the original piece, then indicate the key that is in the existing score. If you want to write a melody from scratch, it is easier to select the key "C major / A minor", and then, if necessary, transpose it into the desired key (menu "Notes" - "Transpose").
The last preparatory stage is working with bars:

Here we need to specify the size of our composition, set up the opening (if any) and set the number of measures in the score. Naturally, all these parameters can be changed in the future, but it's easier to specify everything at once;). At the end of the configuration, you can press the "Finish" button - our project is ready to go :).
Working with Palettes
Since we decided to create the melody of "The Last Train", it would be nice to first find its notes (although you can pick it up by ear, but it's more convenient :)). Open the PDF file with the scores and try to play them one-to-one in the MuseScore environment:

We will figure out how to work with notes and pauses in the next section, and now I want to show you an example of working with "Palettes".
As you can see, we already have the signs for the key and the time signature, but there are no indications about the dynamics of the game. In the original score, there is the designation "mezzo-forte". We need to put the same icon at the very beginning of our sheet music. To do this, go to the "Palettes", look for the "Dynamics" section, open it and drag the desired icon to the staff with the left mouse button. Done :).
In the same simple way, you can add almost any musical signs and designations other than notes to MuseScore.
Entering notes into MuseScore
Notes in MuseScore can be entered in two ways: with the mouse and using a MIDI keyboard. You can also use the "hot" keys of a regular keyboard, but this is not very convenient, so we will not consider this option. Based on the fact that we do not have a synthesizer as a device, let's try to work with a mouse:

By default, MuseScore runs in edit mode. In order to be able to add the notes we need with the mouse, we need to activate the "Note input mode". This can be done by the corresponding button on the note input panel (in the form of the letter "N") or by pressing the "N" key on the computer keyboard.
After the mode is activated, we can enter notes and pauses of the desired duration by clicking with the mouse in the right place on the staff. In this case, we set the duration of the entered notes and pauses by activating the button with the image of the desired duration on the note input panel.
Also, in addition to the buttons with duration and pause, on the panel you can find buttons for applying the most frequently used alteration signs, a key for changing the direction of notes calms and buttons for switching between voices (if the score provides them).
MuseScore automatically groups the notes we entered according to the rules of musical notation, but this grouping is not always convenient. Fortunately, any action of the program can be corrected manually. Let's give a concrete example with our "Electric Train". We entered the notes correctly in the first four measures, but they are grouped differently than in the original score:

In order to combine notes into one group, it is enough to find the Group Properties tab in the "Palettes" and drag the "Group Middle" symbol to the note following the one that should be included in the group.
In order to divide a large group into several smaller ones, we need to drag the "Start of group" icon to the note from which the division should begin. Accordingly, if we need to exclude only one note, then we will apply the "No group" property to it.
In the previous screenshot, you can also notice a few more interesting points. In the original score, there are accent marks above the chords in the second measure. Adding an accent is not a problem: look for it in the "Articulation and Ornamentation" section and drag it to any note of the chord.
But in our case, the emphasis is under the stave rulers, not above them. We can correct the situation in two ways. First, you need to try to rotate the chord calles down using the corresponding button (“Reverse direction”) on the note input panel. In theory, this should help in most cases. If it doesn't help, then another option: turn off the note input mode and just drag any sign to the right place!
Using the latter method, you can control the position of any elements, such as, for example, leagues, volts, crescendo / diminuendo lines, etc.
Inserting text notes
We figured out how to work with notes and insert various notes into them. However, sometimes for practice, musicians have to make a variety of text notes in the scores. With MuseScore you don't have to do them by hand - there is a special section for this in the Insert menu:

In the "Text" section, all items are arranged in three groups.
- The first group contains text fields for entering the name of the composition, its authors, etc., in a word, all those fields that we filled out at the very beginning of creating a new project.
- The second group contains items that allow you to make all sorts of notes above the desired notes, regarding the nuances of their performance. It also has a chord lettering function.
- The third group contains a wide variety of text inserts that allow you to enter everything from vocal text to tempos in different languages \u200b\u200b(no Russian).
To enter text, we must first select the note to which this text will be attached. Moreover, a feature of, for example, vocal text (and some others) is that after pressing a space or a hyphen, the next syllable is automatically tied to the next note, which is very convenient and allows you to quickly write vocals or long explanations using the Staff Text tool.
Copying and pasting note fragments into MuseScore
What I would like to mention separately is the copy and paste function in MuseScore. The fact is that the use of these features is somewhat complicated by the fact that the program does not have the selection frame familiar to many. However, this does not mean that you cannot highlight anything.
The selection in MuseScore is as follows:
- Click the first note of the fragment to be copied;
- Hold the SHIFT button and click the last note. Moreover, if you also want to select the bass part, then you need to mark the end of the fragment exactly on the last note in the bass clef (otherwise, only the notes of the violin range will be selected);
- Press the key combination CTRL + C or "Edit" - "Copy" to copy the selected fragment to the clipboard.
Using such simple manipulations, you can quickly copy repeating parts of a part, as, for example, in measures 1 - 2 and 5 - 6 in the screenshot below:

Adding New Instruments and Working with a Drum Part
As you can see from the previous screenshot, our work on entering the piano part has come to an end. However, with MuseScore we can also create an arrangement for our main melody. For this we need additional musical instruments.
We can add them by calling the "Tools" item in the "Insert" menu:

We will see a list of instruments already familiar to us, which you, I hope, have already Russified. If you have not done this, you can do it from this window, without even resorting to the "Settings" of the program. Just click the Download button, select the instruments_ru.xml file from the list and click Open.
In the list of instruments, open the section "Non-tonal percussion" and select the item "Drum set in five lines". You will have at your disposal a standard drum kit, which is used today in popular music of different genres. Why did we choose drums? Because working with them is different from working with familiar instruments that play by sheet.

In a drum stave, each ruler is responsible for a specific drum or cymbal that goes into the kit. We can add the required one from the "Percussion" palette by dragging and dropping it, which is familiar to us. In this case, we, as before, indicate the duration of the sound with the buttons on the note input panel. That's the whole difference :).
After making a loop of four to eight measures, then you can copy it and fill in all the remaining measures with rhythm!
Additional MuseScore windows
We have figured out all the main features of the MuseScore music editor and all that remains is to clarify some of the nuances. These nuances include additional windows that can be activated in the "View" menu:

These windows include the Playback Panel, Mixer, and Synthesizer.
The "Playback panel" contains in its arsenal a track playback progress slider, the already familiar "Rewind to the beginning" and "Play / Stop" buttons, as well as the "Level" slider, which allows you to adjust the overall volume of the song, and "TMP", which is responsible for the tempo of the melody ...
Among other things, in the lower left corner of the window there is a drop-down list that allows you to choose the style of play of the virtual "performers". The default is "Straight", which corresponds to the standard playing of notes, but shuffle and swing rhythms are also available.
The “mixer”, like its real counterpart, is designed to adjust the volume level, panning and some effects (in our case, reverb and chorus) for each instrument separately. Moreover, the part of any instrument can be switched in real time to “performance” by any other instrument by selecting it in the “Sound” drop-down list.
At the same time, for a set of drum instruments, we can choose the type of drum kit, starting with standard and ending with such exotic as, for example, the TR 808 drum machine!
"Synthesizer", which is the popular free FluidSynth, gives us the ability to adjust the brightness of the effects, and, most interestingly, change the sound sets of virtual instruments, created on the basis of SF2 technology!
There are many pretty good sound banks on the Internet, of which I could recommend RealFont and Shan "s Soundfont. To unpack them into regular SF2 format you will need sfArk SoundFont Compression.
The above soundfonts are full-scale complexes of musical instruments, however, there are also highly specialized ones, for example, electric guitars or sets of folk instruments - search, but you will find :).
Advantages and disadvantages of the program
- user-friendly interface;
- support for all note signs;
- support for SF2 sound banks;
- support for entering text data;
- saving the score into a finished sound file.
- no support for VST plugins;
- the optical note recognition function would not hurt.
conclusions
If you are a musician “friendly” with sheet music, then you should definitely try the possibilities that MuseScore provides. You will receive a double benefit: firstly, a tool for creating high-quality scores, and secondly, a software synthesizer that will allow you to realize almost any of your musical fantasies!
In addition, scores created by you in MuseScore can be distributed in one of the most popular MusicXML formats, which are supported by all popular sheet music editors, which means that you will have a way to the world of modern composers who use computers to write music!
P.S. It is allowed to freely copy and quote this article, provided that an open active link to the source is indicated and the authorship of Ruslan Tertyshny is preserved.
MuseScore is a musical score editing application with a simple and intuitive interface. The program supports input from external MIDI keyboards, available on most popular operating systems, is completely free and translated into Russian. It allows you to add notes in a couple of mouse clicks, makes it possible to work comfortably with instrumental parts and contains a special inspector for customizing each element of the score.
MuseScore also boasts an extensive library with templates, no less extensive base of instruments, the ability to enter notes in WYSIWYG mode, work with an unlimited number of note lines, a built-in sequencer and FluidSynth synthesizer, export of ready-made scores in most common graphic formats, as well as the ability to assign certain actions on keys and keyboard shortcuts. With the support of these very hotkeys, MuseScore greatly reduces the amount of time it takes to create new projects. Included with the program you will find detailed technical documentation in Russian. It will be especially useful for those who have not previously had to work with applications of this kind.
Key features and functions
- knows how to work with connected MIDI keyboards;
- allows you to export working projects and finished scores;
- supports input of notes in WYSIWYG mode;
- can work with an unlimited number of musical lines;
- has a nice graphical interface with customizable toolbars.