Internet access has been one of the dominant sources of information for several years now. In terms of the volume of content provided, it has long outstripped television and print media. Moreover, now the Internet itself can provide services for watching TV programs or reading online versions of printed publications. The d link dir 615 router may well claim to be your main gate, in all this diversity.
But such omnivorousness also hides a shadow side, in the possibility of losing personal information due to an intruder penetrating the local network. Therefore, the safety of your data will also depend on how to configure the dir 615 router.
Appearance of the router
And although many companies produce such devices, D-Link, which is well known in the market for its reliable solutions, offers a very functional and multi-tasking router for organizing wireless Internet access.
Specifications D-LINK DIR-615
Hardware, the router provides the following features:
- 1 WAN port, with PPTP and L2TP implementation
- 4 LAN ports, with automatic polarity selection
- 2 detachable 2dBi antennas
- Wireless network speed up to 300 Mbps
The software stuffing implements:
- WEP/WPA/WPA2
- Telnet, SSH access
- DHCP Server
- UPnP - protocol
- NAT, Port Forwarding
- Firewall and traffic filtering
The weight of the router is 940 grams, the power is supplied from an external power supply unit 5 Volt 2.0 Ampere.
Contents of delivery
The D-LINK DIR-615 model kit includes only the necessary minimum and, apart from the stand for vertical installation, there are no frills:
- The D-LINK DIR-615 router itself
- Stand for vertical installation
- AC Power Supply
- Ethernet cable
- 2 antennas
- User's Manual
- Documentation CD
Please note that there is a button on the side. The purpose of which is the setting of the dir 615 router, in terms of fast connection to a wireless network.
On the back, the dir 615 router has LAN, WAN connectors, a reboot button, antenna and power supply jacks. Also, we note the presence of mounts for installation on the wall and rubber feet for horizontal surfaces.
Setting up a router
After buying this device, the main question that arises for the buyer is how to set up a dir 615 router? The answer is not trivial, and although most routers require a browser, in this case proprietary software is required. And before the setup itself, some formalities must be observed.
First of all, you need to determine how to connect the dir 615 router. You must have an Ethernet cable brought to you by your ISP. Connect it to the WAN connector. Using the included cable, connect the router to your computer. Then connect the power. The power and activity LEDs of the connected interfaces should light up.
Router dir 615, uses the software "Easily Set Up, Secure, and Manage Your Network", thanks to it, you can:
- Set up a secure wireless connection
- Connect network printing
- Set up resource sharing
- Make router settings
Setting up a connection with a provider
To set up an Internet connection, the interface provides a choice between automatic and manual definition of parameters. Automatic will try to do everything by itself, and we will consider manual settings.
The WAN connection settings page allows you to specify an IP address, or select automatic detection if it is provided by the provider. Specify, if necessary, the authorization method for the PPPoE, PPTP, L2TP provider. Specify provider-provided DNS. Also, sometimes the provider requires setting the size of the MTU packets. An interesting feature is the indication of the MAC address, useful if the provider keeps them under control, for cloning devices.
Setting up a wireless network
Similarly, the wireless interface can be configured either automatically or by setting parameters manually. In doing so, the key points are:
- Connection name SSID
- Channel number
- Activating Safe Mode
- Authorization method
Also pay attention to the convenient function of turning off the wireless network according to the schedule - the scheduler.
And finally, you need to set up a local network. Specify the IP address of the port and set the range of addresses that the DHCP server will provide upon request. It is also possible to hard-bind the IP address to the MAC address of the device. Below you can see a table of already assigned IP addresses.
Router firmware
Since routers with rather old firmware often come across, consider the question of how to flash a dir 615 router. In the Firmware section, all the necessary functionality is implemented. Here you can save the settings and specify the firmware file, and initiate the firmware itself. At the moment, there are a great many firmwares, both official and amateur. Soberly be aware of whether it is worth using third-party firmware.
It is important to know that the firmware process cannot be interrupted or the router's power turned off. Since the consequences may be irreversible.
Advanced router settings
Advanced configuration of the d link 615 router involves the use of specific functions that can rarely be useful to a wide range of users.
For example, in Virtual Server, you can specify the IP addresses of those machines from the local network to which incoming connections from the external network will be transferred. This allows you to organize servers on local machines.
Port forwarding, in turn, implements the transfer of outgoing connections to the outside, remembering them, and returning the received data to the one who requested them from the local network. It is also possible to redirect traffic from one port to another.
The router implements the QoS function, this is channel bandwidth control.
It is also possible to filter traffic by MAC addresses, thanks to which you can severely limit the list of devices that have the right to access the network, or prohibit specific devices from working.
In conclusion of the section, we add that setting up the dir 615 router for beeline implies the strict use of firmware approved by the beeline and posted on its website.
Router operation
Router d link 615, very unpretentious in life. Most likely, with proper operation, you will stop noticing it and generally forget about its existence. We recommend hanging it at the front door, away from living rooms, and if the signal quality is good everywhere, fix it thoroughly. Complaints are sometimes caused only by the power supply, which can fail in a few years. But there are a great many on the market who can replace it, for a small amount.
Router performance
Router d link 615, does not apply to champions. In conditions of a good signal with traffic encryption enabled, it shows a maximum of about 70 Mbps. At the same time, its consumption of electricity increases significantly and heating occurs. As a result, after 20-30 minutes, automatics reduce the processor frequency to avoid overheating. At the same time, the speed sags by a third.
The data obtained allow us to consider the dir 615 wifi router sufficient for use in an ordinary apartment, without a high-speed Internet connection. If you are lucky enough to be the owner of a channel with a speed above 50Mbps, we recommend that you pay attention to more productive models.
Setting up a wifi router dir 615 is possible in two versions. If you only have a basic understanding of networking and don't have the time or desire to delve into the details, then limit yourself to basic settings. Leave the advanced setup to a professional, or if you don't need its functionality, don't do it at all.
At the same time, connecting the dir 615 router will not be difficult even for a student. And if you have one, let him connect the cables himself. Perhaps this will be his first step towards a future profession.
Video tutorial, Wi-fi settings D-link DIR-615:
Buying Dir 615, the consumer gets the opportunity to connect devices to it that can connect via a Wi-Fi network. A working router is capable of such a function. Setting up the device at home is a simple process, but it requires attention. Problems in this matter may arise due to a misunderstanding of the functions of the router. To configure it correctly, in addition to the steps required to connect, you need to know:
- What is your Internet connection protocol?
- connection parameters (login and password, etc.).
Let's consider the whole process in more detail.
Characteristics and equipment D-Link Dir 615
Its main purpose is to create a home network and provide a high-quality wireless signal, which it successfully copes with. This model is one of the most popular in the D-Link line.
The use of Intelligent Antenna technology in Dir 615 made it possible to increase the range. Despite the complex system for transmitting several data streams at once, this router remains simple and affordable to set up.
His equipment is nothing special. It has everything that other similar devices have.
Installation
Thanks to D-Link's quick setup wizard, it's up and running in minutes. Even without deep knowledge in the field of network technologies, you can easily:
- connect the device;
- establish an Internet connection and a wireless network;
- configure security settings.
Setting up a computer network card
This is the first thing to do before installing the router.
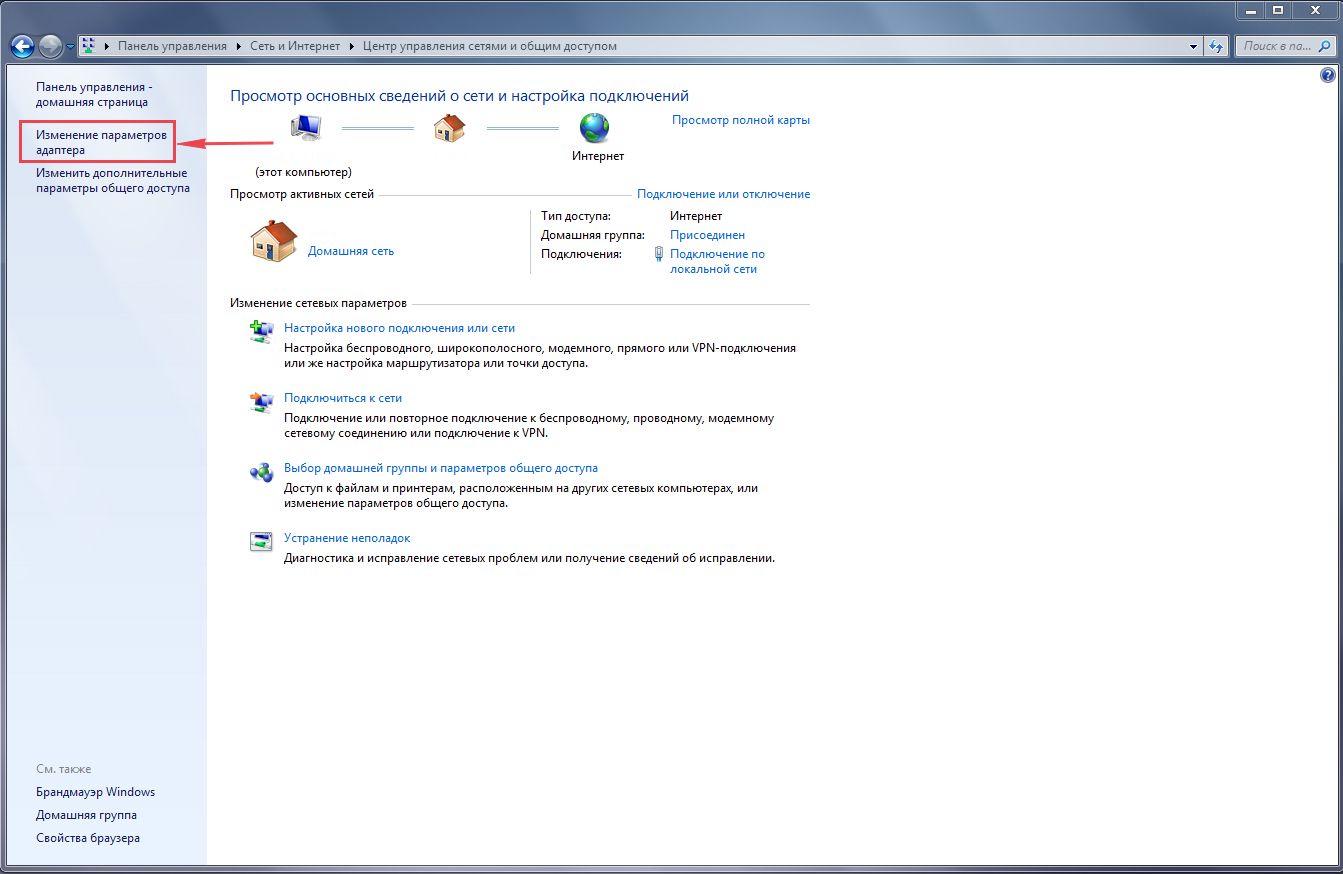
- Determine the type of network connection. We go to "Network Connections" through the "Start" menu - Control Panel - Network and Internet - Network and Sharing Center. On the left side of the window, select "Change adapter settings".

The window that opens displays all connected wired and wireless connections, including the name of the provider and the type of connection.

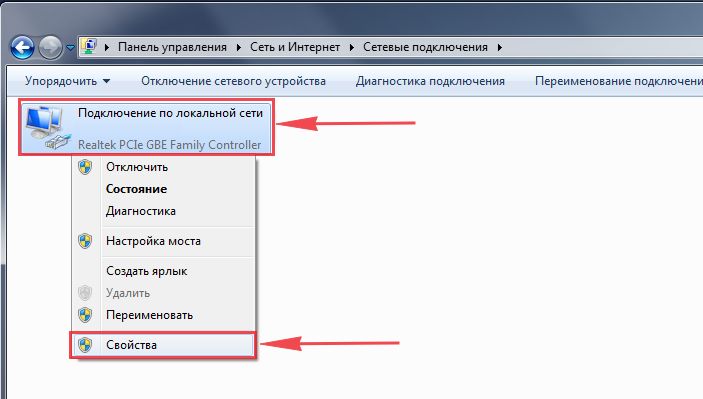
- To determine the dynamic IP, call the context menu by right-clicking on the "Local Area Connections" icon. Find "Properties". Select "Internet Protocol Version 4 (TCP/IPv4)" and click on "Properties".
We look at what items are marked in this menu. If the mark is next to the inscription "Obtain an IP address automatically", then the connection protocol is "Dynamic". "Static" in "Properties" will have the item "Use the following IP address" checked. And opposite the items “IP address”, “Subnet mask” and “Main gateway” will be entered in address numbers.

These numbers must be written out and a check mark is placed in front of the “Obtain an IP address automatically” item. Then double-click "OK" and start connecting the router.
Connecting to a computer or laptop
You need to connect the Internet cable of the provider to the modem using the “WAN” port (usually it says “internet” there). Then, we connect the cable with one end to the “LAN” port on the router, and with the other end to the network card on the computer.

We find the connection to the router in the computer (“Network Connections”) and going to “Properties” select “Internet Protocol version 4 (TCP / IPv4)”. Click "Properties". You need to fill in the fields.

Now the device needs to be configured.
Setting up a router
If the computer is prepared and Dir 615 is connected, then you can start setting up the Web interface for a specific provider.
To do this, open a browser, then enter the address of the router (192.168.0.1) in the address bar. If the server is not responding, then try restarting the router. An authorization window should appear. Enter the username and password in sequence. In both lines, by default, we write "admin" (or the data specified in the instructions).

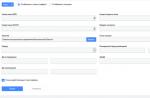
In the "Manual Internet Connection Setup" tab, you need to fill out the form, an example of which is attached. Enter the data for the password and username, fill in the "IP Address" column.
Do not fill in the "Default Gateway" field.

Save your settings by clicking the "Save Settings" button. The fact that everything was done without errors will be evidenced by the available Internet.
Wi-Fi setup
To create a Wi-Fi network you need:

Setting up a wireless network on a computer
You need to find the name of your network in "Wireless Network Connections", click "Connect", confirming your intentions by entering a password in the "Network Key" field. The password set in the router settings is used. Then, press the "Connect" button.
Your router is now connected and ready to use.
First, a few notes on the models that came across:
- If you have D-Link Dir615 HW version E*, then first you need NECESSARILY reflash the router to firmware version 5.11RUB03beta02, which can be downloaded from the D-Link ftp server
- If you have D-Link Dir615 C2- it is first necessary NECESSARILY reflash the router to firmware version 3.03 RU B09, which can be downloaded from the D-Link ftp server
Internet access speeds are constantly increasing, equipment is being improved, its performance is growing, but for previously released devices, the access speed can be very modest.
Informsvyaz tested the performance of D-Link Dir615 routers in different modes, the table shows the maximum speed values \u200b\u200b(indicative data):
1. Connect the Ethernet cable that comes with your apartment to the port Internet your router.
2.
Check the LAN connection settings (In Windows XP- Start, Control Panel,(classic look) Network connections. In Windows Vista, network settings are accessed via Start, Control Panel(classic look), Network and Sharing Center, Manage Network Connections, and in Windows 7 through Start, Control Panel, Network and Internet, Network and Sharing Center, Change adapter settings). Next, in the window that opens, right-click on the local connection icon and select the item in the context menu Properties.
Left-click once on the item Internet protocol TCP/IP and click on the button Properties.
The settings should be similar to those shown in the figure:

3. Connect the computer's network card and one of the ports of the router, for example, port number 1, with an Ethernet cable, as shown in the figure.

4. Open a browser window and in the address bar type http://192.168.0.1 and press Enter. In the authorization window that appears, in the field user name enter admin, field Password leave blank, and in the field Enter the correct Password.... enter the characters generated by the security system as shown in the figure.

5. After pressing the button log in the settings page will open. In the tab Setup this page, select a section Internet(left) and press the button Manual Internet Connection Setup:.
 .
.
6. In the page that opens, make the settings as shown in the figure. IP address, gateway address and DNS servers indicated on the registration card.

Attention!! For the correct operation of the IPTV + Internet connection, the router must be configured using the PPTP protocol.
1) In the field My Internet Connection is choose Russia L2TP (Dual access).
2) Activate the item below static IP.
3) In the field L2TP IP address enter your local IP address.
4) In the field L2TP Subnet Mask enter your subnet mask.
5) In the field L2TP Gateway IP Address enter the address of your network access gateway.
6) In the field Server IP/Name enter the L2TP server address, i.e. L2TP.freedom
7) In the field username enter your account name (login).
8) In the field Password enter your network access password.
9) In the field Verify Password re-enter the password for accessing the network.
10) Activate the item Always opposite the parameter Reconnect mode.
11) In the field Primary DNS address 195.98.64.65
12) In the field Secondary DNS Address enter the DNS server address, that is 195.98.64.66
13) Parameter value MTU leave equal 1400
.
Save Settings located at the top.
7.
To access local network resources Freedom you need to set up static routing.
To do this, go to the tab ADVANCED and activate section Routing(left).
Make settings according to the following figure:

1) You need to check the boxes next to the first lines.
2) In the first rows of the column Interface must be set to WAN(Physical Port).
3) Filling columns Destination IP And netmask see picture.
4) In the first rows of fields Gateway you must enter the address of your network access gateway.
After filling in all the fields, press the button Save Settings located at the top.
8. By default, the speed mode is set on the WAN port. auto, but if there is a decrease in the speed of working on the Internet or in a local network compared to the speed of working without a router, for optimal speed matching, you can try in the tab ADVANCED select section Advanced Network(left), set parameter value WAN PORT SPEED equal 10Mbps and press the button Save Settings
In section Advanced Network the ability to watch TV shows (IPTV) when using a router is also configured by checking the box Enable multicast streams(If the menu is Russian, then Advanced settings, Advanced network settings, Enable multicast streams.)

9. If you have several computers and you want all of them to have access to the network, then to do this, configure their network cards in the same way as the settings given in paragraph 2 of this manual and connect the network cards of computers with free ports of the router using Ethernet cables.
10. To set up a connection using a wireless network, go to the tab Setup and select section Wireless Setup(left).

11. In the page that opens, make the settings as shown in the figure.

1) In the field Wireless Network Name enter a name, for example dlink.
2) In the field security mode you take WPA Personal.
3) In the field WPA Mode select Auto (WPA or WPA2).
4) In the field Cipher Type select TKP and AES.
5) In the field Network Key enter the key (password) to access your wireless network.
After you have entered all the settings, click the button Save Settings located at the top.
12. Set up your Wi-Fi card on your computer to access the network.
To do this, left-click once on the network card icon in the lower right corner of the screen (next to the clock).
In the window that appears, click the button To plug and type Wireless Network Access Key that you asked earlier.

Notes.
1.
Routers with older firmware may become unstable or unable to access local resources. This problem is solved by updating the firmware of the router to the latest.
After the firmware, it is necessary to reset the existing setting and configure the router again.
ATTENTION!!! After updating the firmware, the warranty on the router is not lost. But still, be careful when flashing, otherwise you can disable the device!
2.
When setting up, it is better to use the latest firmware versions.
3.
When working through a router and there are no funds on the personal account, the statistics server may not open to activate the Internet card. Helps selection in the field Reconnect Mode: values Connect-on demand followed by saving the settings by pressing Save Settings.
4.
You can find the latest firmware version for D-Link routers on the manufacturer's website http://ftp.dlink.ru/pub/Router/. It must be saved on the computer. To reflash the router, you need to go to the menu TOOLS, Firmware, FIRMWARE UPGRADE, using the button Browse specify the path to the firmware file and click Upload.
Before proceeding with setting up the router, let's check the LAN connection settings. For this:
Windows 7
1. Click on " Start", "Control Panel".
2. Click on " View network status and tasks".

3. Click on " Change adapter settings".
4. LAN connectionProperty".
5. From the list select " Internet Protocol Version 4 (TCP/IPv4)"and press" Property".

6. " and "", then press the button " Ok".

Windows 10
1. Click on " Start", "Parameters".

2. Click on " Network and Internet".

3. Choose " ethernet" and click on " Configuring Adapter Options".

4. In the window that opens we see " ethernet". Click on it with the right mouse button, select " Property".

5. From the list select " IP version 4 (TCP/IPv4)"and press" Property".

6. In the window that opens, you need to check the boxes " Obtain an IP address automatically" And " Obtain DNS Server Address Automatically", then press the button" Ok".

Connecting a router D-Link DIR-615 to the computer
The next step is to connect the router D-Link DIR-615 to your laptop or personal computer. To do this, you need to connect the cable that your provider ran to the port of the router, where it is signed INTERNET, in older models this port is signed as WAN. The cable that came with the router, connect one end to a laptop or computer, connect the other end to one of the four ports that are marked in black on the router (the colors of the ports may vary depending on the version of the router). And yes, do not forget to connect the power cable.

Authorization of the D-Link DIR-615 router
So, we connected the router, now you need to get into its web interface through any browser (be it Google Chrome, Mozilla Firefox, Internet Explorer, etc.). To do this, open the browser and in the address bar we drive in the address of the router: 192.168.0.1
- Username - admin
- Password - admin
So, we drive in the data and click " Enter"

Setting up a router D-Link DIR-615.
And finally, we got to the web interface of the router and now you need to configure the equipment. First of all, we will secure the wireless network by setting a password for wi-fi. Then you will need to find out what type of connection is used to access the Internet, is it PPTP, L2TP or PPPOE. You can find out by calling your provider (this is the organization with which you have entered into an agreement to provide Internet services). So, let's start setting up the router. First, let's change the language of the Web interface to Russian. To do this, move the mouse cursor over the word " English"and choose" Russian"

Setting a password for wi-fi on a router D-Link DIR-615.
1.
Select in the web interface menu " WiFi"and get into" basic settings"
2.
Let's check" Enable wireless connection" And " Broadcast wireless network" must be checked.
3.
Below in the line " SSID:" come up with and specify the name of your wireless network, this name will continue to glow when you connect to the network.
4.
"The country" - "Russian Federation", "Channel" - "auto", "Wireless mode" - "802.11 B/G/N mixed".
5.
Press " Apply".

6.
On the menu " WiFi"choose" Security Settings".
7.
In line " Network Authentication:"choose" WPA2-PSK".
8.
In line " PSK Encryption Key:" you need to come up with and enter a password for the wireless network that we created above.
9.
Press " Apply".


Setting up PPTP on the router D-Link DIR-615.
1.
Net", get into the settings" WAN".
2.
Press " Add".

3.
In step " Connection type:"choose" PPTP+Dynamic IP".
4.
Check the box next to " Connect automatically".
5.
Username:"), password (on the line " Password:Password confirmation:VPN server address:").
6.
Apply".

Setting up PPTP with a static IP address on the router D-Link DIR-615.
PPTP with static IP on the router D-Link DIR-615
1.
In the web interface menu, select " Net", get into the settings" WAN".
2.
Press " Add".
3.
In step " Connection type:"choose" PPTP+Static IP".
4.
Below in the section IPIP address:", subnet mask in line " Netmask:", default gateway in line " Gateway IP address:" and DNS in line " Primary DNS Server:".
5.
Check the box next to " Connect automatically".
6.
Below we drive in the Username (in the line " Username:"), password (on the line " Password:"), confirm the password (in the line " Password confirmation:") and specify the server address (in the line " VPN server address:").
All of the above data is provided to you by the provider (the organization that provided you with the Internet).
All this data is usually prescribed in the contract with the provider. If for some reason you can't find them, you need to call your provider's hotline and find out how to get them.
7.
After all the manipulations with the settings, press the button " Apply".

Setting up L2TP on the router D-Link DIR-615.
1.
In the web interface menu, select " Net", get into the settings" WAN".
2.
Press " Add".
3.
In step " Connection type:"choose" L2TP+Dynamic IP".
4.
Check the box next to " Connect automatically".
5.
Below we drive in the Username (in the line " Username:"), password (on the line " Password:"), confirm the password (in the line " Password confirmation:") and specify the server address (in the line " VPN server address:").
All of the above data is provided to you by the provider (the organization that provided you with the Internet).
All this data is usually prescribed in the contract with the provider. If for some reason you can't find them, you need to call your provider's hotline and find out how to get them.
6.
After all the manipulations with the settings, press the button " Apply".

Setting up L2TP with a static IP address on the router D-Link DIR-615.
Consider connection setup L2TP with static IP on the router D-Link DIR-615. Typically, a static IP address is provided to legal entities, or as an additional service to the basic tariff for individuals.
1.
In the web interface menu, select " Net", get into the settings" WAN".
2.
Press " Add".
3.
In step " Connection type:"choose" L2TP+Static IP".
4.
Below in the section IP"specify the ip-address in the line" IP address:", subnet mask in line " Netmask:", default gateway in line " Gateway IP address:" and DNS in line " Primary DNS Server:".
5.
Check the box next to " Connect automatically".
6.
Below we drive in the Username (in the line " Username:"), password (on the line " Password:"), confirm the password (in the line " Password confirmation:") and specify the server address (in the line " VPN server address:").
All of the above data is provided to you by the provider (the organization that provided you with the Internet).
All this data is usually prescribed in the contract with the provider. If for some reason you can't find them, you need to call your provider's hotline and find out how to get them.
7.
After all the manipulations with the settings, press the button " Apply".

Setting up PPPOE on the router D-Link DIR-615.
1.
In the web interface menu, select " Net", get into the settings" WAN".
2.
Press " Add".
3.
In step " Connection type:"choose" PPPOE+Dynamic IP".
4.
Below we drive in the Username (in the line " Username:"), password (on the line " Password:Password confirmation:").
All of the above data is provided to you by the provider (the organization that provided you with the Internet).
All this data is usually prescribed in the contract with the provider. If for some reason you can't find them, you need to call your provider's hotline and find out how to get them.
5.
After all the manipulations with the settings, press the button " Apply".

Setting up PPPOE with a static IP address on the router D-Link DIR-615.
Consider connection setup PPPOE with static IP address on the router D-Link DIR-615. Typically, a static IP address is provided to legal entities, or as an additional service to the basic tariff for individuals.
1.
In the web interface menu, select " Net", get into the settings" WAN".
2.
Press " Add".
3.
In step " Connection type:"choose" PPPOE+Static IP".
4.
Below in the section IP"specify the ip-address in the line" IP address:", subnet mask in line " Netmask:", default gateway in line " Gateway IP address:" and DNS in line " Primary DNS Server:".
5.
Below we drive in the Username (in the line " Username:"), password (on the line " Password:") and confirm the password (in the line " Password confirmation:").
All of the above data is provided to you by the provider (the organization that provided you with the Internet).
All this data is usually prescribed in the contract with the provider. If for some reason you can't find them, you need to call your provider's hotline and find out how to get them.
6.
After all the manipulations with the settings, press the button " Apply".

Connecting a computer to wi-fi
After connecting and configuring the router, you need to connect the computer to a wireless network (wi-fi), consider connecting to wi-fi in two operating systems, these are Windows 7 and Windows 10:
Windows 7
Video instruction
1.

2. Sultan

3.
Connect automatically" and press
"Connection".

4. You must specify " Security keyOK".

5.

Windows 10
Video instruction
1. In the lower right corner of the desktop we find the icon for the wireless network (wi-fi), click on it with the left mouse button.

2. A window pops up with a list of available wireless networks. We select a wireless network, in my case it is a network " Sultanova"(You choose the network whose name was given when).

3. After selecting a network, check the box next to " Connect automatically" and press " connect".

4. You must specify " Security key"this is the wireless network password that you specified when. After you have specified the key, press " Further".

5. We wait, perhaps a couple of seconds, and you are connected to your wireless network.

The D-link DIR 615 router is configured through a simple and convenient built-in web interface. The DIR-615 can be put into router, access point, repeater or client mode.
Characteristics
- 1xWAN 100Mbit/s
- 4xLAN 100Mbit/s
- WiFi 11bgn 300Mbit/s
- D-link DIR-615 supports configuration and control via a mobile application for Android and iOS devices.
Training
To configure the router, you will need a username and password issued by the provider.
- Take the cable that comes with the router (patch cord). One end will connect to any LAN port, the other end to the computer.
- Launch your browser and type 192.168.0.1 () in the address bar
- To log in to the site, enter the login admin, password admin.
The router settings page will open. The DIR 615 router has different interfaces. Please select the one you have below:
D-link Gray
If you do not know what protocol the connection is under, then try setting up PPPoE first. In extreme cases, this can be clarified with the provider.
PPPoE D-link setup
- WAN section
- Delete
- Click the add button
- Choose the protocol PPPoE + Dynamic IP, Or just PPPoE
- Apply
- Click on Save at the top


Setting up PPtP D-link
If your interface is in English, then you can change the language at the top right:

- At the bottom right, select Advanced Settings
- WAN section
- Select all connections if any
- Delete
- Click the add button
- Choose the protocol PPtP + Dynamic IP, Or just PPtP
- We collect the login and password issued by the provider
- Apply
- Click on Save at the top


Wi-Fi setup D-link
If your interface is in English, then you can change the language at the top right:

- Click advanced settings
- In the Wi-FI section, select Basic settings
- We return to the main menu by clicking on the arrow on the left and in the Wi-Fi section, select Security settings
- Set network authentication - WPA2-PSK, come up with a password of at least 8 characters.
- Encryption choose AES
- Apply


D-Link firmware update
- Go to advanced settings
- In the System section, click the right arrow
- Click on Software Update
- Click update.


D Link Air
PPPoE Setup D-Link

- On the left, select Network -> WAN
- Select all connections
- Delete
- Adding a new connection
- Choose PPPoE+Dynamic IP or just PPPoE
- Apply
- Top System -> Save


Setting up PPtP D-Link
If the interface is in English, then it can be changed in the menu at the top:

- On the left, select Network -> WAN
- Select all connections
- Delete
- Adding a new connection
- Choose PPtP+Dynamic IP or just PPtP
- We collect the credentials issued by the provider.
- Apply
- Top System -> Save


Setting up Wi-Fi D-Link
If your interface is in English, then you can change the language at the top right:

- On the left in the Wi-FI section, select Basic settings
- In the SSID field, come up with the name of the Wi-Fi network (in Latin)
- Leave the rest unchanged and click Apply.
- On the left in the Wi-Fi section, select Security settings
- Set network authentication - WPA2-PSK, come up with a password of at least 8 characters. Encryption choose AES
- Apply
- At the top, click System - Save


D-Link firmware update
ATTENTION! Updating the firmware may render the router inoperable. The probability is very small, but it exists. Download firmware only from official sites.
The firmware process is very simple. First download the firmware from the official website. When downloading, pay attention to the revision (indicated on the sticker under the router). It must match the downloaded firmware.
- To the System section
- Click on Software Update
- Specify the path to the downloaded firmware
- Click update.

D-link Orange
PPPoE Setup D-Link
- My internet connection is select PPPoE Russia Dual Access or just PPPoE
- Enter the username and password provided by the provider


Setting up PPtP D-Link
- Choose Manual Internet connection setup
- My internet connection is select PPtP Russia Dual Access or just PPtP
- Enter the login, password and address of the PPtP server issued by the provider
- Reconnect mode choose Always
- Save the settings Save setting and wait until the router reboots


Setting up Wi-Fi D-Link
- On the left, select Wireless settings
- Choose Manual wireless connection setup
- Wireless Network Name is the name of your home WiFi network
- Security Mode select WPA Personal
- WPA Mode - select WPA Only
- Pre-Shared Key - come up with a network password of at least 8 characters.
- Save settings - Save settings


Firmware update
- Select Tools from the menu at the top
- On the left side of the Firmware menu
- Specify the path to the firmware
- Upgrade - run the firmware of the router.