This material was prepared for specialists involved in the management of antivirus protection and security at the enterprise.
This page describes and analyzes the most interesting functionality of the latest versions of Kaspersky Endpoint Security 10 and the Central Management Console of Kaspersky Security Center 10.
The information was selected based on the experience of communication by NovaInTech specialists, with system administrators, heads of IT departments and security departments of organizations that are just switching to Kaspersky anti-virus protection, or are going through the process of switching from using the 6th version of the anti-virus on client computers and the Administration management console Kit 8. In the latter case, when anti-virus protection from Kaspersky Lab is already in use, it is also common that IT specialists do not know the most interesting points in the work of new versions of products that really help to make life easier for the same IT specialists, and at the same time increase level of safety and reliability.
After reading this article and watching the videos, you can briefly familiarize yourself with the most interesting functionality provided by the latest version of the Kaseprky Security Center and Kaspersky Endpoint Security management console and see how it works.
1. Installing the Administration Server of Kaspersky Security Center 10.
You can find the required distributions on the official Kaspersky Lab website:
ATTENTION! To distribution full version Kaspersky Security Center already includes the latest version of the distribution package for Kaspersky Endpoint Security.
First of all, I would like to tell you about where to start installing anti-virus protection from Kaspersky Lab: Not from the anti-viruses themselves on client computers, as it might seem at first glance, but from the installation of the administration server and the central management console of Kaspesky Security Center (KSC ). With this console, you can deploy anti-virus protection on all computers of your institution much faster. In this video you will see that after the installation and minimal configuration of the KSC administration server, it becomes possible to create an antivirus solution installer for client computers that even a completely unprepared user can install (I think every administrator has such "users") - the installation interface contains everything 2 buttons - "Install" and "Close".
The administration server itself can be installed on any computer that is always turned on or as accessible as possible, this computer must be visible to other computers on the network, and it is very important for it to have access to the Internet (for downloading databases and synchronizing with the KSN cloud).
Watch the video even if you have installed the center console before, but previous versions - perhaps you will hear and see something new for yourself ...
LIKE THE VIDEO?
We also do delivery of Kaspersky products... And even more - we provide technical support. We care about our customers.
2. Setting up centralized management on computers with Kaspersky already installed.
It is often found that in small organizations, system administrators install and configure anti-virus protection on each computer manually. Thus, the time they spend on maintaining anti-virus protection increases and they do not have enough time for some more important tasks. There are cases when administrators, simply due to lack of time, simply do not know that corporate versions of anti-virus protection from Kaspersky Lab generally have centralized management, and do not know that they do not need to pay anything for this miracle of civilization.
In order to "connect" already installed client antiviruses with the administration server, you need very little:
- Install the Administration Server (Section 1 of this article).
- Install the Administration Server Agent (NetAgent) on all computers - I will describe the installation options in the attached video below.
- After the installation of the Administration Server agent, computers, depending on your settings, will be either in the "Not distributed computers" section or in the "Managed computers" section. If computers will be in "Not distributed computers" - they will need to be transferred to "Managed computers" and set up a policy that will apply to them.
After these steps, your computers will be visible to you from the central console, users will no longer be able to manage the antiviruses installed on their machines, and as a result, there will be less infections and less headache for the administrator.
In the video below, I will try to describe the scenarios for installing NetAgents on client computers, depending on how your network is arranged.
Kaspersky Security Center is a unique tool that allows you to control the security of corporate networks and centrally manages various security tools
Application
Many large organizations create corporate networks between devices to facilitate data transfer and management. Such decisions are very competent, however, one should not forget about certain threats and it is worth thinking about security. Kaspersky Security Center from Kaspersky Lab does an excellent job with this task.Benefits of the program
This tool generates a common control center for the system of devices used by all members of the organization. The software is universal, compatible with both computers and mobile devices. The entire system is under the control of the device administrator, who protects it from viruses and various threats. The implementation of protection occurs at different stages, since it is complex.The Control Center is responsible for controlling the activities of programs, opening them and blocking harmful software. It affects all applications and programs installed on computers that are connected to the corporate network. The administrator controls user actions, either by adjusting their own security settings or using standard templates.
Kaspersky Security Center constantly checks the system for weaknesses, updates security components, and monitors the availability of updates for running software. When checking the system, the program presents reports on its actions. Reports are generated automatically when regular checking is activated, but the tool is able to generate them at the request of the user and translate them into PDF, HTML and XML files.
The program's intuitive interface makes the user's work easier.
Key Features:
- Protection of both stationary and mobile devices.
- Support for devices with different operating systems.
- Control is carried out either by several users or by one administrator.
- Blocking unwanted software.
- Convenient security policy settings, the ability to apply both standard profiles and create your own.
New Web Console
The main advantages of Web Console in comparison with MMC:
No client side installation required, only a web browser needed
Since you only need a browser, it doesn't matter which one operating system
If you work on a mobile device, you can view reports directly from the beach
The Web Console supports the User-Centric model, that is, the administrator assigns the policy not to the device, but to the user. The User-Centric management model works when AD devices are assigned owners. The KSC will be able to retrieve this information and assign policy profiles not to devices, but to device owners. The old mode of Device-Centric management, where policy profiles were assigned to devices, remains available and applied by default.
Web Console is a separate distribution. It can be installed both on a computer with KSC and on a separate computer.
Interaction scheme:
Web Console is a Node.js web server.
The server side of the Web Console connects to the KSC using the new KSC Open API protocol based on HTTPs. The client side is a SPA (Single Page Application).
In its simplest form, SPA is a web application whose components are loaded once per page, and content is loaded as needed. Those. when we click on any interface element in the Web Console, JavaScript is launched, which loads the modules and renders what we requested. And everything will look as if we went to another page.
Changes in the interface of the MMC administration console
Several new nodes have appeared in the console tree:
Multitenant applications - LC applications that have Multitenancy support functionality, for example, KSV, can get here.
Deleted objects - deleted entities, such as tasks, policies, installation packages, go here
Triggering of rules in Smart Training mode - this contains information about triggering rules in training mode for the new AAC component
Active threats (formerly Unprocessed files)
So, what can get into the Deleted objects node. All entities with a Revisions section in their properties go to the Deleted objects node after deletion.
Namely: - Policies - Tasks - Installation packages - Virtual Administration Servers - Users - Security groups - Administration groups
We can say that this is an analogue of the Recycle Bin in Windows.
Common and end-to-end forKSC subnet list
In KSC, subnets can be used in multiple locations. For example, in the properties of KSC, when we want to limit the transmission of traffic by time. In the Agent policy, when configuring connection profiles.
In KSC 10, it was necessary to set the subnet parameters separately in each of these places, which was not very convenient.
In KSC 11, a new section has appeared in the Administration Server properties, where you can specify a list of subnets within an organization once, and this list will be available anywhere in the KSC, where you must select a subnet as a parameter.
Installation package: protection level indicator
The KES 11.1 installation package in KSC 11 no longer has installation options.
But we added a protection indicator to the properties of the installation package, before such an indicator was only in the policy. If the administrator decides to disable the installation of an important component of KES 11.1, the indicator will change color. You can also see what influenced the change in the level of protection.
KSC 11: supportdiff - update files
The update servers store several sets of databases, full and so-called diff files (the difference (delta) between the current and the previous update). Diffs can be daily or weekly. KSC 10 was able to download only a complete set of bases, now it can download both sets, full and diffs.
The paradox is that KES has long been able to work with diffs, but only when updating from the Internet, now KES can also use diffs when updating from KSC. This will significantly reduce internal traffic many times over.
Network Agents: Supportdiff - update files
The option download updates in advance (offline update mode) is enabled in the default Agent policy
Diff file relay does not work when offline update mode is enabled
Diff files will not be transferred to older versions of Agents
BUT! In the properties of the Network Agent there is an option "Download updates from KSC in advance". So if this option is enabled, and it is enabled by default, then KES will be updated the old fashioned way without using diffs.
KSC 11: Update Agents
Update Agents can now distribute update DIFF files too.
In addition, they can now act as KSN Proxy and can forward KSN requests from protected devices to the Administration Server or directly to global KSN servers.
UpdateAgent: support 10,000 nodes
By default, KSC assigns Update Agents automatically.
In KSC 10, if the administrator wanted to manually assign the Update Agent, then in large networks this caused inconvenience. Why? Because earlier one Update Agent could support up to 500 hosts. And if there are several thousand hosts on the network, then you had to assign many Update Agents to cover the entire network. In addition, not every computer can become an Update Agent; it must meet certain system requirements.
In general, manually assigning Update Agents on large networks used to be a daunting task.
Now this problem has disappeared, tk. now one Update Agent supports up to 10,000 hosts.
Since the number of supported hosts has increased, the system requirements for the computer, which can be assigned an Update Agent, have correspondingly increased (processor frequency 3.6 GHz or higher, OP from 8GB, Free disk space from 120GB)
Folder KLSHARE has moved: C: \\ ProgramData \\ KasperskyLab \\ adminkit \\ 1093 \\ .working \\ share \\
KSC 11: Backward compatibility of plugins KES
KSC11 introduces backward compatibility for KES plugins.
Previously, if the network used different versions of KES, then the administrator had to maintain separate sets of policies and tasks for each version. Now the policies and objectives of KES 11.1 will apply to KES 11.
KSC 11 - remote installation
The Remote Installation Wizard has a new section - Behavior for devices managed through other Administration Servers.
If there are several KSC servers on the network, they can see the same devices. The option avoids installation on a device that is connected to another KSC.
KSC 11: improvements inRBAC
First, RBAC no longer requires a license for the Administration Server.
Secondly, new roles have appeared: - Auditor - Security Officer - Supervisor. By default, they are not assigned to anyone.
Thirdly, it became possible to re-broadcast the list of roles to slave Administration Servers. Previously, you had to work with roles separately on each Server, it was not very convenient. Now you can create and configure roles in one place on the Main Administration Server and move them down the hierarchy.
KSC 11: new reports
Report on the status of application components - allows the administrator to clearly understand where which components are installed and their current status. This is important information as an installed but not running component reduces the effectiveness of end-node protection. Previously, the administrator did not have the opportunity to view the status of KES components in one place on all devices at once. To find out which components were installed and running, you had to look at each host separately, which was inconvenient and time-consuming.
If necessary, on the basis of this report, you can build detailed reports on individual components, for example, see where the Endpoint Sensor is installed.
Reportonthreatdetectiondistributedbycomponentanddetectiontechnology- information about which protection component detected the threat and with the help of which technology. This allows you to visually show the operation of detection technologies and the usefulness of protection components.
Integration withSIEM via syslog
You no longer need a license to send events from KSC to a SIEM system via syslog protocol.
But this only applies to Syslog, you still need a license to integrate with ArcSight, QRadar and Splunk!
Updates installation diagnosticsWindows
This option automatically enables tracing of the Network Agent. Trace files are stored in the folder -% WINDIR% \\ Temp
TOTALKSC 11:
A full-fledged KSC Web Console has appeared
Support for update DIFF files has been implemented
Implemented support for KES plugins backward compatibility
Update Agents can act as KSN proxies and support up to 10,000 nodes
Adding new roles to RBAC does not require a KSC license
Added new reports
Integration with SIEM systems via syslog no longer requires a license
Extended diagnostics of Windows updates installation
The article examines the product of "Kaspersky Lab" Kaspersky Endpoint Security and its use in a corporate environment, as exemplified by our clientsGood day, dear visitor. From the title of the article, you already understood that today we will be talking about protection. In one of the previous articles, I considered a product related to this field of IT, which showed itself well. Today I will tell you about an equally interesting product from Kaspersky Lab, whose partners we are, Kaspersky Endpoint Security. It will be reviewed in a Hyper-V virtual environment, on second generation machines. The server side will be implemented on a Windows Server 2012 R2 domain controller, AD mode Windows Server 2012 R2, and the client side on Windows 8.1.
It should be noted that we constantly use this product in our IT outsourcing practice.
What is Kaspersky Endpoint Security?
In Kaspersky Endpoint Security for Windows, world-class technologies for protection against malware can be combined with Application Control, Web Control and Device Control, and data encryption - all within one application. All functionality is managed from a single console, which simplifies the deployment and administration of a wide range of Kaspersky Lab solutions.
Capabilities:
- Single application
- Single console
- Unified politicians
Kaspersky Endpoint Security for Windows is a single application that includes a wide range of critical security technologies, such as:
- Anti-malware protection (including firewall and intrusion prevention system)
- Control of jobs
- Application control
- Web Control
- Device control
- Data encryption
Kaspersky Endpoint Security differs in the set of included modules containing a different number of modules depending on the edition:
- STARTING,
- STANDARD
- ADVANCED
- Kaspersky Total Security for Business
In our case, we will use ADVANCED.
The following features are available as part of Kaspersky Endpoint Security for Business STARTING:
The following features are available as part of Kaspersky Endpoint Security for Business STANDARD:
- Anti-malware, firewall and intrusion prevention
- Control of jobs
- Application control
- Web Control
- Device control
... as well as other technologies of Kaspersky Lab for IT security
The following features are available as part of Kaspersky Endpoint Security for Business ADVANCED and Kaspersky Total Security for Business:
- Anti-malware, firewall and intrusion prevention
- Control of jobs
- Application control
- Web Control
- Device control
- Encryption
... as well as other Kaspersky Lab technologies for IT security.
Architecture
Server part:
- Kaspersky Security Center Administration Server
- Administration Console of Kaspersky Security Center
- Kaspersky Security Center Network Agent
Client part:
- Kaspersky Endpoint Security
So let's get started
Installing the Administration Server
In our case, the administration server will be installed on an AD controller in Windows Server 2012 R2 mode. Let's start the installation:
.jpg)
I forgot to clarify, we will use Kaspersky Security Center 10. Installfull distribution downloaded from the Kaspersky Lab website, which includes the installation package for Kaspersky Endpoint Security 10, respectively, and Network Agent 10
In the next window of the wizard, select the path for unpacking the distribution kit and click "Install".
.jpg)
After unpacking the distribution package, we are greeted by the Kaspersky Security Center installation wizard, after clicking the "Next" button, the wizard asks "Network size", since We will have only two clients, one x86, and the other x64 bit, then we indicate "Less than 100 computers in the network."
.jpg)
We set the account under which the Administration Server will start. In our case account domain administrator.
.jpg)
Kaspersky Security Center stores all its data in the DBMS. During installation, the wizard prompts you to install Microsoft SQL Server 2008 R2 Express, or, if you have an already installed DBMS, you can select the name of the SQL server and the name of the database.
.jpg)
At the “Administration Server Address” stage, the wizard asks you to specify the server address. we have AD and DNS integrated, it would be more reasonable to specify the server name.
.jpg)
After selecting the plug-ins for management, installation of Kaspersky Security Center will start.
.jpg)
After successful installation and the first launch of Kaspersky Security Center, we are greeted by the Initial Configuration Wizard, in which we can specify the key, accept the agreement to participate in KSN, specify the email address for notifications.
.jpg)
.jpg)
The update parameters are also specified and a policy with tasks is created.
.jpg)
After installation, our server will be installed:
- Administration Server
- Administration Console
- Administration Agent
However, Kaspersky Endpoint Security will not be installed. Let's perform a remote installation, because Administration agent is already installed, then we can deploy Kaspersky Endpoint Security to the server. If there is no Network Agent and all incoming connections are denied in the Firewall Windows remote the installation will fail. Expand the "Remote Install" node and select "Run the Remote Install Wizard". Select the installation package and click the "Next" button
.jpg)
In the "Select computers for installation" window, select the installation option for computers located in administration groups. Then select the server and click the "Next" button.
.jpg)
A system restart will be required after updating important modules of Kaspersky Endpoint Security. the package is new enough, no reboot is needed. In the choice of credentials, we will leave everything by default, i.e. empty. After clicking the Next button, we will see the progress of the installation of Kaspersky Endpoint Security.
.jpg)
.jpg)
Creating groups
Because Since the policies and tasks intended for servers differ from the policies and tasks of workstations, we will create groups corresponding to the type of administration for different machines. Expand the node "Managed computers" and select "Groups", click "Create a subgroup". Let's create two subgroups, "Workstations" and "Servers". From the "Managed computers - Computers" menu, using "drag and drop" or "cut & copy", move "DC" to the "Servers" group and create a policy and tasks for this group, different from tasks and policies in the "Managed computers" node ".
Installing Kaspersky Endpoint Security
To install Kaspersky Endpoint Security remotely, you need to disable UAC during installation. The requirement is "inconvenient", so we'll create a policy in the GPO to Windows Firewall, in which we will allow an incoming connection according to the following predefined rule "Sharing files and printers".
After configuring and distributing Group Policy, let's go to the administration console. Expand the "Administration Server" node and select "Install Kaspersky Anti-Virus", click "Run the Remote Installation Wizard". In the window of the installation package selection wizard, select the required package and click "Next". Select clients in the "Unassigned computers" group and click "Next".
.jpg)
In the next window, we will leave everything as default and click "Next". After the window with the choice of the key, the wizard offers to ask the user about restarting the system after the installation of Kaspersky Endpoint Security is complete, leave it by default and click "Next". At the step "Removing incompatible programs" you can make adjustments, of course, if necessary. Further, the wizard offers to move the client computers to one of the groups, in our case, move them to the "Workstations" group.
.jpg)
.jpg)
.jpg)
As we can see, the console “speaks” about the successful installation of Kaspersky Endpoint Security on client stations.
.jpg)
As we can see, after the installation, the Administration Server transferred the client machines according to the conditions in the remote installation task.
.jpg)
Kaspersky Endpoint Security on a client machine.
.jpg)
Let's create a policy for client stations, in which we enable "Password protection", this is necessary, for example, if the user wants to turn off the anti-virus.
.jpg)
Let's try to disable protection on the client machine.
.jpg)
Rules for moving computers
On the administration server, you can set movement rules for client computers. For example, let's create a situation in which Kaspersky Endpoint Security will be installed on a newly discovered PC. This is useful in a scenario where the organization has a new PC installed.
To automate the deployment of Kaspersky Endpoint Security, we will set the rules for moving for computers. To do this, select the "Unassigned computers" node and select the "Configure rules for moving computers to administration groups" item and create a new rule.
.jpg)
.jpg)
In the created rule, the newly discovered PC will be added to the "Workstations" group from the specified range of IP addresses.
Next, let's create a task for automatic deployment of anti-virus protection for machines on which it is not installed. To do this, select the "Workstations" group and go to the "Tasks" tab. Let's create a task for installing anti-virus protection with the "Immediate" schedule.
So, we can see that the client computer has been added to the Workstations group.
.jpg)
Let's go to the Tasks tab and see that the installation task has started.
.jpg)
Let me remind you that the situation was reproduced on a machine without anti-virus protection (although before that I demonstrated remote installation on one of them, after that, the antivirus was removed to demonstrate this scenario) and, as you can see, the installation takes place on a machine without anti-virus protection, a machine with anti-virus protection was not touched. After installing anti-virus protection tools, the KES policy will be applied to this client computer.
Reports
The reports in Kaspersky Endpoint Security are more than informative. For example, let's take a look at the report "About versions of Kaspersky Lab applications".
.jpg)
The report, in some detail, displays information about installed programs Kaspersky Lab. You can see how many agents, client solutions and servers are installed. Reports can be deleted and added. You can also view the status of anti-virus protection using the "Computer selection", which helps to conveniently sort computers with infected objects or critical events.
In conclusion, I would like to say that only a small part of the Kaspersky Lab anti-virus complex has been reviewed. Management, indeed, is convenient and intuitive. But it is worth noting the huge workload of client systems during the search for viruses and potential threats, this workload is mainly due to heuristic analysis, which requires quite a few resources. The product is very easy to administer and is suitable for both an AD environment and a workgroup. This product is installed by many of our customers and shows itself only from the good side.
Everything, people, peace to you!
![]() The larger the network, the more the system administrator (or IT department) tries to automate the management of software products. Antivirus software is no exception in this regard.
The larger the network, the more the system administrator (or IT department) tries to automate the management of software products. Antivirus software is no exception in this regard.
Many antivirus vendors have remote administration tools in their arsenal, today we will talk about a similar solution from Kaspersky Lab.
In general, Kaspersky Security Center is a rather serious application that cannot be described in one article. Therefore, in this article, we will analyze only its deployment.
You can download Kaspersky Security Center. The product itself consists of a server that will need to be deployed, an administration console that can be installed on another computer for remote server administration, a web console as an alternative to the usual one, and an administration agent that is installed on client computers and is responsible for communication between the anti-virus software and the server.
The server itself needs to be deployed only on operating systems of the Windows family. Moreover, the presence of a server edition is optional. Systems from XP and higher are supported, but only in Professional / Enterprise / Ultimate editions. A complete list of supported systems can be found on the website.
In addition, the server needs MS SQL or MySQL for its work (you can also remotely). If there is no ready-made database server at hand, the installer of Kaspersky Security Center will install MS SQL Express itself, which is quite enough for most organizations.
So, to deploy the server, download and run the installation file (I recommend downloading the full distribution). We have chosen a computer with an operating room as a test bench. windows system Server 2012 R2.

You will see a convenient menu in which we are currently interested in the "Install Kaspersky Security Center 10" item.
After starting the installation, you will be prompted to accept the license agreement and select the type of installation. For better control over the installation process, let's note the custom installation.
![]()
If the network has mobile devices, a separate component can be installed to manage their protection.

Indicate the size of your network. This clause, however, does not carry any important determining force.

Next, the installation program will ask which user to run the Administration Server service from. You can specify an existing user with admin rights, or you can let the installer create a new one.


The next step is to choose a database server. As already mentioned, there are two options - MS SQL or MySQL. If you do not have a ready-made server, Kaspersky Security Center will carefully deploy MS SQL Express.


At this step in the installation process, you may be in for a small surprise if it is not installed on your system. NET Framework 3.5 SP 1.

In Windows Server, the .NET Framework 3.5 SP 1 is built-in as a component and only needs to be enabled. If you do not have a server operating system, then you need to go to the Microsoft website and download the installer.
Let's consider the option of including the component in Windows Server. To do this, open the Server Manager and select the "Add Roles and Features" item.

A wizard will start, in which we need to indicate that we are going to install roles or components.
 Add Roles and Features Wizard in Windows Server
 We select our server and skip the selection of roles. In the list of components, we find Functions .NET Framework 3.5 and mark them with a tick.
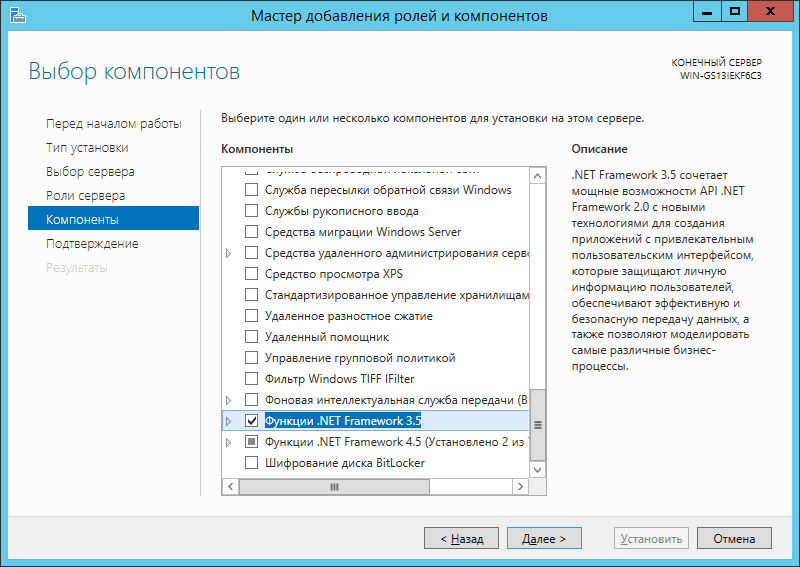
 Adding a Component to Windows Server
 After that, we will return to installing Kaspersky Security Center directly.
We need to select the SQL authentication mode. It can be either a separate account or a current one.

The Kaspersky Security Center server needs a shared folder that client computers can access to receive updates and installation packages. You can create a new folder or specify an existing one.

We indicate the ports through which we will connect to the administration server.

We indicate the server address on the network. If the server has and will have a static IP address, it can be limited. Still, it is more convenient to define the server by name.

The last step before installing is choosing the required plugins. Plugins allow you to manage various anti-virus products of Kaspersky Lab. This is useful if you have a whole zoo of versions. Plugins can also be installed later additionally.

Now it remains only to observe the installation process. Sometimes plugins are required to accept a separate license agreement.

Installation of Kaspersky Security Center is now complete.

Now let's go over the initial server setup. The administration console installed along with the server looks like this:
 Administration Console of Kaspersky Security Center
 The console can be installed separately. And you even need not to log into the server every time for routine actions.
Servers are listed in the left column. So far, there is only our newly created server. If you are administering several servers, then just click Add Administration Server.
So, click on the newly created server and the Quick Start Wizard will start. You will be asked to activate the program with a code or key. However, this can be done later.
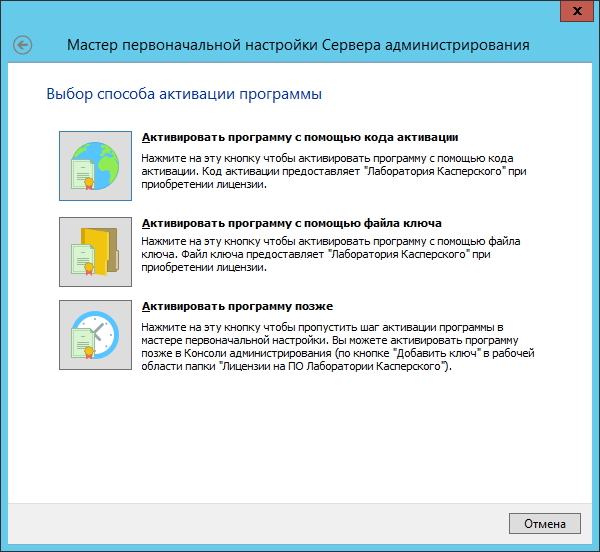
In addition, the wizard will ask your consent to participate in the Kaspersky Security Network program. In fact, it is another spy on your computers that sends data to Kaspersky Lab about which resources you visit and where you catch the infection. This is motivated by the creation of a certain knowledge base. In my opinion, for the end user, the meaning of participation in such a program is questionable.
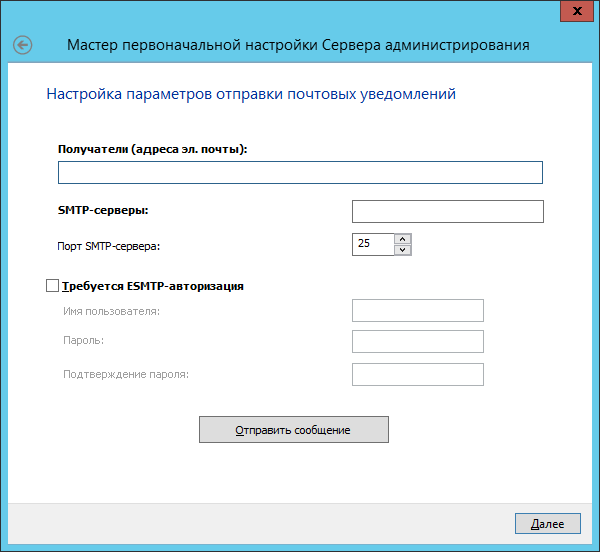
You will also be asked to specify mailboxes for notifications from the Kaspersky Security Center server. You can skip this step.
After all these steps, the server will start downloading latest versions updates from the network. In the future, it will be possible to configure as an update source not a Kaspersky Lab server on the Internet, but an upstream server, if there are several of them on your network.

After downloading updates and polling the network, the wizard will display a message about successful completion and will offer to launch the Wizard for Deploying Protection on Workstations.

We will talk about deploying protection on workstations in.