Windows Defender is a standard antivirus developed by Microsoft system. The company began to integrate it into the OS itself, starting with the release of one of the first mass update packages for the latest versions. Users of version 7 were not left out and they can also download the program on the company’s official website.
You can also recognize this antivirus by the names Windows Defender and Microsoft Security Essentials. Most users use it successfully and do not express any complaints, especially since it works successfully on computers with the old and unstable Vista OS. However, if you consider how many pirated copies operating system Windows is widespread among the people, then problems arise.
An unlicensed OS does not have Latest updates. They are the ones who can be responsible for performance. Since Defender is part of the system, it is also updated along with other firmware. Therefore, users using pirated Windows do not have the latest protection against new viruses and their computer will not be fully protected. As a result, the choice is made in favor of third-party anti spyware.

So, why do users decide to refuse to use the standard antivirus from Microsoft:
- weak protection;
- lack of timely updates for users of pirated copies of the OS;
- the program arbitrarily deletes files it considers malicious;
- other reasons (for example, you don’t like the application interface).
Comparison of popularity with other free antivirus programs. Results of an independent survey.
| Name | Popularity percentage |
|---|---|
| Kaspersky Antivirus Free | 20,97% |
| Avast Free Antivirus | 17,83% |
| 360 Total Security | 15,99% |
| NANO | 7,5% |
| Avira Free Antivirus | 7,18% |
| AVG Antivirus Free | 6,61% |
| Microsoft Security Essentials | 6,4% |
| Comodo Internet Security | 6,21% |
| Bitdefender Antivirus Free Edition | 5,26% |
| Panda Free Antivirus | 4,04% |
Is it possible to remove Windows Defender and how to do it?
Users who are dissatisfied with Defender usually, as already mentioned, download other more powerful antiviruses. After this, Defender turns off and you can ignore its presence. This is necessary to ensure that programs do not conflict, thereby negatively affecting each other’s performance.

It is impossible to completely remove Windows Defender, no matter how much you would like to. The only exceptions are those cases when it was downloaded independently and is not part of the system. For example, at Windows users 7. However, the program can be disabled.
To do this you will need to perform a number of simple steps:
- Go to settings. For Windows 10, this item is called “Settings”. You can also open Defender by finding it in the taskbar. The presented method is more relevant for more recent OS versions.


- Then go to the Security menu and then to the “Windows Defender” subsection. It represents a shield icon. If you are using version 8 or 8.1, then it is better to go directly to the program itself, and then to its settings.


- Click on “Virus and Threat Protection”. This subsection performs the basic Windows settings Defender.

- Next, you need to go to the “Virus and other threat protection settings” section. Turn the indicated switches to the "Off" position.


- Additionally, you can disable SmartScreen filter from Microsoft, which, even after turning off the main program, can continue to monitor the performance of your computer. To do this, go to the “Application and Browser Management” section in the Defender main menu and move the indicated switches to the “Off” position.


Disabling system antivirus (for Windows 10 users)
Important! This method can be used by users on whose computers the Windows 10 Professional or Enterprise package is installed. For those who use the Home version, the registry editor is suitable, but more on that later.
To disable Defender using the chosen method, you will need to perform the following procedure:
- Press the key combination “Win (Start) + R”.

- In the window that opens, enter the command “gpedit.msc”.

- An editing section will open in front of you. group policy. Find the “Computer Configuration” tab in it, and then follow in this order: “Administrative Templates” - “Windows Components” - “Antivirus Program”.


- Double-click the left mouse button on the words “Turn off the antivirus program” and click on the “Enable” button. Don't let this fool you, you are doing everything right.


- The same must be done with allowing the anti-malware service to start and confirming that it is always running. The difference is that there you need to select “Disabled”.

- Next, deactivate real-time protection in the corresponding tab.


- Then disable scanning of all files and attachments you download.

- In the MAPS Remote Service section, disable everything except sending sample files. For the specified option, simply select “Never send.”

Ready! When using this method, the standard one will no longer monitor your computer and the files you download, sending them at the slightest suspicion of investigation to a Microsoft service.

Disabling via Registry Editor
Everything that was indicated in the previous method of disabling can be done through the editor system registry. To do this, you need to do the following procedure:
- Press the key combination “Win (Start) + R”. In the pop-up window, enter the combination “regedit” and left-click on “OK” to launch the editing program.

- Go to the “HKEY LOCAL MACHINE” tab, then “SOFTWARE”, after “Policies” and “Microsoft”. Finally, select Defender.

- On the right side, you must set the DWORD value to 32 bits, even if you are using the 64-bit version.

- The parameter name must be selected “Disable Anti Spyware”. This is what turns off the standard antivirus.

- Once the parameter has been created, click on it and set the value to 1.

- In the same section, you need to make a couple more parameters, calling them “Service Keep Alive” and “Allow Fast Service Startup”. Leave the default value 0.

- Under Windows Defender, select Real-Time Protection. If it doesn't exist, then create it. After switching to it, also do “Disable Realtime Monitoring” and “Disable OAV Protection”.

- Set each parameter to 1.
- Return to the “Windows Defender” section, make a new subsection “Spynet”, and in it the DWORD32 parameters and the names “Local Setting Override Spynet Reporting”, “Disable Block At First Seen”, “Submit Samples Consent”. The values are set as follows: for the first – 0, for the second – 1, for the last – 2. This is necessary to disable the check unknown programs in the cloud.

On a note! Parameter names are entered without spaces in the specified format.
After completing the steps in the instructions, close the Registry Editor. Now, if you wish, you can install software other developers (for example, Avast, Dr Web, Kaspersky Anti-Virus, etc.) to protect your computer from spyware, viruses and Trojans. Additionally, it is recommended to remove Defender from Windows startup when turning on the device.
Video - How to remove Windows Defender 10
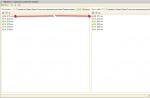
The capabilities of the built-in Windows Defender antivirus, as well as the capabilities of Internet Exlporer, have long been legendary. And if the latter at least allows you to go online and download the installer for a normal browser (and new versions of IE allow you to do this faster, which is good), then Defender, alas, is only capable of loading the processor and disk once a day, and displaying notifications about the scan performed. However, such a check is of little use - reviews from independent sites show that Windows Defender provides only the most basic protection:

As you can see, he is on the penultimate line from the bottom - only worse Comodo antivirus. That's why special meaning There is no need to keep Defender turned on - firstly, it turns itself off when installing a third-party antivirus, and secondly, even if it’s turned on, it won’t be able to provide protection, but it will consume computer resources.
In Windows 8.1 and lower, Defender could be disabled without problems from the Control Panel - yes, Windows displayed a notification once that the system was left without protection, and that’s all. But in Windows 10, Microsoft decided to do one unpleasant thing:

That is, Windows 10 itself turns on Defender after some time, and, of course, immediately after launch it begins scanning the system, which greatly slows down devices with weak processors and hard drives. However, the ability to disable Defender still remains, and there are even two ways.
Disabling Windows Defender via Registry Editor (suitable for everyone) Windows versions 10)
First, go to the registry editor - to do this, press Win + R, in the window that opens, enter regedit and press Enter:

After that, go to the path HKEY_LOCAL_MACHINE - SOFTWARE - Policies - Microsoft - Windows Defender:

Right-click on the empty space on the right, select New - DWORD Value, and name this parameter DisableAntiSpyware:

Right-click on it - Edit, set the value to 1 and click OK:

That's it, after restarting the computer, Defender will be completely disabled. To enable it again, you need to change the value of the created parameter to 0, save the changes and reboot, then click on Start - Settings (gear icon) - Update and Security - Windows Defender - Enable, and in the window that opens, click “Run”.
Disabling Windows Defender via Group Policy (only suitable for Windows 10 Pro)
For Pro version users, it is possible to disable Defender more easily. To do this, press Win+R, enter gpedit.msc and press Enter:

In the window that opens, go to Computer Configuration - Administrative Templates - Windows components- EndpointProtection:

Go to the “Disable EndpointProtection” parameter, change the value to “Enabled”, save the changes and restart the PC:

That's it, the built-in antivirus is turned off. To enable it, you need to return the parameter value to “Not configured”, save the changes and reboot. After the reboot, you need to click on Start - Settings (gear icon) - Update and Security - Windows Defender - Enable, and in the window that opens, click “Run”.
Windows Defender is standard application, which protects the computer system from Trojans and viruses that can be picked up on the Internet or when transferring files from a flash drive or other media. Usually it functions until another antivirus is downloaded, which will disable the standard protection without your intervention.
However, this does not always happen, and you may need to deactivate programs manually. This is necessary in situations where a standard antivirus program prevents you from installing a game or downloading a file. From this article you can understand how to disable Windows Defender in Windows 10 and Windows 8.1. It will also be described at the end how it can be turned back on if necessary.
Method to deactivate Windows Defender 8.1 and Windows 10
There is nothing difficult in disabling a security program; even those people who have basic computer skills can cope with this task. It is enough to follow the instructions and not deviate from them.
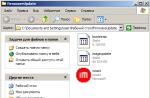
First you need to go to the Control Panel. There are two ways to do this:
- Click on “Start” with the left mouse button and select the desired item.
- Move the cursor to the lower right corner of the screen, in the section that appears, select “Settings”, in which there will be a “Control Panel” item.
A window will appear in which all sorts of sections designed to personalize your computer will be presented. It is advisable to change the view type from “Categories” to “Large Icons” to make it easier to find the required function. Among all the items there will be “Windows Defender” - that’s what we need. You will need to click on it and pay attention to the pop-up window.
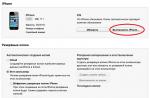
If a message appears saying that the application is not functioning and is not being monitored, then the defender has already been disabled either by you, by another user with access to your electronic device, or by an antivirus. In this case, you won't need to do anything.
How to turn off the defender in the modification of the eighth version “8.1” - a question that may be of interest to people who have this application activated and interferes with operation. The answer is much easier than in the case of the tenth version of the operating system.
First, you need to go to the Control Panel and click on the standard defender icon, select the “Settings” section and the “Administrator” subsection. If everything is done correctly, an item called “Enable application” should appear.

You need to uncheck it and click on the “Save Changes” button, but first make sure that such protection is really no longer needed. If it is not already installed on your computer good antivirus, then it is not recommended to deactivate the built-in one, as this may cause serious problems with the system.
Disabling Defender in Windows 10
Method for deactivating built-in protection in 10 Windows versions much more difficult than in the eighth. However, it is quite doable, the main thing is to strictly follow the guide on how to disable Windows 10 Defender temporarily or permanently.
Having opened “Settings”, which is located at the top right, you will need to move the “Real-time protection” item from on to off. However, this option is only suitable for those people who only need to temporarily deactivate the standard defender. It will not work for about 15 minutes, and then will automatically turn on.
There are others, more complex ways, which will help carry out the shutdown forever. They should be used if this kind of protection is not required or is in the way.
Instructions for the first method:
Launch the Local Group Policy Editor using the Win+R combination and enter gpedit.msc into it. After that, click on the “Ok” button.

Go to Device Configuration - Administrative Templates - Windows Components - Endpoint Protection. The final version of the top ten may not have such a section. Therefore, its owners will need to go to Windows Defender, which also has functions to deactivate the built-in protection.

Find the Endpoint Protection item in the main editor window, open it and set it to Enabled. After that, click “Ok” and leave the editor.
If everything was done correctly, then the Widnovs defender will be disabled, about which you will immediately receive a notification in which you will be asked to launch the program.

Do not be afraid of the inscription that your computer is at risk, since it means practically nothing.
For the second method you will need to use the registry editor:
Having opened it, you need to select the section HKEY_LOCAL_MACHINE\ SOFTWARE\ Policies\ Microsoft\ Windows Defender. You need to make a DWORD parameter in it, which should be called DisableAntiSpyware, if it is not in the section. The main thing is to set it to 1 if the defender needs to be deactivated. If you want it to be on, then the number needs to be changed to 0.

After this, the program should not interfere with work, and you can safely install games or a new antivirus program.
How to activate Windows Defender
It may happen that you or a certain program has deactivated Defender, which can be understood from the corresponding pop-up window. If now for some reason you need to make it working, you can easily do this by clicking on the required notification in the Security Center. The question of how to enable Windows 10 Defender if it is disabled will no longer be relevant, since the system will do everything on its own. However, if you used the registry editor, you will need to do the reverse operation yourself.
How to enable Windows Defender 8.1 if it is disabled is also an easily resolved issue. You just need to go to the Support Center and view the messages that are there.

If they say that standard program anti-virus is disabled, you can activate it by clicking on “Enable now”. After this, everything should work without your intervention. If this does not happen, the system has probably crashed and should be restarted.
As you know, Windows 10 OS includes a built-in Windows antivirus Defender (Windows Defender). Unfortunately, its performance still leaves much to be desired, so many users want to remove this component forever. In this guide, we will look at the most universal method of disabling Defender.
Step 1. Open the Registry Editor
To make changes to the registry, you will need administrator rights.
We use a combination Win+R and write the command in the window that appears regedit:
In the registry editor, look for the following directory:

Step 2: Create a Windows Defender control file
We need to create a new file inside this directory. To do this, right-click on the empty space and select the option Create → DWORD value (32-bit):

Rename the created file to DisableAntiSpyware:

Step 3: Change the value of the Windows Defender control file
Right-click on it and select the function Change:

In the column Meaning indicate the number 1 and press the button OK:

That's it, Defender will be disabled immediately after the system restarts.
Step 4. Check the functionality of the built-in antivirus
Press the key combination Win+I to open the window Settings. Select an option Update and Security:


At the very bottom there is a button Use Windows Defender. If you click on it, the following window will appear with a message about disabling the built-in antivirus:

To enable Windows Defender, you will need to open the registry editor again, find the file DisableAntiSpyware and change its value to 0 .
Windows 10 Defender is a component built into the operating system that is a practically free antivirus. Why practically? The fact is that the OS itself is paid, and its component is as Windows Defender is distributed complete with it. That's why we decided to put it this way. Before we tell you how to disable Windows 10 Defender, we would like to explain why you need to disable it in the first place.
Is there any point in turning off the built-in Anti-Virus in Windows 10?
Let's say right away that yes, it makes sense. The fact is that this software only performs basic protection of the operating system. We simply cannot dare to call it full-fledged. Most shareware and paid antivirus programs will do a much better job of protecting your computer. That is why in using Windows Defender makes no sense if you make a conscious choice in favor of other antivirus software.The AV-Test laboratory tested all known foreign antivirus programs. So, according to the results, Windows 10 Defender latest version didn't even make it into the top ten.
How to disable Windows 10 Defender: Installing a third-party antivirus program
If you have made a choice in favor of any other paid or free antivirus, which in your opinion will cope with protecting your computer much better, then we want to please you, because when you install anti-virus software, the defender is disabled automatically.Accordingly, it will turn on only when you delete the program or its activation key expires.
Temporarily disabling the defender
Defender does not always need to be turned off forever. Sometimes only a temporary solution is enough. As a rule, this is required to install games and programs. In particular, unlicensed ones. Because Windows 10 Defender often doesn't let them through. So, let's quickly look at the instructions for temporarily disabling it:We would like to draw your attention to the fact that in the screenshot above, the slider cannot be moved to the off position. The fact is that in this case it is blocked by a third-party antivirus application - Kaspersky Anti-Virus. That is, by default, Windows 10 Defender is already disabled, so further management of the computer’s protection and, as a result, its disabling is carried out using the above-mentioned program. To disable protection, you need to go to its settings and find the appropriate item.

Turning off Windows 10 Defender through the registry
I would like to immediately note that if you disable it through the registry, Windows Defender will not be restored after a reboot and your computer will be left without protection. In this regard, if you decide to use this method, we recommend that you immediately install third-party anti-virus software so as not to risk the safety of your data. Or don't disable it forever. Well, now let’s look at the shutdown process itself:
To make sure that this is indeed the case, you must do the following: 
Well, times Windows You have disabled Defender, do your business and install another antivirus, otherwise you seriously risk the safety of your data. Viruses don't sleep!