Each version of Windows carries a certain set of installed programs, functions and applications, while the user can disable (remove) unnecessary features, or add those that are needed, but not installed by default. Removing unnecessary features, programs or applications can free up quite a lot of disk space, which is especially true for $ 100 tablets that have flooded the market lately.
In this guide, we'll show you how to add or remove features in Windows 7, Windows 8, and Windows 8.1.
We will perform all the necessary actions in a window called "Windows Components".
How to open "Windows Components" in Windows 7
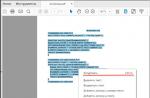
The Windows Features window can be opened from the Uninstall or change a program section (also known as Programs and Features). The easiest way to open Windows Components is to use the Start menu. To do this, you need to open the menu, enter "enable components" in the search bar and click on the corresponding item in the search results (see screenshot below).

How to open "Windows Components" in Windows 8 and 8.1
On the desktop, press the keyboard shortcut Win + S, type "turn on features", and then in the search results, click on "Turn Windows features on or off."

In addition, there is another way that also works in Windows 7. Open the "Control Panel" and in the "Programs" section, click on the "Uninstall a program" link.


As a result, you will see the "Windows Components" window.
How to remove Windows components
The Windows Features window is a list of all the features, programs, and applications available for a particular version of Windows. The components that are checked are already installed and available on your computer. To view additional information about a component, simply move the mouse cursor over it.

To remove a component or program, simply uncheck its box. You can remove multiple components at once. After that, click "OK".
If you uncheck the box, you'll see a warning that disabling the feature may affect other components, programs, or settings. To learn more, you can click on the "Details Online" link at the bottom of the warning. If you agree with the consequences of your choice, click Yes. Otherwise, click "No" and the removal (disabling) process will be canceled.

Windows needs time to make the necessary changes. Some features can be removed or disabled without the need to reboot the system. If this is the case for the feature you selected, you will be informed that Windows has made the requested changes.

After uninstalling some components, Windows may tell you that you need to restart your computer in order to apply the changes. Click Restart Now and wait for the process to complete. Keep in mind that the reboot will take longer than usual because the operating system will need to spend extra time configuring itself according to your instructions.

How to add Windows features
Adding components to Windows consists of the same steps as removing them. The only difference is that instead of unchecking the checkboxes, they need to be checked.
During the installation process, depending on what you choose to install, Windows may ask you for permission to download some files from Windows Update. Let the operating system do this for the installation to complete successfully. And in some cases, Windows may even ask for an operating system installation disk.
Conclusion
Does it make sense to remove some unused components and programs if you do not have enough disk space? The answer is yes!
For example, if you are a Windows 7 user and do not use Gadgets, Windows Media Center, DVD Maker, Internet Games, More Games, and Fax and Scanner, removing these components will free up a total of 0.24 GB (245 MB). That's a decent savings when disk space is a real concern.
Have a great day!
Windows Defender (or Windows Defender) is an antivirus from Microsoft built into the latest OS versions - Windows 10 and 8 (8.1). It works by default until you install some third-party antivirus (and during installation, modern antiviruses disable Windows Defender. True, not all of them have recently) and provides, if not ideal, protection against viruses and malware (although recent tests suggest that it has become much better than it was).
This guide is a step-by-step description of how to turn off Windows Defender 10 and Windows 8.1 in several ways, as well as how to turn it back on if necessary. This may be required in some cases when the built-in antivirus does not allow you to install a program or game, considering them to be malicious, and possibly in other situations. First, the way to turn it off in Windows 10 Creators Update is described, and then in previous versions of Windows 10, 8.1 and 8.
Additional: In recent Windows 10 updates, the Windows Defender icon is displayed in the taskbar notification area by default.
You can turn it off by going to the task manager (via right-click on the Start button), turning on the detailed view and turning off the Windows Defender Notification icon item on the Startup tab.
The next time you reboot, the icon will not be displayed (nevertheless, the defender will continue to work).
How to disable Windows 10 Defender Creators Update
Starting with the Windows 10 1703 Creators Update, disabling Windows Defender has changed somewhat. As before, disabling is possible using the settings (but in this case, the built-in antivirus is disabled only temporarily), or using the local group policy editor (only for Windows 10 Pro and Enterprise) or the registry editor.
Temporarily disable the built-in antivirus using settings
In this case, Windows Defender will be disabled only for a while and in the future the system will re-enable it. If you want to disable it completely, you will need to use the following methods.
Disabling Windows 10 Defender in the Local Group Policy Editor
This method is only suitable for Windows 10 Professional and Enterprise editions, if you have Home - the next section of the instructions shows a method using the registry editor.
After that, Windows 10 Defender will be completely disabled and will not affect the launch of your programs in any way (and also send samples of programs to Microsoft), even if they are questionable. Additionally, I recommend removing the Windows Defender icon in the notification area from startup (see Startup of Windows 10 programs, the task manager method is fine).
How to Completely Disable Windows 10 Defender Using Registry Editor
The settings configured in the local group policy editor can also be set in the registry editor, thereby disabling the built-in antivirus.
The procedure will be as follows (note: if any of the specified sections are missing, you can create them by right-clicking on the “folder” located one level higher and selecting the desired item in the context menu):
Done, after that you can close the registry editor, the antivirus will be disabled. It also makes sense to remove Windows Defender from startup (provided that you do not use other features of the Windows Defender Security Center).
Disable Defender Windows 10 previous versions and Windows 8.1
The required steps to turn off Windows Defender will be different in the last two versions of the operating system from Microsoft. In general, it is enough to start by performing the following steps in both operating systems (but for Windows 10, the procedure for completely disabling the defender is somewhat more complicated, which will be described in detail below).
Go to the control panel: the easiest and fastest way to do this is to right-click on the "Start" button and select the appropriate menu item.
With the Control Panel switched to Icons view (under View in the upper right), select Windows Defender.
The main window of Windows Defender will launch (if you see a message that "The application is disabled and is not monitoring your computer", then most likely you just have a different antivirus installed). Depending on which OS version you have installed, follow the steps below.
Windows 10
The standard way (which is not quite workable) to disable Windows 10 Defender looks like this:
As a result, the protection will be disabled, but only for a while: after about 15 minutes, it will turn on again.
If this option does not suit us, then there are ways to completely and permanently disable Windows Defender 10 in two ways - using the local group policy editor or the registry editor. The method with the local group policy editor is not suitable for Windows 10 Home.
To disable using the Local Group Policy Editor:
As a result, the Windows 10 Defender service will be stopped (i.e. it will be completely disabled) and you will see a message about this when you try to start Windows 10 Defender.
You can also follow the same steps using the Registry Editor:
Done, now, if the built-in antivirus from Microsoft disturbs you, then only with notifications that it is disabled. At the same time, before the first reboot of the computer, you will see the defender icon in the notification area of the taskbar (it will disappear after the reboot). You will also receive a notification that virus protection has been disabled. To remove these notifications, click on it, and then in the next window click "Do not receive more notifications about anti-virus protection"
If the built-in antivirus has not been disabled, then there is a description of ways to disable Windows Defender 10 using free programs for this purpose.
Windows 8.1
Disabling Windows Defender 8.1 is much easier than the previous option. All you need is:
As a result, you will see a notification that the application is disabled and does not monitor the computer - which is what we needed.
Disable Windows 10 Defender with Free Software
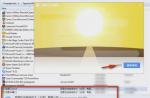
If for one reason or another it is not possible to disable Windows 10 Defender without using programs, you can also do this with the help of simple free utilities, among which I would recommend Win Updates Disabler as a simple, clean and free utility in Russian.
The program was created to disable automatic updates Windows 10, but can disable (and, importantly, enable back) other features, including defender and firewall. You can see the official website of the program in the screenshot above.
The second option is to use the Destroy Windows 10 Spying or DWS utility, the main purpose of which is to disable the tracking function in the OS, but, in the program settings, if you enable advanced mode, you can also disable Windows Defender (however, it is disabled in this program and by by default).
Disabling Windows Defender Using Command Prompt or PowerShell
Another way to disable Windows Defender 10 (although not permanently, but only temporarily - just like when using parameters) is to use the PowerShell command. Windows PowerShell must be run as an administrator, which can be done using the taskbar search and then the right-click context menu.
In the PowerShell window, enter the command
Set-MpPreference -DisableRealtimeMonitoring $true
Immediately after its execution, real-time protection will be disabled.
To use the same command from a command prompt (also run as administrator), simply type powershell followed by a space before the command text.
Disable "Enable Virus Protection" notification
If, after taking steps to disable Windows Defender 10, the notification “Turn on virus protection. Virus protection is disabled", you can follow these steps to remove this notification:
Done, you shouldn't see any messages that Windows Defender is disabled going forward.
Windows Defender says Application is disabled (how to enable)
If you have Windows 8 or 8.1 installed, use the steps below.
If, when you enter the control panel and select the "Windows Defender" item, you see a message that the application is disabled and does not monitor your computer, this may indicate two things:
- Windows Defender is disabled because a different antivirus is installed on your computer. In this case, you should not do anything - after removing the third-party antivirus program, it will turn on automatically.
- Whether you turned off Windows Defender yourself or it was disabled for some reason, you can turn it on here.
In Windows 10, to enable Windows Defender, you can simply click on the corresponding message in the notification area - the system will do the rest for you. Except when you used the Local Group Policy Editor or the Registry Editor (in which case, you should do the reverse operation to enable the defender).
In order to enable Windows Defender 8.1, go to the Action Center (right-click on the "flag" in the notification area). Most likely, you will see two messages: that the protection against spyware and unwanted programs is turned off and the protection against viruses is turned off. Just click "Turn on now" to start Windows Defender again.
Hello. As you understand, the keyboard for me is a constantly used tool. Both as an author of articles, and as a gamer, and even banal surfing on the Internet, I have to do with constant typing to search for new ideas. And, of course, I still happen to press the Win key (the one with the Windows icon). Yes, it happens much less frequently now, but it does happen. Due to the specifics of my site, I cannot disable it, I need it for work. But for you, those who, in principle, do not need it and who never use it, I can tell you how to do it.
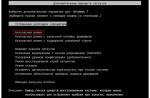
So, for this we need in the registry, in the branch:
HKEY_LOCAL_MACHINE\SYSTEM\CurrentControlSet\Control\Keyboard Layout
create binary parameter Scancode Map. And give it a value:
00 00 00 00 00 00 00 00 03 00 00 00 00 00 5B E0 00 00 5C E0 00 00 00 00
But you will not be able to do this through the built-in registry editor in Windows. And everything written above is indicated for professionals who can do it manually. For normal users, I have easier solutions :)
So, since the registry editor does not suit us, we have several options left:
1) Add parameter via cmd
3) Using registry export files
A more primitive, but no less effective way is reg files. Let's move on
Tired of this endless update of Windows 7 already! Every day downloads and installs. Cuts the speed of the Internet, slows down the computer, restarts it without asking. And it makes no difference to this system, whether I watch a movie, write a term paper or make an important report for the authorities. And updates are installed for 2 hours, and do not allow you to turn off your PC or laptop.
And most importantly - there is almost no sense! Yes, vulnerabilities are fixed, but you will not notice the difference at all BEFORE and AFTER the update. Unless the traffic eats up, but it will take up space on the local drive C again. In general, continuous hemorrhoids.
Therefore, if you are also tired of this option, turn it off! Especially for those who do not know how updates are disabled on Windows 7, detailed instructions with screenshots are attached below.
There are 2 ways to turn off the annoying Windows 7 auto-update feature
To begin with, let's consider turning off automatic updates on Windows 7. This is necessary so that the system does not download anything and does not start installation without your permission.
If you suddenly need to enable the search for updates, then open the same window and select one of the first three items to choose from (whichever is more convenient).
True, after that, at the bottom of the screen (near the clock) the message “Windows Update is disabled. Please turn it on."

To keep it from getting boring:

Ready. You just removed this message and it won't bother you again.
Method 2: Windows Update
For this:
- Open Start - Control Panel - Administrative Tools.

- Launch the Services shortcut.

- Scroll down the window and select "Windows Update" at the very bottom.

- Next, in the "Startup type" field, select "Disabled" and click "Stop". Save the changed settings by clicking "Apply" and close the window.

Ready. You have just completely disabled the update service on Windows 7 (their search and installation).
This procedure is carried out in the same way on all computers and laptops running Windows 7. Version (Home, Professional, Ultimate) or bit depth (32 or 64 bit) does not affect this.
Why turn off auto-update in Windows 7?
- An unlicensed copy of Windows is installed. At a minimum, activation may fail during the update. In the worst cases, a computer or laptop does not turn on after a reboot and you have to reinstall the OS (Microsoft developers know how to surprise 🙂).
- Limit Internet. If you have a limited amount of traffic, then regular updates will cost a pretty penny.
- Slow internet speed. Auto-updates greatly cut download speed. And if you have it and so small, then ....
- Not enough hard disk space. Auto-updates do not take up much space, but over time they can accumulate up to 10-20 GB. And if there is little space left on the hard drive, the computer (or laptop) will work slowly.
- During auto-update, you cannot turn off the PC. This is terribly annoying (do not leave it on at night!).
By the way, as an option, you can disable only auto-update. That is, select the 2nd or 3rd option in the Update Center settings (so that you personally decide on the installation).
The Windows operating system can be fully customized, both with the help of built-in utilities and with the help of third-party applications. Adjustable, including accessories, such as a keyboard. On it, you can reassign the necessary keys by setting the necessary commands on them or completely disabling them.
The Windows key on the keyboard, by default, executes a command to launch the Start menu. Also, its use in combination with other buttons allows you to perform various quick commands, for example, by pressing Windows + R you can launch the Run prompt, and Windows + I will open the options. At the same time, not all users use the Windows key, and some may want to turn it off if it interferes for some reason, for example, it sticks or the game, application, program is minimized due to its accidental pressing.
In this article, we will look at various ways to disable the Windows key on the keyboard or remap it.
Table of contents:How to disable the Windows key using the system tools
Despite the fact that many users remap some keys on the keyboard, there is no utility built into Windows that would allow you to conveniently do this. At the same time, it is possible to disable the Windows key using the operating system if you change some registry settings.
To disable the Windows key using the system tools, do the following:

After the computer restarts, the registry changes will take effect and the Windows key will stop working when you press it. If in the future you need to return the Windows button to a working state, delete the value created in the registry and restart the computer.
How to disable the Windows key with third-party applications
There are a lot of programs on the network that allow you to reassign, disable and combine keys into combinations to perform certain actions. Large companies supply such programs along with keyboard drivers, but there are also a number of "general" applications that can cope with such tasks just as well. Below we will look at two free programs that allow you to disable or customize the Windows key.
The SharpKeys program is distributed for free on the developer's website and does an excellent job of remapping or disabling keys on the keyboard. The application works on the principle of making changes to the registry, that is, it should not be constantly active in the background, due to which it can be used even on low-performance computers.
To use the SharpKeys app to disable the Windows key, download it, install it, and run it. A window will open in which you need to click Add. Next, on the left side of the window, you will need to select a key, and on the right, the action that it will perform. Select the "Special Left Windows" and "Special Right Windows" keys and set them to "Turn off" in the right column, then click "OK".

After that, the selected keys will be displayed in the list of program combinations. For the changes to take effect, click "Write to registry".

After restarting the computer, the Windows keys will no longer work. If you need to restore their functionality again, you will need to run the SharpKeys program and remove the changes made.
Simple Disable Key
The above scenarios were given on how to completely disable the operation of the Windows key in the operating system. However, you might want to disable only commands that are executed when you press a keyboard shortcut, which includes Windows. This can also be done using the third party application Simple Disable Key.
To disable the keyboard shortcuts with the Windows button, you need to do the following:

Please note: Changes made to the program only work when it is active. If you want some key combination to not work all the time, you need to add the program to startup.