screenshot
without resorting to the help of third-party utilities. In this short article I will show you how to do it.
A little deviating from the topic, I repeat that it is easy to create a screenshot using standard tools and programs included in the standard Windows set. In particular, I mean Paint. I will not go into details, because. about it is written quite extensively in the article, the link to which is above.
So, in order to create a screenshot and immediately place (paste) it into Word, you can simply press the PrtScr key on the keyboard, being exactly in the place and window that you need, and then paste with the hot keys Ctrl + V to the right place in the document.
Note: to take a screenshot of the active window (which is on top of all windows, for example, an error message or not in full size) so that the Start button, the taskbar and everything that you see before your eyes do not fall into the screenshot, you need to press Alt + PrtScr
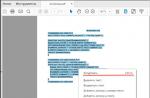
You can also directly select the tab in the Word itself Insert and then click on the arrow under the heading snapshot, as a result of which all available and active windows should open, choosing the one you need from which you will insert a screenshot immediately into Word:
Moreover, a screenshot of the active window will be inserted, as if you pressed Alt + PrtScr
There is one nuance in this method - in order to take a picture of a window, it must be maximized. As soon as you roll it up, it will immediately disappear from the available ones. This should be taken into account so that later the question “Where is the accessible window that is boring for me ???” does not arise.
To make it right and everything is available, you first open the window you need, for example, at least in My Computer Explorer, then start Word without minimizing the explorer, and then you will see that you can insert it.
The advantages of this method of creating a screenshot include the fact that you can not press the PrtScr key, as well as the fact that you can immediately take a screenshot of exactly the window fragment you need directly in the Word (the same often happens). To do this, you need to click on the "Screen Cut" button, which I highlighted on the screen above. As a result, the last active open window will open slightly clarified and a cross, with which you select the desired fragment, and then Word immediately becomes active in which the screenshot has already been inserted. Well, right there you can edit it a little using the standard Word tools.
I do not urge you to use this particular method of creating a screenshot, but I just want you to know about it and someday this method will come in handy for you. For example, if you print and work in Word and you need to insert some kind of window.
By the way, if you want, you can save this picture as a picture by right-clicking on it and selecting "Save as picture". Then it turns out that you created a screenshot without using the keys, but using only the mouse and Word =)
One of the new features of Microsoft Word 2010 is the ability to take screenshots (screenshots) and paste them directly into your document. This should greatly speed up the creation of the document, and today we will show you how to use it.
Screenshots in Word 2010
To take a screenshot, go to the tab Insert(insert) and in section illustrations(illustrations) select team screenshot(Snapshot). Menu will open AvailableWindows(Available windows), which will show thumbnails of all active windows currently open on your desktop. You can also take a screenshot yourself by selecting Screen Clipping(Screen clipping).

In this example, we have selected an image from a Firefox browser that has a window open. The drawing immediately appeared in the document, and the tab opened Picture Tools(Picture Handling) in case you need to further edit the picture.

If you want to capture a specific area of the screen, select Screen Clipping(Screen clipping).

When the screen is covered with a translucent haze, indicate the area that should be included in the picture. To do this, press and hold down the left mouse button and select the required area of the screen.

The snapshot will immediately get into the Word document and, if necessary, you can edit it.

This very handy feature helps you create documents much faster. You no longer need to think about buying and setting up a third-party program to create screenshots for Microsoft Word.
The lesson was prepared for you by the team of the site office-guru.ru
Source: /> Translated by: Anton Andronov
Reprint RulesMore Microsoft Word Tutorials
Step-by-step instructions for creating a screenshot using Microsoft Word 2010.
Text editor users Microsoft Word often you have to insert accompanying illustrations or screenshots into your texts. In earlier versions of the program, in order to add a screenshot to a text document, it was necessary to make it using third-party tools, save it to a computer, and download it separately to the editor.
However, starting from version Microsoft Word 2010, the program now has the function of creating a screenshot using the editor itself with the instant addition of an image to the right place in a text document. Using this function will greatly facilitate the work with texts that have graphical support, and from this article you will learn how to do this.

Image 1. Guidelines for taking screenshots in Microsoft Word 2010 and above.
How to take a screenshot of a Word document?
Before reading the instructions for taking a screenshot, make sure that the package is installed on your computer Microsoft Office 2010 or more recent. Versions Microsoft Office 2003 and this feature is missing.
To create a screenshot, you need to do the following:
Step 1.
- Run the program Microsoft Word, create a new document or open an existing one.
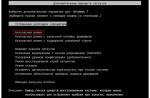
- At the top of the program window, expand the " Insert” and on the toolbar click on the button “ snapshot».
- A small window will open showing thumbnails of all currently running programs and folders.

Image 2 - Create a document and go to the screenshot tools.
Step 2.
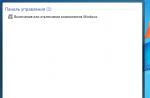
- Next, you need to left-click on the thumbnail of that program, folder or document to create a snapshot of this window.
- After clicking on the thumbnail, an image of the same program or folder that you have selected will appear in an open text document.
With the mouse, you can move it to any place in the text document.

Image 3. Adding the finished screenshot to the document.
Step 3.
- Because Microsoft Word is a professional text editor with the ability to add illustrations, it also has a number of functions for editing these same illustrations.
- For example, blurring the edges of an image is a very useful tool. This allows you to give emphasis to the content of the screenshot.
- To apply the effect, double-click the left mouse button on the image inserted into the document and you will be taken to the " Format". Next, on the toolbar at the top of the program window, click the " Picture effects».
- In the drop-down list, move the mouse cursor over the line " Smoothing” and in the appeared side list, select the appropriate format for blurring the edges of the image.

Image 4. Processing the finished screenshot.
- In addition to blurring, you can add volume to your screenshots by applying shadows, add highlights or rotate the image by creating an effect. 3D.
How to take a screenshot of part of a Word document?
In some cases, you may need to take a screenshot of not the whole window, but only a specific part of it. In order not to have to crop the image with third-party tools, developers from the corporation Microsoft added to their editor the function of taking a screenshot of a separate part of the screen. To use it, you will need to do the following:
Step 1.
- Like last time, create a new text document or open an existing one. Go to the section " Insert' and click on the button ' snapshot» on the toolbar.
- In the window that appears with thumbnails of running programs and open folders at the very bottom, click on the button " Screen cutout».

Image 5. Switching to the tool for capturing a specific part of the screen.
Step 2.
- After clicking on this button, the contents of your screen will become a little foggy. You need to hold down the left mouse button and select the area on the screen that you want to capture.
- As soon as you release the left mouse button, the area selected on the screen will be converted into an image, which will automatically be added to your text document.

Image 6. Selecting an area of the screen and adding its image to the document.
VIDEO: How to take a screenshot in Microsoft Word?
If you fill your site, then you cannot do without knowing what how to take a screenshot. The word screenshot can literally be translated as a screenshot. Indeed, a screenshot is a snapshot or photograph of a frame on the screen. To fill the site, it is often best to use a screenshot instead of copying - let's say you need to place a table or diagram on the site, or a graph, content, or some other design. You pre-make all these objects either in Word or Excel. So, if you just copy them and try to put them on the site through the site management console, they will, of course, change their appearance... In addition, inserting a regular table greatly increases the code of a particular page, which will make it difficult for your site to load. In this case, it is necessary to take a screenshot of the screen with an image of a table, graph, chart, content, and then the listed elements will be displayed on the site as pictures.
Lesson - screenshot in windows. Print Screen key
To begin with, let's consider the simplest and most elementary steps for taking a screenshot without using additional programs. The screenshot itself is directly performed by pressing the "Print Screen" button, it can be abbreviated on the keyboard as "PrtSc Sys Rg". The "Print Screen" key is most often located in the top row on the right. After you have selected the object for the photo, press the "PrtSc Sys Rg" key, and the photo of the object will be on the clipboard. It's like making a copy. Now, to take a snapshot from the clipboard, open any editor you have:
- text Microsoft Office Word;
- graphic Paint, Photoshop;
- a dedicated screenshot app - in our case Snagit!
Microsoft Office Word and Pfint must be installed on your computer as they are standard programs for the Windows operating system.
Pasting into Paint with further processing

Let's say we open Paint, remembering that there is already a copy of ours on the clipboard. In Paint, click "paste". And your screenshot will appear on the Paint editor screen.  Here you can edit the picture, add an inscription or accompanying words, numbers, a frame. You can change the color, size, add arrows or other shapes. Then click "file" and "save as". We save the screenshot in our folder in the format: PNJ, JPEG, BMP or GIF.
  So, the procedure for creating a screenshot for your site, course project, working documentation, etc.:
- Press "PrtSc Sys Rg"
- Open the Word or it is already open, put the cursor on the place where the picture should be
- "paste" or ctrl+v
- Save the screenshot along with the text where it is inserted.
Paste into MO Word and Excel with no post-processing option
 If you are creating a document in MO Word or MO Excel spreadsheet and you need a screenshot of the screen, then it may be appropriate to do the following:
- Press "PrtSc Sys Rg";
- Go to MO Word or Excel and press ctrl+v.

As written in the subtitle, editing the resulting image is no longer possible, but there is one trick. You can right-click on the image and select the image size or format from the context menu that opens. The size tab will allow you to change the overall dimensions of the picture and even crop it. And the picture format tab opens up opportunities for adjusting brightness, contrast, repainting in any color, giving the image volume. You can learn how to arrange your text document with ready-made images from the article inserting a picture.
Paste in photoshop with the possibility of post-processing
Press the print screen button, then open Photoshop, create a new sheet (new file), set the desired sheet parameters. Set the width and height of your document. Pay attention to the resolution, do not set it too high, 72 pixels per inch will be enough. And don't forget to set the color mode to RGB - very often the program automatically sets the "grayscale".  After opening a new window, press ctrl+v and the screenshot appears in this graphical editor. After that, you can use absolutely all the power of Photoshop to process the image. Inserting shapes will allow you to highlight and focus on the most important areas of your image.
The last point is to save the document in the desired format - not necessarily in Photoshop format. To do this, go to the File tab - Save As or the File tab - Save for Web and Devices. The saving process can take place in the two listed ways, you can choose the most convenient one. 
We take a screenshot using special programs - Snagit.
The most productive and fast way, in my opinion, is the use of special programs. We must pay tribute to the fact that although Windows has a built-in ability to make a print screen (print screen) of a computer screen, installing a special program makes the task much easier. Therefore, next I will tell you how to take a screenshot from the screen using Snagit (snagit).
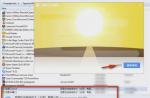
You need to find and install the specified program, by the way, this program may have a certain period of free use. The capabilities of this software are impressive - it can record videos, take screenshots, copy text - all with a user-friendly interface. Working with the program begins with setting the desired parameters. To take a screenshot of the desired size, go to the "effects" tab below, as shown in the illustration below.
First, set the input parameter - that is, how exactly you will take a screenshot. I usually use the "area" parameter to specify an arbitrary area, or the "window" parameter to take screenshots of specific open windows. 
First of all, go to scaling and set the desired value. In scaling, you can choose the size of the image. This action will open a dialog box where you can select the desired image width (the images will be the same width but different in height), height (similar to height), or rigidly define the height and width. Additionally, screenshots can be decorated with frames, edge effects, increase contrast, apply a watermark, etc. 
Next, press the print screen button all the way down, place the cursor in the corner of the selected object and drag it to the diagonally opposite corner. Everything that falls into the frame that appears and will be on your screenshot. The program will process the selected area in accordance with the settings of your effects, and the resulting image will open in the snag editor, which will allow you to continue working as follows: apply text, select a specific area with autoshapes, cover up unnecessary details in the screenshot, etc.
The last point is to save the resulting image. I note that if you do not need to use the snag editor, then you can disable it by clicking the appropriate button in the options (see photo). In addition, you can configure the output of the image to the desired folder and give it a name according to the template. Using the following setting allows you to increase the speed of taking screenshots, so please read to the end. We go to the output and click "properties", as in the photo below. After that, you will see a dialog box in which you can set the format for saving the picture, select the save folder and set the name of the photo according to the template.
How to take a screenshot of the screen (from English. Screenshot) very often you hear this word when it comes to extracting an image from the screen of a monitor, laptop or mobile device.
In fact screenshot is a capture or screenshot of the active area or part of the image that the user sees on the computer display. The need to take a screenshot of the screen appears mainly when you: create technical documentation for your work or another document similar to a course / graduation project, play computer games to capture the best moments and, of course, turn to remote assistance of specialists in solving computer-related problems .
HOW TO TAKE SCREENSHOTS ON A COMPUTER
To take a screenshot on a computer, you only need to press one special key on the keyboard located in the upper right corner with the inscription "Prt Scr SysRq" / Print Screen - this is the function of creating a screenshot of the screen. After clicking, the screenshot will be stored on the clipboard until you paste it into the Paint graphics editor or the Word text editor.
Open the desired program - Paint or Word, insert a picture using the built-in function in programs, as shown in the figure, or use the CTRL + V key combination to insert an image and save the document.

Thus, we took a screenshot of the entire screen on the computer. If we need to take a snapshot of one active window, for example, it will be a half-screen website page, then we need to press the Alt + Prt Scr key combination, paste and save the document.
HOW TO TAKE SCREENSHOTS ON A LAPTOP
Taking a screenshot on a laptop is just as easy as taking a screenshot on a computer. This procedure is practically the same, but there is a slight difference if you have a special "Fn" button on the keyboard and is used in conjunction with the "Print Screen" key.

The main purpose of the key is quick access to additional and multimedia functions. Usually this button is located in the lower left corner of the laptop keyboard. Using the keyboard shortcuts "Fn" + "Prt Sc" you can take a screenshot on a laptop. After taking a screenshot of the screen, save the result as an image of the desired format or add it to a document for further presentation.
HOW TO TAKE SCREENSHOTS ON ANDROID
Oddly enough, it is still possible to take a screenshot on Android, and this is evidenced by the easiest way, which we will briefly discuss at the end of the article “how to take a screenshot”.

The most common way to take a screenshot on Android is to simultaneously press and hold the “volume down” and “power on” buttons of the device until a characteristic sound is heard. After the sound, a notification will appear in the notification menu that the screenshot is ready and is located in the “Screenshots” folder.
HOW TO TAKE SCREENSHOTS ON SAMSUNG
And finally, a few words about how to take a screenshot on Samsung. The above method will not work, so you need to use a different keyboard shortcut on Samsung devices. To take a screenshot on Samsung, you must simultaneously press and hold the "Power" and "Home" buttons on your smartphone.
Now you know how to take a screenshot on different devices, and what keys you need to press to do this.
Without resorting to the help of third-party utilities. In this short article I will show you how to do it.
A little deviating from the topic, I repeat that it is easy to create a screenshot using standard tools and programs included in the standard Windows set. In particular, I mean Paint. I will not go into details, because. about it is written quite extensively in the article, the link to which is above.
So, in order to create a screenshot and immediately place (paste) it into Word, you can simply press the PrtScr key on the keyboard, being exactly in the place and window that you need, and then paste with the hot keys Ctrl + V to the right place in the document.
Note: to take a screenshot of the active window (which is on top of all windows, for example, an error message or not in full size) so that the Start button, the taskbar and everything that you see before your eyes do not fall into the screenshot, you need to press Alt + PrtScr
You can also directly select the tab in the Word itself Insert and then click on the arrow under the heading snapshot, as a result of which all available and active windows should open, choosing the one you need from which you will insert a screenshot immediately into Word:
Moreover, a screenshot of the active window will be inserted, as if you pressed Alt + PrtScr
There is one nuance in this method - in order to take a picture of a window, it must be maximized. As soon as you roll it up, it will immediately disappear from the available ones. This should be taken into account so that later the question "Where is the accessible window that is boring to me ???" does not arise.
To make it right and everything is available, you first open the window you need, for example, at least in My Computer Explorer, then start Word without minimizing the explorer, and then you will see that you can insert it.
The advantages of this method of creating a screenshot include the fact that you can not press the PrtScr key, as well as the fact that you can immediately take a screenshot of exactly the window fragment you need directly in the Word (the same often happens). To do this, click on the "Screen Cut" button, which I highlighted on the screen above. As a result, the last active open window will open slightly clarified and a cross, with which you select the desired fragment, and then Word immediately becomes active in which the screenshot has already been inserted. Well, right there you can edit it a little using the standard Word tools.
I do not urge you to use this particular method of creating a screenshot, but I just want you to know about it and someday this method will come in handy for you. For example, if you print and work in Word and you need to insert some kind of window.
By the way, if you want, you can save this picture as a picture by right-clicking on it and selecting "Save as picture". Then it turns out that you created a screenshot without using the keys, but using only the mouse and Word =)
If you fill your site, then you cannot do without knowing what how to take a screenshot. The word screenshot can literally be translated as a screenshot. Indeed, a screenshot is a snapshot or photograph of a frame on the screen. To fill the site, it is often best to use a screenshot instead of copying - for example, you need to place either or, or some other design on the site. You pre-make all these objects either or in Excel. So, if you just copy them and try to put them on the site through the site management console, they will, of course, change their appearance... In addition, inserting a regular table greatly increases the code of a particular page, which will make it difficult for your site to load. In this case, it is necessary to take a screenshot of the screen with an image of a table, graph, chart, content, and then the listed elements will be displayed on the site as pictures.
Lesson - screenshot in windows. Print Screen key
To begin with, let's consider the simplest and most elementary steps for taking a screenshot without using additional programs. The screenshot itself is directly performed by pressing the "Print Screen" button, it can be abbreviated on the keyboard as "PrtSc Sys Rg". The "Print Screen" key is most often located in the top row on the right. After you have selected the object for the photo, press the "PrtSc Sys Rg" key, and the photo of the object will be on the clipboard. It's like making a copy. Now, to take a snapshot from the clipboard, open any editor you have:
- text Microsoft Office Word;
- graphic Paint, Photoshop;
- a dedicated screenshot app—in our case, Snagit!
Microsoft Office Word and Pfint must be installed on your computer as they are standard programs for the Windows operating system.
Pasting into Paint with further processing

Let's say we open Paint, remembering that there is already a copy of ours on the clipboard. In Paint, click "paste". And your screenshot will appear on the Paint editor screen.  Here you can edit the picture, add an inscription or accompanying words, numbers, a frame. You can change the color, size, add arrows or other shapes. Then click "file" and "save as". We save the screenshot in our folder in the format: PNJ, JPEG, BMP or GIF.
  So, the procedure for creating a screenshot for your site, course project, working documentation, etc.:
- Press "PrtSc Sys Rg"
- Open the Word or it is already open, put the cursor on the place where the picture should be
- "paste" or ctrl+v
- Save the screenshot along with the text where it is inserted.
Paste into MO Word and Excel with no post-processing option
 If you are creating a document in MO Word or MO Excel spreadsheet and you need a screenshot of the screen, then it may be appropriate to do the following:
- Press "PrtSc Sys Rg";
- Go to MO Word or Excel and press ctrl+v.

Paste in photoshop with the possibility of post-processing
 We press the print screen button, after which we open Photoshop, create a new sheet (file - new), set the desired sheet parameters. Set the width and height of your document. Pay attention to the resolution, do not set it too high, 72 pixels per inch will be enough. And don't forget to set the color mode to RGB - very often the program automatically sets the "grayscale".
  After opening a new window, press ctrl+v and the screenshot appears in this graphical editor. After that, you can use absolutely all the power of Photoshop to process the image. Inserting shapes will allow you to highlight and focus on the most important areas of your image.
The last point is to save the document in the desired format - not necessarily in Photoshop format. To do this, go to the File tab - Save As or the File tab - Save for Web and Devices. The saving process can take place in the two listed ways, you can choose the most convenient one. 
We take a screenshot using special programs - Snagit.
 The most productive and fast way, in my opinion, is the use of special programs. We must pay tribute to the fact that although Windows has a built-in ability to make a print screen (print screen) of a computer screen, installing a special program makes the task much easier. Therefore, next I will tell how to take a screenshot with snagit(snake).
You need to find and install the specified program, by the way, this program may have a certain period of free use. The capabilities of this software are impressive - it can record videos, take screenshots, copy text - all with a user-friendly interface. Working with the program begins with setting the desired parameters. To take a screenshot of the desired size, go to the "effects" tab below, as shown in the illustration below.
First, set the input parameter - that is, how exactly you will take a screenshot. I usually use the "area" parameter to specify an arbitrary area, or the "window" parameter to take screenshots of specific open windows. 
First of all, go to scaling and set the desired value. In scaling, you can choose the size of the image. This action will open a dialog box where you can select the desired image width (the images will be the same width but different in height), height (similar to height), or rigidly define the height and width. Additionally, screenshots can be decorated with frames, edge effects, increase contrast, apply a watermark, etc. 
Next, press the print screen button all the way down, place the cursor in the corner of the selected object and drag it to the diagonally opposite corner. Everything that falls into the frame that appears and will be on your screenshot. The program will process the selected area in accordance with the settings of your effects, and the resulting image will open in the snag editor, which will allow you to continue working as follows: apply text, select a specific area with autoshapes, cover up unnecessary details in the screenshot, etc.
The last point is to save the resulting image. I note that if you do not need to use the snag editor, then you can disable it by clicking the appropriate button in the options (see photo).  In addition, you can configure the output of the image to the desired folder and give it a name according to the template. Using the following setting allows you to increase the speed of taking screenshots, so please read to the end. We go to the output and click "properties", as in the photo below. After that, you will see a dialog box in which you can set the format for saving the picture, select the save folder and set the name of the photo according to the template.
Screenshot (and if in Russian, screenshot) is a great thing that will come in handy more than once or twice in your daily work. Illustrate an error in a program, write a sensible instruction for colleagues, or “take a picture” of an image you like on the Internet that you can’t download in any way - all this is almost impossible without the ability to take screenshots.
But did you know that with the release of MS Office 2010 (and all newer versions of Office), you can take screenshots directly from an open MS Word document? Today I will teach you how to use this wonderful tool.
How to take a screenshot directly from a MS Word document
So, you have created a text document and want to illustrate the text with a screenshot. Go to Insert tab, and click on Snapshot button. Please note that a small panel with thumbnail images of all currently open applications will immediately appear.
Taking a screenshot without closing MS Word is not a problem since Office 2010.
Further, everything is even simpler - by clicking the left mouse button on the desired thumbnail, we take a snapshot of that very window, and right there, this snapshot is added to the open text document as an image. Ready!

Screenshot added to text editor page
But the possibilities of MS Word have not yet exhausted themselves. As you already know, Word is not just a word processor, but rather a whole publishing system, albeit an amateur one. And if so, then it offers not only text processing capabilities, but also image processing. Let's "beautify" our screenshot by focusing on the content.
Double-click on the image inserted into the sheet, after which the top toolbar from the "Insert" will switch to "Format". And now, using the group of tools "Drawing Styles", blur the edges of the image a little. I think it turned out just fine! By using styles and predefined settings for working with images, you can significantly increase its visual appeal and make it more understandable for those to whom your report was intended.

And we will decorate the screenshot made a little with effects. Handsomely!
How to take a screenshot of not everything, but only part of the screen?
Yes, no more difficult than a "photo" of the entire active window. Go to Insert tab, and in the Illustrations tool group, Press Snapshot button, and look at the very bottom of the window that appears. Click on the button "Screen Clipping", after which the text document will be automatically minimized, and the screen will be covered with a "white fog".

Screen clipping is another MS Word tool that allows you to take screenshots, but not of the entire contents of the window, but of its selected part.
Feel free to hold down the left mouse button, circle the area that you want to place in the document, and release the button. In a moment, and the document you just took a screenshot of part of the screen already flaunts.

Select an area with the mouse and take a screenshot
The only thing to say is that after activating the cut tool and minimizing the document, only the last viewed tab will appear on the screen. That is, if you have more than 1 application window open, and you need to take a screenshot from one specific window, it makes sense to first deploy the application that you are going to “screenshot”, and then launch MS Word and use its tools to capture part of the screen .
Also you may be interested in: