Consider how to boot from the flash drive to install Windows or restore the system.
Insert the boot bar into the USB port and restart the computer. Your main task at this stage is to change the priority of loading so that the flash drive started first, and not the hard disk. This is done in two ways:
- Selecting a device via Boot Menu (called the F8, F11, F2 or ESC key pressed immediately after the computer is started).
- Changing the priority of downloads in Bios. BIOS is a program that is engaged in the motherboard allows you to change some iron parameters (for example, such as disk loading priority) at the hardware level..
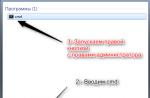
The first method is much more convenient, since it does not require the subsequent return of download from the hard disk. You only need to select the device (DVD or USB) from the list to start loading and press ENTER. It looks like this:
Click F10 and get into the boot menu:

However, on some old computers, Boot Menu does not start, so let's consider in detail the order of changing the priority of download via BIOS. Expand the Start menu and restart the computer. When the logo appears, you need to press a definite key.

On some models of motherboards to enter the BIOS, it is not delete, and the other key - F1, ESC, F10, Ctrl + Alt + S. There is a reasonable question - how to find out the desired button? There are several ways:
- Find on the Internet information about the entrance to the BIOS for your motherboard.
- Read the instructions from the manufacturer of the motherboard.
- Pay attention to the message that appears immediately after the computer is turned on. Message it has "Press .... to Run Setup ». Instead of dull, the specific key will indicate (Del, F1, ESC), pressing the BIOS starts.
Keys to enter BIOS
Here is the key keys to enter the BIOS for most manufacturers of motherboards:

By the way, you need to press the button many times until the BIOS window appears, otherwise you can skip the start of its start.
Examples
Attention!
Depending on the manufacturer, the BIOS interface is seriously different. However, this should not be scared: the procedure remains unchanged on all versions.
Unfortunately, the mouse in the bios does not work, so the navigation is carried out only with the keypad: arrows are used to move, and to select a specific parameter - the Enter key. For a better understanding of the BIOS principle, let's see how to change the priority of downloads in two different interfaces.
If you have an old BIOS interface, you need to go to the section to change the download priority "Advanced Bios Features".

- Find a string "Hard Disk Boot Priority" or FIRST BOOT DEVICE.
- Press ENTER and use the arrows to select the value "USB-FLASH" ("Removable", "USB-HDD0", "flash drive name").
- To save the settings click "SAFE AND EXIT SETUP" In the main menu.
After successfully installing Windows, you will need to repeat this operation, returning to the first HDD (loading from the hard disk).
In Computers, the BIOS version has been installed from AMI (although, more and more often manufacturers of motherboards put bios-e-country development).

The principle of work remains the same:
- Click the tab "Boot" On the top panel.
- Open section "Boot Device Priority".
- Stand on the line "1 ST BOOT DEVICE" And press ENTER.
- Using the arrow on the keyboard, set the value "USB" (or "CDROM"If you install from the disk. There is no CD / DVD-ROM in the picture above, because it is not at all on that computer).
- Click F10. And select Option OkTo save changes and exit BIOS.
Do not be afraid if you have a BIOS with a different interface, and there are no tabs and partition names described above. Just find the tab, in whose name is the word "boot". Inside it, you will definitely find the priority of the download that can be changed by installing the USB-Flash device with a Windows distribution device on the first place.
Almost all models of laptops manufactured today are supplied without built-in CD / DVD drive drive. Not the exception and laptops Lenovo. The boot USB drive in this case is a useful tool for diagnosing and restoring the operating system or to install a new OS.
There are several ways to load Lenovo laptops from a bootable USB drive.
Download from a USB drive (flash drive) through a priority change - the optimal option when you need to unlock a PC using a Windows password recovery tool or correct the download problem, such as a blue screen, no launch of OS, etc.
For download you need:

BIOS BOOT.
- When the BIOS menu appears, go to the "boot" section with the left-right arrow on the keyboard.

- Use the up-down buttons to highlight the "USB HDD" drive and install it with the "F6" and "F5" buttons in the LEGACY list above "SATA HDD".

- In addition to downloading "Legacy", the BIOS can support EFI download. If the HDD is located on the MBR table, you must select "Boot Priority", click "ENTER" and instead of the "UEFI FIRST" to install the "Legacy First" arrows by pressing ENTER.

Reference!If the hard disk is the MBR-partition table (the old version of HDD markup, which works with sections of no more than 2 TB), the "Boot Priority" - "UEFI FIRST" can lead to a widnows installation error.
- Press the "ESC" button to exit the BIOS main menu, and click the "F10" button to save the exit parameters from the BIOS. After restarting the laptop, it will start loaded from a USB drive.


PHOENIX - AWARD BIOS
If Phoenix - Award BIOS is installed on the laptop, after the standard login in the BIOS is necessary:

To start loading Lenovo from a USB drive, it is not necessary to do it through the BIOS Setup. In Lenovo laptops, this provides a special "Boot Menu" download menu.
To go to the boot menu, you must:

If you can not go to the "Boot Manager" download menu by the "F12" key, in this case, on Lenovo laptops, next to the power button or on their sidebar, a special arrow button is provided. This button is present on many Lenovo laptops and is called "Novo Button".
To activate the download via the "Novo Button" button:

Sometimes a laptop is loaded so quickly that the BIOS cannot be logged in by pressing the button "F1", "F2 + Fn", or "F12". If a laptop has no "Novo Button" button, but it can normally download the operating system from the hard disk, then you can enter the UEFI BIOS boot menu directly from Windows 8 / 8.1 / 10.
How to go to the UEFI menu
For Windows 8 / 8.1
- Slide the mouse pointer to the right upper or bottom of the display angle, and move the mouse up or down. The "Charm" panel will appear, where you need to click "Parameters" (gear icon).

- The "Parameters" panel will appear on the site of the "Charm" panel, at the bottom of which you want to select "Changing Computer Parameters".

- In the PC Settings window that appears, select "Update and Recovery".

- In the next window, choose "Restore" - "Restart Now".

For Windows 10.

The last steps are the same for Windows 8 / 8.1 and 10:

As can be seen, the Lenovo laptop download options from the USB drive is quite a lot, and each option offers its most suitable in a particular case, the solution.
Read more detailed information with the instructions in our new article -
LEDOVO IDEAPAD Z580 laptop: home machine at an adequate price
If you plan to purchase a laptop that combines the style and entertainment opportunity at an affordable price, Lenovo IdeaPad Z580 is a great choice for this. Attractive appearance, good ergonomics, durable case, excellent performance - with all these qualities has a laptop from Lenovo.
The quality of the Z580 assembly is also good, and despite some compliance with plastic panels (the laptop is performed both in aluminum and in the plastic case), the chassis has a sufficiently strong model. The laptop offers bold, glossy regiments are one of the brightest budget laptops on the market.

Under the attractive appearance IDEAPAD Z580 hide:
- processor: Intel Core i3 / i5 / i7, 2200-2900 MHz;
- the kernel: Ivy Bridge / Sandy Bridge;
- RAM: 2-8 GB of RAM;
- HDD: 320-1000 GB;
- video HD Graphics 4000 Plus GeForce GT 630M-645M.
Impressive and glossy display from Lenovo. When the screen is diagonally 15.6 "The resolution of the matrix is \u200b\u200bstandard and is 1366 × 768 points. The monitor brightness is also medium, but the contrast reaches the impressive 260: 1, along with good color reproduction provides bright colors and makes it one of the best displays in its price category.
The laptop, not light, has a thickness of 33 mm and weighs about 2.5 kg. The battery life is 5 hours.
Important! According to the results of tests in real games, it is one of the fastest budget laptops. If the buyer needs a quick laptop for everyday tasks without unnecessary investments, Lenovo IdeaPad Z580 will not disappoint it.
Smartphone Lenovo S920, Quick Ideaphone Characteristics
Another interesting solution from Lenovo - Smartphone Lenovo Ideaphone S920.

Phone characteristics:
- screen: IPS 5.3 ", 16 million colors, 1280 × 720, Touch, Capacitive, Multitach;
- processor: 4-core MTK 6589, 1.2 GHz, PowerVR Series5XT video;
- memory: 1 GB RAM, 4 GB built-in + 32 GB MicroSDHC, microSD;
- view of the phone: Monoblock, 159 g, 154 × 77.7 × 7.9 mm;
- phone Charging Connector: Micro-USB;
- communication type: GSM 900/1800/1900, 3G;
- nAVIGATION: GPS, A-GPS;
- interfaces: Wi-Fi, Bluetooth, USB;
- platform: Android 4.2 with the IDEADESKTOP branded shell;
- battery: Li-Pol 2250 Mah, 25 hours. (GSM), 12 hours. (WCDMA);
- camera: Frontal 2 MP, rear 8 mp, flash, detector of faces and smiles.
IdeaPhone S920 can "boast" two SIM cards, but it is equipped with one radio module, which, for example, does not allow it to download the file on the Internet during a telephone conversation.

The quality of the S920 images is very good, however, Ideadesktop "does not shine" design. The battery allows the smartphone intensively to work out the day at one charge, which is a very good indicator. The speaker has a high-quality phone and loud.
Lenovo IdeaPhone S920 is not an unconditional bestseller, but this is a good choice in the case of purchasing a device "all in one", which is emphasized by its good camera, durability and the presence of 2 SIM cards.
Video - how to boot from a flash drive or from a disk on Lenovo laptop
In order to install the operating system to the computer, you must configure it to download it from a flash drive or disk. Therefore, in today's article, we will consider how to download the download from the flash drive to the BIOS. This must be done to start installing Windows. Since if you just insert the bootable USB flash drive, then nothing happens. You will start loading the old OS. If you have not downloaded a fresh version of the operating system, then read the article - like. Let's proceed now directly to the process itself.
We use Boot Menu to download from the flash drive.
After rebooting the computer, it is not always necessary to enter the BIOS motherboard for configuration. To begin with, let's try to use the Boot Menu (Download menu). For this, before the system starts uploaded, you must press the "F8" key, thereby the special window with the list (download menu) of the connected drives should appear. In this menu, you must select our USB flash drive with the OS recorded on it.
After that, it should start, namely copying the installation files to the hard disk. After the computer itself restarts, installing Windows will start from the hard disk.
If for some reason you can't open the download menu, let's start to understand how to download the load from the flash drive to the BIOS. But first, I want to briefly tell you what BIOS is. 
BIOS (Basic Input / Output System - "Basic I / O System")- A special set of built-in software that implements the application programming interface required to work with computer components and devices connected to it. 
In order to get to the BIOS settings, you need to have time to press the "Delete" or "F2" button or any other, depending on the initial boot of the computer. On the monitor you will have at this point in time to display the logo of the motherboard manufacturer or information about the processor, memory and hard drives. At the same time, something similar to the bottom of the screen will be written:
- "PRESS DEL TO ENTER SETUP"
- Press F2 for Settings or similar.
After pressing one of the buttons, you will need to get into the BIOS settings. Depending on the board, the software of the basic I / O system may be different. I suggest to consider the most popular options, as well as configure them to download from the flash drive.
If the AMI BIOS is installed on your board, then in order to set the disc boot order, we need to perform the following steps with you:

Note! The USB flash drive must be connected before you go to the BIOS, otherwise it will not be determined.

If your motherboard with Award or Phoenix BIOS, then to configure Windows downloads from a flash drive, we make the following steps:

On many modern laptops, BIOS InsyDeh2O has been installed and many are faced with the problem of installing the order of disc boot. Let's deal with this problem together. We will perform everything on points to not be mistaken.

Note! If you need to install the boot with a CD or DVD disk, then you need to put the item "Internal Optic Disc Drive"
- After the settings done, go to the "EXIT" menu section and select the "Save and Exit Setup" item, thereby keeping the changes done and exit from the BIOS.
Currently, many manufacturers of motherboards are installed instead of the usual BIOS, UEFI software, which has a graphical interface, as well as support for the mouse control and Russified menu. Thus, it makes it easier to solve us the task as in the BIOS to load the load from the flash drive.
If you are lucky, and entering the BIOS you see that the graphical interface is booting before you, then you need to go to the additional settings by pressing the "F7" key or the corresponding button in the main window. In the menu that appears, you need to go to the "Load" tab and in the "Loading of Disk Download" in the first place to set our bootable USB flash drive. 
After the changes have done, press the "F10" key and select the "Save Settings and Reload Computer" item.
Let's summarize.
In today's article, we looked at how to download boot from the flash drive. At the same time, I tried to show it as much as possible, as is done in different versions of the BIOS. As a rule, all settings are reduced to setting the first in the queue, the loading flash drive or disk with the system. Many users have difficulty with this, as an interface in English. But as you can see, the developers do everything possible to adapt bios for all users. It is clearly seen in the new UEFI.
In previous articles, it was described in detail how to get into. But for what purpose do you need? In most situations, the BIOS entry is required to change the default boot disk. This text disassembles a method of booting from a disk or flash drive on several options for computers. On different devices there are the same principle. Moreover, its observance requires only a minimum of logic and attentiveness.
Two methods boot from disk or flash drive
In the first version it is proposed to put in Setup. (It is BIOS) The default device is required. In practice, it will look like this: if any inclusion, the computer will start from the specified equipment. If the device is unavailable or does not suit the download, the system will try to do this from the next list, which can also be designated. If it does not work, the computer will turn to the third device and so on.The following method is supported by almost all modern laptops or stationary solutions. Enough during the computer start, enable the menu to select the download. Thus, the device is determined from which the system will start only once. This is a more convenient method in a situation if you want to download the system from the flash drive.
When using the first method, to select the download device in the BIOS, go to it and see the existing interface. If you are taking the blue windows, then in front of you - AwardSeriously different AMI., and the graphic of registration indicates UEFI. There are others. To decide, it is enough to simply learn screenshots and compare with your interface.
If you have award
Enter the setup, go to " Advanced Bios Features." Standardly, this item is placed the second-third, starting on top.
Next, maybe several options. In one case, you need to find a clause that is called similar to " BOOT SEQ & FLOPPY SETUP».

In another situation, the required sections can be seen immediately.

Now we will define the necessary items in the menu.

First Boot Device. Means the equipment from which the computer will first start starting.
Second Boot Device. Uses the system in that case, if the first device does not fit for download.
TO Third Boot Device. The computer will switch if with the second in the list of equipment there will also be problems.
Any item from the similar "X Boot Device" corresponds to a hard disk, a flash drive, a CD / DVD disc or a different boot device.
If none of the options approached and the Boot Other Device is ENABLED, the operating system will be searched for other drives.
When choosing opposite any "X Boot Device" Hard Drive, i.e. Hard disk, the Hard Disk Boot Priority item allows you to specify in more detail how specifically the disk is applied. This moment refers to flash drives, since this type of boot device is determined by the computer as a hard disk of an external type.
Consequently, for the start from the DVD disk or the CD is required in the "First Boot Device" item, assign ATAPI CD or "CDROM" and do not choose anything else. However, it takes not only to download from the flash drive not only to click on the "Hard Drive", but also go to the "Hard Disk Boot Priority" section. There, using the "Pageup" and "Pagedown" buttons or "+" and "-", moving the flash drive up to the very beginning of the list.

Taking into account! The flash drive connects to the computer before rebooting or inclusion. Otherwise, it is far from the fact that BIOS will see it.
The name of the flash drive may look different. It usually starts with "USB ...", "Generic USB ...", and sometimes "External Device". The result of all the actions produced must be saved. Just press the key F10."(To clarify, look down the screen on the prompts: there must be the words" Save "and" Exit ") or even return to the main menu and there already choose" Save and Exit Setup" In the "Y" button that appears, I agree with the "YES" and click "ENTER".

A reboot will begin. When starting from the disk, the inscription will appear for a couple of seconds. Press Any Key to Boot from CD or DVD ...».

Literal translation phrase: "Press any key to download CD or DVD ...". This means that you can click any button and the computer starts from the disks. If you do nothing, it will be loaded from the next in the list of equipment.
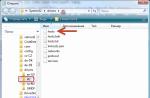
Download process in AMI BIOS
Such bios have a completely different appearance, compared with the Award option. To begin with, we get to SETUP and looking for the section " Boot»Button to the right. Here are the two necessary items, they are clearly visible in the screenshot.
To load a hard disk or flash drive need a tab Hard Disk Drives.. Choose it and in the line "First Drive" (sometimes called "1st drive") We will put our USB flash drive (USB device). After that, you should return to the previous section. Press the "ESC" button.

Then go to Boot Device Priority. Select 1st Boot Device and again from the list - USB flash drive.

Be careful, the selected devices must match! If a hard disk is assigned in the first step, then you need to install a flash drive in the list, but it.
When you need a download from the CD / DVD disk, select "CDROM" in the same menu (sometimes "ATAPI CD-ROM"). Moreover, in this case, the "Hard Disk Drives" section is no longer needed. Save the settings with the " F10."Or you can simply go to the item" Exit "and click" Exit Saving Changes.».

A request will appear, answer "OK".
On different models of laptops and computers, everything is pretty much like. For example, on the standard laptop from Lenovo, the "BOOT" section includes all the equipment immediately, which is very convenient to users. Confusion is excluded with additional subsections and priority. To exhibit the order of equipment loading, just use the keys " F5 / F6." Therefore, to perform the start from the flash drive, simply promote it to the top.

Some users use detailed decoding.
- USB HDD means an external hard disk or flash drive.
- As ATAPI CD is defined by CD or DVD-ROM.
- HDD (Sometimes ATA HDD) is a hard disk.
- USB FDD is an external diskette device.
- USB CD - drive for external disks.
- PCI LAN denotes the load on the local network.
Below is clearly visible BIOS EFI (UEFI), which differs not only by the graphical interface, but also the working mouse. If you have a computer with EFI, then when you enter the BIOS, such an image will be met.

At the bottom of the screen hosted the menu Boot Priority.. Here you can directly with the way dragging to make the required loading order. In addition, by pressing the "EXIT / ADVANCED MODE" button, which is in the top of the right, you can go to the extended version. To do this, in the emerging window you need to select Advanced Mode. Then find the "BOOT" section and in the Boot Option Priorities tab on the "Boot Option # 1" field, put the desired boot device: DVD-ROM, USB flash drive, hard disk or other equipment available.

But computer owners Hewlett-Packard. Usually the next picture is waiting for the transition to the bios.

In the "Storage -\u003e Boot Order" menu section, find the required device and press "ENTER". Move it up and when it will be at the beginning, also press "ENTER". To save the settings, select "File -\u003e Save and Exit".
Methods of loading from disk or flash drive without entering bios
It has already been mentioned above that almost any modern laptops and computers are designed for a one-time load from the desired device and no need to contact the BIOS. It follows only when you start your computer to press a specific button. For example, in this bios Award it is proposed to choose " F12."And call the boot menu.
Typically, something like "Press F12 Boot Menu" is written. This means: press "F12" to select boot equipment. We do it and see the image, as in the screenshot below.

The list features found devices. Select the CD / DVD disc, USB flash drive or something else and press "ENTER". However, other options are possible in AMI BIOS.

The inscription "Press F8 for BBS Popup" requires pressing "F8" to appear the menu with the choice. On laptops, you sometimes need the "F12" button. Looks like a boot menu as a screenshot.

It is enough to choose the desired and wait for the boot from the CD or flash drive.
Possible difficulties in case of download from USB devices
Problems sometimes arise and the computer does not load. Let us dwell on common difficulties. To begin with, make sure that the USB controller in the BIOS is not disabled. In Award, this information is checked in the Integrated Peripherals Point or Advanced Chipset Features. You need to see the "USB Controller" function and "USB Controller 2" status of them must be "enabled".
In the case of AMI, you need to find "USB 2.0 Controller" in the Advanced menu. The position should be "enabled". The "USB 2.0 Controller Mode" options, "Hispeed" status is required.

In addition, the reason may be in sockets placed in front of the system unit panel. It is worth trying to connect the flash drive to the rear inputs of the computer.
If your setup reminds this photo, then in the "Startup" section, the UEFI / Legacy Boot parameter changes to the "Legacy Only" position.

In addition, the problem is possible in a disk or flash drive. Wanted exactly loading! You can check it on another computer running.
For fairly old computers at all. If there is no more new version of the bios, the PLOP solution can help. Download the last option, unpack the archive. You will see files from them plpbt.iso is a way for a CD disk, and plpbt.img for a floppy disk.
It is clear that if there is a floppy disk, then the corresponding image is written to it, and the CD-R / RW disk places an image for a disk. Just record the file on the media fail: there are special software for the image. This topic was described in the instructions for installing the OS. Then you start from the CD disk either the floppy disk, select the device in the window. The way helps to boot from flash drives on the most ancient computers.
Summarize
You have learned a detailed manual for downloading from a disk or flash drives in a wide variety. If this is just once, it is better to use a menu that does not require the transition to the BIOS. With constant loading or if this selection menu is simply no, it's just good to adjust the BIOS. Do not forget everything to return it.In order to follow the instructions, the loading flash drive itself is required. The process of its creation is quite simple. You will need a Flash device itself, software and data that you want to use when running a personal computer.
In the preparation process will be used by the Ultraiso program.
Preparation Action:
- Download the program to the computer with any browser convenient for you.
- After the end of the download, run the installation process and follow the instructions that the Wizard window provides.


- Next, when installing the software ended, you should open the program and insert your Flash drive into the port of the system unit.

- In the program window, select the File tab, where using the Open item open the data you want.

- In the "Self-loading" tab, click the left mouse button on the "Write an image of a hard disk".

- In the window that appears, find the "Disk Drive" selection string, where there must be the name of the Flash device.
- To complete the procedure for creating a boot flash drive, you must click on the left mouse button on the "Write" button.

Work through the selection window
After you have created a bootable USB flash drive, connect it to the free port of the system unit and restart. When it starts, you need to manifically press the "F11" key, if nothing happens, then you may have another version of the BIOS, and you can try to use the "F8", "F10" or "F12" keys.
A window should appear to select the loading of an external device where you need, operating the arrows on the keyboard, select the name of the Flash drive.

Work throughBios.
If there are problems with the previous way, that is, a reliable option - work through.
On a note! BIOS versions are different and for each of them need a special number of actions, but the principle of operation remains the same. In order to understand what your BOIS version is on the PC, you must first call the main menu and view the similarity with the above-mentiones.
To proceed to work, you need to insert a flash drive into any free port in the system unit, restart the computer and at the time of the computer starts often press the "Del" or "F2" key. If nothing happened, and the process of starting the operating system went, then restart the re-computer and see the prompts in which the names of the keys must be written, for example "Tab" or "F1". It already depends on the BIOS version and manufacturer.

VersionAmi Bios.
If, after done manipulations with the keys, this image appeared on your monitor, then, undoubtedly, the BIOS version is installed on your personal computer.

Important! Before installing the launch priority, you need to believe the performance of two functions.

Now it's a queue for installing download priorities:

VersionAward Bios.
Go to the BIOS using actions told earlier. If on your screen this picture, then follow the following plan:
- Go to the "Integrated Peripherals" string using the arrows on the keyboard. The "USB Controller" and "USB 2.0 Controller" features must be "enable".


- Next, return to the level above by clicking the "ESC" button once, and select "Advanced Bios Features".

- After entering the menu from the list of available functions, you will need "Hard Disk Boot Priority", where you will set your flash memory priority to download. This is done in a simple way. Operating the arrows, select the name of the flash drive and by pressing the "+" key raise this name to the first position.

- You need to click "ESC" to perform the last action. Find the item "First Boot Device" in the "Advanced Bios Features" section, and change the previous value to "USB-HDD".

- Then it remains to get out of the BIOS, while saving the settings.
VersionPHOENIX-AWARD BIOS
After entering the BIOS, you should have the following picture, if the BIOS version is PHOENIX-Award.

The procedure for action is almost the same as in the previous version:

Video - How to download the download from the flash drive in the BIOS