Initially, the "seven" is configured in such a way that it does not allow unsigned drivers to be installed. This is a special system protection. It is removed if Win 7 test mode is activated.
Test mode setup
The test mode of Windows 7 can be turned on as a result of installing any software, the installer of which has a built-in script. An ordinary user will easily notice a change in the system by the inscription at the bottom of the screen. It's small, but still seriously distracting.
In this case, you will need to deactivate this function.
But there are also opposite situations, for example, when you need to install custom software. And this cannot be done without activating work with unsigned drivers.
Disconnection
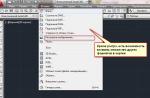
Anyone who is disturbed by the inscription on the desktop will be interested in how to turn off the test mode in Windows 7. This is done from the Command Line. To start it open "Start", find the section in the full list "Standard", the desired item is located there. Right click on it, and then "Starting from ...".

In the text field with the blinking cursor, write the query bcdedit.exe -set loadoptions ENABLE_INTEGRITY_CHECKS, and then press Enter, then - bcdedit.exe -set TESTSIGNING OFF

Note: you won't be able to insert text, you need to type it in manually from the keyboard.
All that remains is to reboot the system.
Important: if you open the command line without administrator rights, then entering the command will be accompanied by the message "Access denied"... This indicates that you have missed the item. "Starting from ...".
Activation
Test mode activation is required to install unsigned drivers, such as those developed by users, that are required to synchronize a device with a computer. But there are other reasons why this function is needed.
Restart Command Prompt following the instructions from the previous section. Activate the first request again. A success notification will be displayed, then write bcdedit.exe -set TESTSIGNING ON
Live and learn - the well-known proverb recently forced myself to remember again. It would seem that we know all these Windows up and down, so it is quite difficult to surprise with our tricks, as for versions 7 and earlier. But the recent moment is a little puzzling. The reason was hundreds of times the operation of flashing a smartphone through a computer on which the operating system Windows 7 was installed.
As usual, after connecting the smartphone, the system began to load the drivers and software necessary for operation, where I pressed the next button almost without looking. After completing the installation, the system asked to reboot, and after booting, an interesting inscription "Test mode Windows 7, build 7601" appeared on the desktop in the corner. Since the inscription appeared in a place where the system usually swears at activating Windows, the first suspicion was that the activation had flown off. However, remembering that just this Windows is licensed and activated according to all the rules, I just googled a strange inscription.
Everything turned out to be simple, pressing without looking at the Next and Yes buttons, I looked that when installing the drivers for the smartphone, they asked me if I wanted to go into testing mode, as a result, my frivolous consent led to the loading of the Windows 7 operating system in testing mode. as evidenced by the corresponding inscription - "Test mode Windows 7, build 7601".
Any software product must certainly undergo appropriate testing, which allows it to identify errors, ensure the full functionality of the program, and optimize it. The only question is how to carry out such testing, Paul Gerrard, who is the director of Gerrard Consulting Limited and runs the UK Test Management Forum, gives an interview where he talks about the advantages of manual testing over automatic testing.
According to information from the Microsoft website, test mode allows you to work with programs that do not have an authentication certificate. That is, nothing terrible happened, the problem remained, how to return to normal mode, since a simple reboot did not allow you to exit the test mode. But even here the official Microsoft website helped, it was enough to follow three simple steps.
1) Launch the command window with the Win + R key combination
2) In the command window, enter the following command: bcdedit / set TESTSIGNING OFF (for Windows 8, the command will be bcdedit -set TESTSIGNING OFF
3) Click OK and reboot the system

Thus, you can turn off the testing mode in Windows, if you wish, turn it on again yourself, for this we perform the same three steps, only instead of OFF we write ON.
During installation, some programs require windows to go into test mode. I personally ran into this while trying to install a little utility called OpenedFilesView. During installation, she asked whether to switch to test mode for signing drivers, which I agreed to for the sake of interest. After rebooting, I noticed the inscription in the lower right corner of the screen: I wondered how to get rid of it. After a bit of searching, I found a solution to the problem.To turn off the test mode in windows 7, open "Start" - "Run" (or press the key combination Win + R) and enter the following: bcdedit.exe -set TESTSIGNING OFF
To enable test mode in windows 7, open "Start" - "Run" and enter the following: bcdedit.exe -set TESTSIGNING ON A little about what the test mode is for. From Microsoft: "Microsoft has added test mode to windows so that users can test programs without an authentication certificate." That is, in test mode, you can use programs whose drivers are not digitally signed by Microsoft. I hope this article will be useful to you! ;-)
tahauov.blogspot.ru
Enabling and disabling windows test mode
Found it on a computer and do not know how to remove the inscription "Test mode build ..." on Windows? Many users face this problem. There is nothing critical here, but the lines at the bottom of the screen can get in the way. Therefore, it is worth knowing what it is, how to enable or disable the test mode of windows 7 or 10.
The functionality of Win 7 and Win 10 provides software testing without certificates.
What's this?
Test mode is a special function that allows you to test programs without a verification certificate. Not all software works with Microsoft electronically signed drivers. For example, the utility has not yet been released in official versions or is about to be released, but it needs to be tested. Sooner or later, any user may come across such a program, after which he will be offered to turn on the "Test". Its activation will be indicated by the inscription "Test mode windows 10 build 0000" in the lower right corner of the screen. Instructions on how to remove the test mode windows 10 are given below.

Activation
Activation of this option for windows 10 and 7, as a rule, takes place without the knowledge of the user. Only then does he notice that incomprehensible inscriptions have appeared on the screen. However, there is a way how to activate this option yourself, without the help of those applications for which it is intended.
- Find the "Command Line" utility. Usually it is easy to find it through the Start menu - in the search or in the Standard Applications.
- Run the line as administrator (right mouse button, select the appropriate parameter).
- Enter the following: bcdedit.exe -set TESTSIGNING ON
- We press "Enter".

After that, a corresponding inscription will appear, which annoys many users.
Deactivation
A much larger number of users are not worried about how to activate the Windows "Test" on the "Seven" or "Ten", but how to remove it. Let's figure out how to turn off the test mode of windows 10.
- Run "Command Line" as administrator.
- We type: bcdedit.exe -set TESTSIGNING OFF
- Press "Enter".

After entering the command, the annoying lines will disappear, which means that you managed to turn off the test mode. However, to remove an enabled mode, you need to restart your PC.
Now you know how to start and disable the "Test" windows 7 or 10. It should be understood that disabling may lead to the fact that the required program will not work.
NastroyVse.ru
windows 7. Test mode: all the details
For many Windows 7 users, test mode is a familiar topic. However, few people will answer the question of why it is necessary to transfer the system to this mode.
It all started with Microsoft's tightening of the requirements for drivers that are installed on a device with windows 7. Now all of them must be certified by Microsoft. This is confirmed by a special digital signature. The system checks each installed driver before starting the installation. If you decide to install new drivers, and the message "windows can’t verify the publisher of this driver software" appears on the screen, then your driver is not certified. Even if later you try to continue the installation, and this option is present, the system will still not allow you to do this. The same situation occurs when installing some programs and utilities. This is where the test mode comes to the aid of users. When windows 7 operates in it, you can safely install unsigned drivers on your device, be it a computer or a netbook.
What is a signed driver?
 Drivers can be signed and unsigned. The only difference is the digital signature. This is an electronic security label that confirms that the driver you have is licensed and has not been changed in any way. The digital signature can also be used to identify the publisher of the driver. If there is none, then it can be risky to install the existing product, therefore in windows 7 test mode for installing such drivers should be used in exceptional cases.
Install or not install?
If you cannot decide which case is exceptional and which is not, do not worry: there are not many such controversial situations. Before rushing to put your system into test mode, learn more about the device you are installing drivers for. Of course, unlicensed software is not safe, and drivers without a digital signature are much more harmful to your computer. It is worth the risk of installing unsigned drivers only on those devices that are already at least a little out of date. For example, not all old printers and scanners can now find licensed drivers. But, nevertheless, it is necessary to somehow work with these devices. This situation will really be considered exceptional, so, dear windows 7 users, the test mode will save you in this case.
Turning on
 The transition to the test mode when installing some programs and utilities will occur with your consent - during the installation process, a window may appear in which you need to give the go-ahead to transfer the system to the appropriate mode. But in most cases you will have to turn it on yourself. This is almost as easy as turning off the test mode of windows 7. So, go to the Start menu, select the Run line and enter the following code: bcdedit.exe -set TESTSIGNING ON.
Disconnection
 After the installation of the drivers is complete, you should remove the test mode of windows 7. To do this, there are two ways, slightly different from each other. The first option resembles the inclusion of this mode. Go to Start, then Run. Enter the following: bcdedit.exe -set TESTSIGNING OFF. The second way is perhaps a little easier. The above text must be entered after pressing the "Win + R" key combination. Test mode is disabled.
In windows 7, test mode is not the most everyday, but still a necessary thing, especially immediately after switching to windows 7 from any other system. The operating system changes, but the devices remain the same. So don't be afraid to use test mode in this case. But in other situations, you should still contact licensed drivers.
If you weren't setting up your PC, keep in mind that the system has a special solution that allows you to check for a signature on the drivers.
fb.ru
Test mode windows 7 build 7601. How to remove?

Hello everyone.
There will be a short article today.
Recently there was a problem like this:
At the bottom right there is an inscription "Test mode windows 7 build 7601".

This happens when the test mode is turned on so that you can use unsigned drivers.
It's actually pretty easy to remove this label.
You must open a command prompt as administrator.
Launch "Start - All Programs - Accessories - Run", enter cmd.exe, press Enter.
In the command line itself, type the following:
bcdedit / set TESTSIGNING OFF
bcdedit / set TESTSIGNING OFF |
We reboot the computer.
That's all)
Such is the simple life hack.
If this information turned out to be useful, leave comments and share with your friends.
Bye everyone ...
Best regards, Sergey Krivtsov
In the process of working at a computer, situations sometimes arise (for example, when connecting Android devices to reflash them) when you need to install specific and unsigned hardware drivers. In this case, it is best to use Windows test mode. Let's consider this issue in more detail.
Turn on test mode in the Windows command line
For the transition to the test mode to be successful, you must first turn off the "Secure Boot" mode in the BIOS, so you need to log into your computer before starting. For different manufacturers of motherboards, the settings will be slightly different, but we will figure out how to disable "Secure Boot" using the example of our computer with an Asus motherboard.
So: start BIOS (UEFI) and go to the "Download" section. In it, go to the "Safe Boot" item and click it with the mouse.
A small menu "OS Type" appears, in which we select the "Other OS" item.
We save the parameters and reload. If there is no Safe Boot item in the menu of your BIOS, then it is already disabled at the hardware level and you do not need to perform the above actions.
Now you can run the top ten in test mode to remove some of the OS restrictions, in particular those that are imposed when installing unsigned drivers. Launch (with administrator rights), enter the command:
bcdedit.exe -set loadoptions DISABLE_INTEGRITY_CHECKS
bcdedit . exe — set TESTSIGNING ON
We are waiting for the completion of the execution of each of the commands, after which the system will issue a corresponding notification.
We close the window, we are overloaded. After rebooting, next to the notification panel, we will see an inscription reminding of the mode in which the operating system is now running.
You can disable the test mode in a similar way, only the command syntax will be slightly different:
bcdedit . exe — set TESTSIGNING OFF
In Windows 10, more and more are given to security measures to protect the user from various threats, from the failure of installed programs. One of these innovations is the Secure Boot feature of UEFI systems, which prohibits the installation of unsigned drivers in the operating system in such a way that only those that were previously approved by the company could install. Fortunately for users who need to install a specific, unsigned driver for special reasons, there is a function Windows 10 test mode.
Windows 10 test mode is a special mode of operation by which users can install unsigned drivers and run software without a digital signature from Microsoft. This mode is good because you can run one or another driver and see the consequences on the system without any risks. When you turn on Test Mode, you will see a watermark on the screen, but what if it turned on by itself? And how to turn off Test Mode in Windows 10.
How to enable or disable Test Mode in Windows 10
Important:
- If it worked automatically and appeared on the screen Test Mode watermark and you just need to turn off the test mode, go directly to step 4.
Step 1... Run Command Prompt as Administrator:
- Click Search.
- Enter cmd.
- Right click on Command Prompt and Run as Administrator.

Step 2... To enable test mode, enter the following commands:
- Bcdedit.exe -set TESTSIGNING ON
Step 3... To disable test mode in windows 10, type:
Step 4... If step 3 did not help, then try entering these commands to disable:
- Bcdedit.exe -set loadoptions ENABLE_INTEGRITY_CHECKS
- Bcdedit.exe -set TESTSIGNING OFF
Reboot your computer or laptop.