To create copies of drawing objects in AutoCAD, the tool Copy... The location of the copy is specified either with a cross-hair pointer or by entering coordinates from the keyboard. When copying, you need to set the base point, that is, the point "for which" the user "takes" objects, and the second point, the location of which relative to the base determines the direction and distance of the copy.
If the distance and direction of movement of the copy are known exactly (for example, the copy needs to be shifted to the right by 100 mm), the base point can be selected arbitrarily, since the second point in such cases is specified in relative polar or Cartesian coordinates. But in our situation, the exact distance and angle of movement of the copy of the contour of the rounded shelf are not known in advance, so the choice of the base point must be approached carefully.
Since there are no characteristic points on the right side border of the desk contour to which we could snap, we can take either the center point of the arc or its end point as the base when moving the arc (coincides with the lower right corner of the rectangle representing the side wall of the small curbstone) ... Let's choose the end point of the arc as the base point - in this case, we can snap the copy to the point located in the lower right corner of the rectangle, which represents the back wall of the work area.
1. Click the button Copy toolbars Change, select the command from the menu Change? Copying properties or enter the command in the command window Copy or simply kp... AutoCAD in the command window will prompt you to select the objects to be copied. Select the arc you created in the previous step and press Enter.
2. The command line will prompt Base point or [Move]:... Turn on snapping mode End and select the point shown in fig. 4.50. (If you find it difficult to select a point correctly, enlarge the corresponding fragment of the drawing by clicking on the button Zoom window on the Standard toolbar).
Rice. 4.50 Selecting the end point of the arc as the base point for copying
3. As soon as you set the base point, the copy of the arc "sticks" to the crosshair with its endpoint, and the prompt appears in the command window Second point or:... Now you should specify the point at which the contour of the second flange will touch the end point of the bottom line of the contour of the back wall. (If you have changed the view scale, click on the button Zoom to previous on the Standard toolbar.) Move the crosshair pointer with the "glued" arc to it to the upper right corner of the drawing (see Fig. 4.3).
Advice. Note that there are two buttons on the Standard panel Zoom to previous- one is among the floating panel buttons Zooming and the second is to the right of this panel. Therefore, it is most convenient to use the floating panel to launch the tool. Zoom window and the tool Zoom to previous launch by clicking on a separate button (without the black triangle in the lower right corner). The same, by the way, applies to the button Zoom in real time which is to the left of the floating panel Zooming(if your computer mouse is equipped with a wheel, the button functions Zoom in real time rotates the wheel).
4. Turn on the mode End and select the endpoint of the lower horizontal contour line for the rear wall of the work area. A copy of the arc will immediately take its place (Fig. 4.51), and the execution of the command Copy will continue. 5. Press Enter to complete the COPY command.

Rice. 4.51 Rounded flange outline copied
Note. If you have changed the view scale using the buttons Zoom window and Zoom to previous Standard toolbars, we noticed that they did not affect the team's work in any way Copy... Other zoom and pan tools work in the same way - you can use them without interrupting previously run commands. This method of using commands Show, Pan or pan and others in AutoCAD is called the transparent launch method.
By now, you can probably see why we didn't create a second rectangle to represent the right side wall of the small cabinet. Indeed, it can be simply copied. However, in this case, you can do even easier - create not a copy of the object, but its mirror image. Similar situations when creating drawings of technical objects, which are characterized by symmetry, arise quite often. Therefore, let's take advantage of the fact that the small cabinet is symmetrical about the longitudinal axis, and apply a mirror image of the contour of its left wall to obtain the contour of the right wall. Along the way, you will become familiar with another object snapping mode.
In this video and tutorial we will show you how to work with properties in AutoCAD and also how the properties panel works and how to copy them.
The lesson will answer the following questions:
- What are Properties in AutoCAD?
- How to enable the properties panel in AutoCAD?
- What are fast properties and how can I turn them off?
- How to copy properties in AutoCAD between objects?
- What to do if the properties panel disappeared?
Video version of the lesson:
Text version of the lesson:
After a long break, we have prepared for you a new video lesson on the topic “ Properties in AutoCAD“. I suggest not to create a long prelude and go straight to the practical study of this issue!
Question 1. How to copy properties in AutoCAD from one object and transfer them to another?
Before us are almost identical objects. The only difference is that the axial lines on one are dash-dotted and the circles are of a different color. Our task is to copy these properties (color and linetype) and transfer them to another object.
Step 1. Transfer properties in AutoCAD we will perform from one object to another using the “copy properties” command. The icon is on the top bar in AutoCAD.

If you do not have such an icon, just click on the arrow and put a tick next to the words “copy properties”

Step 2. We click once on the “copy property” function and select the objects, the properties of which we want to copy and move to another object. More specifically, you need to select the original object in AutoCAD.

In our example, we want to copy the properties of the lines and transfer them to the lines of another object, so that they also become dash-dotted. To do this, we move the cursor to the desired object (in our case, this is a line) and see that the object is highlighted.

After clicking on the object (the properties of which we are copying), the line is highlighted in blue, which means that the properties have been copied.

Step 3. After we have selected the object whose properties we are copying, we need to select the lines to which these properties need to be passed.

Pay attention, when we move the cursor to the lines, AutoCAD already shows us the future changes in advance.

In order to finally transfer the properties, you just need to click on the lines we need.

We finish working with the command “copy properties” using a space or an enter.
Step 4. Let's do the same, only with the colors of the circles. We select the command “copy properties”, select the circles with yellow color and transfer these properties to another object.

Question 2. How to call a window properties in AutoCAD and find out everything about any object?
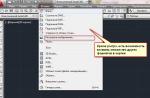
Step 1. Select any object in the program and press RMB (right mouse button), in the context menu select the item "properties".

Step 2. Please note that the "properties" window always displays different sets of the properties themselves, it all depends on what you have selected. In our case, these are geometric objects that have “color, dimensions, coordinates, thickness and other parameters”. Moreover, if you select several objects, many items in the properties will have the meaning "different" and it is understandable, there are several objects.

Step 3. If you select one line, then the properties will display full information about this object.

Interesting fact!
If you copy any property in AutoCAD and transfer it to another object, then at once you will transfer not only its parameters (color, thickness, etc.) but also the layer!
Question 3. How do I disable swift properties?
Quick properties are information that was forced to be displayed after selecting any object in the form of a small window. Many people do not like this (although, on the contrary, I find it convenient to me). Moreover, starting with the 2014 version of AutoCAD, this is not the default.

Step 1. The most remarkable thing is that to disable the fast properties "bs" in the mode panel, you must first add them to this very panel. Because By default, we do not have this icon, and the "bs" function is disabled, but you may have a different situation. Therefore, we go to a special item, click on it and put a tick in front of the "quick properties" so that they appear on our panel.

Step 2. So, we activate the quick properties icon, select the object and see a window that many do not like very much, this is quick properties in AutoCAD.

Step 3. To disable these properties, you need to, yes, right, click on the icon on the mode bar. When the color turns gray, the function is no longer active.

And that's all for us! Thank you for your attention!
If you liked our lesson and you want to know more, then be sure to take your copy of the lessons ““. With these simple lessons, you will be able to understand the basics and navigate better in this professional and highly demanded program.
As a rule, for any constructions, we use copying of objects, properties and entire drawings, and in order to do this as efficiently and quickly as possible, we need to have an impressive arsenal of tools. But, to the question "How to copy in AutoCoad?" there is no definite answer!
The thing is that you can copy to AutoCAD in at least 12 different ways. Moreover, each option has its own characteristics and provides certain advantages. It is about the copying methods that will be discussed in this lesson.
How to copy from AutoCAD to AutoCAD?
In AutoCAD, you can copy both individual objects and entire drawings. The question of how to transfer a drawing from AutoCAD to AutoCAD arises very often. After all, as a rule, it is not necessary to draw a project from scratch. You can simply take another drawing or its individual elements as a basis.
To copy a drawing in AutoCAD, just select it, then use the hotkey Ctrl + C, then paste it into a new file (hotkey Ctrl + V). This is the fastest and easiest way.

NOTE: To copy with a base point, you must use the keyboard shortcut Ctrl + Shiht + C, and then graphically indicate the anchor point of your object. In this case, a specific insertion point is determined with the hot keys Ctrl + V.
To make copying from one drawing to another more comfortable, you should place the files next to each other, as in Fig. 1. You will find more details about this arrangement of windows in the article “How to correctly insert a block from another drawing in AutoCAD? "
How to copy an object in AutoCAD?
You can copy an object in AutoCAD as described above. However, for these purposes there is a separate command, which is located on the "Home" tab, the "Editing" panel (Fig. 2).

The practical application of various copying methods is discussed in detail in the free video course "Creating an AutoCAD Project from Idea to Printing", which will be useful not only for beginners, but also for more experienced users.

In AutoCAD, you can copy not only drawing elements, but also other objects, for example, pictures, graphs, diagrams from Word or PowerPoint. Sometimes it may be necessary to create several duplicate Sheets. Therefore, we recommend that you familiarize yourself with the following publications from the AutoCAD Tutorial.
AutoCAD users are usually experienced with the Copy Properties (COPY TO) command, which allows you to quickly copy AutoCAD primitive properties such as layer, color, and linetype and apply them to another primitive. Beginning in AutoCAD Architecture and AutoCAD MEP 2009, you can also copy style and object graphical properties between AD objects of the same type (for example, two doors of different sizes) or between AutoCAD MEP objects of the same type. ... For AD objects of different types (for example, door and window), you cannot copy AutoCAD base properties using this command. In the same way, you can copy basic AutoCAD properties between an AutoCAD primitive and an AD object.
When you copy properties between style-based AD objects, both the style properties and the graphical properties of the selected source object are applied to one or more selected targets. For non-styled objects, only graphical properties are copied. In both cases, the graphics properties apply to all display representations of the target.
Object types in which both style properties and graphical properties are copied
- 2D section
- AD-size
- AD polygon
- Stained glass
- Wall block
- Display theme
- Door
- Door / window assembly
- Masking block
- Shaping element
- Multi-view block
- Railings
- Roof slope
- Specification
- Overlapping
- Space
- Stairs
- Load-bearing elements
- Wall
Object types in which only graphic properties are copied
- 3D mesh
- Ceiling mesh
- Column grid
- Spot elevation mark
- Layout curve
- Marking grid
- Opening roof
Overrides
When you run the Copy Properties command, any style or object overrides that are in effect on the source object are applied to all display representations of the target object. If the target object is currently in effect with overrides that are not consistent with the corresponding settings on the source object, those overrides are removed. It is recommended that you use the Display tab of the Properties palette when you need to change settings for specific graphical properties in specific display representations.