Windows 10 differs in many ways from previous operating systems from Microsoft, including the location of system files, as well as the availability and access to accessibility features and functionality of the OS. The update center has also undergone certain changes, which will be discussed below. Nevertheless, setting up Windows 10 System Update itself has not become more difficult, but on the contrary, it has become easier and more convenient.
Windows 10 Update- a program with which the operating system is updated to its more current versions, and also downloads updates for related programs. Without it, the operating system on your computer will quickly lose its relevance and will not have many additional features that appear over time.
Location
Previously, this program could be accessed through the Control Panel, but now no user can find it there. Now the Update Center can be opened through the menu " Start". In it you need to go to the section " Parameters", From there to the section" Update & Security". In this submenu, you can easily find this program and update your system with it.
How to check for updates
To make sure that your system has updates, you need to click the button Checking for Updates, which will show all found updates and offer to install them. In addition, there are not many properties that can be adjusted in the basic settings. You can adjust a wider range of parameters by clicking on the item " Extra options". Windows 10 not every build supports this method. It is available in Pro, Education and Enterpise versions.
How to set up Update Center
The automatic operating system update process is configurable and can be disabled in several ways. The methods below allow you to quickly do this without the need to install additional utilities.
Using the built-in "Services" program

Using the registry editor
- Open the registry editor using the Win + R key combination.
- Type the command regedit
- There, move to the folder " Auto Update"Located along the path" Hkey_Local_Machine» → « Software» → « Microsoft» → « Windows» → « CurrentVersion» → « WindowsUpdate».
- In the menu that appears, double-click on the item " AUOption". After that, set it to 1. This means that the Update Center will stop checking for new versions of programs for Windows. If you want to enable updates again, then just change the value to 0.
It is possible that there will be no such parameter, then you need to write it down yourself. Just right-click on a section of the field and select the creation of a separate parameter with the DWORD type. Name it the same as indicated here.

In the Advanced Options menu
Go to the Update Center menu for the guide above. Select " Extra options"And go to the window" Reboot notification". There select the item " Postpone updates».
It is worth saying that with this method of disabling, updates will still be installed.
You can enable automatic updates from here.
Possible problems
Sometimes it may happen that a previously working update center stops functioning for unknown reasons. Below are the most common problems with this program and solutions if suddenly the update service does not work.
Troubleshoot problems with Windows 10 Troubleshooter
Modern Windows operating systems have a built-in way to deal with crashes and malfunctions in applications. It can also help you deal with problems with the not working Update Center.
- Go to the menu " Start».
- In the search line, write “ Troubleshooting».
- Double click on the icon that appears. A window with the menu " system and safety". There, at the very bottom, click on the item " Troubleshooting».
- In the menu that appears, click " Additionally", Check the box" Accept corrections automatically"And confirm the launch as administrator.
- Then click Next and wait. After some time, the correction process will be completed and “ Update centre»Will resume work.
Error "Service Registration is Missing or Corrupt"
This problem occurs if a proxy server is registered on your computer without permission to update. There are two ways out of this situation: do not use a proxy for updates, or set permission in the system itself.
Restarting Update on Windows 10
In the operation of this program, situations sometimes arise when the error is not corrected by the Troubleshooting Center, as well as by other methods.

Thus, the most effective method of solving the problem is to reset the Update Center system and restore it to default.
To do this, you need to do the following:

Upon completion of this procedure, the Update Center will be reinstalled along with all related services. Thus, the system will stop crashing and start updating.

In general, this is all that can be said about Update in Windows 10. Its work, of course, is somewhat different from what it was before, however, it still performs the same functions as before the new OS from Microsoft. In addition, in the tenth version of Windows, it is in a different place, which changes the order of actions for configuring and debugging it.
Related Videos
Today, despite the abundance of various criticism, Windows remains an advanced operating system, occupying a leading position all over the world. This year, the company presented to the public a new OS - Windows 10, enabling users of old systems to upgrade to it (the promotion is open until August 2016).
On the whole, the “top ten” received positive ratings, in contrast to its predecessor, however, some elements caused a certain misunderstanding. One such element is the Update Center, which is best described as “forced”.
Moreover, the initial settings assume the installation of updates during the reboot process, which the user is not even notified of. Naturally, the user is not given any choice.
Update system
In Windows 10, it is made so that the restart of the computer system in order to install updates occurs only if it is idle. An obvious measure that should have prevented the system from interfering with the user's work.
It should be said that in the vast majority of situations, Windows 10 detects well enough that the computer is not being used. However, for many people who need a PC running in the background, such a system will not work, as unexpected reboots will create some discomfort.
In all past Microsoft operating systems, the Update Center was a permanent element that was responsible for downloading and checking for the latest fix packs and device drivers from the Internet, and integrating them further.
Previously, all of these processes were completely customizable. Even in Windows 8, the user could manually manage system updates through the control panel. Optionally, you could disable and enable them, as well as choose to download only the most serious fixes.
In the latest 10 operating system, Microsoft has completely removed the option to opt out of updates. In this case, of course, we are talking about setting using the built-in interfaces - the control panel and the program " Parameters».
Microsoft is now solely making the decisions about updating your system. The only thing that is left to the mercy of the user is the ability to postpone the process of installing fixes for a certain period of time. But even this feature is only available to owners of the Windows 10 Pro version. Owners of other assemblies of the operating system do not have this option either.
Customization
The operating system update center in 10 has finally moved to the standard application " Parameters", You can go to which you can follow the link from the menu" Start».

Among other subsections of settings, it is located on the main screen of the program under the name " Updates and security».
You will find a modest number of customizable elements here:
- Enable / disable PC restart when installing fix packs. If you want to avoid a sudden shutdown of the computer, you should change this parameter, as a result of which you will receive notifications before restarting the system.
- Enabling / disabling updates for other Microsoft programs installed on the PC. If you do not want to receive maintenance for various products of the company, you should disable this option.
- Postponing updates. With this option it is possible to postpone the system update. However, fixes regarding the security of the system will continue to arrive.
In addition, the basic functionality of the OS allows you to disable downloading and installing drivers. This requires:
- Open the Run dialog using the Win + R keyboard shortcut
- Enter the following text into the window:
Rundll32 newdev.dll, DeviceInternetSettingUi
then click on the Enter button. - In the window that appears, first select the item " No, provide a choice", then - " Never install drivers from Windows Update».
- Save changes.
After completing this sequence of actions, you will prevent the system from looking for drivers on the Internet, and instruct them to install them exclusively from the memory of a personal computer.

Show or hide updates tool for Windows 10
Another way to stop automatic system updates is to use the Show or hide updates tool.
To do this, you should download the program from the Web and run it, which will lead to the start of a system scan, at the end of which you should click on the Hide updates button.
The screen that appears will prompt you to select the fixes you want to hide. You should proceed in a similar way if you want to return some of the updates.
Wi-Fi limiting
Another method of limiting updates. To do this, you need to set up an Internet connection via a "metered" Wi-Fi channel.
To do this, you need to follow these steps:
- Open the menu " Parameters"And go to the subsection" Network and Internet».
- Then, in the subsection of the wireless connection, go to " Extra options"And enable the option" Set as metered connection».

Using the Windows 10 Registry
Using the registry, you can completely disable the download of update packages.
To do this, you should perform the following operations:

Thus, there are many options for configuring and limiting the Windows 10 update system, which more than pays for the modesty of the built-in functionality, which has only a few adjustable options.
Related Videos
By default, system updates are found, downloaded and installed in automatic mode, the computer only informs the user that the update process has been completed. A reboot to complete the installation is also done automatically. But these and other parameters can be changed without resorting to third-party programs.
About update center
Update Center is the place where all settings and functions related to system updates are located. In Windows 10, the number of settings that could be changed without third-party applications and editing the registry has greatly decreased compared to previous versions of the operating system. For example, you cannot completely prohibit downloading and installing updates using the standard method.
Also, the settings for the edition of Windows 10 "Home" are cut: some features are missing, available in the professional and higher editions. You can find the update center only in the system settings, it was removed from the "Control Panel":
Search for available updates
There are several ways to check for updates: through command execution, third-party applications from Microsoft, and Update Center.
Through "Windows Update"
The standard and easiest way is using the update center: just click the "Check for updates" button. If updates are found, you will receive a notification containing the name and a unique update code that starts with KB. When you confirm that you want to install the found updates, they will start downloading, and then installation, followed by a computer restart.
 Click on the button "Check for updates"
 The only thing that is required of you is to provide your computer with a stable Internet connection and power supply. An interrupted process can cause a variety of errors, which will lead to a breakdown of the operating system.
Through third-party programs
If updating through the update center for some reason is not possible, use the Windows 10 Updates program by downloading it for free from the official Microsoft website. Regardless of which update method you use, the information stored on your hard drive and third-party applications will not be affected.
 Download the Windows 10 Updates program from the official Microsoft website
 Possible settings for home edition
The settings for Windows Home Edition are very limited. The only thing that can be changed is the time when the computer will automatically restart. A reboot is only necessary if there are updates downloaded but not installed. You can execute it right away or choose one of two options:

Having decided on the reboot period, you can check the update settings.

This completes the steps available in the home version of the operating system. All other settings can be done using third-party programs, command line, registry editing, or other system parameters. But it is strongly recommended to perform deeper settings only for those who understand this, otherwise changing the system settings may lead to errors.
Video: Configure Update Center in Windows 10
Possible settings for other editions
All Windows Home features described above are available in Professional and higher editions. But besides them, there are other settings that help to customize the conditions for receiving updates in more detail.
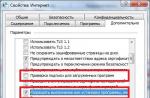
- Go to the "Advanced options" update center.
 Press the button "Additional parameters"
 - In the advanced settings, you can choose one of two options: automatic, that is, when updates are received and installed without your knowledge, or manual, when everything happens automatically and without your permission, but you can define the time for restarting the computer, which is necessary to complete the installation of updates.
 We choose automatic receipt of updates or mode with notifications
 - The Delay Updates feature allows you not to install some updates for up to 8 months after they are released. Security updates and versions important to Microsoft will be installed even if this feature is activated, and everyone else will wait for the expiration or deactivation of the feature. You should postpone updates only if there are very important data on your computer or something depends on its stable operation. If you do not install the updates right away, then other users will have time to try it out on themselves and find all the flaws that Microsoft will fix with the next update or replacing the existing one.
 We activate the "Postpone Updates" function in order not to install updates immediately after they are downloaded
 - In the "How and when to receive updates" section, you can enable or disable receiving updates from other computers. This feature allows you to reduce the load on Microsoft servers due to the fact that users who have already received updates on their computers begin to distribute them to other users. If this function is enabled, then you also become a member of the program, that is, you distribute and receive updates.
 Specify where to get updates from
 - In the "Change the active period" section, you can set the time frame during which you usually use the device, they should be no more than 12 hours. During this time, the computer will not automatically restart to install updates.
Windows 10 is a new modification of the popular operating system, which has already become quite popular among users; it has some differences from other modifications.
There are some additional functions, and still missing others, familiar to Windows 7 and 8. In particular, in the tenth version of the system, it is not known where the Windows 10 update is located, since it is not in the same place in the control panel.
Features of the service
To find the update center in this operating system, you need to open the "options", and from there go to the item "updates and security".
But if necessary, you can make it so that the control center will be in the control panel. To do this, you need to type in a notepad:

Next, you need to save the resulting file under the name "winupdate", at the end of which "reg" will appear, and only then open it. As a result, the Update Center service will appear in the control panel. Attention! this method does not work in the latest versions of Windows 10.

In order not to do the above translated work manually, download the ready-made file from the link.
Features of managing the new update center
Management of the center has been significantly narrowed: for the owner of the computer, only the function of checking for available updates is available. But even without that, Windows 10 Update functions completely on its own. It installs both driver and software updates, so it's almost impossible to tamper with it. But there are a number of possibilities, thanks to which you can still slightly correct the work of the center:
You should open the menu of additional parameters and there uncheck the box opposite the item, which contains consent to install other components besides the operating system. As a result, the programs required for operation will remain unchanged.

You can independently choose the time to restart your computer when installing new updates in order to avoid unwanted interruptions during work and the loss of important information. To do this, in the additional parameters, you need to specify the restart time and uncheck the box with the automatic restart function. But it should be understood that such settings do not affect the download of updates, they will still be installed automatically.
If the version of the operating system is professional, then you can postpone the installation of updates for some time, up to several months. This can also be configured in the advanced parameters. This approach will be useful for system administrators who are used to testing them thoroughly before introducing new technologies. It is worth considering that only the most important components will be regularly updated.

It happens that updates are not downloaded even if you set a limit connection to the Internet. Initially, you will need to connect to the appropriate network and activate the "Set as metered connection" option in the "Additional parameters" menu.
It is possible to choose the method of downloading updates, one of which is a peer-to-peer network.
The Update Center service in this operating system is convenient for functioning in local networks, since it is possible to use only one PC for downloading, in order to transfer data to other computers later. However, it should be remembered that when the updates are erased, they will no longer be transferred to other PCs.

If you experience problems with the functioning of your computer, you can get rid of unnecessary updates by going to advanced options. There you should open the log and remove unnecessary updates.

One of the significant advantages of the Windows 10 operating system is the fact that when you return to the initial state, the system is automatically updated. This saves you from wasting extra time performing the required actions. At the same time, it is possible to update not each application separately, but several components at once, which simplifies the work.
Update Center problems
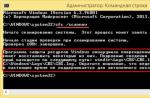
Sometimes, when working with the update center, problems arise due to which updates are not downloaded, or other errors may occur that lead to failures and incorrect operation of the system. The main way by which it is possible to fix problems is to reset the previously specified settings of the update center and then reboot it. To do this, type the text in a notepad:

The next step is to save the typed file under a name that will end with the letters "bat".

You can download the file already ready for launch by following the link.
After that, you need to right-click on the created file, select the item that implies opening on behalf of the administrator and follow the further instructions of the system.

As a result, the settings for the Update Center service will be canceled and it will be restarted. When all operations are completed, it is worth restarting the computer and checking the operation of the element. In many cases, this approach helps to solve the problem.
But it also happens that such a solution does not help get rid of the problem, so you should pay attention to other methods, and understand in more detail how you can enable the update center. For example, you can try to see the type of malfunction and how to solve it on the network using the error number that is indicated in the message. Everyone knows the fact that almost any information can be found on the Internet, so it's worth a try.
You can also see whether the BITS, cryptography service is running or not, as well as the update center itself. If not, then you should try to start them, sometimes the problem can be solved in this way.
Another method is to go to the network connection settings and set the following DNS values there: 8.8.4.4 and 8.8.8.8. Sometimes, if updates are downloaded through the store and there are failures, then it is better to download them through the service of the update center.
There are other reasons for the failure or incorrect operation of the update center in the operating system, they all require different types of solutions, however, the ones listed above are the most universal. If it was not possible to fix the problems on your own, it is better to contact an experienced specialist so as not to harm the operating system, as well as to avoid its incorrect operation.
After the latest updates appear on your PC, a notification will pop up prompting you to install the update. The notification itself is saved in the Notification Center.


Unfortunately, Windows 10 Home users won't be able to configure updates this way. This is due to the fact that in this version of the operating system, the Group Policy editor is simply absent. But do not be upset, you can still configure the receipt of updates and this is done through the registry editor.
1. Open the registry editor window. To do this, simultaneously press the two keys Win + R then, in the next window, you must enter regedit and press "Enter".
2. Then, in the editor window, we go through the directories along the following path:
3. Right-click on the Windows directory and select New → Partition.
4. For this section, enter the following name: WindowsUpdate.
5. In the section that we have created, in the same way, you need to create another one, but with the name AU.
6. In the AU directory, in the right half of the editor window, right-click on any empty space and in the menu that opens, click Create → Parameter DWORD(32-bit).
7. This parameter must be given a name AUOptions.
8. In the same way, create a few more parameters with the following names: NoAutoUpdate, ScheduledInstallDay, ScheduledInstallTime... Optionally, you can create a parameter.
9. For all created parameters, specify the values that depend on the desired result.
| Parameter | Description | Value options |
| AUOptions | This parameter determines how updates are downloaded and installed. | 2- notification when updates are available. 4 - everything happens automatically, but according to a specific schedule. 5 - Allows local administrators to configure notifications and boot methods. |
| NoAutoUpdate | This option can be used to disable updates. | 0 - this value disables this parameter. 1 - this value of the parameter disables automatic updates. |
| ScheduledInstallDay | With this parameter, you can specify the tribute of the week for installing updates. This option will only work if the AUOptions option is set to 4. | 0 - any day. 1 - on Monday. 2 - on Tuesdays. 3 - every Wednesday. 4 - Thursdays. 5 - every Friday. 6 - Saturdays. 7 - on Sundays. |
| ScheduledInstallTime | With this parameter, you can specify a specific time to install updates. As in the previous case, this option works when the AUOptions value is 4. | Here you can specify values from 0 to 23. According to the clock. |
| NoAutoRebootWithLoggedOnUsers | Disables automatic restart after installing updates. The reboot is carried out only by the user, manually. Works only if the AUOptions value is 4. | 1 - disables automatic reboot. 0 - this parameter is not active. That is, reboot is enabled. |
Files for automatic creation and configuration of registry settings
Download the automatic registry configuration files and unpack it. The archive contains the following files:
1. WU_Notifu_Updates.reg- indicates the second value: notification before update operations.
2. WU_Never_Notifu_Updates.reg- this file will disable updates altogether (not recommended).
This instruction can help in the event that after the automatic installation of the driver, various failures and malfunctions in the system begin to occur. In such cases, this type of installation is disabled in order to avoid installing problematic drivers.
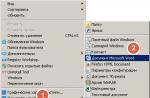
1. Open the Control Panel window. To do this, use the simultaneous pressing of two keys: Win + X, and then select "Control Panel" from the menu.
2. Open the Systems and Security section and then expand the "System" category.
4. Now, in the properties window, open the "Hardware" and here click on "Device installation options".
5. In the next window, set the switch to the "No ..." position. Slightly below, set the switch to the "Never install drivers ..." position. To apply all the settings made, click on the "Save" button. 
In the same way, you can prevent the installation of drivers through Group Policy.
1. Open group policies (simultaneously press two keys Win + R, enter gpedit.msc and press "Enter").