A graphics tablet makes working with computer graphics faster and easier. But in order to achieve maximum performance, a tablet, like any complex equipment, requires careful tuning and our article will help you figure out how to set up a graphics tablet and pen yourself. It will be very problematic for a person who is not thoroughly familiar with Photoshop and installing the necessary drivers to figure it out on his own. Therefore, let's figure out where to start and consider each stage of setting up the device. Take a Wacom graphic tablet as an example.
Installing the required software
The first thing to start with is connecting your device to your computer using the cable out of the box. It should be noted that without drivers (on Windwos 10 it happens automatically) the tablet will not work correctly or will not work at all. Regardless of the OS of your computer (Windows, mac OS), the installation of drivers occurs automatically after launching the corresponding program. You can install it using a disk that was in the box with the tablet (if it was not there, go to the next paragraph). Insert the disc, run the software update program. Follow the simple instructions and then the device will be ready for use.
Another way to install or update gadget drivers is to download them from the graphics tablet manufacturer's website. There are two reasons for this:
- the first is the lack of a floppy drive on a computer or laptop
- the second reason is that the manufacturer's website contains the latest drivers
In new versions of the software, bugs can be fixed, functionality expanded, localization improved or added. Drivers for devices from Wacom can be found on their official website by clicking on the link.
Setting up the graphics tablet itself

After installing and updating the software, you need to properly configure the graphics tablet for its correct operation. We will select the sensitivity of the pen in SAI or PS to the pressure on the pen that suits you. Launch a suitable program and open the tablet control panel (in our case, this is "Wacom Tablet"). Create a new drawing and use as a tool the most ordinary brush with a large size (a diameter of about 50 in Photoshop is fine). Draw a couple of lines using the pen and clicking on it with different strengths. Continue drawing lines while adjusting the Sensitivity setting in the Wacom Tablet settings until you feel comfortable and comfortable adjusting the thickness of the brush by pressing the pen. On some more expensive models, it is possible to save similar settings for several programs separately (for example, for SAI one setting, and for Photoshop - another). This is sometimes extremely useful when working with a graphics tablet.
Choosing and setting up brushes

Let's now set up the brushes that you will be using in Photoshop. Press F5 or click on the Brushes button with the mouse, select Brush Tip Shape.
- Let's start with the shape of the brush. We make an extended or inclined brush by changing the values \u200b\u200bof the Angle and Roundness parameters or simply visually adjusting the shape of the brush in the picture on the right.
- The second item we'll set up is Spacing. It affects the smoothness of the brush. All changes made are displayed in the figure below.
- The third item is Shape Dynamics. Here you can adjust the following parameters: Pen Pressure (force of pressing the pen), Pen Tilt (angle of inclination of the tool), Stylus Wheel (wheel setting on some pens), Rotation (angle of rotation) It is very convenient to change the size of the brush by simply applying different pressure to the nib, especially if you frequently need to change the diameter of the tool you are using. It should be noted that the Pen Tilt parameter is supported mainly on expensive models only. The wheel can be used to quickly adjust the size and rotation of the tool being used.
- And finally, the fourth item is Other Dynamics. Here you can adjust the dependence of the transparency of the brush on the pressure on the pen.
Customizing additional keys

Some tablets have additional physical keys. They are called ExpressKeys on Wacom tablets. They are located on the sides of the work area and, as their name suggests, they are designed to more conveniently and quickly control the program in which you are working. Each key can be assigned its own button. The default keys are usually the most popular, but you can customize everything if you want. Note that initially both blocks of keys repeat their functions. Therefore, in the device settings, it is possible to change the preset values \u200b\u200bof the shortcut keys. Here, the values \u200b\u200bof each key are edited separately, and in some tablets, you can also save different settings for different programs (different, for example, for sais and photoshop).
We have examined with you how to use a tablet to significantly increase the efficiency of retouching.
Today we will talk about the first steps after buying a tablet, about what you need to do for comfortable work.
I will illustrate the material using the example of setting up my old Wacom Bamboo tablet.
So, let's move on to the first step.
Step 1. Installing the tablet driver.
Do not rush to immediately connect the tablet to your computer after purchase! First, you need to install the driver so that the tablet works correctly and all its settings become available.
The driver for any tablet can be downloaded from the manufacturer's website in the Support section.
Download the driver specifically for your tablet model.
Step 2. Setting orientation and keys.
Find the installed driver in the list of recent programs and run it.
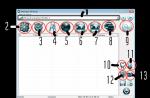
The settings window will open. Its appearance may differ depending on the tablet manufacturer and driver version.

First, you need to adjust the orientation of the tablet, depending on whether you are right-handed or left-handed. By default, the tablet is configured for right-handed users.
Next, you need to configure, if necessary, the function keys Express Keys... These keys are programmable. That is, each can be assigned a specific action from the drop-down list.

It is very convenient and helps to speed up your work.
Step 3. Customize the tablet pen.
The most important thing here is to make sure the tablet is in pen mode, not mouse mode. Otherwise, you will not be able to take advantage of the main advantage - the sensitivity to the pressure of the pen on the working surface.
Go to the tab Pen and check the tablet mode.

You also need to adjust the pen sensitivity. For example, to work with wider brush strokes in Photoshop, move the slider Pen sensitivity in closer to position Soft... Conversely, to work with thin strokes and lines, move the slider closer to the position Hard.
Click the button Display to the right of the setting Pen mode... Here you need to enable proportional scaling and uncheck the parameter Use Windows Handwriting

Step 4. Disable touch input.
Go to the tab Touch options and uncheck the parameter Enable touch input.

This must be done, otherwise in the process of retouching in Photoshop, the tablet will react not only to the pen, but also to the movements of the hand on the surface of the tablet, and in an unpredictable way. By disabling touch input, you get rid of this problem.
Now you can get to work. Launch Photoshop, open a photo for retouching, grab a tablet pen and try using it instead of a mouse while retouching. If you don't have your own sources for retouching, you can try your hand at this photo.
You can attach the results of retouching in the comments, having previously reduced the size to 2000 pixels. on the long side, or post it on the forum.
And as an example, I propose to see the result of retouching a photo with creative makeup. Here, the models applied a special make-up to give the skin a golden hue and highlight the highlights on the skin. The picture is enlarged on click.

I wish you all creative inspiration and enjoyable work with your graphics tablet!
The second article from a short series of materials by Alexey Dovgul about graphic tablets talks about the intricacies of setting up a newly acquired unit. Think it's enough to plug it into your computer? It was not so!
Of course, we all love, having bought some new thing, immediately connect it and see how it works. It's good if she needs a driver, but graphics tablets in most cases are recognized by the system as a mouse and immediately start working. An inexperienced retoucher will not immediately find the catch, because the tablet will work, although not correctly. The point is that the pen will act like a mouse, not edge-to-edge like a tablet (that is, the endpoints on the tablet correspond to the endpoints on the screen).
- Therefore, before starting work with the tablet, install a fresh driver from the manufacturer's website - the driver in the kit may be outdated due to changes in the model range and updates operating systems, - reboot and only after that start working. If you already have a driver, then it will not be superfluous to check the settings.

I will only mark the important points.
Check in the Mapping section if the Mode-Pen is set: in this case, the pen will work as a pen, not as a mouse.
In the Screen Area drop-down list, if you work with one monitor, you should put Full, and if with two, then select a really working monitor (not the one on which you watch TV shows, but the one on which you open Photoshop), for example, let's call it Monitor 1. Otherwise, both monitors will be used on the tablet surface at once, which will significantly change the proportions and, most importantly, significantly reduce the usability.
Wrong

Right

Check the Force Proportions checkbox too - this will allow you to maintain the correct proportions, that is, if you draw a circle on the tablet, then on the canvas you will also have a circle, not an ellipse.
Tablet Area - Full, but if you are tired of working on a huge tablet, you can reduce the size as you see fit (Portion).
Let's customize the keys too: in the Tool palette, select Functions and open the Express Keys section.
If you are working with two monitors, the first thing you need to do is set up the Display Toggle function.

And set the order of the monitors in the Display Toggle section. However, if you really only watch serials on the second monitor, then uncheck the second monitor - one keystroke will be less.

If you work with one monitor, then do not try to find this menu in yourself - it appears automatically as soon as you connect to the second monitor.
Let's continue configuring Express Keys.
What can be attached to Express Keys on a tablet?
- Modifiers (Alt, Command, Shift).
- Keystrokes.
- Actions in Photoshop.
- Switch Applications.
- Undo / Redo.
- Application Hotkeys.
- Tools in Photoshop and Lightroom.
- Open Apps like Lightroom or Photoshop.
As an example, let's create a couple of settings for these keys. If in your work you try to use the keyboard less, then it will be useful for you to configure the Undo function. Select the Keystroke function in Express Keys and set the key combination Cmd + Option + Z or in Windows Ctrl + Alt + Z.


You now have the ability to undo past actions in Photoshop as long as your History resource lasts.
The second setting, one of my favorites, is Express Key for Action in Photoshop. To begin with, I create an Action in Photoshop - I'll take any as an example, just to demonstrate how it works - and assign Hotkey F2 to it. I use a lot of different Actions, for example frequency decomposition with a certain radius, merging all layers, creating a layer for working with Dodge & Burn, Color Correction layer, and all of them, depending on the type of activity, I fix in Express Keys.


Thus, you can add several Express Keys, for example Frequency Separation and Merge Visible, in order to quickly lay out and fold a photo during retouching without using the keyboard.
The next thing I would like to talk about is the Touch Ring (available only in the professional line), a ring that allows you to change the brush size, Zoom and much more, whatever you come up with. To do this, go to the Touch Ring section.

Usually I only create two settings, Zoom and Brush Size, and the rest are set to Skip.
I like the zoom offered by the Wacom settings more than if I exhibited Hotkeys from Photoshop - Cmd + / Cmd- via Keystroke, as it works smoother. But in the meantime, Rotation in Photoshop (Hotkey R) I like more than the Rotate function in the Wacom settings. Try it and you will understand what I mean.
Set the Brush Size setting, it will greatly help you when retouching and drawing details.

Adjust the speed of the brush size to suit you. I have such a setting.

If your tablet has Touch, turn it off! The fact is that when you draw a detail or, even worse, highlight something, with the Touch function enabled, the bend of your hand in which you are holding the Grip Pen can be recognized as some kind of gesture and ruin work for you. Most often, the function recognizes movements as Zoom or movement on the canvas. In general, it's up to you.

The next setting is extremely important - the Grip Pen sensitivity setting. On tablets of the professional line it is possible to adjust the pen pressure sensitivity more finely.

The first place to start tweaking is Click Threshold, an option to eliminate the effects of accidental touch. For example, you are thinking about the eternal and accidentally touched the tablet with the pen at the moment of selection with the magnetic lasso, and your selection ended prematurely or even reset. To prevent this situation from arising, there is this parameter, Click Threshold.
Relax your hand and let the pen touch the tablet surface under the weight of your hand on the Try Here test field. Have a point? If so, then shift the Threshold parameter further to the right. Appears? No? Ok, so this is your pen exposure cutoff setting.

The next parameter is Max Pressure, it is responsible for the level of maximum pressure on the pen shaft. If you feel that your hand is tired or the rod is very worn out when working with the tablet, then you need to move this parameter to the left, which will reduce the pressure on the pen.
As an example, consider two options made with the same pen pressure:
- Default pressure.

- Shift of the maximum pressure point.

To tune this parameter, you need to test the comfortable position of the maximum point, at which you get the maximum result without excessive pressure on the pen.
The next parameter is Sensitivity, which controls how sensitive the pen is to your pressure. I like to change this parameter depending on what kind of work I'm doing. For example, if I need to draw shadows on a photo rather quickly, then I increase the sensitivity, and if I need to perform a sufficiently subtle and precise work, then I take the sensitivity to the average value.
Here are two examples with the same pressure and different settings; I think the difference is obvious.


But if you have a non-professional tablet model, then you only have one pressure control available. However, do not despair, because, as my many years of experience have shown, everything is in your hands!

And the last setting I would like to mention is customizing the buttons on the nib. I myself do not use buttons on the pen in principle, and my main pen has no buttons at all, but colleagues, whose opinion I trust, say that it is convenient to set one button to the Hand tool (Key Space in Photoshop) or Pan / Scroll, and the other - to the Undo command (Cmd + Option + Z).

By the way, the Tilt Sensitivity parameter does not matter for retouching, since we are not using brushes that would support the tilt angle.
There will be no short summary, because customization and customization are all purely individual. In order to understand which of the settings will be more convenient for you, you need to test the tablet operation in different conditions and with different types of work. So try it!
In the design world, more and more space is given to applications that make it easier to work with graphics programs. The leading position among all gadgets is occupied by a graphics tablet.
It is thanks to him that modern designers have received a number of advantages, such as convenience in drawing illustrations to the smallest details (which could not have been achieved using a mouse), the ability to control the thickness of the pen line depending on the pressure.
In Adobe Illustrator, drawing on a tablet is possible with tools such as a pencil, a brush, and a blob brush. It is about them that we will talk about in this article. But the emphasis will be on how to set up such tools to work with a graphics tablet.
I want to note that the brush tool is most convenient for drawing consisting of lines of different thickness, and the pencil tool is best suited for drawing silhouettes.
Let's get started!
The most important thing is a properly tuned pen
Open Window - Brushes and select any round brush. Double-click on the icon of the brush you selected, as a result of which a dialog box with its settings opens. In this window, set the following parameters: Diameter - 10, pen pressure, 10 (equal to the maximum diameter of the brush). Such parameters will allow us to further change the thickness of the contour depending on the degree of pressure from 0 to double the size.
To check what we got, select the Blob Brush Tool and start putting points with varying degrees of pressure.

Having practiced in this way, you will be able to create a path with different thicknesses without interrupting it, which is extremely useful when drawing.
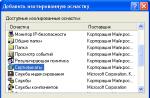
If you were unable to draw with different pressures, then I advise you to play with the pen settings of the tablet itself, which are located in the Start menu - All Programs - Wacom Tablet - Wacom Tablet Properties. Adjust Pen Sensitivity until you can draw such a line without much difficulty.

Adjusting the Paintbrush Tool
Double click on the icon of this tool on the Toolbar to open a window with settings. Now let's get acquainted with the parameters of the Brush tool.

Fill new brush strokes - when this option is selected, the program applies a fill to the path, which is especially useful when drawing closed paths.
Keep selected - when this option is selected, the program leaves the outline selected after it has finished drawing.
Editing area for selected contours - when this option is selected, you can make changes to the selected contour.
Within: _ pixels (becomes available when the previous parameter is selected) - shows how close the brush must be to an existing path in order to make changes to the path.
Adjusting the Blob Brush Tool
Double click on the icon of this tool on the Toolbar to open a window with settings. Now let's look at the options for the Blob Brush tool.

Keep selected - when this option is selected, the program automatically leaves the paths selected while drawing continues.
Merge with selection only - when this option is selected, the program will merge the new stroke with the existing selection.
Precision - shows how far you can move the brush before the program automatically adds a new anchor point. Values \u200b\u200bfrom 0.5 to 20 pixels are available. The higher the value you set, the less complex the path you create (with fewer anchor points) and, accordingly, will be smoother.
Anti-aliasing - show the degree of anti-aliasing when drawing. Values \u200b\u200bfrom 0 to 100% are available. The higher the percentage you choose, the smoother the outline will be when you paint.
Size - set the size of the brush.
Angle - choose the angle of rotation of the brush.
Roundness - shows the roundness of the brush (the higher the value, the more roundness).
Setting up the Pencil Tool
Double click on the icon of this tool on the Toolbar to open a window with settings. Now let's get acquainted with the parameters of the Pencil tool.

Deviation - is responsible for the frequency of adding new anchor points when drawing with a pencil. The higher the value, the less sharp the corners will be and vice versa.
Smoothness - is responsible for the degree of smoothing when drawing. The higher the value, the smoother and smoother the created path will be.
Fill new strokes with a pencil - this option allows the program to apply a fill applied to the stroke. Don't forget to choose a fill color before painting.
Keep path selected - selecting this option allows you to keep the path selected after it is created.
The edit area for selected paths determines whether the selected path can be modified or merged when the pointer is at a certain distance from it (specified by the next parameter).
Within: 20 px (available if the previous option is selected) - shows how close the pencil should be to an existing path in order to make changes to the path.
To restore the default settings, just click the Restore button.
You will also love these articles:

Those who are not intimately familiar with graphic tablets think that this tool is used exclusively by people whose work is related to design, engineering, etc. In fact, it can be an ordinary input device, along with a keyboard and a computer mouse.
Naturally, there are various models that differ in their capabilities and functions. And depending on this, they are used either by professionals or by ordinary users leading an active computer lifestyle. Let's take a closer look at graphics tablets.
A graphics tablet is a pen device designed to enter information into a computer for subsequent work. In other words, a graphic tablet is an electronic sheet of paper and a pen with which you can perform various manipulations with information in various programs. And do it with great comfort.
This article will focus on the company's graphics tablets Wacom.
Working on a tablet is easy. First, a little preparation: we connect the tablet to a computer or laptop via a USB port and install the driver. The device is now ready for use.
Typically, the surface is a sensitive area on which you can write or draw with an electronic pen. All information is displayed on the computer screen. Some models combine the MultiTouch function. Many users are accustomed to using the trackpad on a laptop. A graphics tablet allows you to do the same. You can rotate, scroll, and zoom images with simple gestures.
There are also tablet displays in which the tablet is combined with the monitor. Work on electronic canvas. Isn't it great? Examples include Wacom displays Cintiq... So, how can a graphic tablet be useful and convenient for an ordinary user?
Consider the functions Wacom Bamboo Pen & Touch Series.
Bloggers, active participants social networks, lovers of digital creativity, gamers, attention! Using a tablet, you can take handwritten notes, create sketches, sketches, sign photos, work on the Internet, draw graffiti on the Vkontakte wall, give your character to any material.
Edit documents quickly and clearly, create annotations, speed up your communication with an instant stroke of a pen!
Convenience is largely due to the work with the pen. It has a familiar shape for a human hand, intuitively resembles a pencil. The pen is ergonomic, the muscles of the hand are relaxed during work, the fingers are in motion. It is safe for users who spend a lot of time at the computer and is especially useful for children who develop motor skills. All these pleasures will bring you bamboo Pen & Touch tablets... These are devices for home and office work. They come in different sizes, customizable for left and right handers, and come with the necessary software. Despite the wide possibilities, working with the tablet is very easy, even for a child.
There are also amateur pL series... They are intended for people with an active business lifestyle, businessmen who often go to meetings, take part in negotiations and presentations, sign documents, as well as for teachers, business coaches who need to convey information to a wide audience.
With Wacom PL tablets, you can insert electronic signatures into documents and office programs, draw diagrams, graphs, and handwritten notes. It is a good tool for presentations, it is convenient for them to equip classrooms and meeting rooms.
We talked about the amateur Wacom models, now let's talk about professional graphic tablets. These include Intuos and interactive display Cintiq... They have more features and accessories, higher resolutions and are available in a variety of sizes.

In particular, Intuos has pen tilt sensitivity, programmable keys, touch ring with mode switching. All this helps to work with materials on an intuitive level. Different sizes: from A6 to A3.
As a rule, designers, photographers, artists, in general professionals, whose activities are related to work in graphic editors... Such a tablet is indispensable for processing photos, drawing, creating 3D models, etc.
As mentioned earlier, there are also graphic displays. Wacom offers 2 models: Cintiq12 and Cintiq21 with a diagonal of 12 and 21 inches, respectively.

Working with such a device, the designer draws directly on the screen. The Cintiq 21, for example, has 16 programmable hot keys, 2 scroll bars, and 2 touch rings. Thanks to a special stand, it can be rotated 360 degrees while lying down and tilted vertically by 10-60 degrees.
No matter what you do, a graphic tablet is a good helper during work and leisure, speeds up communication with friends and colleagues, is ergonomic and functional. And most importantly, it does not require special knowledge and skills.