It's so nice to receive handmade gifts. By creating such a present, you put part of your soul and emotions into it, and this is already of great value. If you turn on your imagination, there are many original gift ideas that you can do yourself.
In this article we will try to tell you how to make a postcard with a photo and colorful design. Agree, the idea is not new, but what huge open spaces open up for your creativity!

An example of a greeting card created in the PhotoCollage program
To make a postcard with a photograph, it is not at all necessary to pick up cardboard and scissors. Moreover, you will spend a minimum of time and effort on making such a postcard. You can make a photo postcard using special software. In this case, AMS Software is perfect for us.
It is a handy and uncomplicated professional quality program. The procedure for creating a collage is quite simple and consists of several simple steps.
For the convenience of work, the editor contains a large base of ready-made templates for design, and also allows you to choose your own original design using an extensive catalog of functions.
The program allows you to add stylish frames and masks to the image, use inscriptions and decorations, contains a large set of effects for processing photos. With the help of the Photo COLLAGE editor, you can easily make a postcard with a photo and choose an interesting design for it.
In order to make a postcard with a photo, first you need to choose beautiful background... It can be monophonic, gradient, textured - it all depends on your imagination. Use the images offered by the program catalog or choose your own background. The choice of background should be focused on the photo you plan to use in the postcard.

Choose a background image from the collection of the program or pick up a picture from your PC
Now about the very Photo... If you decide to make a postcard with a photograph, choose the brightest and most beautiful photo. For example, if this is a Happy Birthday card, choose the best photo of the cheater, where he is happy and smiling. The photo must be quality, since when using it in a collage, the quality will decrease slightly.
Next comes the most interesting and exciting stage of preparing the postcard - this is the choice of the original registration... The Photo COLLAGE program is equipped with a large catalog of options and allows you to create colorful cards of a wide variety of designs. You can make a postcard with a photo and add congratulations text.

The font of the greeting lettering must be sure to be well readable.
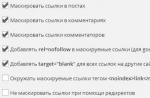
In addition, the utility is equipped with a rich collection of decorative framework, with which you can frame both individual photos and the entire postcard as a whole. You can also effectively blur the edges of pictures using special masks or process the image through the catalog filters.
Photo COLLAGE includes a large set of clip art on various subjects, which is ideal for decorating postcards of a wide variety of styles.

The collection of clipart will help you to tastefully design your postcard design
Photo COLLAGE will become an irreplaceable assistant in making gifts with your own hands. You can easily prepare interesting thematic collages, stylish screensavers for your desktop or.
Thus, you are convinced that in order to make a postcard with a photo, it is enough to spend just a couple of minutes, and the result will surpass all expectations! The finished postcard can only be saved and printed. A colorful do-it-yourself card with a photo will be a great gift for your family and friends and will always evoke pleasant and kind memories.
An e-card is a great way to congratulate a person on any occasion, especially if you are far from each other. There are several ways to create a greeting card. This can be done using special services or on your own using the software of your computer.
To create a beautiful virtual postcard yourself, you need to consider the following points:
- use complex graphic editors only if you have minimal knowledge of these programs;
- use ready-made templates that programs offer - it's easier and faster, especially since the template can be adjusted to your liking;
- make postcards that are neutral in content - a virtual greeting should appeal not only to the creator, but also to the recipient;
- first of all, the practicality of the e-card is important, do not add too many pictures and text, try to maintain a certain color scheme.
The note! When creating a postcard, take your time, carefully follow the step-by-step instructions and do not forget to save your creativity on a computer or flash drive.
How to make a greeting card in Word?

Creating a greeting card in MS Word is not difficult. Although the program is most often used to create text files, here you can make a beautiful postcard for any occasion. Create an e-card in six easy steps:
Step 1. Open the program and go to the File menu.

Step 2. Select the "Create" tab, write the word "Postcard" in the search bar that opens.

Step 3. Choose a ready-made, quality e-card template. In the right side list, you can select the appropriate category.

Step 4. Click on the selected template and click "Create". Wait for the template to open in a new file.

Step 5. Fill in the free fields. Write congratulations, signature and other necessary information.

Step 6. Make sure the text fits in the margins of the card. Change the orientation of the sheet from portrait to landscape if necessary.

Step 7. We save the postcard ("File" - "Save As"), and then send it to the recipient or print it.


Video - How to Make a Greeting Card in MS Word
Postcard using PowerPoint
PowerPoint is a presentation software that can be found on every Windows computer. To get started, open the program through the "Start" menu. Master class on creating a postcard on a computer using PowerPoint:
Step 1. First you need to choose a background for your slide. Click on the Home tab, then select Layout, then Blank Slide.

Step 2. To create a beautiful background for your postcard, click on the Design tab and select the Format Background button in the Background Styles category.

Step 3. Select a picture or texture, or you can add your own image from your computer. The picture will stretch to fit the slide.

Step 4. Click on the "Insert" tab, then - "Picture". Select the image you like, add it to the slide, if necessary, move the picture to the desired corner of the postcard.


Step 5. The next step is adding text. You need to use the same "Insert" command, then click on "WordArt". Choose a font sample and write your own greeting.


Step 6. Save the postcard via the "File" - "Save As" command. Be sure to change the file type to Picture in JPEG format, otherwise the recipient will open the card in PowerPoint.


Step 7. Select the "Only this" button. Ready! You can send a postcard to a recipient.


The note! Don't rush to delete. It can be used later as a template for other postcards.
Postcard in Microsoft Office Publisher
Use Microsoft Office Publisher to create a beautiful postcard to a friend, acquaintance, or family member. You can make a postcard from scratch, but the easiest way is to use a ready-made template built into the program.
Step 1. Start the program, in the window that appears, select "Built-in", then - "Postcards".

Step 2. Several subject categories can be found in the program. Choose the template you like the most.

On a note! If none of them suit you, you can find more designs of cards on the website of the program.
Step 3. Click on the "Create" tab. You will see a workspace with the template you selected. Replace the text with your own, after clicking on it.

Step 4. To add new text, click on "Insert", then on the "Add text box" button. Come up with an original greeting and place it on the slide.


Step 5. Right-click on the picture and select Change Picture to select the source for the new picture.

Step 6. To add a new or your own picture, click on the "Insert" tab, select the "Illustrations" group and click "Picture".


Greeting card online services
If you do not want to use computer programs, you can use services where you can make an online greeting card for the New Year, Birthday, wedding and other celebration. Here is a list of free resources:

The note! Some services may have additional paid services that will make your postcard more original. If you don't want to pay for images, just use free images.
How to send a postcard made on a computer?
So, the postcard is ready, it's time to please the recipient with a pleasant virtual surprise. You can send e-cards in a variety of ways. Among them:
Sending by email

Sharing via social media

Present a postcard in person. What could be better than a personal meeting? You can personally donate a postcard made by yourself, but you need to remember that for this you need to first print your work.
Now you know how to make an electronic postcard on your computer. This is a simple and interesting action that can be easily performed using MS Office programs. Do not be afraid to create, surprise your loved ones with a magnificent electronic postcard, and yourself - with your creativity! Your loved ones will definitely say “Thank you” to you.
Video - How to create a postcard using the online service Online-postcard.rf
Who among us doesn't like holidays ?! Metushnya and preparation, friends and family, gifts and many kind words. And often many people come up with these very words on the fly when they congratulate the hero of the occasion. Or there is a second option - to buy a postcard and read a greeting from it.
In this article, we will talk about them just the same, and I will tell you about creating a postcard from scratch, if you want to do everything yourself, and how you can use ready-made templates in Word.
The need to make a postcard can arise for various reasons, for example, you did not have time to go to the store and buy it, you simply did not find a suitable one, or you wanted to show your talent and please a person with handmade work. I like to tell poems of my own composition for the holidays, and not read ready-made ones from a postcard, so I have to look for one that would be empty inside. And since it is difficult to find with an interesting cover and without scribbling, the “do it yourself” option can help out perfectly.
Let's start with ready-made options. Open any Word file, go to "File" at the top and select "New" from the menu on the left.

If you are using 2013 or 2016 Word, then also create a new document, and then enter the desired phrase in the search.

The difference is that in newer versions of the text editor, there are categories on the right, which makes it easier to find a postcard on a specific topic. That is, you need a card Happy Birthday, Happy Easter or March 8, just click on the appropriate item and available templates will appear in the middle area.

If the Word version is not new, then scroll through the list and find a suitable template for a postcard. Then select it and click on the button.

When it is downloaded, it will open in a new window. On the top of the page, the image that is upside down is the cover, everything below is the inside.
First you need to print the first sheet, then turn it over and run it through the printer again. As a result, you should get this: a picture, and on the back there will be text. Cut and fold in half - done.
If there are notes in the margins - pay attention to them, there may be explanations on how to print and fold the card, where to insert the text.

You can change the template a little. In the example, the middle will turn out to be white with text. Let's add a picture there to make it look more interesting. Open the "Insert" at the top and click "Picture".

The top two cells must be drawn upside down. This is done in order to print the postcard correctly later.
The top left square will be the cover, the right will be the last page, and the bottom will be the inner part.

You can add pictures, for this you need to take care that they are saved on the computer, areas with inscriptions and various shapes (you will find the necessary button on the "Insert" tab). I will have images and an inscription.
I put italic in the cell with the cover and insert the picture. I use the handles to resize it, then select the "In Front of Text" wrap and flip it 180 degrees.

For the last page, I simply chose a plain background, this is the cell fill, and inserted an inscription.

The next thing to do is to remove all internal borders so that they do not spoil the appearance. Leave the frame around so that it is convenient to cut. Select the entire table, open the "Constructor" at the top, click on the arrow next to the "Borders" button, and in the drop-down list, first click "No Borders", then "External borders".

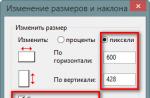
Now let's place the card on the page correctly so that during printing, after you flip the sheet to the other side, everything on the other side will fit right. To do this, you need to make sure that the values for the top and bottom margins of the page are the same.
Open the "View" tab and turn on the display of the grid by ticking the corresponding item. Then select the entire table and in the document on the ruler on the left, move the markers so that the card clearly lies on the grid above and below. It should look like the screenshot. My top of the postcard coincides with the beginning of the grid, do the same at the bottom.

Then we go at the top to "Page Layout", press the "Fields" button and select the item "Customizable"... Please note that the table must be highlighted.

We sum the values in the upper and lower fields and divide by two.

We indicate the resulting value in these fields and click "OK". You should now have your postcard clearly in the middle of the top and bottom of the page.
You can make postcards online for free to wish your loved ones a Happy Birthday, New Year, February 23, March 8, Valentine's Day and other holidays on the presented Russian-language services, the principle of work with which is very similar. The intuitive interface will help you create a postcard in a couple of minutes. You choose a template, upload your photo or indicate the address of the picture on the Internet, then edit, add effects, congratulatory inscriptions and download to your computer or share with friends on networks, by e-mail.
A selection of services that allow you to make postcards online:
1. Fun photo box
Create online postcards, cool animated pictures, add photo effects, photo frames and filters for free, without registration, without SMS.
2.Funny.Pho.to
Free postcards, collages, photo effects, frames and photomontages online. Lots of editing tools and templates.
3. Card
On the service, you can choose a ready-made postcard or create it online by uploading a photo to the template, adding greeting text, music or video, including elements, customizing the background, etc. etc.
4. LoonaPix
5. PicJoke.net
Daily updated online service of photo frames and photo fun. Online postcards in a couple of clicks.
Choose a template by theme or date, upload a photo and create a joke. Save the postcard to disk or share with your friends on social media. networks.
6. Free postcard maker Pro100tak
Choose a background for a postcard from the proposed templates, upload a photo from a computer or a picture from a webcam, add your own text, you can use gold or fire letters. The mini photo editor allows you to work with layers, create copies of them, move them, change the rotation angle.
The finished postcard can be downloaded to your computer or immediately sent to a friend by e-mail.
7.Create your own mood photo effects
Create the mood, of course, not only for yourself, but also for the recipient of the postcard. Choose photo effects,
It is quite simple to create a New Year's mood, because everything is in the details. Try to make wonderful New Year's cards with your own hands, it's very fun and simple, such an original gift will be appreciated by friends and family. We invite you to familiarize yourself with several master classes on creating postcards, translate the proposed ideas into reality.
Master classes
Mini-album-postcard "Herringbone"

What is necessary:
- Pastel paper;
- Corrugated cardboard with a picture;
- Double-sided tape;
- Spray paint;
- Cutter;
- Rhinestones;
- Decorative lace (golden);
- The pillow is pigmented;
- Glue "Moment" and for attaching rhinestones (transparent);
- Ruler;
- Breadboard mat;
- Creasing tools;
- Pencil.

Origami Christmas tree for postcards
Today, scrapbooking postcards have become very popular, the finished product looks bright and very beautiful. We recommend that you familiarize yourself with the scrapbooking master class for beginners.Required materials: 5 squares of colored paper, 10 cm; 9 cm; 7.5 cm; 6.5 cm; 5.5 cm.
How to do:

- So, you need to take the largest square and fold it in such a way that you get a triangle.
- Unfold the square and make the exact same triangle, bending over opposite sides of the cardboard.
- Place the unfolded sheet of cardboard in front of you.
- Fold the sheet along the folds so that you get a volumetric triangle.
- Now one of the sides of the figure will need to be bent inward, as shown in the photo.
- In the same way, fold the cardboard on the second side - this is the first module of our Christmas tree.
- We add the rest of the modules in the same way, respectively, their size should be different - from larger to smaller.
- A small piece of tape must be glued to the top of the first module. We place the largest module inside the smaller one and do the same with the rest.
Herringbone made of decorative tape for a postcard
It is very entertaining to create wonderful postcards for the New Year 2019 with your own hands, so involve the kids in this process. Preparing for the holiday with children will be more fun.
For work, you will need a minimum of material - decorative tape, as well as strips of colored paper.

Manufacturing features:
- On a cardboard blank, stick a piece of scotch tape (preferably one-color) vertically, the top of the strip should be slightly narrower than the bottom - this is the trunk of the future Christmas tree.
- After that, you will need to cut the tape into strips of various sizes. The ends of the strips should be cut obliquely, imitating spruce branches.
- Stick the strips in the form of a pyramid (from largest to smallest).
Manufacturing instruction:

- Take colored green paper, cut out a circle, cut into two halves.
- Fold the edge of the paper as shown in the photo.
- Now make the next fold in the opposite direction, thus fold the edge again and arrange the herringbone. The paper craft looks original.
- Glue the "twigs" to the base with glue-pencil and you can start decorating New Year's cards with your own hands.
3D greeting card for New Year
Making voluminous New Year's cards with your own hands is not at all difficult, make sure of this using the example of the proposed master class.You need to prepare:
- Double-sided adhesive tape;
- Multi-colored cardboard;
- Glue;
- Scissors;
- Figured hole punch.


Postcard "Christmas balls"
You can make an unusual New Year's card with your own hands in just a few minutes, prepare an excellent gift for your loved ones for 2019.You need to prepare:
- Colored paper in two colors;
- Scissors;
- Stationery glue;
- Inscription pen.

- Before you start making a New Year's card with your own hands, as in the photo, you will need to prepare all the necessary materials and tools.
- Fold the blue paper in half for the base, so the background will contrast perfectly with the light blue "balls".
- Cut the circles out of light-colored paper.
- Fold each one in half.
- Now you need to attach these circles to each other, thus forming volumetric balls.
- Glue them on the outside of our postcard.
- Using a pen, draw the threads that "hold" the balls. Now the do-it-yourself New Year card is completely ready, you just need to sign it.
Quilling holiday card
You can even create beautiful baby cards from quilling, try it, you will like it.You will need to prepare:
- Colored cardboard;
- Colored strips;
- Glue;
- Toothpicks;
- Scissors;
- Corrugated light paper.

- Take a quilling (green stripes), make cuts at the same distance using nail scissors.
- Wind the prepared ribbons on a toothpick, so you get several skeins, as in the photo.
- Now you need to fix the bottom of the skein with glue and straighten the fringe, you get voluminous balls.
- Next, we proceed to the final stage of making a postcard for the New Year with our own hands. It is necessary to glue the balls on a sheet of cardboard in the form of a pyramid, you get a Christmas tree. Now you can "decorate" it as you wish.
Bright "Christmas tree"
Would need:- Paper of various colors and textures;
- Double-sided adhesive tape;
- PVA type glue;
- The hole punch is decorative;
- Rope.

- A piece of colored paper will need to be folded in half, glue a triangle of green paper and a small rectangle of brown, you get a tree.
- Cut out circles of various sizes, then use a hole punch to make snowflakes.
- Glue all the figures on the Christmas tree, decorate it with beads, then decorate the lower part with an openwork paper ribbon. You can also come up with your own postcard designs.
- Wrap the string around the postcard, then tie a bow. Below you can glue white paper for text.
Volumetric herringbone with beads
Required tools and materials:- Colored paper with ornaments for scrapbooking;
- White postcard without a picture;
- Scissors;
- Stationery glue;
- Double-sided adhesive tape;
- Ruler;
- Decorative pins with carnations.

- It is necessary to cut 12 rectangles out of paper, their length should be 10 cm. The width of the smallest one is 9 cm, all others are wider by 6 mm.
- Wrap each of the rectangles around a pencil, thus making tubes.
- Now you need to glue them, the longest will be at the base, and the short one should be at the top.
- Glue the tree to the card, decorate with carnations and pins. That's all you are done.
Children's card with fingers
Children get acquainted with this method of creating postcards in kindergarten, try to do this at home.

These photos show how you can keep the kids busy and prepare for the New Year, for this you need to prepare paints and paper or cardboard.

Postcards with "potato print"
If you don't know how fun it is to celebrate the 2019 year of the pig, then get creative with the kids. This master class demonstrates the original creation of a holiday card.You will need:
- Raw potatoes;
- Paints.

How to do:
- Cut the potatoes in half, dip them in paint, make a print on the cardboard.
- Now it remains to finish drawing the details of the drawing, you will get a cute penguin or snowman.

You can make the following design out of felt:


Ideas for inspiration


Quilling:


Video about creating a scrapbooking card:
Origami crafts for cards: