Lovely rust game is gaining popularity with great speed. Every day more and more newcomers arrive in Rast. In this regard, many players ponder the question, but how to create your own server in Rust? - So in this article we will just consider this issue and learn how to create our own server. Will it rust server pirate or rust steam server, it doesn't matter, we will consider both options.
If you want to make a high-quality server on an excellent hosting, then I advise you to use the services of GameButton hosting
And so, let's get started:
How to create a Rust pirate server
- First, of course, we need the server itself. Go to the "ready-made Rust server" category and download the server you like.
- Create a new folder on your hard drive, for example " D: \\ ServerRust". But see that the name and path to the folder do not contain Russian characters.
- Unpack the previously downloaded server into the created folder.
- Now you need to go to the folder - " / serverdata / cfg"
- Open with notepad (RMB - open with - Notepad) file " server.cfg"and customize it at your discretion. A small file with a description of all the commands will help you with this -
4.69 Kb downloads: 4365
- Further, we also configure " Run Server.bat"as it is written in the description on the page where you downloaded rust server ready
How to create a Rust steam server
- We do all the same just the file " server.cfg"we just find it in the folder" / cfg".
We launch " Run Server.bat"our newly created server. Turn on Rust, press" F1 ", write net.connect 127.0.0.1:28015 this is a normal local IP address, so that your friends can connect to you via the Internet, you must have a dedicated IP.
So, the site has great things on the net. But it only takes a couple of lines to launch and configure the server.
I will try to help users who would like to play on their local server with friends and with your own settings. In this short article I will try to show the whole process: from installing the server to configuring it, including using mods.
1. The first thing we need is to switch to running Rust over the network and download an archive containing all the necessary tools, and unpack to any location.
2. Now go to installation... Run the file Update-Rust-Server.bat from folder SteamCMD and wait while our server is downloading. The servers will boot into the RustServer folder.
Everything, we have installed the server, proceed to the next steps.
3. Now we will start the server, customize it and invite friends. In order to connect to the created server, we perform the following steps:
Go to the folder SteamCMD and run the file Run-Rust-Server.bat (It is him, not Rust_server). To start the experimental Rust server, run the file Run-Rust-Exp-Server.bat
- After starting, the command line will contain lines with information about the download, we are waiting for the moment when the inscription appears "server initialized".
- Everything, the server is running.
- Now, in order to enter the server, we need to find out the address of our server. The classic option is
- Write your ip somewhere in text file (so as not to forget).
- Next, start the game and press the F1 key (console) and enter the net.connect command there Your ip: 28015 (where your ip is your ip that you learned in advance). In theory, this should also be 127.0.0.1.
If done correctly, you will connect to your server. For friends to be able to connect to you, you need, of course, that the server is running on your computer, and that your friends correctly enter the connection command that you tell them.
Now you can start playing. BUT! Correct execution of all actions in some cases cannot guarantee your success. Since there are a great many reasons why you may fail. For solutions to the most common problems, see.
4.
Well, now, if everything worked out for you and you liked it, you can play with server settings.
For example, in latest update the developers added such an interesting thing as weapon wear (I immediately remembered the Dead island series), as well as wear of clothing and equipment.
This did not suit many, and there is an opportunity to disable this function.
For this you need:
\u003e Log in to the server as an administrator. To do this, open the console in the game with the F1 key and enter the Rcon.login command your password (your password is set in the server.cfg file and by default it looks like 123456). After entering, an inscription should appear (in the console) "logged as admin", which means that you are logged in as admin. Now we enter the commands:
- To disable clothing wear: conditionloss.armorhealthmult "0.0"
- To disable wear on weapons / inventory: conditionloss.damagemultiplier "0.0"
Various mods can also be used to disable or enable different things. For example, disable decay on the server or adjust the flight interval of airplanes. The network already has both affordable and not very affordable mods. I recommend using the free mod Magma, due to its ease of customization and the large number of plugins.
Rust is a first-person survival computer game from Facepunch Studios, available for Windows, Linux, or Mac OSX. It is currently still in development (early access), but you can already play it on Steam for about $ 12.
There are two different versions of the game, the older and more stable Rust Legacy, and more a new version Rust Experimental, which has been completely rewritten from scratch, is now the focus of all current developer efforts.
If you want to make a high-quality server on an excellent hosting, then I advise you to use the services of GameButton hosting
How to create a rust experimental steam server
What do we need?
Secondly, before starting, look at the contents of the batch file.
RustDedicated.exe -batchmode -load is responsible for starting the server without a graphical interface, and the load prefix is \u200b\u200bvery important, because without it, the next time the server starts, all progress will not be loaded, so to speak there will be a wipe.
server.seed - "seed" -modifier for creating the world, an integer from -2147483647 to 2147483647. How the world will be generated depends on this number. There are only general locations that are unchanged, these are snow, forest, desert.
You can start bat and connect using:
“Client.connect (ip) :( port)” in the F1 console. If the host is you, then for the LAN connection “client.connect localhost: 28015”
As for the rest of the settings, read above, they are the same as for the Steam version.
How to get a rust experimental admin
There are several ways to add Admins and Moderators
1. Via the server console Do not confuse the server console and the client (game) console. In the console, you must write the Code:
ownerid "player nickname" - Administrator (server owner)
Example: Code: ownerid 76561198002158852 "megarust" moderatorid 76561198002158852 "megarust" Then we will receive a response from the server about assigning the status
2. Through users .cfg. We find the users .cfg file, usually it is located (The folder with the server \\ server \\ my _server _identity \\ cfg) Opens it with any text editor and write:
Code: ownerid "player's nickname" - Administrator (server owner)
moderatorid "player's nickname" - Moderator
Note! Front editing users .cfg, you need to shut down the server, because. the next time the server is turned off, this config will be overwritten.
3.Using Rusty - Server RCON administration tool
This method will take a little more time and effort than the previous two. First, we need to configure rcon .port and rcon .password if not already done. Rcon .port is usually 1 more than your regular port.
Example: Normal port: Ip: 28015 Rcon port: Ip: 28016 Rcon port and password setup Code: @echo off RustDedicated .exe -batchmode + server .port 28015 + rcon .port 28016 + rcon .password "changeme123" + server .hostname "Rust -Helper .ru" + server .identity "my _server _identity" + server .maxplayers 100 + server .saveinterval 3600 -logFile "log .txt" Now start Rusty and go to Settings and enter your details. If everything is done correctly, then change to. Then go to the Rcon -\u003e Console tab and write the Code: ownerid "player's nickname" - Administrator (server owner) moderatorid "player's nickname" - Moderator
Congratulations, you are now an admin! Go back to the server, because. admin panel may not work if you were online during the status change!
Have you ever wondered how to make your own RUST server, but faced the limitations of Windows? There is no point in worrying anymore! In this guide, we will focus on setting up a server for Linux, especially the Debian 8 x64 distribution. Rather than focusing only on RUST VANILLA, we will describe the settings for Oxide and teach you how to secure your server.
Initial setup
This will probably be the longest part of the tutorial, but will help you in terms of configuring server security. Basically, this tutorial is aimed at people who are not familiar with the concepts of server security and Debian in general.
- Connect to the server with SSH client (we recommend using PuTTY).
- Go to the Password Generator website and create a 50+ random password and copy it. Then enter "passwd root" into the console, right click twice in the terminal.
- Now that you have a secure password set, you can update the system: write in the terminal “apt-get update -y && apt-get upgrade -y”, press Enter, then “apt-get install fail2ban nano -y” and again Enter.
- Now download the PuTTYgen program and generate a key. Now enter the following commands one after the other by pressing Enter to move to a new line in PuTTY:
Mkdir ~ / .ssh
chmod 0700 ~ / .ssh
touch ~ / .ssh / authorized_keys
chmod 0644 ~ / .ssh / authorized_keys
nano ~ / .ssh / authorized_keys
Now go back to PuTTYgen, then right click inside the window with more characters and hit select all and then copy. Now go back to PuTTY where you opened the nano editor and right click to paste your public key, then press ctrl + o -\u003e enter -\u003e ctrl + x.
Now enter "nano / etc / ssh / sshd_config", then ctrl + w, then enter "PasswordAuth". Now remove the hash and change yes at the end to no. Now scroll down the page and change UsePAM to no. Now ctrl + w and type PermitRootLogin and just change it to "without-password". Now press ctrl + p (save) and ctrl + x (exit) and then type "service ssh reload".
Coming back to PuTTYgen, you need to store the public and private keys in a safe place. We close PuTTY and open it again, on the left side, select Connection -\u003e SSH -\u003e Authorization, and specify the file with the private key that you just saved. After returning to the session, click "Default Settings", then "Save", then "Open" to log in without a password.
SteamCMD
Valve has its own documentation for configuring SteamCMD, which you can find. Once you go to the app_update section, enter "app_update 258550". This is just the ID of the RUST server.
VANILLA
After you have completed all the points with SteamCMD, you can proceed to setting up VANILLA. Do "cd DirectoryCoSteamCMD" and then write nano startrust.sh and paste this: "258550".
#! / bin / sh
clear while: do
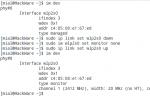
exec ./RustDedicated -batchmode -nographics \\
-server.ip IPAddressHere \\
-server.port 28015 \\
-rcon.ip IPAddressHere \\
-rcon.port 28016 \\
-rcon.password "rcon password here" \\
-server.maxplayers 75 \\
-server.hostname "Server Name" \\
-server.identity "my_server_identity" \\
-server.level "Procedural Map" \\
-server.seed 12345 \\
-server.worldsize 3000 \\
-server.saveinterval 300 \\ -server.globalchat true \\
-server.description "Description Here" \\
-server.headerimage "512x256px JPG / PNG headerimage link here" \\
-server.url "Website Here"
echo "\\ nRestarting server ... \\ n" done
You will need to fill in your own values \u200b\u200bsuch as seed (you can use the map preview generator for this), etc. Now do "chmod u + x startrust.sh" then "./startrust.sh" and your server will start. If there are no problems during the start, then you can connect to the server via RCON. In game, you can connect to the server by pressing F1, selecting the console and typing the following: "connect Server IP: 28015". We will describe how to set up your administrator status in the game in the following guides.
Oxide
This add-on on top of the Rust server is very popular. Here we will describe the process of setting it up. First of all you need to do "wget \u200b\u200bhttps://github.com/OxideMod/Snapshots/raw/master/Oxide-Rust_Linux.zip". Then, if you haven't installed unzip yet, "apt-get install unzip -y", after "unzip Oxide-Rust_Linux.zip". This must be done in the RUST server directory that you installed via SteamCMD (you must agree with everything that will be offered). Then you need to configure the right to run the compiler: "chmod u + x CSharpCompiler" so that it can compile plugins for the RUST server with the cs extension (remember the Kits plugin). Congratulations on making your RUST Oxide server fully functional. In the following guides, we will cover aspects such as Resolutions and current issues with RUST servers.
Update
It's very simple. You need to repeat the steps that you did when you installed RUST via SteamCMD. If you are using Oxide, you will have to re-download it after the update. Use the link above, then unzip it. You may need to change the permissions for CSharpCompiler again.
Firewall (for advanced users)
For additional security of the RUST server, you can configure a firewall. Attention: Changes to the server settings on a Debian system can lead to complete inoperability, limited or complete lack of access to the server.
Write “nano iptables.sh” then copy the following:
iptables -P INPUT ACCEPT
iptables -P OUTPUT ACCEPT
iptables -F
iptables -A INPUT -m conntrack --ctstate ESTABLISHED, RELATED -j ACCEPT
iptables -A INPUT -p tcp --dport 22 -j ACCEPT
iptables -A INPUT -p tcp --dport 28016 -j ACCEPT
iptables -A INPUT -p udp --dport 28015 -j ACCEPT
iptables -I INPUT 1 -i lo -j ACCEPT
iptables -P INPUT ACCEPT
iptables -A INPUT -j DROP
apt-get install iptables-persistent -y
invoke-rc.d iptables-persistent save
Then enter "chmod u + ux iptables.sh", then enter "./iptables.sh". It will execute a bunch of commands that will eventually just open the standard ssh port (22) and then the two standard ports for the RUST server.
How to create your own pirate server Rast experiment. This is a very exciting question, and I must warn you, not everything is so simple.
System requirements
A Rast server can be expensive on your computer, but maybe not as much as you might think. In the base area of \u200b\u200b4 sq. km (default generation size) the map will run close to 1 gigabyte random access memory... After stress testing and 144,000 objects, the server uses about 1.8 gigabytes of memory. So I would suggest to have at least 3 GB dedicated per server. For the most part, typically, the server will fall apart when the server reaches 150,000 objects.
Server start
After downloading the server itself, it remains a small matter to figure out how to start it. Before starting, look at the contents of the batch file.
RustDedicated.exe -batchmode -load is responsible for starting the server without a graphical interface, and the load prefix is \u200b\u200bvery important, because without it, the next time the server starts, all progress will not be loaded, so to speak there will be a wipe.
server.seed - "seed" -modifier for creating the world, an integer from -2147483647 to 2147483647. How the world will be generated depends on this number. There are only general locations that are unchanged, these are snow, forest, desert.
You can start bat and connect using:
“Client.connect (ip) :( port)” in the F1 console. If the host is you, then for the LAN connection “client.connect localhost: 28015”
Console commands
As for the rest of the settings, they are the same as for the Steam version, the list of commands for the console to control the server:
Kick "Name" - kick by name
Kickall - indiscriminately kick
Ban "Name" - ban by name of Playera
Banid "Steam ID" - ban by idStima Playera
Status - who is online
Say - to say
Users - Info about players
Banlist - register of "criminals" or all kinds of cheaters
Banlistex - a registry of "criminals" with answers why they were excluded from the server
Listid - register of "criminals" or cheaters of all kinds according to idStim
Event.run - start of an undefined plane path, which will drop boxes into a place with zero abscissa, ordinate and applicate. You can not use if you don't want events.
Server.port "28015" - everything is clear without words, the port on which to connect
Server.maxplayers 500 - it's also not difficult to guess (how many maximum players are you planning or not planning)
Server.hostname "My Personal Server" - How would you like to see your server listed in the game
Server.identity "MegaRust" - the name of the server that needs a place in the folder name
Server.saveinterval 3600 - how often to save (for non-math friendly 1 hour \u003d 3600 seconds)
Server.seed is an add-on for creating a map, any numbers are suitable in principle, since the boundaries are quite large: from -2147483647 to 2147483647. It affects which map will turn out.
Server.secure - everything is clear (VAC and EAC)
Server.tickrate - clock frequency cards in Hz, it is better to set 30, performance is inversely proportional to the number, but failures are not excluded.
Server.start - start the server
Server.stop - stop the server
Server.writecfg - saving settings to a file
Gc.collect - clearing the server cache