If the chipset and the LGA 775 motherboard can theoretically support the XEON 771, but the native BIOS does not support it, and the modified one does not, then you can modify the BIOS yourself.
IMPORTANT
1. All changes in the BIOS firmware (.ROM file usually) you make at your own peril and risk. In case of an error, a guaranteed "brick" is obtained from the motherboard
2. The file size of the original firmware and the modified version must match up to a byte.
3. Flashing the modified BIOS file back into the microcircuit is performed only using proprietary utility from the motherboard developer (must be downloaded from the manufacturer's website).
4. Top motherboards have a built-in firmware update module in the BIOS itself (for example, EZ Flash 2 utility for ASUS P5Q in the Tools section) - the best option.
How to do it better:
1. Still looking for a ready-made version with XEON support on the Internet?
2. Download from the official site latest version firmware and add microcodes?
As you can see, the second option is safer, in any case you download the original firmware from the motherboard manufacturer's website, i.e. the latest version and the absence of errors are guaranteed (more precisely, the correction of all previously found errors). When downloading a ready-made version from third-party resources (for obvious reasons, it will not be on the original site) - you can get a crooked version and kill the BIOS.
Preliminary, you can evaluate the presence of XEON microcodes in the BIOS firmware.
- get the current AMI BIOS image via Universal BIOS Backup ToolKit 2.0
- look at the contents of the received ROM file through AMIBCP V 3.37

BIOS option AMI (American Megatrends Inc).
1. Download the latest version BIOS from the website of your motherboard manufacturer
3. Download microcodes for XEON 771 processors: lga771_microcodes
4. Find out the CPUID of your processor using AIDA64 or a similar program (it looks like cpu0001067Ah). If BIOS will be sewn up before installing the processor, then we skip this item.

5. Unpack the archives MMTool and lga771_microcodes and leave from files with the extension .bin only those files beginning with the CPUID of your computer (for example, cpu0001067a_plat00000044_ver00000a0b_date20100928.bin)
If we don't know what code, then we sew everything up.

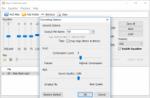
A. Launch MMTool... Press the button (1) Load ROM and load the latest BIOS for your motherboard into the program. If you have the newest BIOS, then you can also merge the BIOS backup utility from the PC and edit it.
B. Go to the tab (2) CPU Patch, then with the button (3) Browse, open the file .bin corresponding to your CPUID.
C. Leave the default in options "Insert a Patch data" and press the button (4) Apply.
After updating with modified bios you need to do a factory resetthrough the reset button or jumpers, if the motherboard supports such a reset, or by pulling out the BIOS battery for a couple of minutes. Further, the processor is already correctly perceived by the computer and works as it should.
Basic Input Output System - basic input-output system, abbreviated BIOS. A small microcircuit on the motherboard that gets control first when the PC is turned on. Provided: basic PC settings check PC components at startup ...
Since the beginning of January, it has been difficult to miss the news regarding Specter and Meltdown hardware vulnerabilities - the topic turned out to be so serious and comprehensive. Although manufacturers have been aware of these problems since last summer, most seem to have begun to react only after the details were released by the Google Project Zero team.
For example, Intel back in January among other patches released microcode updates against Specter for its Broadwell, Haswell, Skylake, Kaby Lake and Coffee Lake processors. But almost immediately it turned out that they lead to failures and. Intel initially stated that the problem only affected Broadwell and Haswell chips, but later acknowledged the existence of glitches on computers with Skylake, Kaby Lake and Coffee Lake processors and partners and users to refrain from installing patches for now. Finally, in early February, a revised version of the microcode, but only for mobile and desktop consumer chips of the Skylake family.
Now, after a month of intensive tests and patches by Intel and its partners, the time has come for other more or less relevant processors: microcode updates have been released for chips based on Kaby Lake and Coffee Lake architectures, as well as Skylake-based platforms unaffected by the previous update. We are talking about 6th, 7th and 8th generation Intel Core i processors, as well as the latest Core X, Xeon Scalable and Xeon D families.

The new version of the microcode will be available in most cases through the release by OEMs of new firmware for motherboards and laptops. Intel continued to urge people to constantly update their systems to the latest versions, and also posted a document outlining the status of similar microcode fixes for its other products, including earlier chips starting with 45nm Core 2. For some of these chips, patches are only planned, for others they are in early testing, for others they already exist in the form of a beta version. Generally, the older an architecture is, the later it will receive Specter-protected firmware. However, microcode updates for more or less current Sandy Bridge, Ivy Bridge, Haswell and Broadwell architectures are already in beta testing. Also, a number of Atom chips and even Xeon Phi accelerators have already received patches.
Intel recalled that there are other methods of fighting against the exposed vulnerabilities of the branch prediction unit in modern processors. For example, Retpoline, developed by Google against Specter CVE-2017-5715 (branch target injection). For those interested in more information about Retpoline and how it works, the company has published a special technical report.
Intel's Specter microcode updates will begin rolling out in the coming days and weeks in the form of fresh BIOS updates for various motherboards. I wonder if they will have an additional effect on the degradation of the performance of end systems?

Purchased at Aliexpress for Intel DG965SS motherboard (with LGA775 socket). You can, of course, remake LGA771 into LGA775 yourself, but at a price of $ 6.5 per processor, it is much easier to take it and the Chinese.
When using Intel Xeon 5320 operating system Windows 10 worked only when the "Core multiplexing" mode was turned off in the BIOS (in contrast to the perfectly working Ubuntu 17.10). At the same time, the processor worked only in single-threaded mode, so, according to the CPU-Z test, the performance in multi-threaded mode was 2 times lower than that of Intel Core 2 duo E6300, which was replaced by Xeon.
It turned out that the processor microcodes needed to be updated. You can do this in program mode, and in Ubuntu the operation is easier on the head than in Windows 10. And in the latter, you need to make sure that the microcodes are updated with each boot. It is also possible to update microcodes in BIOS, at least in some BIOS from AWARD, AMI, Phoenix, especially in versions up to UEFI.
There are much less instructions for Intel motherboards. And no wonder. The Intel DG965SS had a lot of tinkering with.
Before updating the microcode, you need to install the processor that we want to support. If you need to install another processor, then the procedure will have to be repeated.
Some instructions suggest creating a bootable floppy disk. not all computers allow booting into flash drives. I made a bootable USB stick with FreeDOS using free app with open source code Rufus (to do this, check the "Create a bootable disk using" box and select the "FreeDOS" item from the list).
I represent the donor BioStar A740G M2L + (AMD 740G / SB710) and the recipient BioStar A740G M2 + (AMD 740G / SB700). The motherboard with the letter "L" is more recent and officially supports AM3 processors, unlike the other, which is limited only by support for AM2 + processors. They ask for a comparative analysis of their BIOS.
From office. we load the site only last update BIOS firmware for each of these motherboards:
- for A740G M2 + latest beta A74GM916.BSS for September 2009
- for A740G M2L + - file 74GCU511.BSS - for May 2010.
Next, we arm ourselves with the MMTOOL utility (I used versions 3.22, 3.23 and 3.26 - I did not find any differences in work)... To work with MMTOOL, the BIOS firmware file extensions must be renamed to * .rom.
Now we launch two MMTOOL and load the firmware files from two mat into them. boards. Pay attention to the different sizes in the "Source size" column (and of course in "Size in Rom" too) of module 11 "P6 Micro Code" in each of the firmwares.
Go to the CPU PATCH section for a detailed comparison:
Donor file 74GCU511.rom - cpu_list contains 14 lines with CPURev.ID support + 1 empty (Fig. 1).
The beta version of the recipient A74GM916.rom - cpu_list contains 13 lines with CPURev.ID support + 1 empty (Fig. 2).
After analyzing the lists of these two BIOS, it becomes obvious that for the newer motherboard, the developers used more recent patches for AMD processors, where the microcode of two lines with CPURev.IDs 1043 and 1062 (dated 2009/07/31) and one line with CPURev are corrected .ID 10A0 added (dated 2010/02/17).
Method # 1 - modifying distinctive strings.
These three distinctive lines are extracted from the donor 74GCU511.rom - the actions "Extract a Patch Data" + "Apply" + 1 last blank line and saved to separate files.Previously, in the CPU PATCH section of the recipient file A74GM916.rom, two lines with the CPURev.ID numbers 1043 and 1062 (whose microcode is older than we will insert further) and the last empty line - the actions “Delete a Patch Data” + “Apply” ( fig. 3).
After that, a newer microcode from four previously received patch files for CPURev.ID 1043, 1062, 10A0 and an empty line are inserted in turn (Fig. 4).
Pay attention to the sizes ("Source size" and "Size in Rom") of module 11 "P6 Micro Code" before and after applying these changes in the recipient file.
After application, these dimensions in the recipient (Fig. 6) will become identical to the dimensions of the same module in the donor file 74GCU511.rom (Fig. 5).
It is worth noting that it is easy to understand how the module size is formed (each line in the CPU PATCH section takes up 2048 bytes).
It is better to save changes under a new file name.
Next, this file is checked so that MMTOOL opens again without errors.
Method # 2 - modification by replacing the entire module.
Actually, it is he who is described on the Internet (for example, partially).In MMTOOL we load the donor file 74GCU511.rom, go to the “Extract” tab and look for the line “P6 Micro Code”. Then we select it, in the “module file” field we give it the name ncpucode.bin and execute Extract module “in uncompressed form”.
Now in MMTOOL we load the recipient file A74GM916.rom, go to the “Replace” tab and look for the line “P6 Micro Code” again. Select it, wait for Browse and select our donor module ncpucode.bin. Click Replase and then agree to replace this module.
We again pay attention to the sizes ("Source size" and "Size in Rom") of module 11 "P6 Micro Code" before and after replacing this module in the recipient file.
After application, these dimensions in the recipient (Fig. 7) will become identical to the dimensions of the same module in the donor file 74GCU511.rom (Fig. 5).
If we compare the results of both methods (Fig. 6 and Fig. 7), then there is a noticeable difference of 10 bytes in the RomLoc address of the “User Defined or Reserved” module following the updated “P6 Micro Code” module - perhaps these are the peculiarities of MMTOOL operation ...
Conclusion and afterword.
Thus, from different BIOS firmwares of various mat. boards on the AM2 + socket (and even AM3 for comparison), you can find the latest microcodes for each type of CPURev.ID, both in Award and AMI BIOSes, and then combine them into a single ncpucode.bin.As a result, I got it 32768 bytes in size from 16 lines (microcodes) with the most recent dates from among the studied firmwares of various BIOSes: with 15 different types of processor revisions for the AM2 + socket (040A, 0413, 0414, 041B, 0433, 0680, 0C1B, 1000, 1020, 1022, 1040, 1041, 1043, 1062, 10A0) and the 16th line for RevID 0000 (apparently some universal microcode for revisions of processors not described in other lines - IMHO, for example, future ones).
When combining your own ncpucode.bin by importing the necessary patches (microcodes) for each required revision of processors, you can use absolutely any AMI BIOS firmware with the "P6 Micro Code" module as a laboratory one.
However, when saving the firmware file, an unpleasant feature of MMTOOL was noticed - the utility for some reason added 8 zero bytes to the end of the "P6 Micro Code" module - it turned out to be 32776 bytes in size. When extracting the same MMTOOL from the laboratory firmware, the ncpucode.bin file also became 32776 bytes in size at the output.
You can edit these things with simple editors available to all. But I also (accidentally) discovered an alternative way: when the universal utility BIOS_EXT.EXE extracted all modules from the laboratory firmware, the ncpucode.bin file was already the correct size of 32768 bytes - the BIOS_EXT.EXE utility itself correctly determined the end of the "P6 Micro Code" module when saving it to the file.