Framing a paragraph allows you to highlight an important idea, and a frame around the page decorates or is needed according to the requirements for the design of some types of documents. We will tell you how to make a frame in - for a fragment of text or for all sheets, including a frame with a stamp in accordance with GOST.
You can select a fragment of text with a regular rectangular frame or curly.
Regular frame
How to make a border around the text in Word:
- Select the text you want to frame. It can be a single sentence or an entire paragraph.
- On the toolbar in the "Home" tab, click on the "Borders" icon in the "Paragraph" section.
- Choose which sides of the paragraph you want the border on.
To change the appearance of lines or frame text, open the last item in the Borders and Fill submenu. Change the type, color and width of the borders. In the "Sample" box, configure which sides to put the lines on. If you want to draw frames for each line taken, in the "Apply to" item select "Text" - the lines will be framed separately. In the Fill tab, adjust the background color and pattern.
Figure
You can make a beautiful frame using a variety of shapes. Go to the "Insert" tab, in the "Illustrations" section, click on "Shapes". In the drop-down list, select an image from the list - rectangles, stars, arrows, callouts and much more. Click on the selected picture, place the cursor in the desired place on the sheet, hold down the left mouse button and drag it to the side - a shape will appear on the page. To insert text into a frame, right-click on the image, select "Add text" from the menu.

The frame-shape can be changed at any time - click on it, the "Format" tab will appear in the menu. Various styles, fill patterns are available on it, you can change the direction of text, add WordArt objects. It is easy to move such a frame around the document - just hold down the mouse button on it and move the pointer in any direction - or copy, the text content will also move.
Page Border
Let's figure out how to insert a base frame in Word. We need the "Page Borders" tool, depending on the version of the program, it is located in the tab:
- 2016: "Constructor";
- 2013: Design;
- 2010 and in Word 2007: "Page markup";
- to create a frame in Word 2003, select the item of the same name in the "Format" menu.
In the window, set up the frame - the type of borders, the format of the lines, their color and width, for patterned frames - the picture. In the "Sample" section, set the border locations.

You can apply the created picture to all documents - in this case, the same frames will automatically appear on all sheets. Or to individual sections, for which you must first place the section break symbols in the right places.
Using templates
To draw up documents in accordance with GOST, use special frame templates that can be downloaded for free on the Internet. A template is a ".dot" file. After downloading, open it like a regular document. A security message appears stating that macros are running - allow content to be included. A new "Add-ins" tab appears on the toolbar.

How to insert a frame in Word: select the desired frame with a stamp and click on it. A border will appear on the current sheet, you just have to enter the data in the fields.
Conclusion
We figured out how to make a frame in Word. The program provides interesting tools to create strict or beautiful frames. You can make frames yourself or use ready-made templates to quickly get the finished result.
When designing creative works, we try to decorate our documents with frames.
In different versions of Word, it is possible to make frames in the form of a picture for one or more pages.
If you do not know how to make beautiful frames in a Word, then today we will analyze this issue so that there are no unknown moments left.
Ready? Then we read.
Insert frames
1. Open the "Page Borders" window.
1.1. In Word 2013, go to the Design tab and click the Page Borders button.

Clicking on the tab - Design, click the button - Page Layout
(picture 1)
1.2. In Word 2010, go to the Page Layout tab and click the Page Borders button.

Here, instead of the tab - Design, click the tab - Page Layout
(picture 2)
1.3. In word 2003, we open a Word document, it can be clean, or it can be with already printed text.
Click "Format" - "Borders and Fill", if this inscription is not there, then click on the double quotes to expand the entire list.

(picture 3)
2. Moving on to the choice of boundaries
2.1. In the "Borders and Fill" window, switch to the "Page" tab, this is necessary to make a frame around the page, and not around the text.
2.2. Click on the black triangle and select the picture you like from the drop-down list.

(picture 4)
2.3. You can also choose on which pages your frame will be displayed, on all or only on the first.

(picture 5)
2.4. Inkjet printers do not print the entire bottom border of the frame.
By clicking on the "Options" button (number 5), you can make indents from the edge of the page, which will allow you to print the lower border of the frame more than usual.

(picture 6)

(figure 7)
conclusions
If you want to make the frame not entirely, but only on three sides of the sheet, then for this you can click on the corresponding buttons in the "Borders and Fill" window.

(figure 8)
Just like that, you can simply quickly decorate any document.
I would like to draw your attention to the fact that business documents should be drawn up in a more strict framework.
While working with the Microsoft Word word processor, I had to study it so that, if necessary, I consult on the phone without looking at the monitor screen.
I will assume that you, too, will easily master the possibility of inserting frames and that they will already ask you for help.
Thank you for the attention.
In the Microsoft Office Word application, there are many ways to format and decorate a file: choose a font style and color, add a graphic object or table, make a background fill, and more. These include creating the faces of an element or page.
Technical documentation uses a special text formatting
Borders in Word allow you to add expressiveness or a more interesting appearance to parts of the document. A frame can be applied to a whole sheet, paragraph of content, picture, graphic, table cell. This function is used when creating teaching materials, manuals, reports, reports and other works. Lines can be set on all sides of an element or page, or only from user-selected ones. It can be styled and colored with stripes.
In addition, in some cases, the use of dividing lines in the file is required. For example, when processing legal documents or work for an educational institution. Edges are used to separate part of the content from the rest, to highlight tables or pictures and figures. In this case, it is important to know how to apply one or another edging that is required by the conditions.
There are two types of separator bars in Word:
- For the page. Used to decorate a file or give it a look that conforms to some binding standard.
- For an element, that is, parts of a sheet are everything else, including borders for content or images.
There are also reverse situations when it is necessary to remove edges because they are unnecessary or due to a Word display error. We will consider all these actions further.
There are two types of stripes: for an object on the page or for itself. When creating faces, you can set many options (from which sides and which element to display it, etc.) and properties (color, border style and thickness).
How to add edges to text, table, graphics, or picture
This function is used to separate one or another element in a file and make it more expressive, or just decorate:
- Select a piece of content, the contents of an entire table or specific cells, or a graphic insert to which you want to add a border.
- Go to the "Border" tab.
- Set the type of border and border lines, color, thickness and pattern of edges in the corresponding options.
- In the Sample area, you can use the menus to create custom stripes.
- Activate the appropriate parameter in "Apply to" - with its help you can set the belonging of the function.
- Click OK.

How to add lines to a sheet
With the help of these lines, you can design one or more Word elements - for decorative purposes, or so that the content conforms to a certain standard. For this:
- Go to the "Design" tab on the main panel.
- In the "Background" area, click on "Page Borders".
- Go to the "Page" tab.
- Set the type of border and border stripes, color, thickness and pattern of the border in the corresponding options.
- In the Swatch area, you can use the menu to create custom edges.
- Assign a suitable parameter in "Apply to" - with its help you can set the belonging of the function.
- Click OK.

In the "Apply to" area (drop-down menu and the "Parameters" button) you can make settings:
- In order to indicate the belonging of the faces on the sheet, assign the appropriate option by clicking on the arrow.
- To specify the exact location of the edges on the sheet, click "Options" and activate the desired one.
Four functions of the "Apply to" dropdown menu:
- "For the whole document." If it contains more than 1 sheet, and the edges need to be applied to everything, then this option allows you to do everything in one click. The edges will appear on all sheets of the file.
- "For one section". If the document is divided into sections, then you can use lines for one of them.
- "For this section" (margins are used only on the first sheet) is a way to create a cover sheet.
- “For this section” (on the contrary, the border will appear on all pages except the first) - this is important for the design according to one standard or another, while the first page can be made as a title page with a different splash screen or with the author's signature and title.

How to add edges to a graphic
There is a second way to make a border around the insert:
- Click on the place in the file where you want to place the object with edges.
- Click Insert - Illustrations - Shapes, create a New Canvas.
- In the new window, select the color, style and thickness of the line.
- Add graphic elements to the canvas.

How to change the options and properties of the border
If you are working with text that was created by another author, it may be necessary to correct the lines that they have set in the file. As with creation, the edges in this case are divided into 2 types - the edges of the object and the sheet.
Changing the border of an object
To edit the edges of a piece of text, figure, table or graphic:
- Select a section of the file.
- Go to the tab "Design" - "Page Borders" - "Border".
- Configure options.
- Save your changes.
Changing the edges of the sheet
To edit the edges of the entire sheet:
- Select a section of the file.
- Go to the "Design" - "Page Borders" - "Page" tab.
- Adjust the parameters.
- Save your changes.

Custom Borders in Word
In the Word program, you can create unusual edges for a passage or sheet:
- Select the file element for which you will create a function.
- Go to "Insert" - "Shapes" and find the appropriate option.
- A pointer will appear that will determine where to insert the shape - click in the required place (then it can be modified by clicking "Shape Format" in the context menu).
- It is impossible to make a custom frame around a fragment of a document, for this you first need to create a shape, then right-click on it and select "Add Text".

Frame according to a certain standard
Some users may need to draw up a Word document in accordance with a certain standard, for example, State, for the creation of texts. For this, a certain type of edging is used, which plays an important role. You can do it yourself, but often it is too difficult and time-consuming, and there is also a risk of being wrong. The best option would be to download the border or the document in which it is applied. To install it in your document:
- Open the file that uses the desired divider strip pattern.
- Click on the line with the right mouse button, select "Copy" in the context menu.
- Open the document to which you want to copy it.
- From the toolbar, select Insert - Header, then Blank.
- Edit the separator bars if necessary.
- Establish where it should be located.
- Click "OK" and it will appear on the sheet (or several) of your document.
The boundaries that are adopted by the State Standard on Text Formatting must be used when creating official documents, including those related to the exact sciences. In addition, dividing stripes of one type or another will be required for the design of a thesis in drawing.
How to remove edges in Word
In some cases, the separator bars in a text document need to be removed if:
- an additional object with arrowheads and the words "Formatted" or "Deleted" has appeared - an error has occurred and the edges must be replaced;
- you made a border by mistake in a place where it is not needed;
- you are working with a document that was created by another author if he made mistakes in the design of text and objects, or created extra lines.
How to quickly remove the border of a passage along with the content
A simple and quick way to remove lines around a fragment along with their content:
- Select a piece of content.
- Click Delete.
How to remove page separators
This method is also suitable if you want to remove the insertion lines, but keep the content:
- Select a fragment or select a sheet on which you want to remove the frame.
- Go to "Design" - "Page Borders".
- In "Borders" you can control lines around objects, and in "Page" - on the entire sheet of the Word.
- To delete, accept the item "No" in "Type".

How to remove some of the edges of the divider bars
To remove only part of the dividing lines:
- Select a framed object or select a page.
- Click Design - Page Borders.
- Open the tab that matches the purpose - "Borders" or "Page".
- Use the interactive panel in the Sample area to customize the stripes as you like.
Outcome
Frame in Word is a tool for giving expressiveness to a file. Some users need it in order to style the content according to a certain standard. To work with edges, it is important to know how to create, edit, and delete them.
If it becomes necessary to make a frame in Word, most users follow the most obvious path - they create a huge table on the entire page, inside which they place text. But, despite its simplicity, this method of creating a frame is not very convenient. Especially if there are other tables in the text.
Instead, it's better to use a tool called Page Borders. With it, you can make a frame in Word for all pages of a document, only for individual pages, or even for individual paragraphs of text. You can find out how this is done in this article.
How to make a border in Word 2007 and 2010
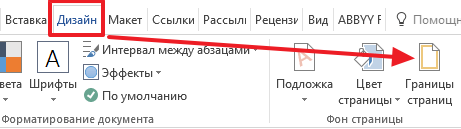
If you are using Word 2007 and 2010, then to make the frame you need to open the Page Layout tab and click on the Page Borders button. If you have Word 2016, then the button "Page Borders" should be found on the "Design" tab.
After that, the "Borders and Fill" window will appear. Here you need to select a frame and click on the "Ok" button... After that, each page of the document will be framed.

If necessary, you can make the frame the way you want. In the "Borders and Fill" window, you can select the type of frame, its color and thickness.

If you want to add a frame only on certain pages, then you can split the Word document into several sections and then apply the frame only to those pages to which you need.

How to make a border around text in Word
If you do not need to make a border around the entire page, then you can make it around the paragraph of text of your choice. For this place the cursor on the paragraph around which you want to make a frame, click on the "Page Borders" button and go to the "Border" tab.

A quick way to make a border around text
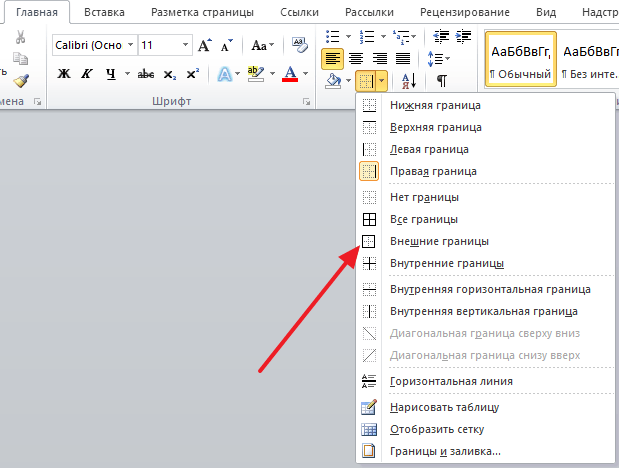
There is also a faster way to make a border around the text in Word. The Home tab has a button that users usually don't notice.

This button allows you to quickly create frames around the text. To do this, just place the cursor on the desired paragraph of text, click on this button and select the appropriate frame.
How to make a border in Word 2013 and 2016
If you have Word 2013 and 2016, then the frame is added in exactly the same way as described above. The only exception is the "Page Borders" button will not be on the "Page Layout" tab, but on the "Design" tab.
Otherwise, the process for creating a frame is exactly the same as in Word 2007 and 2010.
In order to make a frame in Word 2003, you need highlight page by clicking on it.
A window with the same name appears. In it, go to the second tab, “ Page", Where we select the required options for the frame. 
Here you can set Colour and thickness lines. The buttons on the right indicate on which sides of the sheet the border will be located. In the list " Type of" can choose shape lines - double, solid, or dotted. " Drawing»Allows you to set a border with one of the repeating pattern patterns.
To move the frame relative to the borders of the sheet, you need to click on the button " Options" v right bottom corner. 
Frames in Word 2007, 10, 13
Since the 2007 version, the program interface has changed significantly. Now, to create a frame, you need to find the section " Page layout"And click on" Page borders». 
Starting from the 2013 version, this button has been moved to the section " Design».
The window that appears does not differ from its previous versions. It displays all available options: the type, color and width of the line, the ability to design a repeating pattern, and the sides on which the border will be displayed. 
Beautiful picture frame
Framing the document can be done not only directly with the means intended for this, but also with images, which allows you to significantly diversify the design of the document.
To do this, you need to download the image you like in a suitable format. The larger the picture, the clearer and more beautiful it will be when printed.
Next you need insert downloaded image per sheet. This can be done in the menu " Insert"By selecting the item" Drawing" or simply dragging file into the program window. 
After that you need highlight picture by clicking, and clicking on it with the right mouse button select " Size and position»From the context menu. 
In the pop-up window go to the section " Wrap text"And select the item" behind the text». 
Now the image will not overlap the typed text and will remain on in the background... In addition, it is not anchored to the edges of the sheet, and can move freely to the very edges.
If the picture does not fit in size, you can stretch out for the appeared "corners". Points at the corners are resized while maintaining proportions, and points at the sides are stretched vertically or horizontally.